2006 NISSAN MAXIMA warning light
[x] Cancel search: warning lightPage 127 of 312
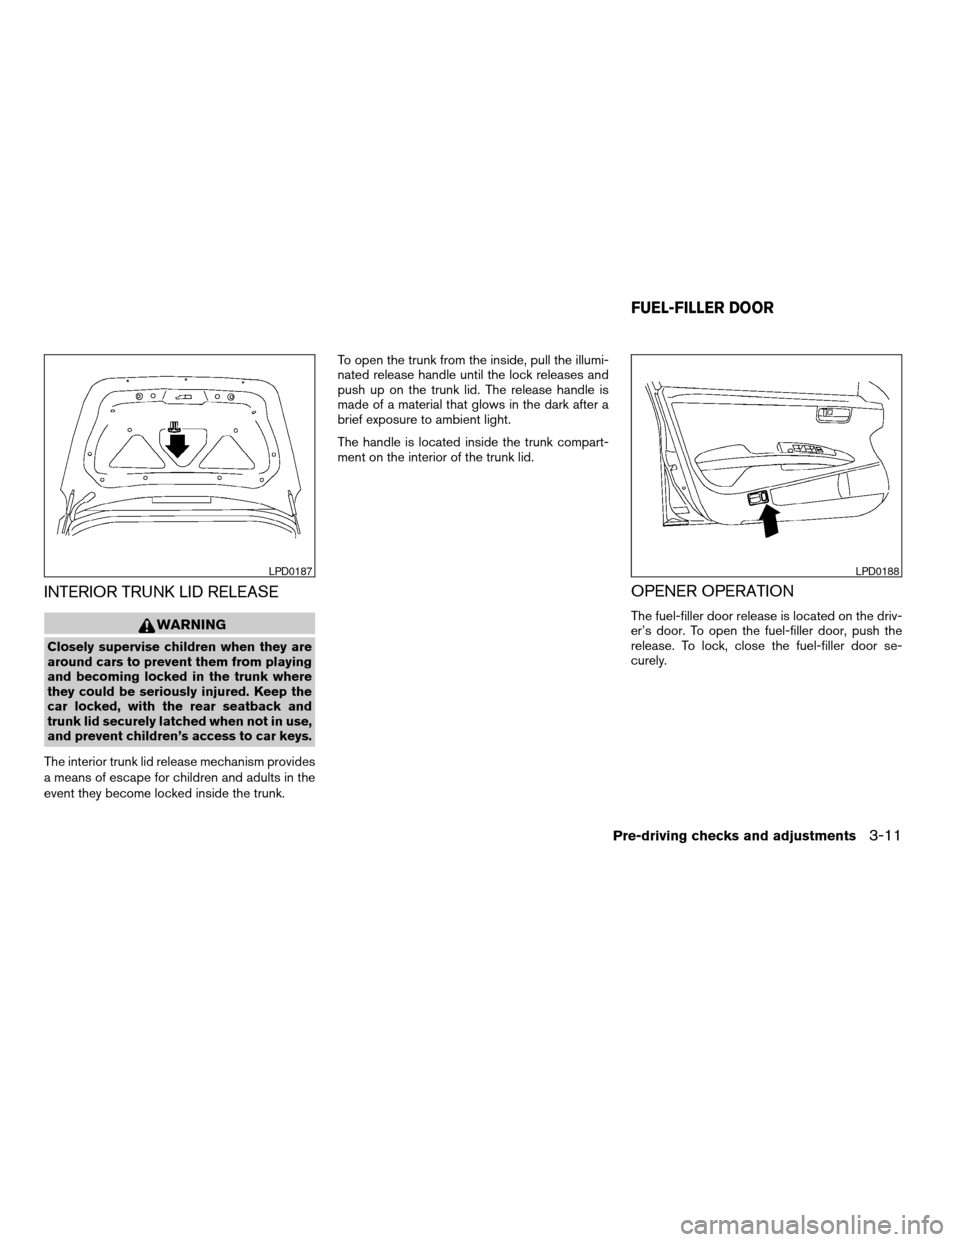
INTERIOR TRUNK LID RELEASE
WARNING
Closely supervise children when they are
around cars to prevent them from playing
and becoming locked in the trunk where
they could be seriously injured. Keep the
car locked, with the rear seatback and
trunk lid securely latched when not in use,
and prevent children’s access to car keys.
The interior trunk lid release mechanism provides
a means of escape for children and adults in the
event they become locked inside the trunk.To open the trunk from the inside, pull the illumi-
nated release handle until the lock releases and
push up on the trunk lid. The release handle is
made of a material that glows in the dark after a
brief exposure to ambient light.
The handle is located inside the trunk compart-
ment on the interior of the trunk lid.
OPENER OPERATION
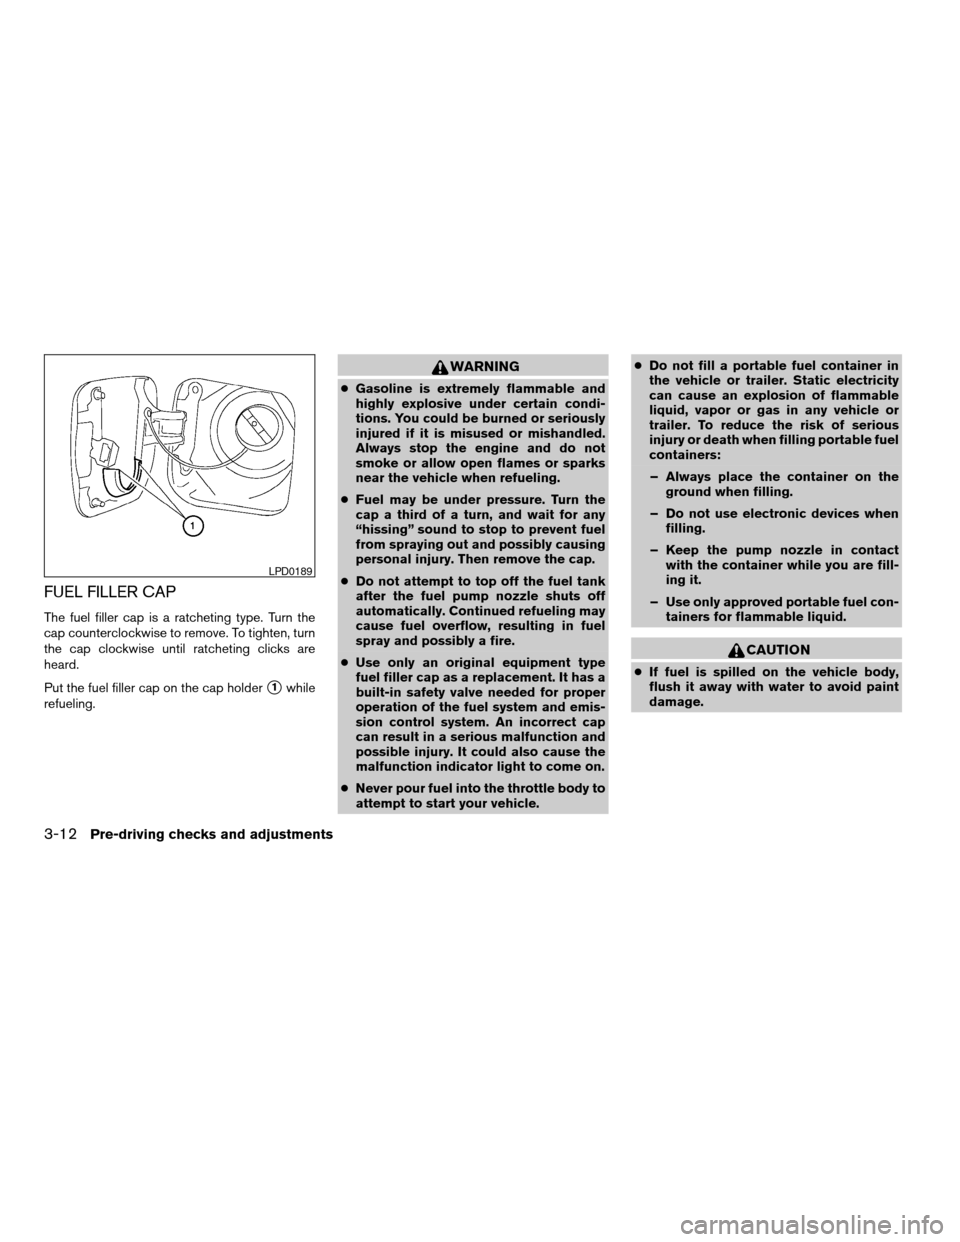
The fuel-filler door release is located on the driv-
er’s door. To open the fuel-filler door, push the
release. To lock, close the fuel-filler door se-
curely.
LPD0187LPD0188
FUEL-FILLER DOOR
Pre-driving checks and adjustments3-11
ZREVIEW COPYÐ2006 Maxima(max)
Owners ManualÐUSA_English(nna)
06/22/05Ðtbrooks
X
Page 128 of 312
FUEL FILLER CAP
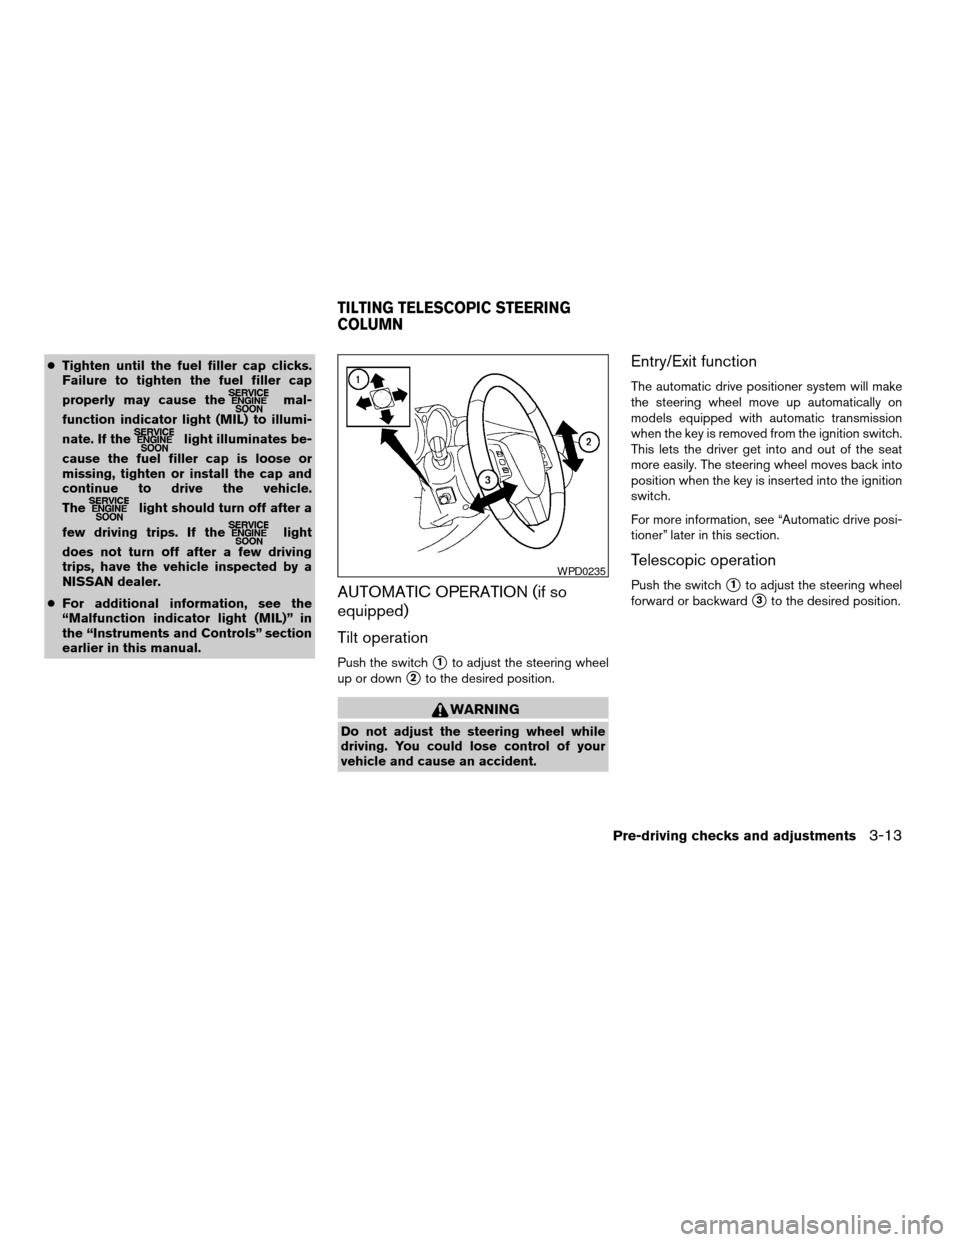
The fuel filler cap is a ratcheting type. Turn the
cap counterclockwise to remove. To tighten, turn
the cap clockwise until ratcheting clicks are
heard.
Put the fuel filler cap on the cap holder
s1while
refueling.
WARNING
cGasoline is extremely flammable and
highly explosive under certain condi-
tions. You could be burned or seriously
injured if it is misused or mishandled.
Always stop the engine and do not
smoke or allow open flames or sparks
near the vehicle when refueling.
cFuel may be under pressure. Turn the
cap a third of a turn, and wait for any
“hissing” sound to stop to prevent fuel
from spraying out and possibly causing
personal injury. Then remove the cap.
cDo not attempt to top off the fuel tank
after the fuel pump nozzle shuts off
automatically. Continued refueling may
cause fuel overflow, resulting in fuel
spray and possibly a fire.
cUse only an original equipment type
fuel filler cap as a replacement. It has a
built-in safety valve needed for proper
operation of the fuel system and emis-
sion control system. An incorrect cap
can result in a serious malfunction and
possible injury. It could also cause the
malfunction indicator light to come on.
cNever pour fuel into the throttle body to
attempt to start your vehicle.cDo not fill a portable fuel container in
the vehicle or trailer. Static electricity
can cause an explosion of flammable
liquid, vapor or gas in any vehicle or
trailer. To reduce the risk of serious
injury or death when filling portable fuel
containers:
– Always place the container on the
ground when filling.
– Do not use electronic devices when
filling.
– Keep the pump nozzle in contact
with the container while you are fill-
ing it.
– Use only approved portable fuel con-
tainers for flammable liquid.
CAUTION
cIf fuel is spilled on the vehicle body,
flush it away with water to avoid paint
damage.
LPD0189
3-12Pre-driving checks and adjustments
ZREVIEW COPYÐ2006 Maxima(max)
Owners ManualÐUSA_English(nna)
06/22/05Ðtbrooks
X
Page 129 of 312
cTighten until the fuel filler cap clicks.
Failure to tighten the fuel filler cap
properly may cause the
mal-
function indicator light (MIL) to illumi-
nate. If the
light illuminates be-
cause the fuel filler cap is loose or
missing, tighten or install the cap and
continue to drive the vehicle.
The
light should turn off after a
few driving trips. If the
light
does not turn off after a few driving
trips, have the vehicle inspected by a
NISSAN dealer.
cFor additional information, see the
“Malfunction indicator light (MIL)” in
the “Instruments and Controls” section
earlier in this manual.
AUTOMATIC OPERATION (if so
equipped)
Tilt operation
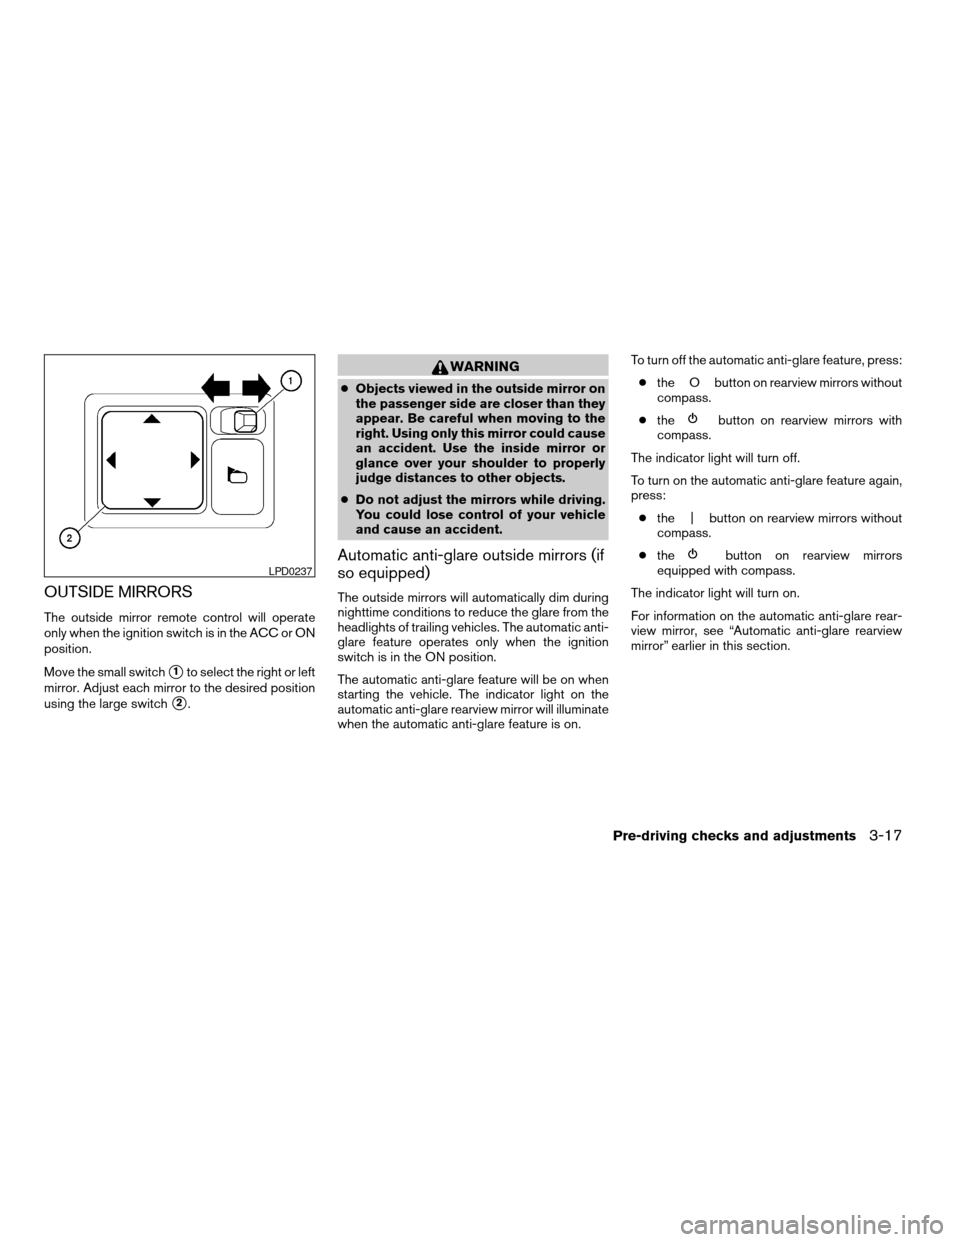
Push the switchs1to adjust the steering wheel
up or down
s2to the desired position.
WARNING
Do not adjust the steering wheel while
driving. You could lose control of your
vehicle and cause an accident.
Entry/Exit function
The automatic drive positioner system will make
the steering wheel move up automatically on
models equipped with automatic transmission
when the key is removed from the ignition switch.
This lets the driver get into and out of the seat
more easily. The steering wheel moves back into
position when the key is inserted into the ignition
switch.
For more information, see “Automatic drive posi-
tioner” later in this section.
Telescopic operation
Push the switchs1to adjust the steering wheel
forward or backward
s3to the desired position.
WPD0235
TILTING TELESCOPIC STEERING
COLUMN
Pre-driving checks and adjustments3-13
ZREVIEW COPYÐ2006 Maxima(max)
Owners ManualÐUSA_English(nna)
06/22/05Ðtbrooks
X
Page 133 of 312
OUTSIDE MIRRORS
The outside mirror remote control will operate
only when the ignition switch is in the ACC or ON
position.
Move the small switch
s1to select the right or left
mirror. Adjust each mirror to the desired position
using the large switch
s2.
WARNING
cObjects viewed in the outside mirror on
the passenger side are closer than they
appear. Be careful when moving to the
right. Using only this mirror could cause
an accident. Use the inside mirror or
glance over your shoulder to properly
judge distances to other objects.
cDo not adjust the mirrors while driving.
You could lose control of your vehicle
and cause an accident.
Automatic anti-glare outside mirrors (if
so equipped)
The outside mirrors will automatically dim during
nighttime conditions to reduce the glare from the
headlights of trailing vehicles. The automatic anti-
glare feature operates only when the ignition
switch is in the ON position.
The automatic anti-glare feature will be on when
starting the vehicle. The indicator light on the
automatic anti-glare rearview mirror will illuminate
when the automatic anti-glare feature is on.To turn off the automatic anti-glare feature, press:
cthe O button on rearview mirrors without
compass.
cthe
button on rearview mirrors with
compass.
The indicator light will turn off.
To turn on the automatic anti-glare feature again,
press:
cthe | button on rearview mirrors without
compass.
cthe
button on rearview mirrors
equipped with compass.
The indicator light will turn on.
For information on the automatic anti-glare rear-
view mirror, see “Automatic anti-glare rearview
mirror” earlier in this section.LPD0237
Pre-driving checks and adjustments3-17
ZREVIEW COPYÐ2006 Maxima(max)
Owners ManualÐUSA_English(nna)
06/22/05Ðtbrooks
X
Page 144 of 312
Service alert
If the service alert “ON” key is selected, the
information will be displayed when the engine oil
and the tire rotation periods reach the preset
driving distance.
Personalized settings menu
You can set the following electronic systems
operating conditions using the joystick.
Slide back DR (driver’s) seat on exit:
The driver’s seat automatically moves back and
returns to the original position for exceptional
ease of exit and entry.
Remote unlock door logic:
This option allows you to select which doors will
unlock first during an unlocking operation:
Only the driver’s doorÃ!All the doors
Horn chirp with remote:
This option allows you to select the horn chirp
mode that occurs when the LOCK or UNLOCK
button on the keyfob is pressed.NOTE:
If you change the horn beep or the lamp
flash feature with the keyfob, the display
screen will not show the current mode. Use
the keyfob to return to the previous mode
and re-enable the display screen control.
Lamps flash with remote:
This option allows you to select the hazard indi-
cator flash mode that occurs when the LOCK or
UNLOCK button on the keyfob is pressed.
NOTE:
If you change the horn beep or the lamp
flash feature with the keyfob, the mode will
not be changed with the display. Use the
keyfob to return to the previous mode and
re-enable the display control.
Auto relock time:
This option allows you to set the length of time
before the doors lock with the auto re-lock func-
tion.
Auto headlamp sensitivity:
This option allows you to set the sensitivity of the
autolights.Auto headlamp off delay:
This option allows you to select the length of time
before the autolights turn off.
Speed sensing wiper interval:
This option allows you to turn on or turn off the
driving speed dependent intermittent wiper func-
tion.
Confirm reset settings:
This option allows you to reset all options to their
default settings.
BUTTON
To change the display brightness, push
thebutton. Pushing the button again will
change the display to DAY or NIGHT display.
Then, adjust the brightness moving the joystick
right or left.
If no operation is done within 10 seconds, or if the
“BACK”button is pushed, the display will return
to the previous display.
WARNING
cPositioning of the heating or air condi-
tioning controls and display controls
should not be done while driving in or-
der that full attention may be given to
the driving operation.
4-6Display screen, heater, air conditioner, audio and phone systems
ZREVIEW COPYÐ2006 Maxima(max)
Owners ManualÐUSA_English(nna)
06/22/05Ðtbrooks
X
Page 158 of 312
The air conditioner system in your NISSAN ve-
hicle is charged with a refrigerant designed with
the environment in mind.
This refrigerant does not harm the earth’s
ozone layer.
Special charging equipment and lubricant is re-
quired when servicing your NISSAN air condi-
tioner. Using improper refrigerants or lubricants
will cause severe damage to your air conditioner
system. See “Air conditioner system refrigerant
and lubricant recommendations” in the “Techni-
cal and consumer information” section of this
manual.
A NISSAN dealer is able to service your “environ-
mentally friendly” air conditioning system.
WARNING
The air conditioner system contains re-
frigerant under high pressure. To avoid
personal injury, any air conditioner ser-
vice should be done only by an experi-
enced technician with proper equipment.
RADIO
Turn the ignition key to the ACC or ON position
and press the ON·OFF/VOLUME control knob to
turn the radio on. If you listen to the radio with the
engine not running, the key should be turned to
the ACC position.
Radio reception is affected by station signal
strength, distance from radio transmitter, build-
ings, bridges, mountains and other external influ-
ences. Intermittent changes in reception quality
normally are caused by these external influences.
Using a cellular phone in or near the ve-
hicle may influence radio reception quality.
Radio reception
Your NISSAN radio system is equipped with
state-of-the-art electronic circuits to enhance ra-
dio reception. These circuits are designed to
extend reception range, and to enhance the qual-
ity of that reception.
However there are some general characteristics
of both FM and AM radio signals that can affect
radio reception quality in a moving vehicle, even
when the finest equipment is used. These char-
acteristics are completely normal in a given re-
ception area, and do not indicate any malfunction
in your NISSAN radio system.Reception conditions will constantly change be-
cause of vehicle movement. Buildings, terrain,
signal distance and interference from other ve-
hicles can work against ideal reception. De-
scribed below are some of the factors that can
affect your radio reception.
FM RADIO RECEPTION
Range: FM range is normally limited to 25 – 30
miles (40 – 48 km) , with monaural (single chan-
nel) FM having slightly more range than stereo
FM. External influences may sometimes interfere
with FM station reception even if the FM station is
within 25 miles (40 km) . The strength of the FM
signal is directly related to the distance between
the transmitter and receiver. FM signals follow a
line-of-sight path, exhibiting many of the same
characteristics as light. For example they will
reflect off objects.
Fade and drift: As your vehicle moves away from
a station transmitter, the signals will tend to fade
and/or drift.
Static and flutter: During signal interference from
buildings, large hills or due to antenna position
(usually in conjunction with increased distance
from the station transmitter) static or flutter can
be heard. This can be reduced by adjusting the
treble control to reduce treble response.
SERVICING AIR CONDITIONER AUDIO SYSTEM
4-20Display screen, heater, air conditioner, audio and phone systems
ZREVIEW COPYÐ2006 Maxima(max)
Owners ManualÐUSA_English(nna)
06/22/05Ðtbrooks
X
Page 166 of 312
SEEK tuning:
3. After selecting a program type, push the
SEEK button (
or) for less than
1.5 seconds within 10 seconds. Tuning to
the PTY station will start. If you do not push
the SEEK button within the 10 second pe-
riod, the PTY mode will be canceled.
SCAN tuning:
4. Push the
orbutton for more
than 1.5 seconds to scan the PTY name
stations and stop at each broadcasting sta-
tion for 5 seconds. Pushing the button again
during this 5 second period will stop SCAN
tuning and the radio will remain tuned to that
station. If the
orbutton is not
pushed within 5 seconds, SCAN tuning
moves to the next station.
Cassette tape player operation
Turn the ignition key to ACC or ON, then lightly
insert the cassette tape into the tape door. The
cassette tape will be automatically pulled into the
player.
The radio or CD will turn off (if it is on) and the
cassette tape will begin to play.
WARNING
Do not force the cassette tape into the
tape door. This could damage the player.
If the system is turned off by pushing the
ON·OFF/VOL control knob with the cassette
tape still in the player, the tape will resume playing
when the system is turned back on.
PLAY:
cWhen the TAPE button is pushed with the
system turned off and a tape already loaded,
the system will come on and the tape will
play.
cWhen the TAPE button is pushed with either
the radio or compact disc turned on and a
tape already loaded, the compact disc or the
radio will automatically be turned off and the
tape will play.
cWhen the TAPE button is pushed with a
TAPE playing, the tape will play the program
recorded on the reverse side.
REW (Rewind) , FF (Fast
Forward):
Push the
(rewind) button to rewind the
tape. Push the(fast forward) button to fast
forward the tape. Either the REW or FF symbol
illuminates on the display window. To stop theREW or FF function, press the
(rewind)
or(fast forward) again, or press the TAPE
button.
APS (Automatic Program
Search) REW, APS FF:
When the
(APS REW) button is
pushed once for less than 1.5 seconds while a
tape is playing, the program being played will
start over from the beginning. Push the
(APS REW) button several times to skip back
several selections. The tape will go back the
number of times the button is pushed.
When the
(APS FF) button is pushed
for less than 1.5 seconds while a tape is playing,
the next program will start to play from the begin-
ning. Push the
(APS FF) button several
times to skip through programs. The tape will
advance the number of times the button is
pushed (up to 9 programs) . Either the REW or FF
symbol flashes on the display window while
searching for the selection.
When pushing the
(APS REW)
or(APS FF) button for more than 1.5
seconds, each program will play for about 10
seconds. To stop playing, push the
but-
ton again.
4-28Display screen, heater, air conditioner, audio and phone systems
ZREVIEW COPYÐ2006 Maxima(max)
Owners ManualÐUSA_English(nna)
06/22/05Ðtbrooks
X
Page 172 of 312
cWhen cleaning the inside of the rear
window, be careful not to scratch or
damage the rear window antenna.
Lightly wipe along the antenna with a
dampened soft cloth.When installing a CB, ham radio or car phone in
your NISSAN, be sure to observe the following
cautions, otherwise the new equipment may ad-
versely affect the engine control system and
other electronic parts.
WARNING
cA cellular telephone should not be used
while driving so full attention may be
given to vehicle operation. Some juris-
dictions prohibit the use of cellular tele-
phones while driving.
cIf you must make a call while your ve-
hicle is in motion, the hands free cellu-
lar phone operational mode (if so
equipped) is highly recommended. Ex-
ercise extreme caution at all times so
full attention may be given to vehicle
operation.
cIf a conversation in a moving vehicle
requires you to take notes, pull off the
road to a safe location and stop your
vehicle before doing so.
CAUTION
cKeep the antenna as far away as pos-
sible from the electronic control
modules.
cKeep the antenna wire more than 8 in
(20 cm) away from the electronic con-
trol system harnesses. Do not route the
antenna wire next to any harness.
cAdjust the antenna standing-wave ratio
as recommended by the manufacturer.
cConnect the ground wire from the CB
radio chassis to the body.
cFor details, consult a NISSAN dealer.
CAR PHONE OR CB RADIO
4-34Display screen, heater, air conditioner, audio and phone systems
ZREVIEW COPYÐ2006 Maxima(max)
Owners ManualÐUSA_English(nna)
06/22/05Ðtbrooks
X