2006 NISSAN MAXIMA battery
[x] Cancel search: batteryPage 244 of 312

cWhen working on or near a battery, al-
ways wear suitable eye protection and
remove all jewelry.
cBattery posts, terminals and related ac-
cessories contain lead and lead com-
pounds. Wash hands after handling.
cKeep battery out of the reach of
children.
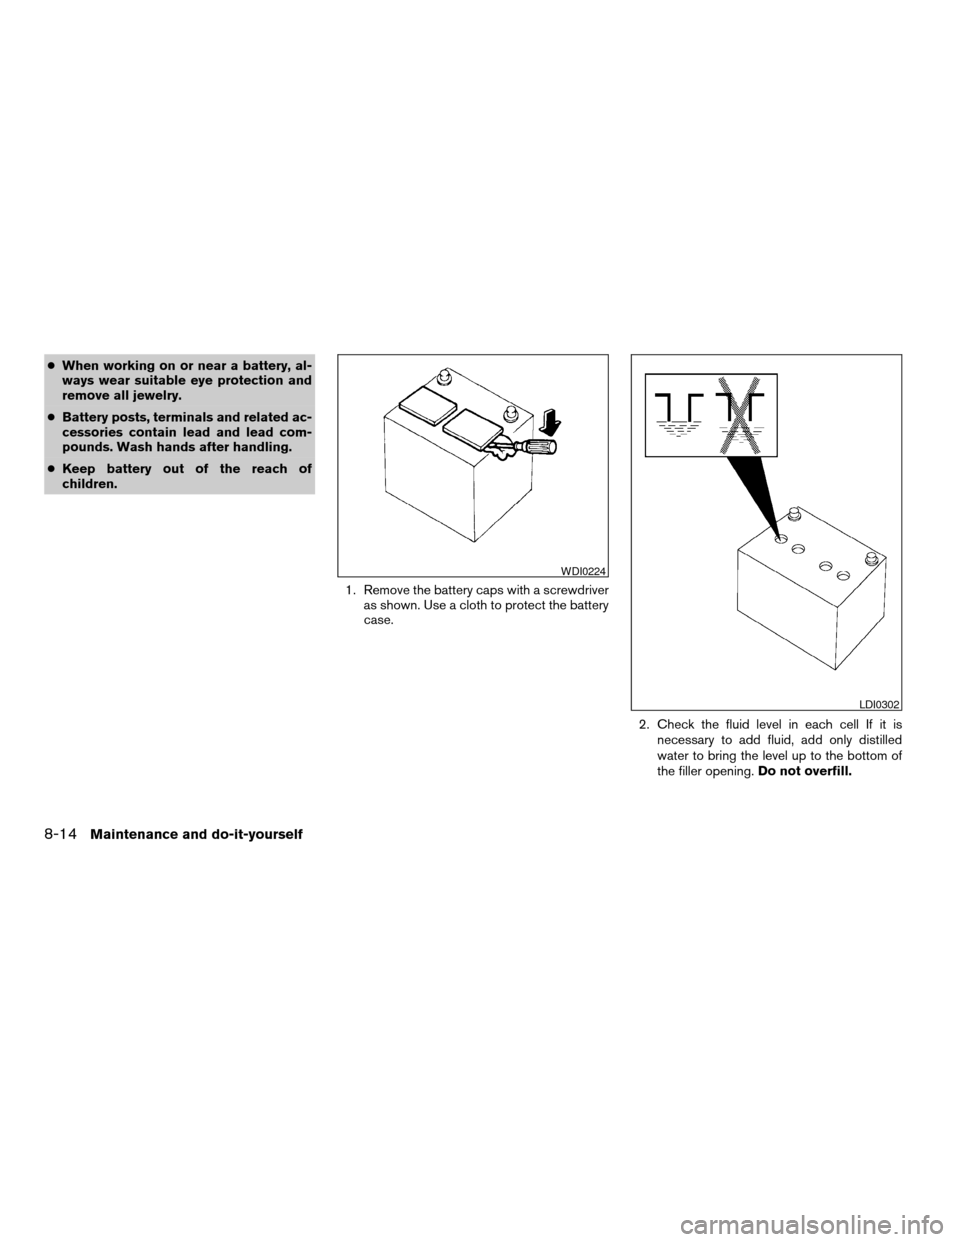
1. Remove the battery caps with a screwdriver
as shown. Use a cloth to protect the battery
case.
2. Check the fluid level in each cell If it is
necessary to add fluid, add only distilled
water to bring the level up to the bottom of
the filler opening.Do not overfill.
WDI0224
LDI0302
8-14Maintenance and do-it-yourself
ZREVIEW COPYÐ2006 Maxima(max)
Owners ManualÐUSA_English(nna)
06/23/05Ðtbrooks
X
Page 245 of 312

Vehicles operated in high temperatures or under
severe conditions require frequent checks of the
battery fluid level.
JUMP STARTING
If jump starting is necessary, see “Jump starting”
in the “In case of emergency” section of this
manual. If the engine does not start by jump
starting, the battery may have to be replaced.
Contact a NISSAN dealer.
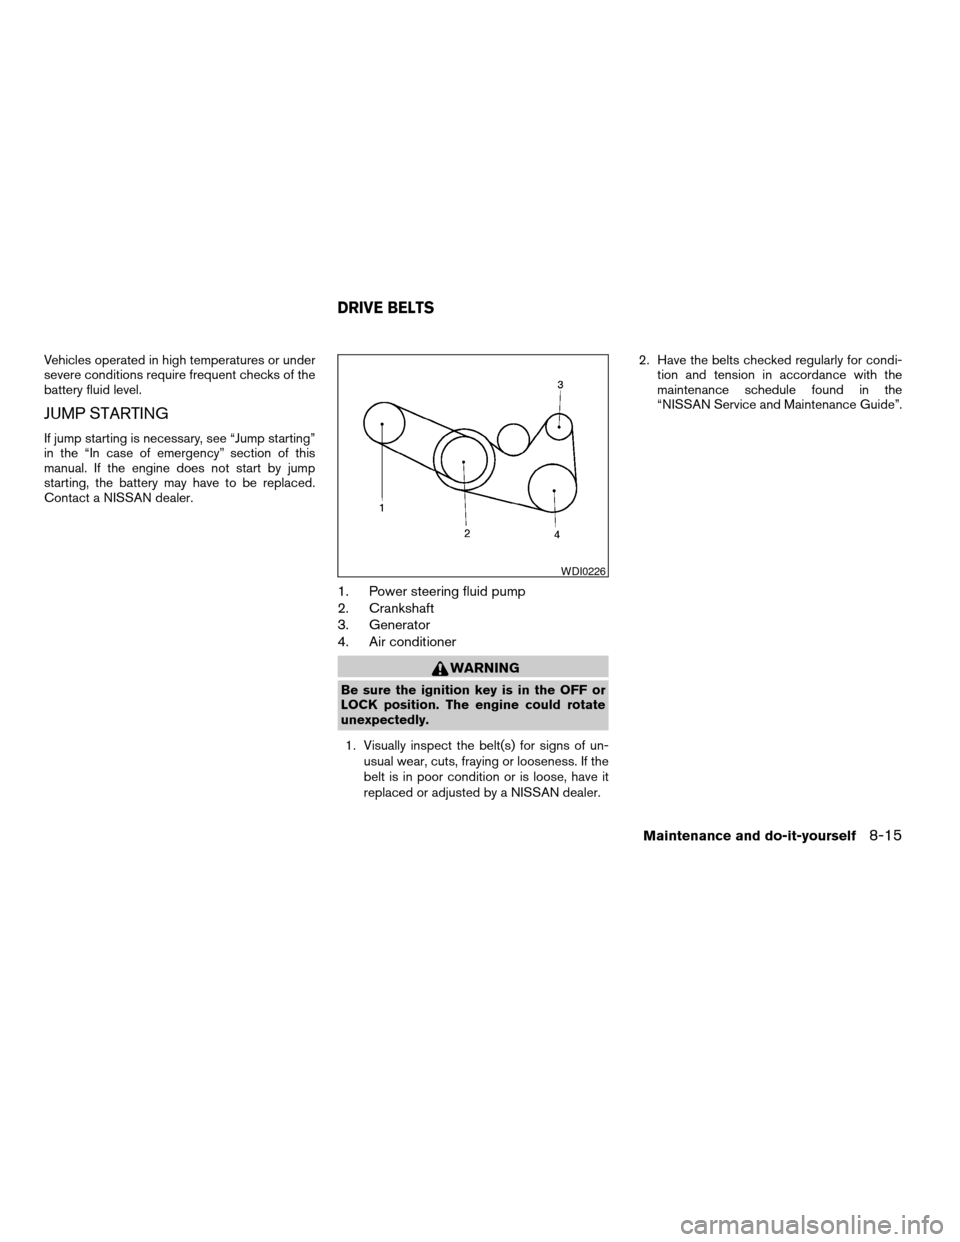
1. Power steering fluid pump
2. Crankshaft
3. Generator
4. Air conditioner
WARNING
Be sure the ignition key is in the OFF or
LOCK position. The engine could rotate
unexpectedly.
1. Visually inspect the belt(s) for signs of un-
usual wear, cuts, fraying or looseness. If the
belt is in poor condition or is loose, have it
replaced or adjusted by a NISSAN dealer.2. Have the belts checked regularly for condi-
tion and tension in accordance with the
maintenance schedule found in the
“NISSAN Service and Maintenance Guide”.
WDI0226
DRIVE BELTS
Maintenance and do-it-yourself8-15
ZREVIEW COPYÐ2006 Maxima(max)
Owners ManualÐUSA_English(nna)
06/23/05Ðtbrooks
X
Page 256 of 312

Replace the battery in the keyfob as follows:
s1Open the lid using a coinsA.
s2Remove the batterysB.
s3Install a new batterysCwith the “+” facing
down.Recommended battery: CR2025 or equivalent.
s4Close the lid securely.
5. Press the
button, then thebutton two or three times to check the key-
fob operation.If the battery is removed for any reason
other than replacement, perform step 5.
cAn improperly disposed battery can
hurt the environment. Always confirm
local regulations for battery disposal.
cThe keyfob is water-resistant; how-
ever, if it does get wet, immediately
wipe completely dry.
cThe operational range of the keyfob
extends to approximately 33 ft (10 m)
from the vehicle. This range may vary
with conditions.
FCC Notice:
Changes or modifications not expressly ap-
proved by the party responsible for compli-
ance could void the user’s authority to op-
erate the equipment.
This device complies with Part 15 of the
FCC Rules and RSS-210 of Industry
Canada.
Operation is subject to the following two
conditions: (1) This device may not cause
harmful interference, and (2) this device
must accept any interference received, in-
cluding interference that may cause undes-
ired operation of the device.
LDI0484
KEYFOB BATTERY REPLACEMENT
8-26Maintenance and do-it-yourself
ZREVIEW COPYÐ2006 Maxima(max)
Owners ManualÐUSA_English(nna)
06/23/05Ðtbrooks
X
Page 292 of 312

Trailer lights
CAUTION
When splicing into the vehicle electrical
system, a commercially available power-
type module/converter must be used to
provide power for all trailer lighting. This
unit uses the vehicle battery as a direct
power source for all trailer lights while
using the vehicle tail light, stoplight and
turn signal circuits as a signal source. The
module/converter must draw no more
that 15 milliamps from the stop and tail
lamp circuits. Using a module/converter
that exceeds these power requirements
may damage the vehicle’s electrical sys-
tem. See a reputable trailer dealer to ob-
tain the proper equipment and to have it
installed.
Trailer lights should comply with federal and/or
local regulations. For assistance in hooking up
trailer lights, contact a NISSAN dealer or repu-
table trailer dealer.
Trailer brakes
If your trailer is equipped with a braking system,
make sure it conforms to federal and/or local
regulations and that it is properly installed.
WARNING
Never connect a trailer brake system di-
rectly to the vehicle brake system.
Pre-towing tips
cBe certain your vehicle maintains a level
position when a loaded and/or unloaded
trailer is hitched. Do not drive the vehicle if it
has an abnormal nose-up or nose-down
condition; check for improper tongue load,
overload, worn suspension or other possible
causes of either condition.
cAlways secure items in the trailer to prevent
load shift while driving.
cLoad the trailer so approximately 60% of the
trailer load is in the front half and 40% is in
the back half.
cCheck your hitch, trailer tire pressure, ve-
hicle tire pressure, trailer light operation, and
trailer wheel lug nuts every time you attach a
trailer to the vehicle.
cBe certain your rearview mirrors conform to
all federal, state or local regulations. If not,
install any mirrors required for towing before
driving the vehicle.
Trailer towing tips
In order to gain skill and an understanding of the
vehicle’s behavior, you should practice turning,
stopping and backing up in an area which is free
from traffic. Steering stability and braking perfor-
mance will be somewhat different than under
normal driving conditions.
cAlways secure items in the trailer to prevent
load shift while driving.
cAvoid abrupt starts, acceleration or stops.
cAvoid sharp turns or lane changes.
cAlways drive your vehicle at a moderate
speed. Some states or provinces have spe-
cific speed limits for vehicles that are towing
trailers. Obey the local speed limits.
cWhen backing up, hold the bottom of the
steering wheel with one hand. Move your
hand in the direction in which you want the
trailer to go. Make small corrections and
back up slowly. If possible, have someone
guide you when you are backing up.
c
Always block the wheels on both vehicle and
trailer when parking. Parking on a slope is not
recommended; however, if you must do so,
and if your vehicle is equipped with an auto-
matic transmission, first block the wheels and
apply the parking brake, and then move the
9-18Technical and consumer information
ZREVIEW COPYÐ2006 Maxima(max)
Owners ManualÐUSA_English(nna)
06/23/05Ðtbrooks
X
Page 296 of 312

Due to legal requirements in some states and
Canadian Provinces, your vehicle may be re-
quired to be in what is called the “ready condi-
tion” for an Inspection/Maintenance (I/M) test of
the emission control system.
The vehicle is set to the “ready condition” when it
is driven through certain driving patterns. Usually,
the ready condition can be obtained by ordinary
usage of the vehicle.
If a powertrain system component is repaired or
the battery is disconnected, the vehicle may be
reset to a “not ready” condition. Before taking the
I/M test, check the vehicle’s
inspection/maintenance test readiness condi-
tion. Turn the ignition switch ON without starting
the engine. If the Malfunction Indicator Light
(MIL) comes on steady for 20 seconds and then
blinks for 10 seconds , the I/M test condition is
9not ready9. If the MIL does not blink after 20
seconds, the I/M test condition is9ready.9If the
MIL indicates the vehicle is in a9not ready9con-
dition, drive the vehicle through the following
pattern to set the vehicle to the ready condition. If
you cannot or do not want to perform the driving
pattern, a NISSAN dealer can conduct it for you.WARNING
Always drive the vehicle in a safe and
prudent manner according to traffic con-
ditions and obey all traffic laws.
1. Start the engine when the engine coolant
temperature gauge needle points to C. Al-
low the engine to idle until the gauge needle
points between the C and H (normal oper-
ating temperature) .
2. Accelerate the vehicle to 55 MPH (88
km/h) , then quickly release the accelerator
pedal completely and keep it released for at
least 10 seconds.
3. Quickly depress the accelerator pedal for a
moment, then drive the vehicle at a speed of
53 - 60 MPH (86 - 96 km/h) for at least 9
minutes.
4. Stop the vehicle.
5. Accelerate the vehicle to 35 MPH (55 km/h)
and maintain the speed for 20 seconds.
6. Repeat steps 4 through 5 at least 10 times.
7. Accelerate the vehicle to 55 MPH (88 km/h)
and maintain the speed for at least 3 min-
utes.8. Stop the vehicle. Place the transmission se-
lector lever in the P (Park) or N (Neutral)
position.
9. Turn the engine off.
10. Repeat steps1-8atleast one more time.
If steps 1 through 7 are interrupted, repeat the
preceding step. Any safe driving mode is accept-
able between steps. Do not stop the engine until
step 7 is completed.
READINESS FOR INSPECTION/
MAINTENANCE (I/M) TEST
9-22Technical and consumer information
ZREVIEW COPYÐ2006 Maxima(max)
Owners ManualÐUSA_English(nna)
06/23/05Ðtbrooks
X
Page 299 of 312

10 Index
A
Active head restraint...............1-9
Air bag
(See supplemental restraint
system).....................1-35
Air bag system
Front (See supplemental front impact
air bag system)...............1-42
Air bag warning light...........1-50, 2-12
Air cleaner housing filter............8-16
Air conditioner
Air conditioner service...........4-20
Air conditioner specification label.....9-11
Air conditioner system refrigerant and oil
recommendations..............9-6
Servicing air conditioner..........4-20
Alarm system (See vehicle security system). .2-15
Anchor point locations.............1-27
Antenna.....................4-33
Anti-lock brake system (ABS).........5-18
Anti-lock brake warning light..........2-10
Armrests.....................1-7
Audible reminders................2-15
Audio system..................4-20
AM-FM radio with cassette player.....4-28
Cassette player...............4-28
Compact Disc (CD) changer.......4-30
Compact disc (CD) player.........4-29
FM-AM-SAT radio with cassette player
and compact disc (CD) changer......4-24FM-AM-SAT radio with cassette player
and compact disc (CD) player.......4-24
Radio....................4-20
Steering wheel audio control switch. . . .4-33
Autolight switch.................2-22
Automatic
Automatic drive positioner.........3-19
Automatic power window switch.....2-38
Driving with automatic transmission.....5-7
Transmission selector lever lock
release....................5-10
B
Battery......................8-13
Charge warning light............2-11
Before starting the engine............5-6
Belts (See drive belts).............8-15
BluetoothThands-free phone system.....4-35
Booster seats..................1-31
Brake
Anti-lock brake system (ABS).......5-18
Brake booster................8-22
Brake fluid..................8-12
Brake light (See stop light).........8-28
Brake pedal.................8-21
Brake system................5-17
Brake warning light.............2-11
Brake wear indicators........2-15, 8-22
Parking brake check............8-21
Parking brake operation..........5-12Self-adjusting brakes............8-22
Break-in schedule................5-14
Brightness control
Instrument panel..............2-24
Brightness/Contrast button........4-6, 4-16
Control panel buttons.........4-6, 4-16
Bulb check/instrument panel..........2-10
Bulb replacement................8-28
C
Capacities and recommended
fuel/lubricants...................9-2
Car phone or CB radio.............4-34
Cargo (See vehicle loading information) . . .9-12
Cassette player (See audio system)......4-28
CD care and cleaning.............4-32
CD changer (See audio system)........4-30
CD player (See audio system).........4-29
Child restraint with top tether strap......1-26
Child restraints.......1-12, 1-13, 1-18, 1-25
Precautions on child restraints . . .1-18, 1-31
Top tether strap anchor point locations . .1-27
Child safety rear door lock............3-5
Chimes, audible reminders...........2-15
Cigarette lighter.................2-30
Cleaning exterior and interior..........7-2
Clock
(models with navigation system)......4-14
(models without navigation system).....4-4
ZREVIEW COPYÐ2006 Maxima(max)
Owners ManualÐUSA_English(nna)
06/23/05Ðtbrooks
X
Page 301 of 312

Fuel octane rating..............9-4
Fuel recommendation............9-3
Fuel-filler door and cap...........3-11
Fuel-filler door lock opener lever......3-11
FUEL ECON button............4-4, 4-9
Fuel Econ button
Control panel buttons..........4-4, 4-9
Fuses......................8-22
Fusible links...................8-24
G
Garage door opener, HomeLinkTUniversal
Transceiver...................2-44
Gascap.....................3-11
Gauge
Engine coolant temperature gauge.....2-5
Fuel gauge..................2-6
Odometer...................2-4
Speedometer.................2-4
Tachometer..................2-5
Trip odometer.................2-4
General maintenance..............8-2
Glove box....................2-33
Glove box lock.................2-33
Grocery hooks.................2-36
H
Hazard warning flasher switch.........2-25
Head restraints..................1-8
Active head restraint.............1-9
Headlight and turn signal switch........2-20
Headlight control switch............2-21Heated seats..................2-26
Heated steering wheel.............2-27
Heater
Heater operation..............4-19
HomeLinkTUniversal Transceiver.......2-44
Hood release...................3-9
Horn.......................2-26
I
Ignition switch..................5-4
Immobilizer system..........2-17, 3-2, 5-5
Important vehicle information label.......9-10
In-cabin microfilter...............8-17
Increasing fuel economy............5-15
Indicator lights and audible reminders
(See warning/indicator lights and audible
reminders)....................2-10
Instrument brightness control.........2-24
Instrument panel..............0-6, 2-2
Interior light...................2-42
Interior trunk lid release.............3-11
ISOFIX child restraints.............1-25
J
Jump starting...................6-6
K
Key ........................3-2
Keyfob battery replacement..........8-26Keyless entry system
(See remote keyless entry system).......3-5
L
Labels
Air conditioner specification label.....9-11
C.M.V.S.S. certification label........9-10
Emission control information label.....9-10
Engine serial number............9-10
F.M.V.S.S. certification label........9-10
Vehicle identification number (VIN) plate . .9-9
Warning labels (for SRS)..........1-49
LATCH (Lower Anchors and Tethers for CHildren)
System......................1-25
License plate
Installing the license plate.........9-12
Light
Air bag warning light.........1-50, 2-12
Brake light (See stop light).........8-28
Bulb check/instrument panel........2-10
Bulb replacement..............8-28
Charge warning light............2-11
Cornering light...............2-25
Fog light switch...............2-24
Headlight and turn signal switch......2-20
Headlight control switch..........2-21
Interior light.................2-42
Light bulbs..................8-27
Low washer fluid warning light.......2-12
Passenger air bag and status light.....1-44
Personal lights...............2-43
Trunk light..................2-44
Warning/indicator lights and audible
reminders..................2-10
10-3
ZREVIEW COPYÐ2006 Maxima(max)
Owners ManualÐUSA_English(nna)
06/23/05Ðtbrooks
X
Page 304 of 312

Tire
Flat tire....................6-2
Spare tire................6-3, 8-44
Tire chains..................8-41
Tire placard.................9-11
Tire pressure................8-33
Tire rotation.................8-41
Types of tires................8-40
Uniform tire quality grading.........9-20
Wheels and tires..............8-33
Wheel/tire size................9-8
Tire pressure display...............4-5
Tire rotation maintenance reminder.......4-5
Top tether strap child restraint.........1-26
Towing
Flat towing..................9-19
Tow truck towing..............6-10
Towing load/specification.........9-16
Trailer towing................9-15
Traction control system (TCS) off switch . . .2-28
Transceiver
HomeLinkTUniversal Transceiver.....2-44
Transmission
Driving with automatic transmission.....5-7
Driving with manual transmission.....5-11
Selector lever lock release.........5-10
Travel (See registering your vehicle in
another country).................9-9
TRIP button.................4-3, 4-9
Trip button
Control panel buttons..........4-3, 4-9
Trip odometer...................2-4
Trunk access through the rear seat.......1-6
Trunk lid lock opener lever............3-9
Trunk light....................2-44
Turn signal switch................2-24U
Uniform tire quality grading...........9-20
V
Vanity mirror...................3-15
Vehicle dimensions and weights........9-8
Vehicle dynamic control (VDC) off switch. . .2-28
Vehicle dynamic control (VDC) system. . . .5-20
Vehicle electronic system...........4-12
Vehicle identification...............9-9
Vehicle identification number (VIN)
(Chassis number).................9-9
Vehicle identification number (VIN) plate. . . .9-9
Vehicle loading information...........9-12
Vehicle recovery.............6-11, 6-12
Vehicle security system.............2-15
Vehicle security system (NISSAN vehicle
immobilizer system) , engine start . .2-17, 3-2, 5-5
Visors......................3-15
W
Warning
Air bag warning light.........1-50, 2-12
Anti-lock brake warning light........2-10
Battery charge warning light........2-11
Brake warning light.............2-11
Door open warning light..........2-11
Engine oil pressure warning light.....2-11
Hazard warning flasher switch.......2-25
Low fuel warning light...........2-12Low washer fluid warning light.......2-12
Passenger air bag and status light.....1-44
Seat belt warning light...........2-12
Vehicle security system...........2-15
Warning labels (for SRS)..........1-49
Warning/indicator lights and audible
reminders..................2-10
Warning lights..................2-10
Washer switch
Windshield wiper and washer switch . . .2-19
Weights (See dimensions and weights). . . .9-8
Wheels and tires................8-33
Wheel/tire size..................9-8
When traveling or registering your vehicle in
another country..................9-9
Window washer fluid..............8-13
Windows
Locking passengers’ windows.......2-38
Power rear windows............2-38
Power windows...............2-37
Rear power windows............2-38
Windshield wiper and washer switch.....2-19
Wiper
Windshield wiper and washer switch . . .2-19
Wiper blades................8-20
10-6
ZREVIEW COPYÐ2006 Maxima(max)
Owners ManualÐUSA_English(nna)
06/23/05Ðtbrooks
X