2006 NISSAN MAXIMA check engine light
[x] Cancel search: check engine lightPage 240 of 312
7. Refill engine with recommended oil through
the oil filler opening, then install the oil filler
cap securely.
See “Capacities and recommended
fuel/lubricants” in the “Technical and con-
sumer information” section of this manual for
drain and refill capacity.
The drain and refill capacity depends on the
oil temperature and drain time. Use these
specifications for reference only. Always use
the dipstick to determine when the proper
amount of oil is in the engine.
8. Start the engine. Check for leakage around
the drain plug and oil filter. Correct as re-
quired.
9. Turn the engine off and wait more than 10
minutes. Check the oil level with the dipstick.
Add engine oil if necessary.
CHANGING ENGINE OIL FILTER
1. Park the vehicle on a level surface and apply
the parking brake.
2. Turn the engine off.
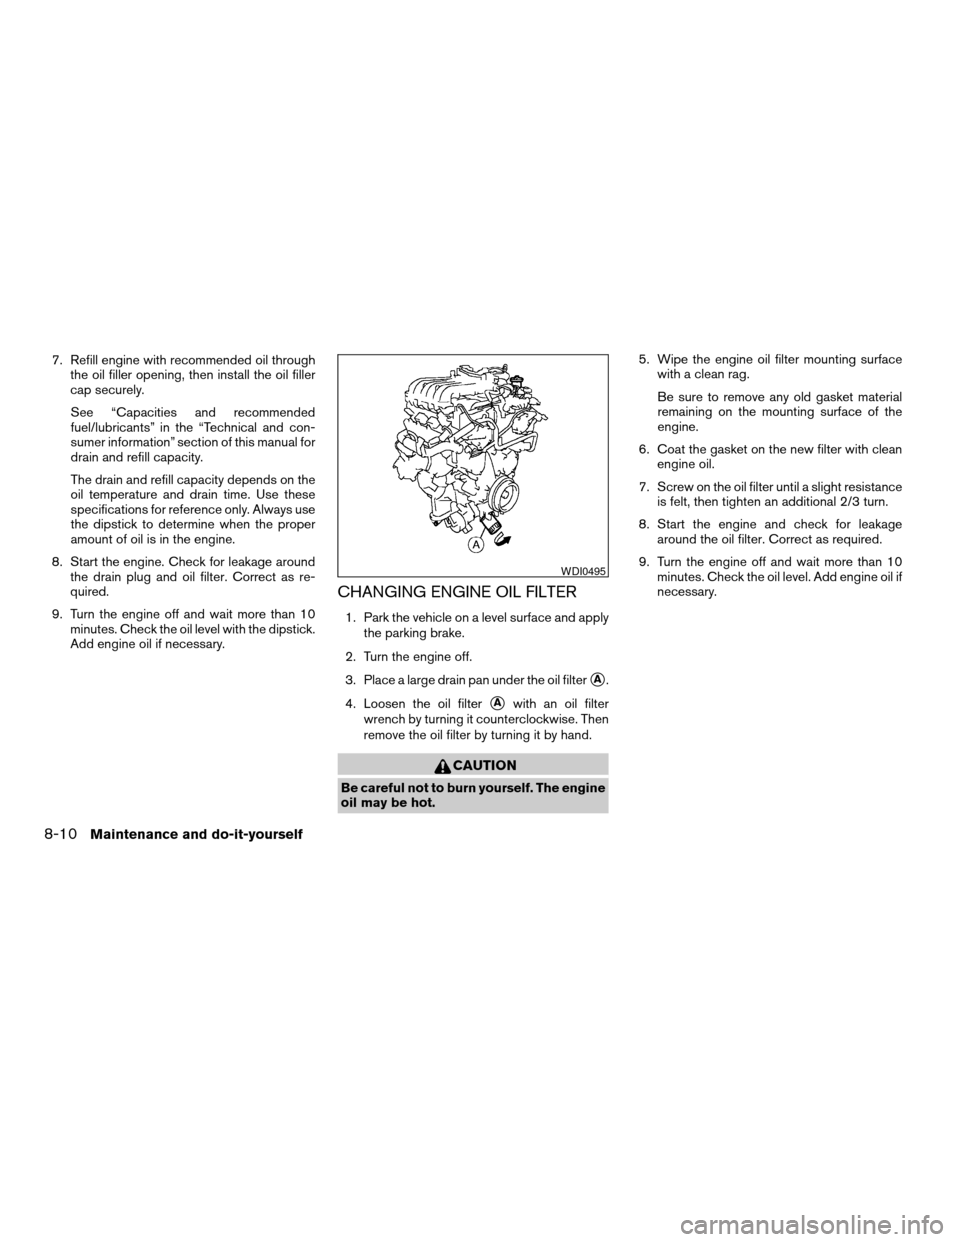
3. Place a large drain pan under the oil filter
sA.
4. Loosen the oil filter
sAwith an oil filter
wrench by turning it counterclockwise. Then
remove the oil filter by turning it by hand.
CAUTION
Be careful not to burn yourself. The engine
oil may be hot.5. Wipe the engine oil filter mounting surface
with a clean rag.
Be sure to remove any old gasket material
remaining on the mounting surface of the
engine.
6. Coat the gasket on the new filter with clean
engine oil.
7. Screw on the oil filter until a slight resistance
is felt, then tighten an additional 2/3 turn.
8. Start the engine and check for leakage
around the oil filter. Correct as required.
9. Turn the engine off and wait more than 10
minutes. Check the oil level. Add engine oil if
necessary.
WDI0495
8-10Maintenance and do-it-yourself
ZREVIEW COPYÐ2006 Maxima(max)
Owners ManualÐUSA_English(nna)
07/06/05Ðbetty
X
Page 252 of 312
Self-adjusting brakes
Your vehicle is equipped with self-adjusting
brakes.
The front and rear disc-type brakes self-adjust
every time the brake pedal is applied.
WARNING
See a NISSAN dealer for a brake system
check if the brake pedal height does not
return to normal.
Brake pad wear indicators
The disc brake pads on your vehicle have audible
wear indicators. When a brake pad requires re-
placement, a high pitched scraping or screech-
ing sound will be heard when the vehicle is in
motion. The noise will be heard whether or not the
brake pedal is depressed. Have the brakes
checked as soon as possible if the wear indicator
sound is heard.
Under some driving or climate conditions, occa-
sional brake squeak, squeal or other noise may
be heard. Occasional brake noise during light to
moderate stops is normal and does not affect the
function or performance of the brake system.Proper brake inspection intervals should
be followed.For more information regarding
brake inspections, see the appropriate mainte-
nance schedule information in the “NISSAN Ser-
vice and Maintenance Guide”.
BRAKE BOOSTER
Check the brake booster function as follows:
1. With the engine off, press and release the
brake pedal several times. When brake
pedal movement (distance of travel) remains
the same from one pedal application to the
next, continue on to the next step.
2. While depressing the brake pedal, start the
engine. The pedal height should drop a little.
3. With the brake pedal depressed, stop the
engine. Keep the pedal depressed for about
30 seconds. The pedal height should not
change.
4. Run the engine for one minute without de-
pressing the brake pedal, then turn it off.
Depress the brake pedal several times. The
pedal travel distance will decrease gradually
with each depression as the vacuum is re-
leased from the booster.
If the brakes do not operate properly, have the
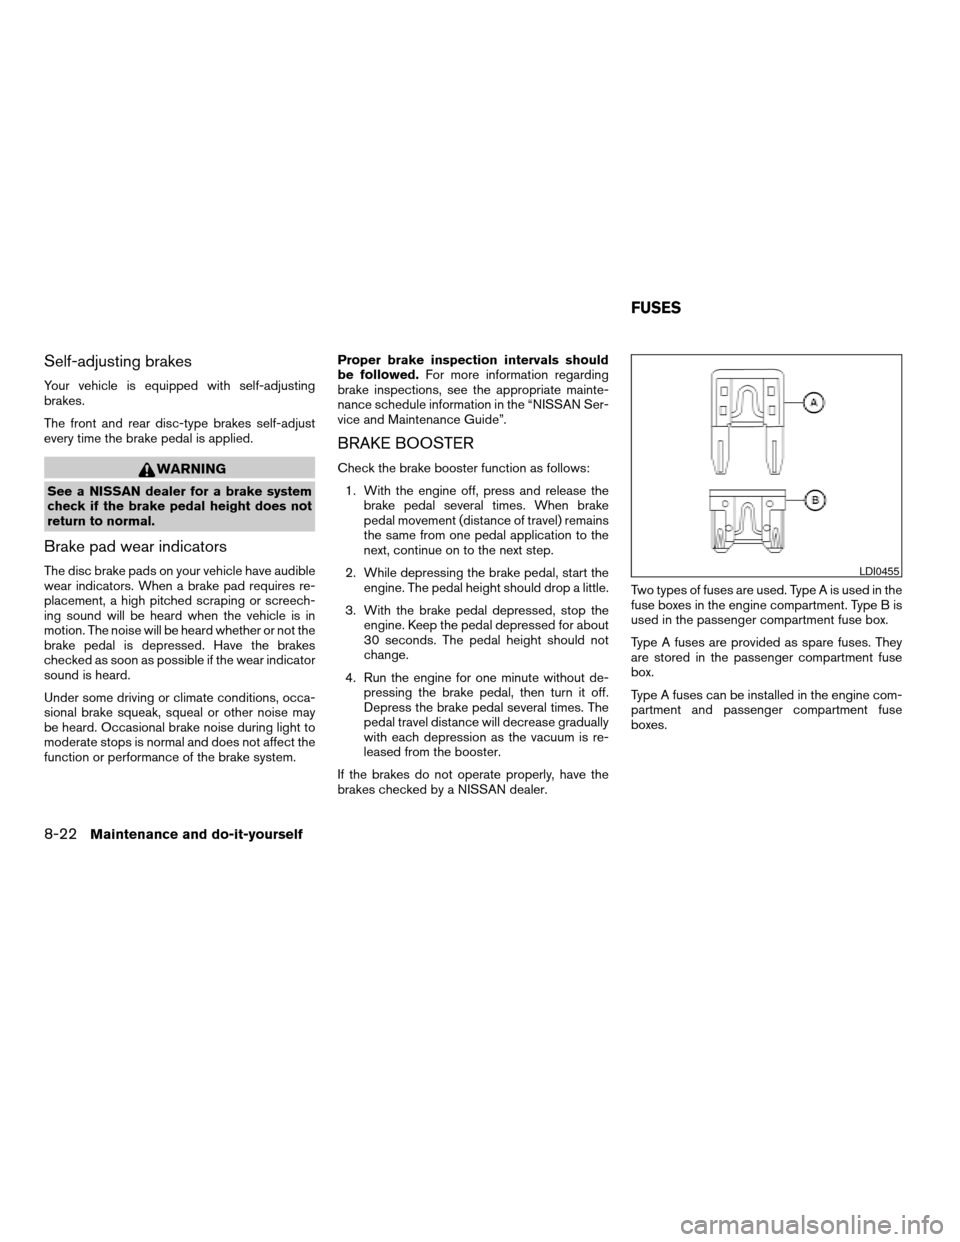
brakes checked by a NISSAN dealer.Two types of fuses are used. Type A is used in the
fuse boxes in the engine compartment. Type B is
used in the passenger compartment fuse box.
Type A fuses are provided as spare fuses. They
are stored in the passenger compartment fuse
box.
Type A fuses can be installed in the engine com-
partment and passenger compartment fuse
boxes.
LDI0455
FUSES
8-22Maintenance and do-it-yourself
ZREVIEW COPYÐ2006 Maxima(max)
Owners ManualÐUSA_English(nna)
06/23/05Ðtbrooks
X
Page 253 of 312
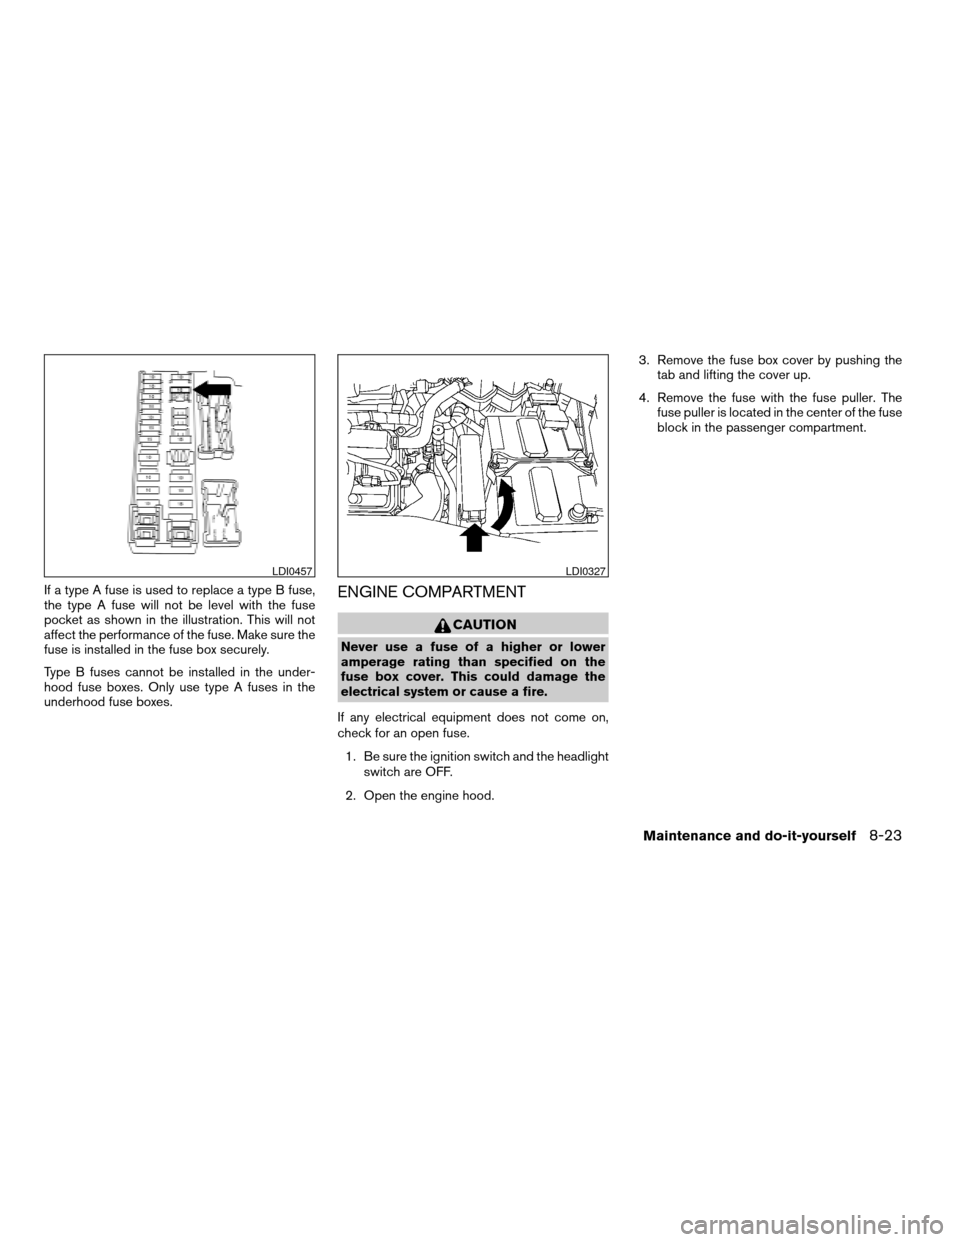
If a type A fuse is used to replace a type B fuse,
the type A fuse will not be level with the fuse
pocket as shown in the illustration. This will not
affect the performance of the fuse. Make sure the
fuse is installed in the fuse box securely.
Type B fuses cannot be installed in the under-
hood fuse boxes. Only use type A fuses in the
underhood fuse boxes.ENGINE COMPARTMENT
CAUTION
Never use a fuse of a higher or lower
amperage rating than specified on the
fuse box cover. This could damage the
electrical system or cause a fire.
If any electrical equipment does not come on,
check for an open fuse.
1. Be sure the ignition switch and the headlight
switch are OFF.
2. Open the engine hood.3. Remove the fuse box cover by pushing the
tab and lifting the cover up.
4. Remove the fuse with the fuse puller. The
fuse puller is located in the center of the fuse
block in the passenger compartment.
LDI0457LDI0327
Maintenance and do-it-yourself8-23
ZREVIEW COPYÐ2006 Maxima(max)
Owners ManualÐUSA_English(nna)
06/23/05Ðtbrooks
X
Page 278 of 312
Aftermarket fuel additives
NISSAN does not recommend the use of any
aftermarket fuel additives (for example, fuel injec-
tor cleaner, octane booster, intake valve deposit
removers, etc.) which are sold commercially.
Many of these additives intended for gum, varnish
or deposit removal may contain active solvents or
similar ingredients that can be harmful to the fuel
system and engine.
Octane rating tips
Using unleaded gasoline with an octane
rating lower than recommended can cause
persistent, heavy “spark knock.” (“Spark
knock” is a metallic rapping noise.) If se-
vere, this can lead to engine damage. If you
detect a persistent heavy spark knock even
when using gasoline of the stated octane
rating, or if you hear steady spark knock
while holding a steady speed on level
roads, have a NISSAN dealer correct the
condition. Failure to correct the condition
is misuse of the vehicle, for which NISSAN
is not responsible.
Incorrect ignition timing may result in spark
knock, after-run and/or overheating, which may
cause excessive fuel consumption or enginedamage. If any of the above symptoms are en-
countered, have your vehicle checked at a
NISSAN dealer.
However, now and then you may notice
light spark knock for a short time while
accelerating or driving up hills. This is not a
cause for concern, because you get the
greatest fuel benefit when there is light
spark knock for a short time under heavy
engine load.CAUTION
cYour vehicle is not designed to run on
E-85 fuel. Using E-85 fuel in a vehicle
not specifically designed for E-85 fuel
can damage fuel system components
and is not covered by the NISSAN new
vehicle limited warranty.
cE-85 is a mixture of approximately 85%
fuel ethanol and 15% unleaded
gasoline.
cU.S. government regulations require
ethanol dispensing pumps to be identi-
fied by a small, square, orange and
black label with the common abbrevia-
tion or the appropriate percentage for
that region.
9-4Technical and consumer information
ZREVIEW COPYÐ2006 Maxima(max)
Owners ManualÐUSA_English(nna)
06/23/05Ðtbrooks
X
Page 296 of 312
Due to legal requirements in some states and
Canadian Provinces, your vehicle may be re-
quired to be in what is called the “ready condi-
tion” for an Inspection/Maintenance (I/M) test of
the emission control system.
The vehicle is set to the “ready condition” when it
is driven through certain driving patterns. Usually,
the ready condition can be obtained by ordinary
usage of the vehicle.
If a powertrain system component is repaired or
the battery is disconnected, the vehicle may be
reset to a “not ready” condition. Before taking the
I/M test, check the vehicle’s
inspection/maintenance test readiness condi-
tion. Turn the ignition switch ON without starting
the engine. If the Malfunction Indicator Light
(MIL) comes on steady for 20 seconds and then
blinks for 10 seconds , the I/M test condition is
9not ready9. If the MIL does not blink after 20
seconds, the I/M test condition is9ready.9If the
MIL indicates the vehicle is in a9not ready9con-
dition, drive the vehicle through the following
pattern to set the vehicle to the ready condition. If
you cannot or do not want to perform the driving
pattern, a NISSAN dealer can conduct it for you.WARNING
Always drive the vehicle in a safe and
prudent manner according to traffic con-
ditions and obey all traffic laws.
1. Start the engine when the engine coolant
temperature gauge needle points to C. Al-
low the engine to idle until the gauge needle
points between the C and H (normal oper-
ating temperature) .
2. Accelerate the vehicle to 55 MPH (88
km/h) , then quickly release the accelerator
pedal completely and keep it released for at
least 10 seconds.
3. Quickly depress the accelerator pedal for a
moment, then drive the vehicle at a speed of
53 - 60 MPH (86 - 96 km/h) for at least 9
minutes.
4. Stop the vehicle.
5. Accelerate the vehicle to 35 MPH (55 km/h)
and maintain the speed for 20 seconds.
6. Repeat steps 4 through 5 at least 10 times.
7. Accelerate the vehicle to 55 MPH (88 km/h)
and maintain the speed for at least 3 min-
utes.8. Stop the vehicle. Place the transmission se-
lector lever in the P (Park) or N (Neutral)
position.
9. Turn the engine off.
10. Repeat steps1-8atleast one more time.
If steps 1 through 7 are interrupted, repeat the
preceding step. Any safe driving mode is accept-
able between steps. Do not stop the engine until
step 7 is completed.
READINESS FOR INSPECTION/
MAINTENANCE (I/M) TEST
9-22Technical and consumer information
ZREVIEW COPYÐ2006 Maxima(max)
Owners ManualÐUSA_English(nna)
06/23/05Ðtbrooks
X
Page 299 of 312

10 Index
A
Active head restraint...............1-9
Air bag
(See supplemental restraint
system).....................1-35
Air bag system
Front (See supplemental front impact
air bag system)...............1-42
Air bag warning light...........1-50, 2-12
Air cleaner housing filter............8-16
Air conditioner
Air conditioner service...........4-20
Air conditioner specification label.....9-11
Air conditioner system refrigerant and oil
recommendations..............9-6
Servicing air conditioner..........4-20
Alarm system (See vehicle security system). .2-15
Anchor point locations.............1-27
Antenna.....................4-33
Anti-lock brake system (ABS).........5-18
Anti-lock brake warning light..........2-10
Armrests.....................1-7
Audible reminders................2-15
Audio system..................4-20
AM-FM radio with cassette player.....4-28
Cassette player...............4-28
Compact Disc (CD) changer.......4-30
Compact disc (CD) player.........4-29
FM-AM-SAT radio with cassette player
and compact disc (CD) changer......4-24FM-AM-SAT radio with cassette player
and compact disc (CD) player.......4-24
Radio....................4-20
Steering wheel audio control switch. . . .4-33
Autolight switch.................2-22
Automatic
Automatic drive positioner.........3-19
Automatic power window switch.....2-38
Driving with automatic transmission.....5-7
Transmission selector lever lock
release....................5-10
B
Battery......................8-13
Charge warning light............2-11
Before starting the engine............5-6
Belts (See drive belts).............8-15
BluetoothThands-free phone system.....4-35
Booster seats..................1-31
Brake
Anti-lock brake system (ABS).......5-18
Brake booster................8-22
Brake fluid..................8-12
Brake light (See stop light).........8-28
Brake pedal.................8-21
Brake system................5-17
Brake warning light.............2-11
Brake wear indicators........2-15, 8-22
Parking brake check............8-21
Parking brake operation..........5-12Self-adjusting brakes............8-22
Break-in schedule................5-14
Brightness control
Instrument panel..............2-24
Brightness/Contrast button........4-6, 4-16
Control panel buttons.........4-6, 4-16
Bulb check/instrument panel..........2-10
Bulb replacement................8-28
C
Capacities and recommended
fuel/lubricants...................9-2
Car phone or CB radio.............4-34
Cargo (See vehicle loading information) . . .9-12
Cassette player (See audio system)......4-28
CD care and cleaning.............4-32
CD changer (See audio system)........4-30
CD player (See audio system).........4-29
Child restraint with top tether strap......1-26
Child restraints.......1-12, 1-13, 1-18, 1-25
Precautions on child restraints . . .1-18, 1-31
Top tether strap anchor point locations . .1-27
Child safety rear door lock............3-5
Chimes, audible reminders...........2-15
Cigarette lighter.................2-30
Cleaning exterior and interior..........7-2
Clock
(models with navigation system)......4-14
(models without navigation system).....4-4
ZREVIEW COPYÐ2006 Maxima(max)
Owners ManualÐUSA_English(nna)
06/23/05Ðtbrooks
X
Page 300 of 312

Clock set
Control panel buttons.........4-4, 4-14
Clutch
Clutch fluid.................8-12
C.M.V.S.S. certification label..........9-10
Cold weather driving..............5-21
Compact disc (CD) player...........4-29
Compass display.................2-6
Console box...................2-34
Control panel buttons
With navigation system...........4-7
Without navigation system..........4-2
Controls
Audio controls (steering wheel)......4-33
Coolant
Capacities and recommended
fuel/lubricants.................9-2
Changing engine coolant..........8-8
Checking engine coolant level........8-7
Engine coolant temperature gauge.....2-5
Cornering light.................2-25
Corrosion protection...............7-5
Cruise control..................5-13
Cup holders...................2-32
D
Daytime running light system
(Canada only)..................2-23
Defroster switch
Rear window and outside mirror defroster
switch....................2-20
Dimensions and weights.............9-8
Display controls
(see control panel buttons).........4-2, 4-7Door locks....................3-3
Door open warning light............2-11
Drive belts....................8-15
Drive positioner, Automatic...........3-19
Driving
Cold weather driving............5-21
Driving with automatic transmission.....5-7
Driving with manual transmission.....5-11
Precautions when starting and driving . . .5-2
E
Economy - fuel.................5-15
Emission control information label.......9-10
Emission control system warranty.......9-21
Engine
Before starting the engine..........5-6
Capacities and recommended
fuel/lubricants.................9-2
Changing engine coolant..........8-8
Changing engine oil.............8-9
Changing engine oil filter..........8-10
Checking engine coolant level........8-7
Checking engine oil level..........8-8
Engine compartment check locations. . . .8-7
Engine coolant temperature gauge.....2-5
Engine cooling system............8-7
Engine oil...................8-8
Engine oil and oil filter recommendation . .9-5
Engine oil pressure warning light.....2-11
Engine oil viscosity..............9-5
Engine serial number............9-10
Engine specifications.............9-7
Starting the engine..............5-6English/Metric button...........4-4, 4-14
Control panel buttons.........4-4, 4-14
ENTER button.............4-2, 4-3, 4-7
Enter button
Control panel buttons.......4-2, 4-3, 4-7
Event data recorders..............9-23
Exhaust gas (Carbon monoxide)........5-2
Eyeglass case..................2-31
F
Flashers
(See hazard warning flasher switch)......2-25
Flat tire......................6-2
Floor mat positioning aid.............7-5
Fluid
Brake fluid..................8-12
Capacities and recommended
fuel/lubricants.................9-2
Clutch fluid.................8-12
Engine coolant................8-7
Engine oil...................8-8
Power steering fluid.............8-11
Window washer fluid............8-13
F.M.V.S.S. certification label..........9-10
Fog light switch.................2-24
Folding rear seat.................1-6
Front air bag system
(See supplemental restraint system).....1-42
Front seats....................1-2
Fuel
Capacities and recommended
fuel/lubricants.................9-2
Fuel economy................5-15
Fuel gauge..................2-6
10-2
ZREVIEW COPYÐ2006 Maxima(max)
Owners ManualÐUSA_English(nna)
06/23/05Ðtbrooks
X
Page 301 of 312

Fuel octane rating..............9-4
Fuel recommendation............9-3
Fuel-filler door and cap...........3-11
Fuel-filler door lock opener lever......3-11
FUEL ECON button............4-4, 4-9
Fuel Econ button
Control panel buttons..........4-4, 4-9
Fuses......................8-22
Fusible links...................8-24
G
Garage door opener, HomeLinkTUniversal
Transceiver...................2-44
Gascap.....................3-11
Gauge
Engine coolant temperature gauge.....2-5
Fuel gauge..................2-6
Odometer...................2-4
Speedometer.................2-4
Tachometer..................2-5
Trip odometer.................2-4
General maintenance..............8-2
Glove box....................2-33
Glove box lock.................2-33
Grocery hooks.................2-36
H
Hazard warning flasher switch.........2-25
Head restraints..................1-8
Active head restraint.............1-9
Headlight and turn signal switch........2-20
Headlight control switch............2-21Heated seats..................2-26
Heated steering wheel.............2-27
Heater
Heater operation..............4-19
HomeLinkTUniversal Transceiver.......2-44
Hood release...................3-9
Horn.......................2-26
I
Ignition switch..................5-4
Immobilizer system..........2-17, 3-2, 5-5
Important vehicle information label.......9-10
In-cabin microfilter...............8-17
Increasing fuel economy............5-15
Indicator lights and audible reminders
(See warning/indicator lights and audible
reminders)....................2-10
Instrument brightness control.........2-24
Instrument panel..............0-6, 2-2
Interior light...................2-42
Interior trunk lid release.............3-11
ISOFIX child restraints.............1-25
J
Jump starting...................6-6
K
Key ........................3-2
Keyfob battery replacement..........8-26Keyless entry system
(See remote keyless entry system).......3-5
L
Labels
Air conditioner specification label.....9-11
C.M.V.S.S. certification label........9-10
Emission control information label.....9-10
Engine serial number............9-10
F.M.V.S.S. certification label........9-10
Vehicle identification number (VIN) plate . .9-9
Warning labels (for SRS)..........1-49
LATCH (Lower Anchors and Tethers for CHildren)
System......................1-25
License plate
Installing the license plate.........9-12
Light
Air bag warning light.........1-50, 2-12
Brake light (See stop light).........8-28
Bulb check/instrument panel........2-10
Bulb replacement..............8-28
Charge warning light............2-11
Cornering light...............2-25
Fog light switch...............2-24
Headlight and turn signal switch......2-20
Headlight control switch..........2-21
Interior light.................2-42
Light bulbs..................8-27
Low washer fluid warning light.......2-12
Passenger air bag and status light.....1-44
Personal lights...............2-43
Trunk light..................2-44
Warning/indicator lights and audible
reminders..................2-10
10-3
ZREVIEW COPYÐ2006 Maxima(max)
Owners ManualÐUSA_English(nna)
06/23/05Ðtbrooks
X