2006 NISSAN MAXIMA ECU
[x] Cancel search: ECUPage 45 of 312

The back of the child restraint should be
secured against the vehicle seat back. If
necessary, adjust or remove the head re-
straint to obtain the correct child restraint fit.
See “Head restraint adjustment” earlier in
this section. If the head restraint is removed,
store it in a secure place. Be sure to install
the head restraint when the child restraint is
removed. If the seating position does not
have an adjustable head restraint and it is
interfering with the proper child restraint fit,
try another seating position or a different
child restraint.
s2Route the seat belt tongue through the child
restraint and insert it into the buckle until you
hear and feel the latch engage.
Be sure to follow the child restraint manu-
facturer’s instructions for belt routing.s3Pull on the shoulder belt until all of the belt is
fully extended. At this time, the seat belt
retractor is in the automatic locking mode
(child restraint mode) . It reverts to emer-
gency locking mode when the seat belt is
fully retracted.
Front Facing — step 2
WRS0159
Front Facing — step 3
WRS0160
Safety—Seats, seat belts and supplemental restraint system1-29
ZREVIEW COPYÐ2006 Maxima(max)
Owners ManualÐUSA_English(nna)
06/22/05Ðtbrooks
X
Page 46 of 312

s4Allow the seat belt to retract slightly. Pull up
on the shoulder belt to remove any slack in
the belt.s5Before placing the child in the child restraint,
use force to push the child restraint from
side to side, and tug it forward to make sure
that it is securely held in place. It should not
move more than 1 inch (25 mm) . If it does
move more than 1 inch (25 mm) , pull again
on the shoulder belt to further tighten the
child restraint. If unable to properly secure
the restraint move the restraint to another
seating position and try again , or try a differ-
ent child restraint. Not all child restraints fit in
all types of vehicles.6. Check that the retractor is in the automatic
locking mode by trying to pull more seat belt
out of the retractor. If you cannot pull any
more belt webbing out of the retractor, the
retractor is in the automatic locking mode.
7. Check to make sure the child restraint is
properly secured prior to each use. If the
seat belt is not locked, repeat steps 3
through 6.
8. Turn the ignition to the ON position. The
passenger air bag status light should say
‘‘OFF’’
. If this light is not illuminated it
may indicate a malfunction.Move the child
restraint to another seating position.
Have the system checked by a NISSAN
dealer.
After the child restraint is removed and the seat
belt is fully retracted, the automatic locking mode
(child restraint mode) is canceled.
Front Facing — step 4
LRS0457
Front Facing — step 5
WRS0380
1-30Safety—Seats, seat belts and supplemental restraint system
ZREVIEW COPYÐ2006 Maxima(max)
Owners ManualÐUSA_English(nna)
07/07/05Ðcathy
X
Page 49 of 312

cAfter placing the child in the booster
seat and fastening the seat belt, make
sure the shoulder portion of the belt is
away from the child’s face and neck and
the lap portion of the belt does not
cross the abdomen.
cDo not put the shoulder belt behind the
child or under the child’s arm. If you
must install a booster seat in the front
seat, see “Booster seat installation on
front passenger seat” later in this
section.
cWhen your booster seat is not in use,
keep it secured with a seat belt to pre-
vent it from being thrown around in
case of a sudden stop or accident.
CAUTION
Remember that a booster seat left in a
closed vehicle can become very hot.
Check the seating surface and buckles
before placing your child in the booster
seat.
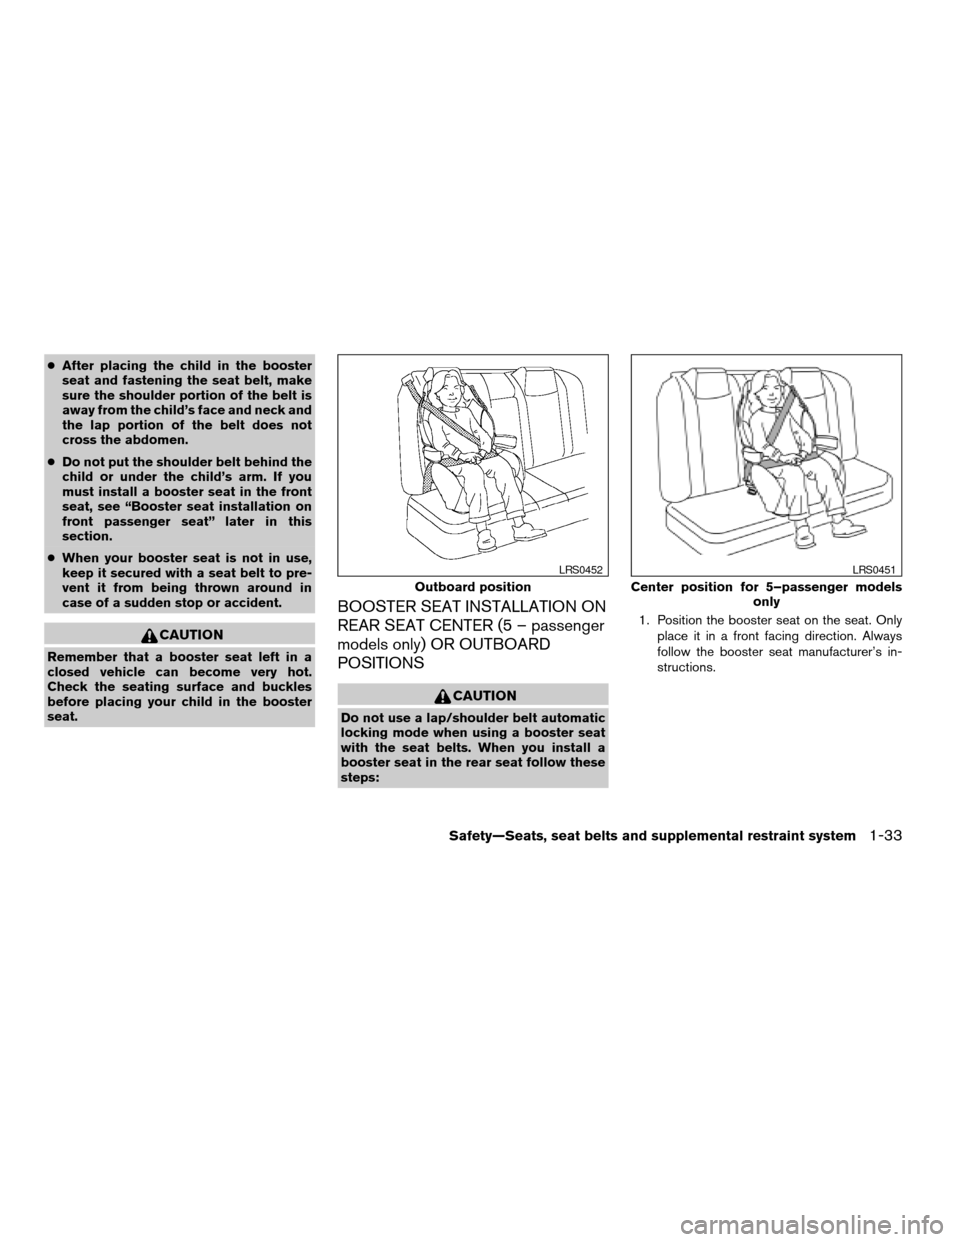
BOOSTER SEAT INSTALLATION ON
REAR SEAT CENTER (5 – passenger
models only) OR OUTBOARD
POSITIONS
CAUTION
Do not use a lap/shoulder belt automatic
locking mode when using a booster seat
with the seat belts. When you install a
booster seat in the rear seat follow these
steps:1. Position the booster seat on the seat. Only
place it in a front facing direction. Always
follow the booster seat manufacturer’s in-
structions.
Outboard position
LRS0452
Center position for 5–passenger models
only
LRS0451
Safety—Seats, seat belts and supplemental restraint system1-33
ZREVIEW COPYÐ2006 Maxima(max)
Owners ManualÐUSA_English(nna)
06/22/05Ðtbrooks
X
Page 50 of 312

2. The booster seat should be positioned on
the vehicle seat so that it is stable. If neces-
sary, adjust or remove the head restraint to
obtain the correct booster seat fit. See
“Head restraint adjustment” earlier in this
section. If the head restraint is removed,
store it in a secure place. Be sure to install
the head restraint when the booster seat is
removed. If the seating position does not
have an adjustable head restraint and it is
interfering with the proper booster seat fit,
try another seating position or a different
booster seat.
3. Position the lap portion of the seat belt low
and snug on the child’s hips. Be sure to
follow the booster seat manufacturer’s in-
structions for adjusting the belt routing.
4. Pull the shoulder belt portion of the seat belt
toward the retractor to take up extra slack.
Be sure the shoulder belt is positioned
across the top, middle portion of the child’s
shoulder. Be sure to follow the booster seat
manufacturer’s instructions for adjusting the
belt routing.
5. Follow the warnings, cautions and instruc-
tions for properly fastening a seat belt
shown in the “Three-point seat belt with
retractor” earlier in this section.
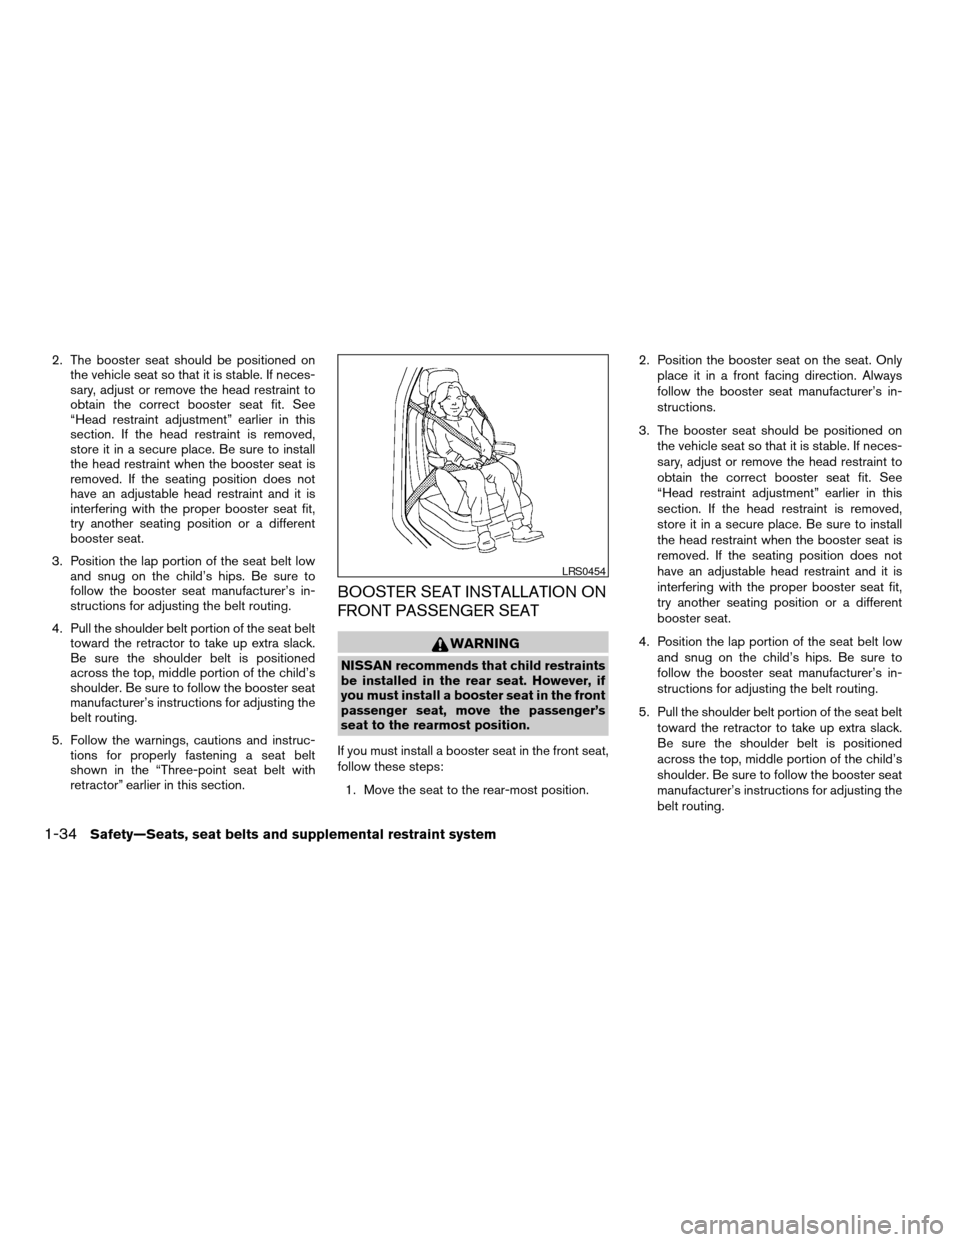
BOOSTER SEAT INSTALLATION ON
FRONT PASSENGER SEAT
WARNING
NISSAN recommends that child restraints
be installed in the rear seat. However, if
you must install a booster seat in the front
passenger seat, move the passenger’s
seat to the rearmost position.
If you must install a booster seat in the front seat,
follow these steps:
1. Move the seat to the rear-most position.2. Position the booster seat on the seat. Only
place it in a front facing direction. Always
follow the booster seat manufacturer’s in-
structions.
3. The booster seat should be positioned on
the vehicle seat so that it is stable. If neces-
sary, adjust or remove the head restraint to
obtain the correct booster seat fit. See
“Head restraint adjustment” earlier in this
section. If the head restraint is removed,
store it in a secure place. Be sure to install
the head restraint when the booster seat is
removed. If the seating position does not
have an adjustable head restraint and it is
interfering with the proper booster seat fit,
try another seating position or a different
booster seat.
4. Position the lap portion of the seat belt low
and snug on the child’s hips. Be sure to
follow the booster seat manufacturer’s in-
structions for adjusting the belt routing.
5. Pull the shoulder belt portion of the seat belt
toward the retractor to take up extra slack.
Be sure the shoulder belt is positioned
across the top, middle portion of the child’s
shoulder. Be sure to follow the booster seat
manufacturer’s instructions for adjusting the
belt routing.
LRS0454
1-34Safety—Seats, seat belts and supplemental restraint system
ZREVIEW COPYÐ2006 Maxima(max)
Owners ManualÐUSA_English(nna)
06/22/05Ðtbrooks
X
Page 60 of 312

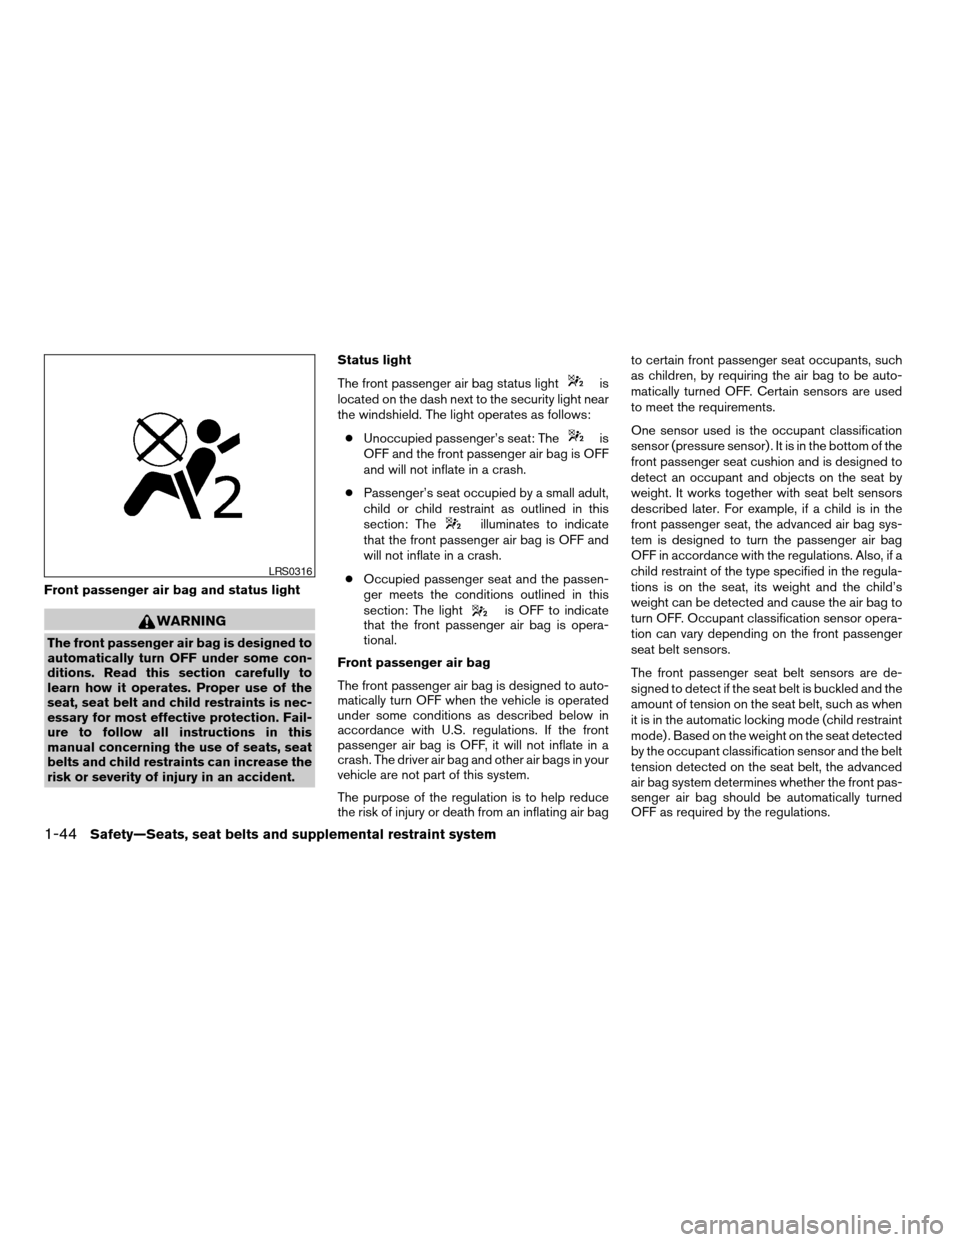
Front passenger air bag and status light
WARNING
The front passenger air bag is designed to
automatically turn OFF under some con-
ditions. Read this section carefully to
learn how it operates. Proper use of the
seat, seat belt and child restraints is nec-
essary for most effective protection. Fail-
ure to follow all instructions in this
manual concerning the use of seats, seat
belts and child restraints can increase the
risk or severity of injury in an accident.Status light
The front passenger air bag status light
is
located on the dash next to the security light near
the windshield. The light operates as follows:
cUnoccupied passenger’s seat: The
is
OFF and the front passenger air bag is OFF
and will not inflate in a crash.
cPassenger’s seat occupied by a small adult,
child or child restraint as outlined in this
section: The
illuminates to indicate
that the front passenger air bag is OFF and
will not inflate in a crash.
cOccupied passenger seat and the passen-
ger meets the conditions outlined in this
section: The light
is OFF to indicate
that the front passenger air bag is opera-
tional.
Front passenger air bag
The front passenger air bag is designed to auto-
matically turn OFF when the vehicle is operated
under some conditions as described below in
accordance with U.S. regulations. If the front
passenger air bag is OFF, it will not inflate in a
crash. The driver air bag and other air bags in your
vehicle are not part of this system.
The purpose of the regulation is to help reduce
the risk of injury or death from an inflating air bagto certain front passenger seat occupants, such
as children, by requiring the air bag to be auto-
matically turned OFF. Certain sensors are used
to meet the requirements.
One sensor used is the occupant classification
sensor (pressure sensor) . It is in the bottom of the
front passenger seat cushion and is designed to
detect an occupant and objects on the seat by
weight. It works together with seat belt sensors
described later. For example, if a child is in the
front passenger seat, the advanced air bag sys-
tem is designed to turn the passenger air bag
OFF in accordance with the regulations. Also, if a
child restraint of the type specified in the regula-
tions is on the seat, its weight and the child’s
weight can be detected and cause the air bag to
turn OFF. Occupant classification sensor opera-
tion can vary depending on the front passenger
seat belt sensors.
The front passenger seat belt sensors are de-
signed to detect if the seat belt is buckled and the
amount of tension on the seat belt, such as when
it is in the automatic locking mode (child restraint
mode) . Based on the weight on the seat detected
by the occupant classification sensor and the belt
tension detected on the seat belt, the advanced
air bag system determines whether the front pas-
senger air bag should be automatically turned
OFF as required by the regulations.
LRS0316
1-44Safety—Seats, seat belts and supplemental restraint system
ZREVIEW COPYÐ2006 Maxima(max)
Owners ManualÐUSA_English(nna)
06/22/05Ðtbrooks
X
Page 61 of 312

Front passenger seat adult occupants who are
properly seated and using the seat belt as out-
lined in this manual should not cause the passen-
ger air bag to be automatically turned OFF. For
small adults it may be turned OFF; however if the
occupant takes his/her weight off the seat cush-
ion (for example, by not sitting upright, by sitting
on an edge of the seat, or by otherwise being out
of position) , this could cause the sensor to turn
the air bag OFF. In addition, if the occupant
improperly uses the seat belt in the automatic
locking mode (child restraint mode) , this could
cause the air bag to be turned OFF. Always be
sure to be seated and wearing the seat belt
properly for the most effective protection by the
seat belt and supplemental air bag.
NISSAN recommends that pre-teens and chil-
dren be properly restrained in a rear seat.
NISSAN also recommends that appropriate child
restraints and booster seats be properly installed
in a rear seat. If this is not possible, the occupant
classification sensor and seat belt sensors are
designed to operate as described above to turn
the front passenger air bag OFF for specified
child restraints as required by the regulations.
Failing to properly secure child restraints and to
use the automatic locking mode (child restraint
mode) may allow the restraint to tip or move in an
accident or sudden stop. This can also result in
the passenger air bag inflating in a crash insteadof being OFF. See “Child restraints” earlier in this
section for proper use and installation.
If the front passenger seat is not occupied the
passenger air bag is designed not to inflate in a
crash. However, heavy objects placed on the
seat could result in air bag inflation, because of
the object’s weight detected by the occupant
classification sensor. Other conditions could also
result in air bag inflation, such as if a child is
standing on the seat, or if two children are on the
seat, contrary to the instructions in this manual.
Always be sure that you and all vehicle occupants
are seated and restrained properly.
Using the passenger air bag status light, you can
monitor when the front passenger air bag is au-
tomatically turned OFF with the seat occupied.
The light will not illuminate when the front pas-
senger seat is unoccupied.
If an adult occupant is in the seat and the pas-
senger air bag status light is illuminated (indicat-
ing that the air bag is OFF) , it could be that the
person is a small adult, or is not sitting on the seat
properly or not using the seat belt properly.
If a child restraint must be used in the front seat,
the passenger air bag status light may or may not
be illuminated, depending on the size of the child
and the type of child restraint being used. If the
status light is not lit (indicating that the air bag
might inflate in a crash) , it could be that the childrestraint or seat belt is not being used properly. In
rare cases, the passenger air bag status light will
not illuminate even though the air bag is OFF.
If such situations happen, properly position and
restrain the occupant or child restraint. Other-
wise reposition the occupant or child restraint in
a rear seat. If you have any questions about
whether your passenger air bag is working as
designed, your dealer can use a special tool to
confirm that it is working properly.
The air bag system and passenger air bag status
light will take a few seconds to register a change
in the passenger seat status. For example, if a
large adult who is sitting in the front passenger
seat exits the vehicle, the passenger air bag
status light will go from OFF to ON for a few
seconds and then to OFF. This is normal system
operation and does not indicate a malfunction.
If a malfunction occurs in the front passenger air
bag system, the supplemental air bag warning
light
, located in the meter and gauges area
in the center of the instrument panel, will blink.
Have the system checked by a NISSAN dealer.
Safety—Seats, seat belts and supplemental restraint system1-45
ZREVIEW COPYÐ2006 Maxima(max)
Owners ManualÐUSA_English(nna)
06/22/05Ðtbrooks
X
Page 68 of 312

2 Instruments and controls
Instrument panel...................................2-2
Meters and gauges................................2-3
Speedometer and odometer.....................2-4
Tachometer....................................2-5
Engine coolant temperature gauge...............2-5
Fuel gauge....................................2-6
Compass display (if so equipped)...................2-6
Zone variation change procedure.................2-8
Warning/indicator lights and audible reminders......2-10
Checking bulbs...............................2-10
Warning lights................................2-10
Indicator lights................................2-13
Audible reminders.............................2-15
Security systems.................................2-15
Vehicle security system.........................2-15
Nissan vehicle immobilizer system...............2-17
Windshield wiper and washer switch...............2-19
Switch operation..............................2-19
Rear window and outside mirror (if so equipped)
defroster switch..................................2-20
Headlight and turn signal switch....................2-20
Xenon headlights (if so equipped)...............2-20
Headlight control switch........................2-21Daytime running light system (Canada only)......2-23
Instrument brightness control...................2-24
Turn signal switch.............................2-24
Fog light switch...............................2-24
Cornering light................................2-25
Hazard warning flasher switch.....................2-25
Horn............................................2-26
Heated seats (if so equipped)......................2-26
Heated steering wheel (if so equipped).............2-27
Traction control system (TCS) off switch
(if so equipped)..................................2-28
Vehicle dynamic control (VDC) off switch
(if so equipped)..................................2-28
Power outlet.....................................2-29
Cigarette lighter..................................2-30
Storage.........................................2-31
Map pockets..................................2-31
Seatback pockets.............................2-31
Sunglasses holder.............................2-31
Cup holders..................................2-32
Glove box....................................2-33
Console box..................................2-34
Rear center console (if so equipped).............2-35
ZREVIEW COPYÐ2006 Maxima(max)
Owners ManualÐUSA_English(nna)
06/23/05Ðtbrooks
X
Page 70 of 312

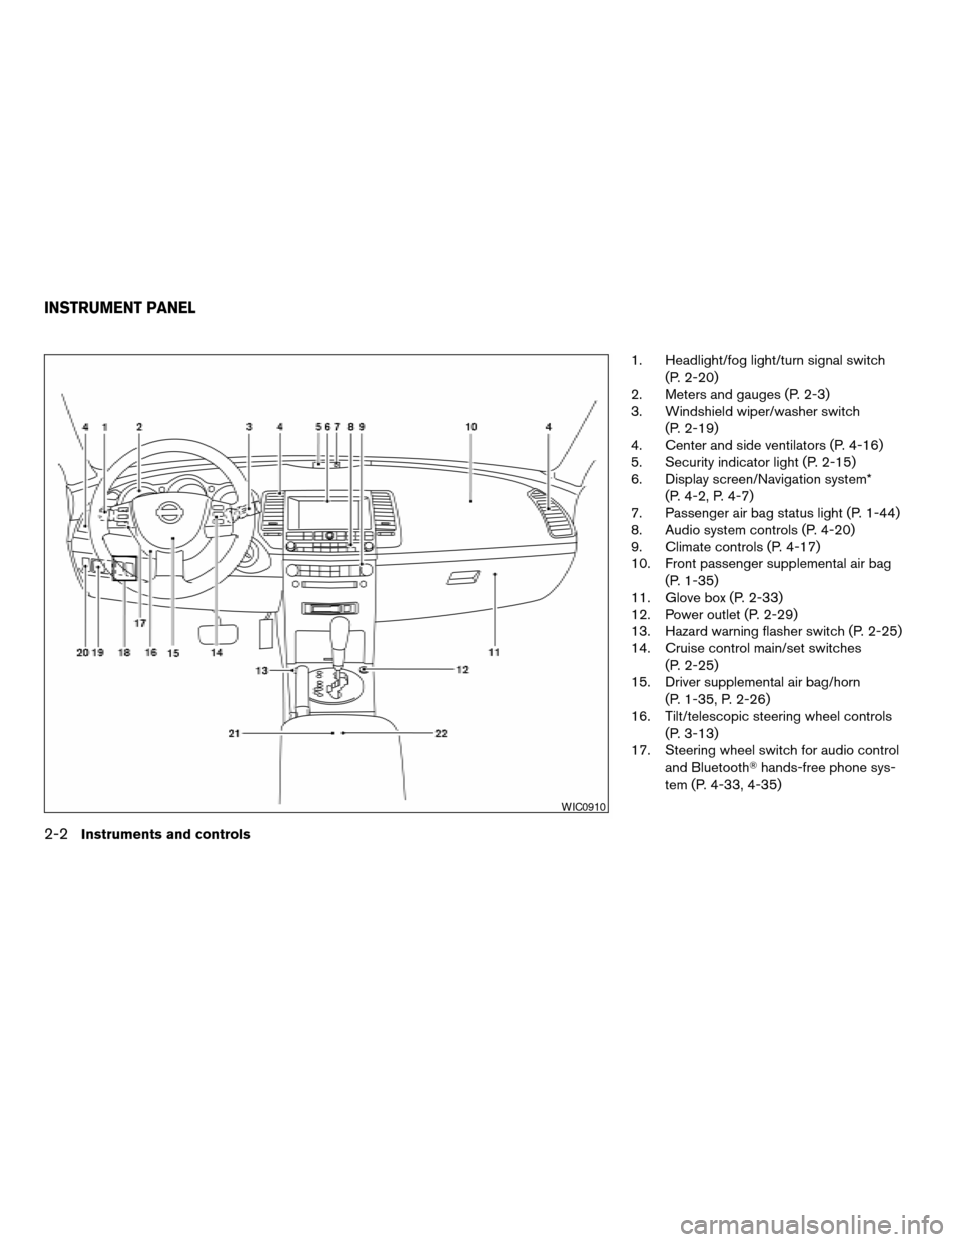
1. Headlight/fog light/turn signal switch
(P. 2-20)
2. Meters and gauges (P. 2-3)
3. Windshield wiper/washer switch
(P. 2-19)
4. Center and side ventilators (P. 4-16)
5. Security indicator light (P. 2-15)
6. Display screen/Navigation system*
(P. 4-2, P. 4-7)
7. Passenger air bag status light (P. 1-44)
8. Audio system controls (P. 4-20)
9. Climate controls (P. 4-17)
10. Front passenger supplemental air bag
(P. 1-35)
11. Glove box (P. 2-33)
12. Power outlet (P. 2-29)
13. Hazard warning flasher switch (P. 2-25)
14. Cruise control main/set switches
(P. 2-25)
15. Driver supplemental air bag/horn
(P. 1-35, P. 2-26)
16. Tilt/telescopic steering wheel controls
(P. 3-13)
17. Steering wheel switch for audio control
and BluetoothThands-free phone sys-
tem (P. 4-33, 4-35)
WIC0910
INSTRUMENT PANEL
2-2Instruments and controls
ZREVIEW COPYÐ2006 Maxima(max)
Owners ManualÐUSA_English(nna)
06/23/05Ðtbrooks
X