2006 NISSAN MAXIMA phone
[x] Cancel search: phonePage 97 of 312

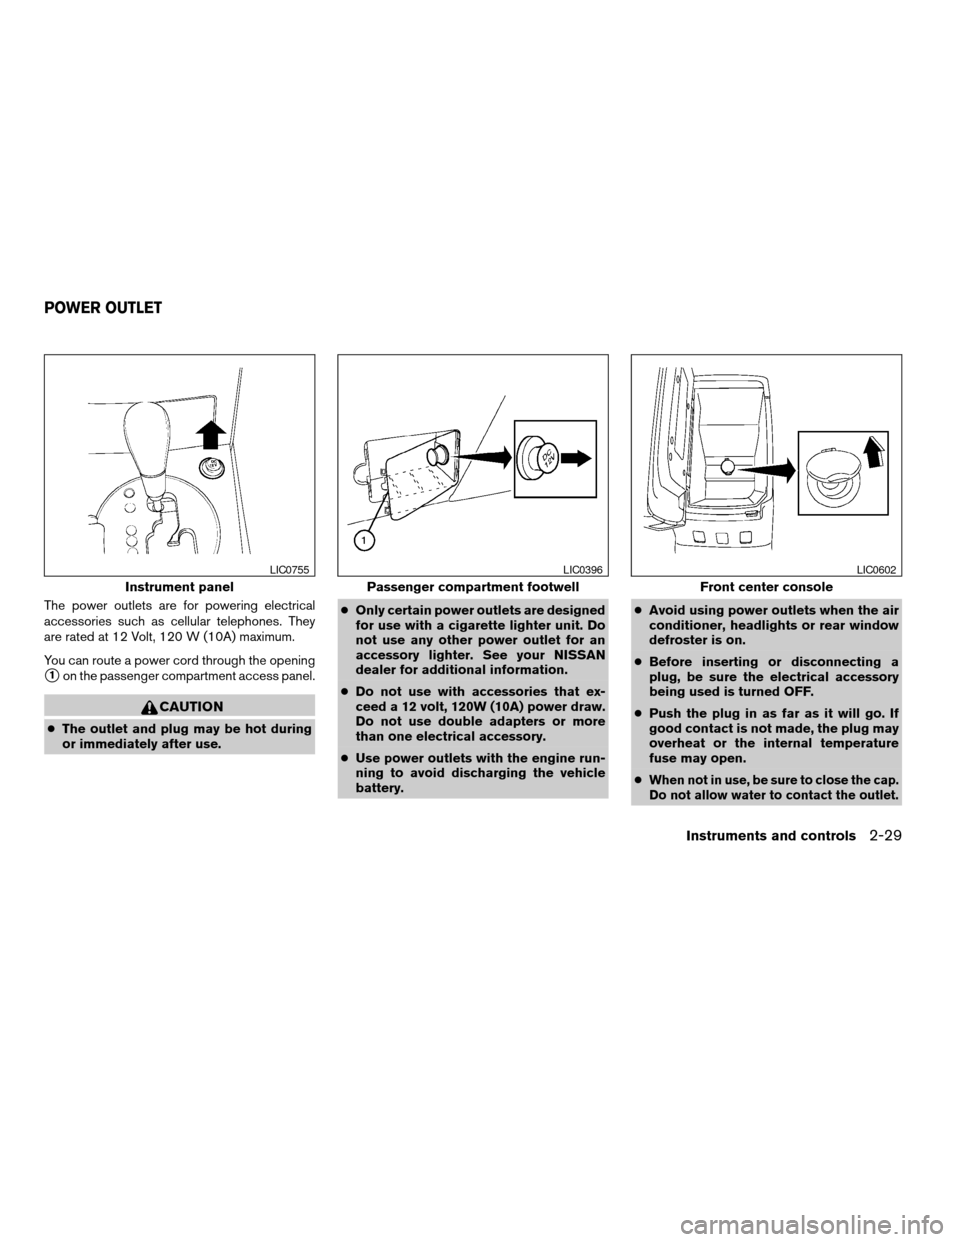
The power outlets are for powering electrical
accessories such as cellular telephones. They
are rated at 12 Volt, 120 W (10A) maximum.
You can route a power cord through the opening
s1on the passenger compartment access panel.
CAUTION
cThe outlet and plug may be hot during
or immediately after use.cOnly certain power outlets are designed
for use with a cigarette lighter unit. Do
not use any other power outlet for an
accessory lighter. See your NISSAN
dealer for additional information.
cDo not use with accessories that ex-
ceed a 12 volt, 120W (10A) power draw.
Do not use double adapters or more
than one electrical accessory.
cUse power outlets with the engine run-
ning to avoid discharging the vehicle
battery.cAvoid using power outlets when the air
conditioner, headlights or rear window
defroster is on.
cBefore inserting or disconnecting a
plug, be sure the electrical accessory
being used is turned OFF.
cPush the plug in as far as it will go. If
good contact is not made, the plug may
overheat or the internal temperature
fuse may open.
c
When not in use, be sure to close the cap.
Do not allow water to contact the outlet.
Instrument panel
LIC0755
Passenger compartment footwell
LIC0396
Front center console
LIC0602
POWER OUTLET
Instruments and controls2-29
ZREVIEW COPYÐ2006 Maxima(max)
Owners ManualÐUSA_English(nna)
06/22/05Ðtbrooks
X
Page 98 of 312

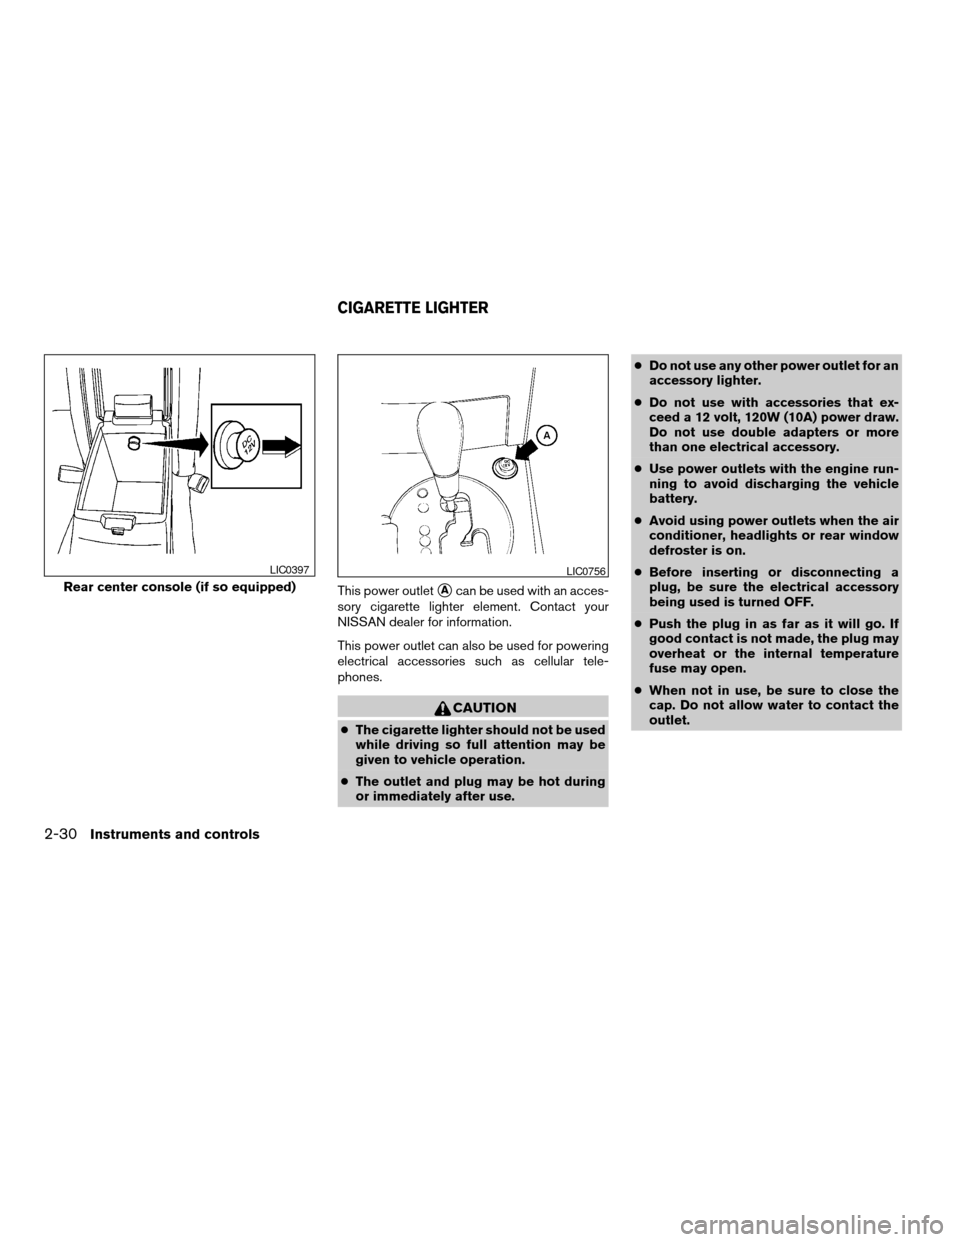
This power outletsAcan be used with an acces-
sory cigarette lighter element. Contact your
NISSAN dealer for information.
This power outlet can also be used for powering
electrical accessories such as cellular tele-
phones.
CAUTION
cThe cigarette lighter should not be used
while driving so full attention may be
given to vehicle operation.
cThe outlet and plug may be hot during
or immediately after use.cDo not use any other power outlet for an
accessory lighter.
cDo not use with accessories that ex-
ceed a 12 volt, 120W (10A) power draw.
Do not use double adapters or more
than one electrical accessory.
cUse power outlets with the engine run-
ning to avoid discharging the vehicle
battery.
cAvoid using power outlets when the air
conditioner, headlights or rear window
defroster is on.
cBefore inserting or disconnecting a
plug, be sure the electrical accessory
being used is turned OFF.
cPush the plug in as far as it will go. If
good contact is not made, the plug may
overheat or the internal temperature
fuse may open.
cWhen not in use, be sure to close the
cap. Do not allow water to contact the
outlet.
Rear center console (if so equipped)
LIC0397LIC0756
CIGARETTE LIGHTER
2-30Instruments and controls
ZREVIEW COPYÐ2006 Maxima(max)
Owners ManualÐUSA_English(nna)
06/22/05Ðtbrooks
X
Page 102 of 312

CONSOLE BOX
WARNING
The center console box should not be
used while driving so full attention may be
given to vehicle operation.
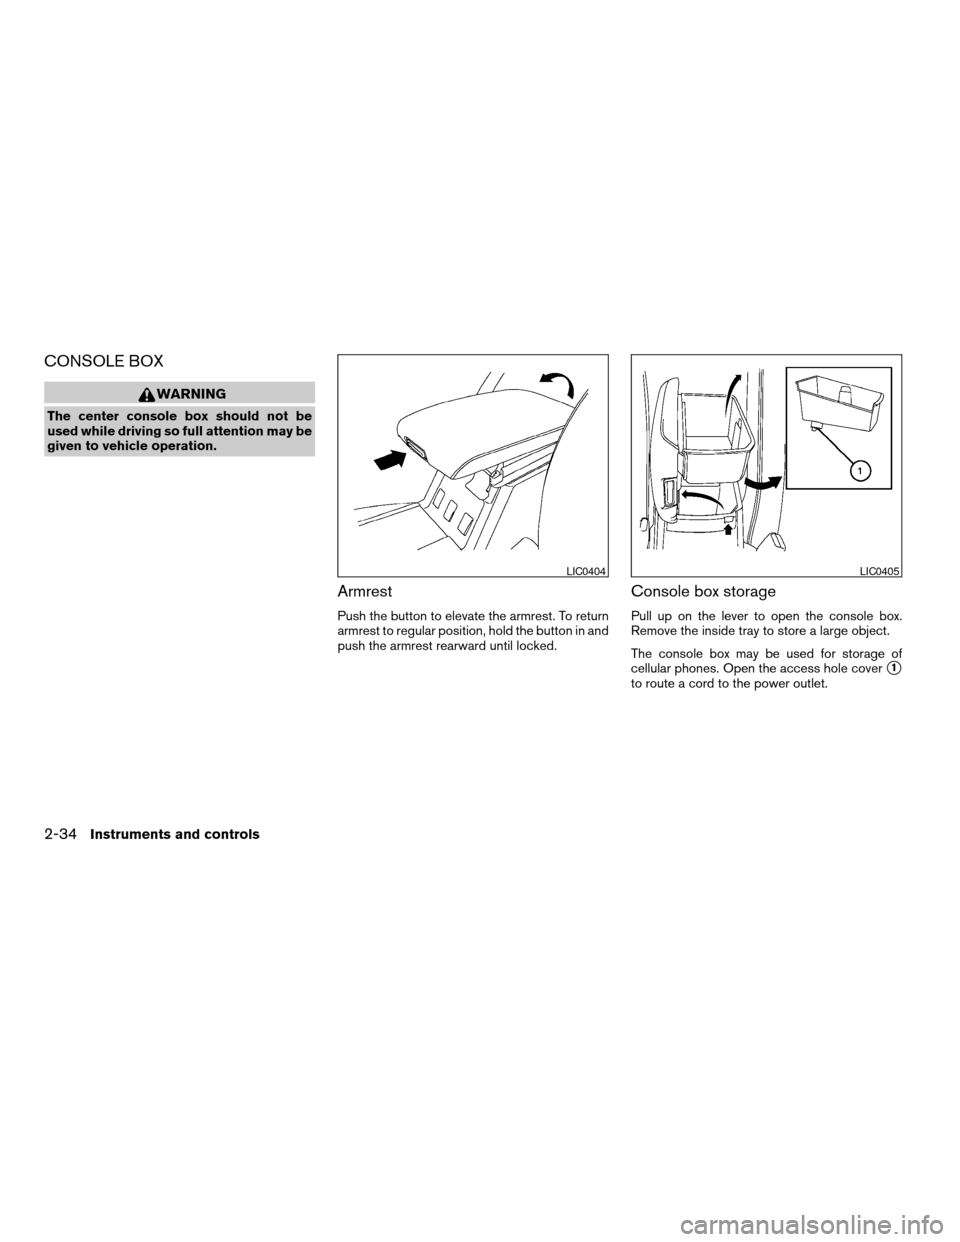
Armrest
Push the button to elevate the armrest. To return
armrest to regular position, hold the button in and
push the armrest rearward until locked.
Console box storage
Pull up on the lever to open the console box.
Remove the inside tray to store a large object.
The console box may be used for storage of
cellular phones. Open the access hole cover
s1
to route a cord to the power outlet.
LIC0404LIC0405
2-34Instruments and controls
ZREVIEW COPYÐ2006 Maxima(max)
Owners ManualÐUSA_English(nna)
06/22/05Ðtbrooks
X
Page 115 of 312

PROGRAMMING TROUBLE-
DIAGNOSIS
If the HomeLinkTdoes not quickly learn the hand-
held transmitter information:
creplace the hand-held transmitter batteries
with new batteries.
cposition the hand-held transmitter with its
battery area facing away from the
HomeLinkTsurface.
cpress and hold both the HomeLinkTand
hand-held transmitter buttons without inter-
ruption.
cposition the hand-held transmitter1-3
inches (26 - 76 mm) away from the
HomeLinkTsurface. Hold the transmitter in
that position for up to 15 seconds. If
HomeLinkTis not programmed within that
time, try holding the transmitter in another
position – keeping the indicator light in view
at all times.
If you continue to have programming difficulties,
please contact the NISSAN Consumer Affairs
Department. The phone numbers are located in
the Foreword of this manual.
CLEARING THE PROGRAMMED
INFORMATION
Individual buttons cannot be cleared. However,
to clear all programming, press and hold the two
outside buttons and release when the indicator
light begins to flash (approximately 20 seconds) .
REPROGRAMMING A SINGLE
HOMELINKTBUTTON
To reprogram a HomeLinkTUniversal Transceiver
button, complete the following.
1. Press and hold the desired HomeLinkTbut-
ton.Do notrelease the button until step 4
has been completed.
2. When the indicator light begins to flash
slowly (after 20 seconds) , position the
hand-held transmitter1-3inches (26 - 76
mm) away from the HomeLinkTsurface.
3. Press and hold the hand-held transmitter
button.
4.
The HomeLinkTindicator light will flash, first
slowly and then rapidly. When the indicator light
begins to flash rapidly, release both buttons.
The HomeLinkTUniversal Transceiver button has
now been reprogrammed. The new device can be
activated by pushing the HomeLinkTbutton that
was just programmed. This procedure will not af-
fect any other programmed HomeLinkTbuttons.
IF YOUR VEHICLE IS STOLEN
If your vehicle is stolen, you should change the
codes of any non-rolling code device that has
been programmed into HomeLinkT. Consult the
Owner’s Manual of each device or call the manu-
facturer or dealer of those devices for additional
information.
When your vehicle is recovered, you will
need to reprogram the HomeLinkTUniver-
sal Transceiver with your new transmitter
information.
FCC Notice:
This device complies with FCC rules part
15. Operation is subject to the following
two conditions: (1) This device may not
cause harmful interference and (2) This de-
vice must accept any interference that may
be received, including interference that
may cause undesired operation.
This transmitter has been tested and com-
plies with FCC and DOC/MDC rules.
Changes or modifications not expressly ap-
proved by the party responsible for compli-
ance could void the user’s authority to op-
erate the equipment.
DOC: ISTC 1763K1313
FCC I.D. CV2V67690
Instruments and controls2-47
ZREVIEW COPYÐ2006 Maxima(max)
Owners ManualÐUSA_English(nna)
06/22/05Ðtbrooks
X
Page 122 of 312

HOW TO USE REMOTE KEYLESS
ENTRY SYSTEM
Locking doors
1. Close all windows
2. Remove the key from the ignition switch.
3. Close the hood, trunk lid and all doors.
4. Push the
button on the keyfob. All
the doors lock. The hazard warning lights
flash twice and the horn beeps once to
indicate all doors are locked.cWhen the
button is pushed with all
doors locked, the hazard warning lights flash
twice and the horn beeps once as a re-
minder that the doors are already locked.
cIf a door is open and you push the
button, the doors will lock but the horn will
not beep and the hazard warning lights will
not flash.
The horn may or may not beep. Refer to “Person-
alized settings menu” (vehicles without naviga-
tion system) or “Vehicle electronic systems” (ve-
hicles with navigation system) in the “Display
screen, heater, air conditioner, audio and phone
systems” section later in this manual.
NOTE:
If you change the horn beep and lamp flash
feature with the keyfob, the display screen
will not show the current mode and cannot
be used to change the mode. Use the key-
fob to return to the previous mode and
re-enable the display screen control.
Unlocking doors
Push thebutton on the keyfob once.
cOnly the driver’s door unlocks.
cThe hazard warning lights flash once if all
doors are completely closed with the ignition
key in any position except the ON position.
cThe interior light turns on and the light timer
activates for 30 seconds when the interior
light switch is in the center DOOR position
with the ignition key in any position except
the ON position.
LPD0209LPD0210
3-6Pre-driving checks and adjustments
ZREVIEW COPYÐ2006 Maxima(max)
Owners ManualÐUSA_English(nna)
06/22/05Ðtbrooks
X
Page 137 of 312

Confirming memory storage
cTurn the ignition ON and push the SET
switch. If the main memory has not been
stored, the indicator light will come on for
approximately 0.5 seconds. When the
memory has stored the position, the indica-
tor light will stay on for approximately 5 sec-
onds.
cIf the battery cable is disconnected, or if the
fuse opens, the memory will be canceled. In
such a case, reset the desired positions
using the following procedures.
1. Open and close the driver’s door more than
two times with the ignition key in the LOCK
position.
2. Reset the desired position using the previ-
ous procedure.
Selecting the memorized position
For vehicles equipped with automatic transmis-
sion, set the selector lever to the P (Park) posi-
tion.
For vehicles equipped with manual transmission,
place the shift lever in the N (Neutral) position
and set the parking brake.Then:
cWithin 45 seconds of opening the driver’s
door, push the memory switch (1 or 2) fully
for at least 1 second, or
cTurn the ignition switch to the ON position
and push the memory switch (1 or 2) fully for
at least 1 second.
The driver’s seat, accelerator and brake pedals,
and outside mirrors will move to the memorized
position with the indicator light blinking, and then
the light will stay on for approximately 5 seconds.
ENTRY/EXIT FUNCTION (for
automatic transmission model)
This system is designed so that the driver’s seat
and steering column will automatically move
when the automatic transmission selector lever is
in the P (Park) position. This allows the driver to
get into and out of the driver’s seat more easily.
(This feature is not available on manual transmis-
sion model.)
The driver’s seat will slide backward and the
steering wheel will move up:
cWhen the key is removed from the ignition
switch and the driver’s door is opened.cWhen the driver’s door is opened with the
key turned to LOCK.
cWhen the key is turned from ACC to LOCK
with the driver’s door open.
The driver’s seat and steering wheel will return to
previous position:
cWhen the key is inserted into the ignition
switch and the driver’s door is closed.
cWhen the driver’s door is closed with the key
turned to LOCK.
cWhen the key is turned from ACC to ON
while the automatic transmission selector
lever is in the P (Park) position.
The entry/exit feature can be adjusted or can-
celed. See “Personalized settings menu” (ve-
hicles without navigation system) or “Vehicle
electronic systems” (vehicles with navigation sys-
tem) in the “Display screen, heater, air condi-
tioner, audio and phone systems” section of this
manual.
Pre-driving checks and adjustments3-21
ZREVIEW COPYÐ2006 Maxima(max)
Owners ManualÐUSA_English(nna)
06/22/05Ðtbrooks
X
Page 138 of 312

SYSTEM OPERATION
The automatic drive positioner system will not
work or will stop operating under the following
conditions:
cWhen the vehicle speed is above 4 MPH (7
km/h) .
cWhen any of the memory switches are
pushed while the automatic drive positioner
is operating.
cWhen the adjusting switch for the driver’s
seat is turned on while the automatic drive
positioner is operating.
cWhen the memory switch (1 or 2) is not
pushed and held for at least 1 second.
cWhen the seat has been already moved to
the memorized position.
cWhen no seat position is stored in the
memory switch.
cWhen the automatic transmission selector
lever is moved from P (Park) to any other
position.cWhen the driver’s door remains open more
than 45 seconds and the ignition switch is
not in the ON position.
The automatic drive positioner system can be
adjusted and canceled. See “Personalized set-
tings menu” (vehicles without navigation system)
or “Vehicle electronic systems” (vehicles with
navigation system) in the “Display screen, heater,
air conditioner, audio and phone systems” sec-
tion of this manual.
3-22Pre-driving checks and adjustments
ZREVIEW COPYÐ2006 Maxima(max)
Owners ManualÐUSA_English(nna)
06/22/05Ðtbrooks
X
Page 139 of 312

4 Display screen, heater, air conditioner,
audio and phone systems
Control panel buttons — without navigation system....4-2
Names of components..........................4-3
How to use JOYSTICK and “ENTER” button.......4-3
How to use “BACK” button......................4-3
How to use “TRIP” button.......................4-3
How to use “FUEL ECON” button................4-4
Clock.........................................4-4
How to use “E/M” (English/Metric) button.........4-4
How to use
(maintenance) button..........4-5
How to use the “SETTING” button................4-5
button...................................4-6
Control panel buttons — with navigation system.......4-7
Names of the components.......................4-8
How to use joystick and “ENTER” button..........4-8
How to use “BACK” button......................4-8
Setting up the start-up screen...................4-8
How to use the “TRIP” button....................4-9
How to use the “SETTING” button...............4-11
Setting the display (Audio or HVAC display):.....4-11
button..................................4-16
Ventilators.......................................4-16
Heater and air conditioner (automatic)..............4-17
Automatic operation...........................4-18Manual operation..............................4-19
Operating tips.................................4-19
Servicing air conditioner...........................4-20
Audio system....................................4-20
Radio........................................4-20
FM radio reception............................4-20
AM radio reception............................4-21
Satellite radio reception (if so equipped).........4-21
Audio operation precautions....................4-21
FM-AM-SAT radio with cassette player and
compact disc (CD) player (Type A)/CD
changer (Type B)..............................4-24
CD care and cleaning..........................4-32
Steering wheel switch for audio control..........4-33
Antenna......................................4-33
Car phone or CB radio............................4-34
BluetoothTHands-Free Phone System
(if so equipped)..................................4-35
Using the system..............................4-36
Control buttons...............................4-38
Getting started................................4-38
List of voice commands........................4-40
Speaker adaptation (SA) mode..................4-45
Troubleshooting guide.........................4-48
ZREVIEW COPYÐ2006 Maxima(max)
Owners ManualÐUSA_English(nna)
06/23/05Ðtbrooks
X