Page 222 of 272
NAV3011
3. Highlight the preferred setting item andpush . The indicator light of the
selected item illuminates.
Available languages
— English
— Franc¸ ais
NAV3012
4. A message is displayed. Confirm the con-
tents of the message.
After confirming the message, highlight [Yes]
and push .
NAV3013
5. The program loading screen is displayed,
and the system initiates language setting.
Upon completion, the start-up screen is
automatically displayed.
CAUTION
Do not change the ignition switch posi-
tion while changing the language. Doing
so may cause a system malfunction.
8-20
Other settings
Page 223 of 272
NAV3009
Unit settings1. Highlight [Language/Units] and push .
NAV3014
2. Highlight [Select Units] and push
.
NAV3015
3. Highlight the preferred unit and push
.
The indicator of the selected unit illuminates.
Available units
— US: mile, MPH, 8F, MPG
— Metric: km, km/h, 8
C, L/100 km
4. Push to return to the previous
screen.
Push
Page 224 of 272
This allows you to change the map color.
NAV3005
1. Highlight [Navigation] and push
.
2. Highlight [Map Color Settings] and push .
NAV3006
3. Highlight the preferred map color and push
. The indicator light of the se-
lected color illuminates.
Available map colors
Warm: Sets warm colors for the map coloring.
Cool: Sets cool colors for the map color- ing.
INFO:
You can confirm the effect of your setting on the
preview displayed on the right side of the
screen.
MAP COLOR SETTINGS8-22
Other settings
Page 225 of 272

If the vehicle icon indicating the current vehicle
location is not located in the correct position,
you can correct the position of the vehicle icon
on the map screen.
INFO:
. Regardless of the map view setting, the map
is displayed in Plan View when adjusting the
position of the vehicle icon.
. When you correct the position of the vehicle
icon, the map is automatically displayed in
the North Up mode. After finishing the
correction, the map restores the current
orientation setting.
. The position and direction of the vehicle icon
may be misaligned depending on the
external conditions and environment.
. If the vehicle icon is misaligned, drive for a
while in a location where the GPS signals
can be received. This may correct the
position of the vehicle icon.
“CURRENT VEHICLE LOCATION”
(page 9-3)
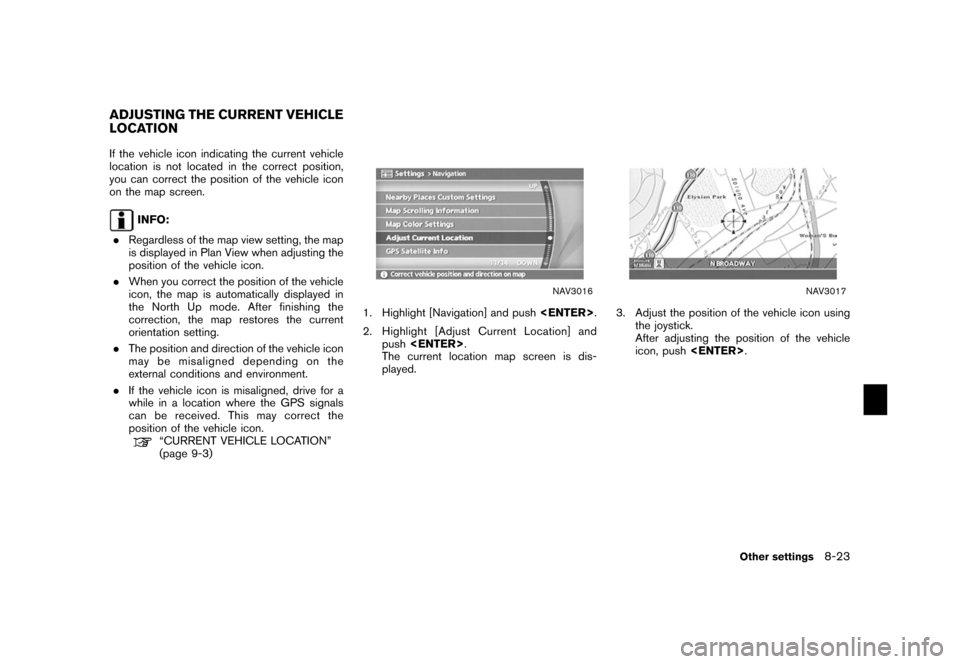
NAV3016
1. Highlight [Navigation] and push
.
2. Highlight [Adjust Current Location] and push .
The current location map screen is dis-
played.
NAV3017
3. Adjust the position of the vehicle icon using
the joystick.
After adjusting the position of the vehicle
icon, push .
ADJUSTING THE CURRENT VEHICLE
LOCATION
Other settings
8-23
Page 227 of 272
This allows you to restore various settings
(display, volume level, etc.) to the default
settings.
INFO:
The memory contents, such as the stored
locations, will not be deleted.
NAV3020
1. Highlight [Navigation] and push
.
2. Highlight [Reset ALL navigation settings to default] and push .
NAV3021
3. A confirmation message is displayed. Con-
firm the contents of the message, highlight
[Yes] and push .
RESET ALL NAVIGATION SETTINGS
TO DEFAULT
Other settings
8-25
Page 242 of 272

Notification when approaching the des-
tinationOrdinary road:
When approaching the destination, voice gui-
dance will announce, “You have arrived at your
destination. Ending route guidance.” To finally
reach your destination, refer to the map screen.
Dark green road:
After passing the last turning point on a
suggested route, voice guidance will announce,
“En route to your destination, some roads
contain incomplete map data. Turn guidance
willnotbeprovidedinthisarea.”When
approaching the endpoint of the suggested
road, voice guidance will announce, “Entering
the road with incomplete map data. Please use
the direction arrow and distance information to
proceed to your destination.”
REPEATING VOICE GUIDANCEThis function is available throughout route
guidance, from the time after the route calcula-
tion is completed until the vehicle arrives at the
destination.
Push /
.
Voice guidance will be repeated.
INFO:
. If you push /
when you have deviated from the suggested
route and when the automatic reroute
function is off, voice guidance will announce,
“Proceed to the highlighted route.”
. If you push /
when you are going in the wrong direction,
voice guidance will announce: “Please make
a legal U-turn if possible.”
NOTES ON VOICE GUIDANCE. Voice guidance in this system should be
regarded as a supplem entary function.
When driving your vehicle, check the route
on the map and follow the actual roads and
traffic regulations.
. Voice guidance is activated only for inter-
sections with certain conditions. There may
be cases that the vehicle has to turn, but
voice guidance is not provided.
. Voice guidance contents may vary, depend-
ing on the direction of the turn and the type
of intersection.
. The voice guidance timing will vary depend-
ing on the situation.
. When the vehicle has deviated from the
suggested route, voice guidance is not
available. The system will not announce this
to you. Refer to the map and recalculate the
route.
“RECALCULATE ROUTE”
(page 5-18)
. Voice guidance may not accurately corre-
spond with road numbers and directions at
freeway junctions.
. Voice guidance may not accurately corre-
spond to street names at freeway exits.
9-14
General system information
Page 247 of 272

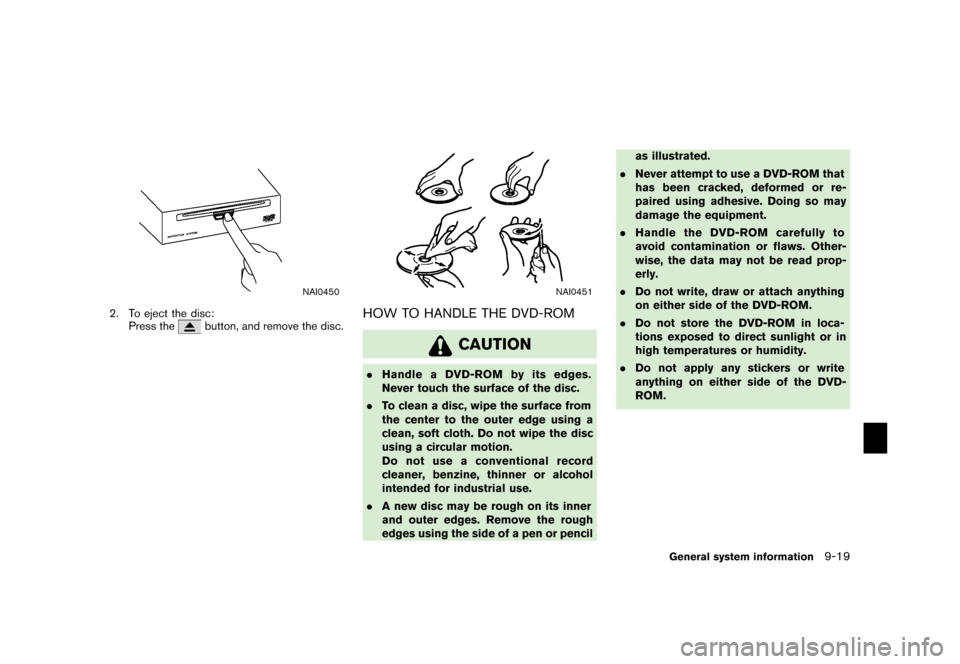
NAI0450
2. To eject the disc:Press the
button, and remove the disc.
NAI0451
HOW TO HANDLE THE DVD-ROM
CAUTION
.Handle a DVD-ROM by its edges.
Never touch the surface of the disc.
. To clean a disc, wipe the surface from
the center to the outer edge using a
clean, soft cloth. Do not wipe the disc
using a circular motion.
Do not use a conventional record
cleaner, benzine, thinner or alcohol
intended for industrial use.
. A new disc may be rough on its inner
and outer edges. Remove the rough
edges using the side of a pen or pencil as illustrated.
. Never attempt to use a DVD-ROM that
has been cracked, deformed or re-
paired using adhesive. Doing so may
damage the equipment.
. Handle the DVD-ROM carefully to
avoid contamination or flaws. Other-
wise, the data may not be read prop-
erly.
. Do not write, draw or attach anything
on either side of the DVD-ROM.
. Do not store the DVD-ROM in loca-
tions exposed to direct sunlight or in
high temperatures or humidity.
. Do not apply any stickers or write
anything on either side of the DVD-
ROM.
General system information
9-19
Page 252 of 272

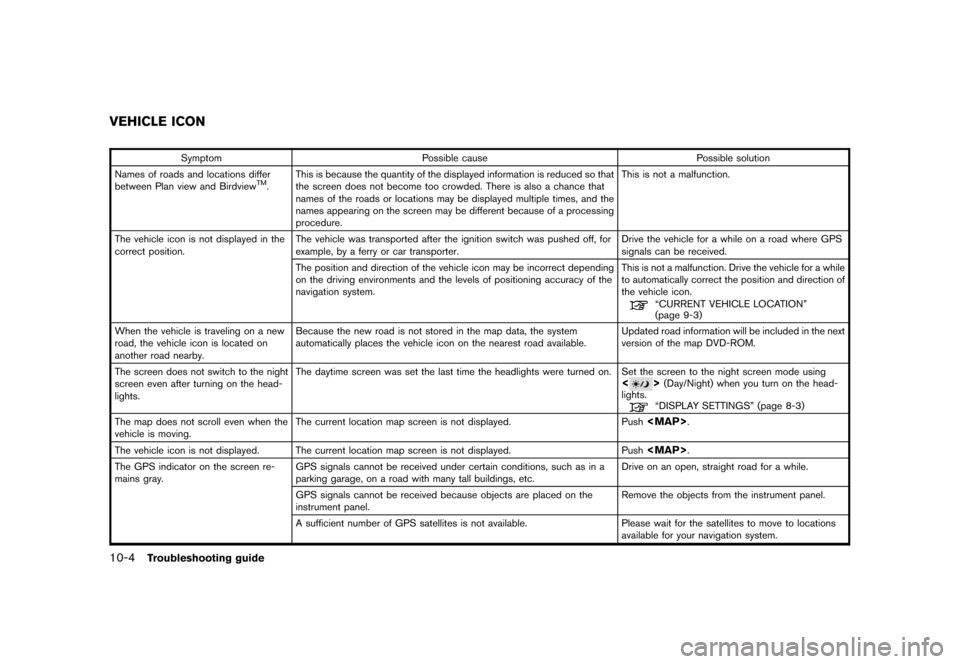
SymptomPossible cause Possible solution
Names of roads and locations differ
between Plan view and Birdview
TM. This is because the quantity of the displayed information
is reduced so that
the screen does not become too crowded. There is also a chance that
names of the roads or locations may be displayed multiple times, and the
names appearing on the screen may be different because of a processing
procedure. This is not a malfunction.
The vehicle icon is not displayed in the
correct position. The vehicle was transported after the ignition switch
was pushed off, for
example, by a ferry or car transporter. Drive the vehicle for a while on a road where
GPS
signals can be received.
The position and direction of the vehicle icon may be incorrect depending
on the driving environments and the levels of positioning accuracy of the
navigation system. This is not a malfunction. Drive the vehicle for a while
to automatically correct the position and direction of
the vehicle icon.
“CURRENT VEHICLE LOCATION”
(page 9-3)
When the vehicle is traveling on a new
road, the vehicle icon is located on
another road nearby. Because the new road is not stored in the map
data, the system
automatically places the vehicle icon on the nearest road available.Updated road information will be included in the next
version of the map DVD-ROM.
The screen does not switch to the night
screen even after turning on the head-
lights. The daytime screen was set the last time the headlights
were turned on. Set the screen to the night screen mode using
<
>(Day/Night) when you turn on the head-
lights.“DISPLAY SETTINGS” (page 8-3)
The map does not scroll even when the
vehicle is moving. The current location map screen is not displayed.
Push