2006 NISSAN FRONTIER engine
[x] Cancel search: enginePage 214 of 336
cWhen installing a spare tire, make sure
it is the proper size and type as speci-
fied on the tire placard. For tire placard
location information, refer to “Tire plac-
ard” in the “Technical and consumer
information” section of this manual.
cRefer to “Wheels and tires” in the
“Maintenance and do-it-yourself” sec-
tion of this manual.cABLS is a form of traction control using
sensors from the Anti-lock Brake System
(ABS) to transfer power from a slipping drive
wheel to a wheel with more traction. The
ABLS system applies braking to the slipping
wheel, which helps redirect power to an-
other wheel.
cOn 4WD models the ABLS system operates
in both 4H and 4LO modes. On 2WD ve-
hicles, the ABLS system operates on the
drive axle only.
cThe ABLS system is always ON unless the
system detects brake pad overheating. If
high brake pad temperature is detected, it
will turn OFF, but normal brake function will
continue. ABLS will function even when the
VDC system (if so equipped) is turned OFF.
WARNING
The ABLS system provides increased trac-
tion, but will not prevent accidents due to
abrupt steering operation or by careless
driving or dangerous driving practices.
Reduce vehicle speed and be especially
careful when driving and cornering on
slippery surfaces, and always drive
carefully.When accelerating or driving on slippery sur-
faces, the tires may spin or slide. With the Vehicle
Dynamic Control (VDC) system, sensors detect
these movements and control the braking and
engine output to help improve vehicle stability.
cWhen the vehicle dynamic control (VDC)
system is operating, the SLIP indicator in the
instrument panel blinks.
cIf the 4WD transfer case is shifted into 4LO
the
indicator light will come on and
the VDC system will be turned off. See
“Transfer case shifting procedures” earlier in
this section.
cIf the SLIP indicator blinks, the road condi-
tions are slippery. Be sure to adjust your
speed and driving to these conditions. See
“Slip indicator light”, and “Vehicle dynamic
control (VDC) off indicator light” in the “In-
struments and controls” section.
If the battery is removed or discharged, the trac-
tion control system may be disabled and the
SLIPand
indicator lights will not turn off
after 2 seconds when the ignition switch is turned
to the ON position. Perform the following proce-
dure to reset the system:
cStart the engine and set the steering wheel
in the straight forward position.
ACTIVE BRAKE LIMITED SLIP (ABLS)
SYSTEM (if so equipped)VEHICLE DYNAMIC CONTROL (VDC)
SYSTEM (if so equipped)
5-30Starting and driving
ZREVIEW COPYÐ2006 Truck/Frontier(d22)
Owners ManualÐUSA_English(nna)
10/17/05Ðdebbie
X
Page 215 of 336
cDrive the vehicle at speeds above 10 mph
(15 km/h) for at least 10 minutes.
cThe VDC OFF indicator light should go off
indicating the traction control system is op-
erational.
cIf you interrupt the reset procedure by turn-
ing the ignition off, you will need to restart
the reset procedure.
If after driving the vehicle for more than 10 min-
utes and theSLIPand
lights remain illumi-
nated in the instrument panel, have the vehicle
dynamic control system checked by a NISSAN
dealer.
If the vehicle is operated with the vehicle dynamic
control system off using the VDC OFF switch,
most VDC functions will be turned off. The VDC
system will still try to transfer power from a slip-
ping drive wheel to one with more traction when
the VDC system switch is OFF. The Slip indicator
will flash if wheel spin is detected. The ABS will
still operate with the VDC system off.
When the VDC system is operating, you may feel
a pulsation in the brake pedal and hear a noise or
vibration from under the hood. This is normal and
indicates that the VDC system is working prop-
erly.The computer has a built in diagnostic feature
that tests the system each time you start the
engine and move the vehicle forward or in reverse
at a slow speed. When the self-test occurs, you
may hear a clunk noise and/or feel a pulsation in
the brake pedal. This is normal and is not an
indication of a malfunction.
WARNING
cThe vehicle dynamic control system is
designed to help improve driving stabil-
ity but does not prevent accidents due
to abrupt steering operation at high
speeds or by careless or dangerous
driving techniques. Reduce vehicle
speed and be especially careful when
driving and cornering on slippery sur-
faces and always drive carefully.
cIf brake related parts such as brake
pads, rotors and calipers are not stan-
dard equipment or are extremely dete-
riorated, the vehicle dynamic control
system may not operate properly and
the vehicle dynamic control off indica-
tor light may come on.c
Do not modify the vehicle’s suspension. If
suspension parts such as shock absorb-
ers, struts, springs, stabilizer bars and
bushings are not NISSAN approved for
your vehicle or are extremely deteriorated
the vehicle dynamic control system may
not operate properly. This could adversely
affect vehicle handling performance, and
the VDC OFF indicator light may come on.
cWhen driving on extremely inclined sur-
faces such as higher banked corners,
the vehicle dynamic control system may
not operate properly and the VDC OFF
indicator light may come on. Do not
drive on these types of roads.
cWhen driving on an unstable surface
such as a turntable, ferry, elevator or
ramp, the vehicle dynamic control off
indicator light may illuminate. This is
not a malfunction. Restart the engine
after driving onto a stable surface
cIf wheels or tires other than the recom-
mended ones are used, the vehicle dy-
namic control system may not operate
properly and the vehicle dynamic con-
trol off indicator light may come on.
cThe vehicle dynamic control system is
not a substitute for winter tires or tire
chains on a snow covered road.
Starting and driving5-31
ZREVIEW COPYÐ2006 Truck/Frontier(d22)
Owners ManualÐUSA_English(nna)
10/17/05Ðdebbie
X
Page 216 of 336
WARNING
cNever rely solely on the hill descent
control system to control vehicle speed
when driving on steep down hill grades.
Always drive carefully and attentively
when using the hill descent control sys-
tem and decelerate the vehicle speed
by depressing the brake pedal if neces-
sary. Be especially careful when driving
on frozen, muddy or an extremely steep
downhill roads. Failure to control ve-
hicle speed may result in a loss of con-
trol of the vehicle and possible serious
injury or death.
cThe hill descent control may not control
the vehicle speed on a hill under all load
or road conditions. Always be prepared
to depress the brake pedal to control
vehicle speed. Failure to do so may re-
sult in a collision or serious personal
injury.
The hill descent control system helps maintain
vehicle speed when driving under 15-21 mph
(25-35 km/h) on steeper downhill grades. HDC
is useful when engine braking alone in 4H or 4L
cannot control vehicle speed. HDC applies the
vehicle brakes to control vehicle speed allowingthe driver to concentrate on steering while reduc-
ing the burden of brake and accelerator opera-
tion.
cWhen additional braking is required on
steep downhill roads activate the HDC sys-
tem by pushing the switch ON, see “Hill
descent control (HDC) switch” in the “In-
struments and controls” section.
cOnce the system is activated the indicator
light will remain on in the instrument panel,
see “Hill descent control (HDC) system on
indicator light” in the “Instruments and con-
trols” section.
If the accelerator or brake pedal is depressed
while the HDC system is on, the system will stop
operating temporarily. As soon as the accelerator
or brake pedal is released, the HDC system
begins to function again if the HDC operating
conditions are fulfilled.
For the best results, when descending steep
downhill grades, the HDC switch should be ON
and the selector lever in 2 (Second gear) or 1
(Low gear) for engine braking.
WARNING
cNever rely solely on the hill start assist
system to prevent the vehicle from mov-
ing backward on a hill. Always drive
carefully and attentively. Depress the
brake pedal when the vehicle is
stopped on a steep hill. Be especially
careful when stopped on a hill on frozen
or muddy roads. Failure to prevent the
vehicle from rolling backwards may re-
sult in a loss of control of the vehicle
and possible serious injury or death.
cThe hill start assist system is not de-
signed to hold the vehicle at a standstill
on a hill. Depress the brake pedal when
the vehicle is stopped on a steep hill.
Failure to do so may cause the vehicle
to roll backwards and may result in a
collision or serious personal injury.
cThe hill start assist may not prevent the
vehicle from rolling backwards on a hill
under all load or road conditions. Al-
ways be prepared to depress the brake
pedal to prevent the vehicle from rolling
backwards. Failure to do so may result
in a collision or serious personal injury.
HILL DESCENT CONTROL (HDC)
SYSTEM (if so equipped)HILL START ASSIST (HSA) SYSTEM
(if so equipped)
5-32Starting and driving
ZREVIEW COPYÐ2006 Truck/Frontier(d22)
Owners ManualÐUSA_English(nna)
10/17/05Ðdebbie
X
Page 217 of 336

The hill start assist system automatically keeps
the brakes applied to help prevent the vehicle
from rolling backwards in the time it takes the
driver to release the brake pedal and apply the
accelerator when the vehicle is stopped on a hill.
Hill start assist will operate automatically under
the following conditions:
cThe selector lever is shifted to a forward or
reverse gear.
cThe vehicle is stopped completely on a hill
by applying the brake.
The maximum holding time is 2 seconds. After 2
seconds the vehicle will begin to roll back and hill
start assist will stop operating completely.
Hill start assist will not operate when the selector
lever is shifted to N or P or on a flat and level road.FREEING A FROZEN DOOR LOCK
To prevent a door lock from freezing, apply de-
icer through the key hole. If the lock becomes
frozen, heat the key before inserting it into the key
hole or use the remote keyless entry keyfob (if so
equipped) .
ANTI-FREEZE
In the winter when it is anticipated that the tem-
perature will drop below 32°F (0°C) , check the
anti-freeze to assure proper winter protection.
For details, see “Engine cooling system” in the
“Maintenance and do-it-yourself” section of this
manual.
BATTERY
If the battery is not fully charged during extremely
cold weather conditions, the battery fluid may
freeze and damage the battery. To maintain maxi-
mum efficiency, the battery should be checked
regularly. For details, see “Battery” in the “Main-
tenance and do-it-yourself” section of this
manual.
DRAINING OF COOLANT WATER
If the vehicle is to be left outside without anti-
freeze, drain the cooling system, including the
engine block. Refill before operating the vehicle.
For details, see “Changing engine coolant” in the
“Maintenance and do-it-yourself” section of this
manual.
TIRE EQUIPMENT
1. SUMMER tires have a tread designed to
provide superior performance on dry pave-
ment. However, the performance of these
tires will be substantially reduced in snowy
and icy conditions. If you operate your ve-
hicle on snowy or icy roads, NISSAN recom-
mends the use of MUD & SNOW or ALL
SEASON TIRES on all four wheels. Please
consult a NISSAN dealer for the tire type,
size, speed rating and availability informa-
tion.
2. For additional traction on icy roads, studded
tires may be used. However, some U.S.
states and Canadian provinces prohibit their
use. Check local, state and provincial laws
before installing studded tires.
Skid and traction capabilities of studded
snow tires on wet or dry surfaces may be
poorer than that of non-studded snow tires.
COLD WEATHER DRIVING
Starting and driving5-33
ZREVIEW COPYÐ2006 Truck/Frontier(d22)
Owners ManualÐUSA_English(nna)
10/17/05Ðdebbie
X
Page 218 of 336
3. Tire chains may be used.
Use of tire chains may be prohibited according
to location. Check the local laws before install-
ing tire chains. When installing tire chains,
make sure they are the proper size for the tires
on your vehicle and are installed according to
the chain manufacturer’s suggestions.Use
only SAE Class “S” chains.
Class “S”
chains are used on vehicles with restricted tire
to vehicle clearance. Vehicles that can use
Class “S” chains are designed to meet the
minimum clearances between the tire and the
closest vehicle suspension or body compo-
nent required to accommodate the use of a
winter traction device (tire chains or cables) .
The minimum clearances are determined us-
ing the factory equipped tire size. Other types
may damage your vehicle. Use chain tension-
ers when recommended by the tire chain
manufacturer to ensure a tight fit. Loose end
links of the tire chain must be secured or
removed to prevent the possibility of whipping
action damage to the fenders or underbody. If
possible, avoid fully loading your vehicle when
using tire chains. In addition, drive at a re-
duced speed. Otherwise, your vehicle may be
damaged and/or vehicle handling and perfor-
mance may be adversely affected.
Never install tire chains on spare tires. Do
not use tire chains on dry roads.
SPECIAL WINTER EQUIPMENT
It is recommended that the following items be
carried in the vehicle during winter:
cA scraper and stiff-bristled brush to remove
ice and snow from the windows and wiper
blades.
cA sturdy, flat board to be placed under the
jack to give it firm support.
cA shovel to dig the vehicle out of snowdrifts.
cExtra window washer fluid to refill the reser-
voir tank.
DRIVING ON SNOW OR ICE
WARNING
cWet ice (32°F, 0°C and freezing rain) ,
very cold snow or ice can be slick and
very hard to drive on. The vehicle will
have much less traction or “grip” under
these conditions. Try to avoid driving on
wet ice until the road is salted or
sanded.
cWhatever the condition, drive with cau-
tion. Accelerate and slow down with
care. If accelerating or downshifting too
fast, the drive wheels will lose even
more traction.cAllow more stopping distance under
these conditions. Braking should be
started sooner than on dry pavement.
cAllow greater following distances on
slippery roads.
c
Watch for slippery spots (glare ice) .
These may appear on an otherwise clear
road in shaded areas. If a patch of ice is
seen ahead, brake before reaching it. Try
not to brake while on the ice, and avoid
any sudden steering maneuvers.
cDo not use the cruise control on slip-
pery roads.
cSnow can trap dangerous exhaust
gases under your vehicle. Keep snow
clear of the exhaust pipe and from
around your vehicle.
ENGINE BLOCK HEATER (if so
equipped)
An engine block heater to assist in extreme cold
temperature starting is available through a
NISSAN dealer.
WARNING
Do not use your heater with an ungrounded
electrical system or two-pronged (cheater)
adapters. You can be injured by an electrical
shock if you use an ungrounded connection.
5-34Starting and driving
ZREVIEW COPYÐ2006 Truck/Frontier(d22)
Owners ManualÐUSA_English(nna)
10/17/05Ðdebbie
X
Page 221 of 336
cReplacing tires with those not originally
specified by NISSAN could affect the
proper operation of the TPMS.
cDo not inject any tire liquid or aerosol
tire sealant into the tires, as this may
cause a malfunction of the tire pressure
sensors.
CHANGING A FLAT TIRE
If you have a flat tire, follow the instructions be-
low.
Stopping the vehicle
1. Safely move the vehicle off the road and
away from traffic.
2. Turn on the hazard warning flashers.
3. Park on a level surface and apply the parking
brake. Shift the manual transmission into R
(Reverse) , or the automatic transmission
into P (Park) .
4. Turn off the engine.
5. Raise the hood to warn other traffic and to
signal professional road assistance person-
nel that you need assistance.
6. Have all passengers get out of the vehicle
and stand in a safe place, away from traffic
and clear of the vehicle.
WARNING
cMake sure the parking brake is securely
applied and the manual transmission is
shifted into R (Reverse) , or the auto-
matic transmission into P (Park) .
cNever change tires when the vehicle is
on a slope, ice or slippery areas. This is
hazardous.
cNever change tires if oncoming traffic is
close to your vehicle. Wait for profes-
sional road assistance.
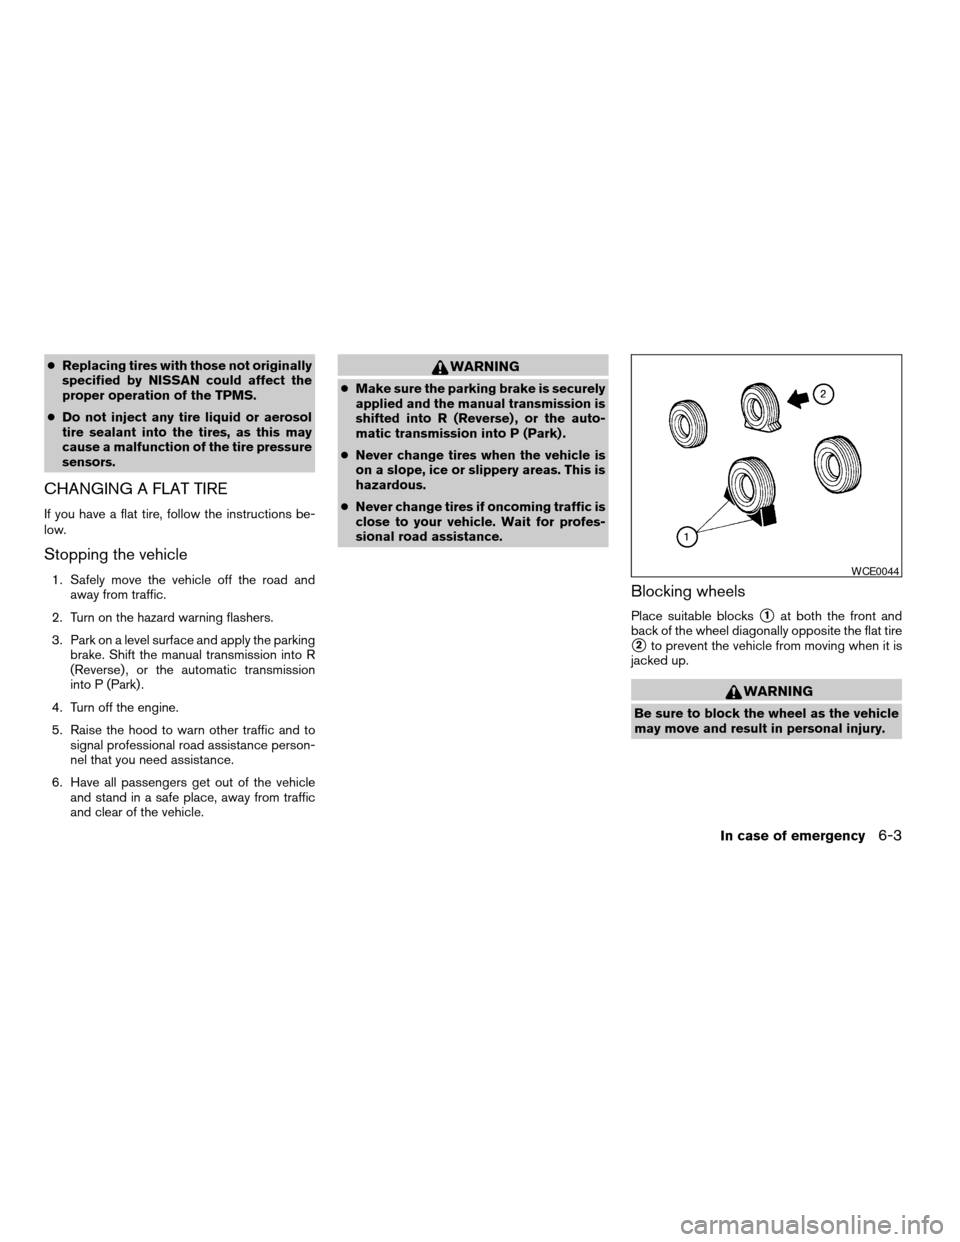
Blocking wheels
Place suitable blockss1at both the front and
back of the wheel diagonally opposite the flat tire
s2to prevent the vehicle from moving when it is
jacked up.
WARNING
Be sure to block the wheel as the vehicle
may move and result in personal injury.
WCE0044
In case of emergency6-3
ZREVIEW COPYÐ2006 Truck/Frontier(d22)
Owners ManualÐUSA_English(nna)
10/17/05Ðdebbie
X
Page 224 of 336
cNever use blocks on or under the jack.
cDo not start or run the engine while
vehicle is on the jack. It may cause the
vehicle to move. This is especially true
for vehicles with limited slip
differentials.
cDo not allow passengers to stay in the
vehicle while it is on the jack.
cNever run the engine with a wheel(s) off
the ground. It may cause the vehicle to
move.
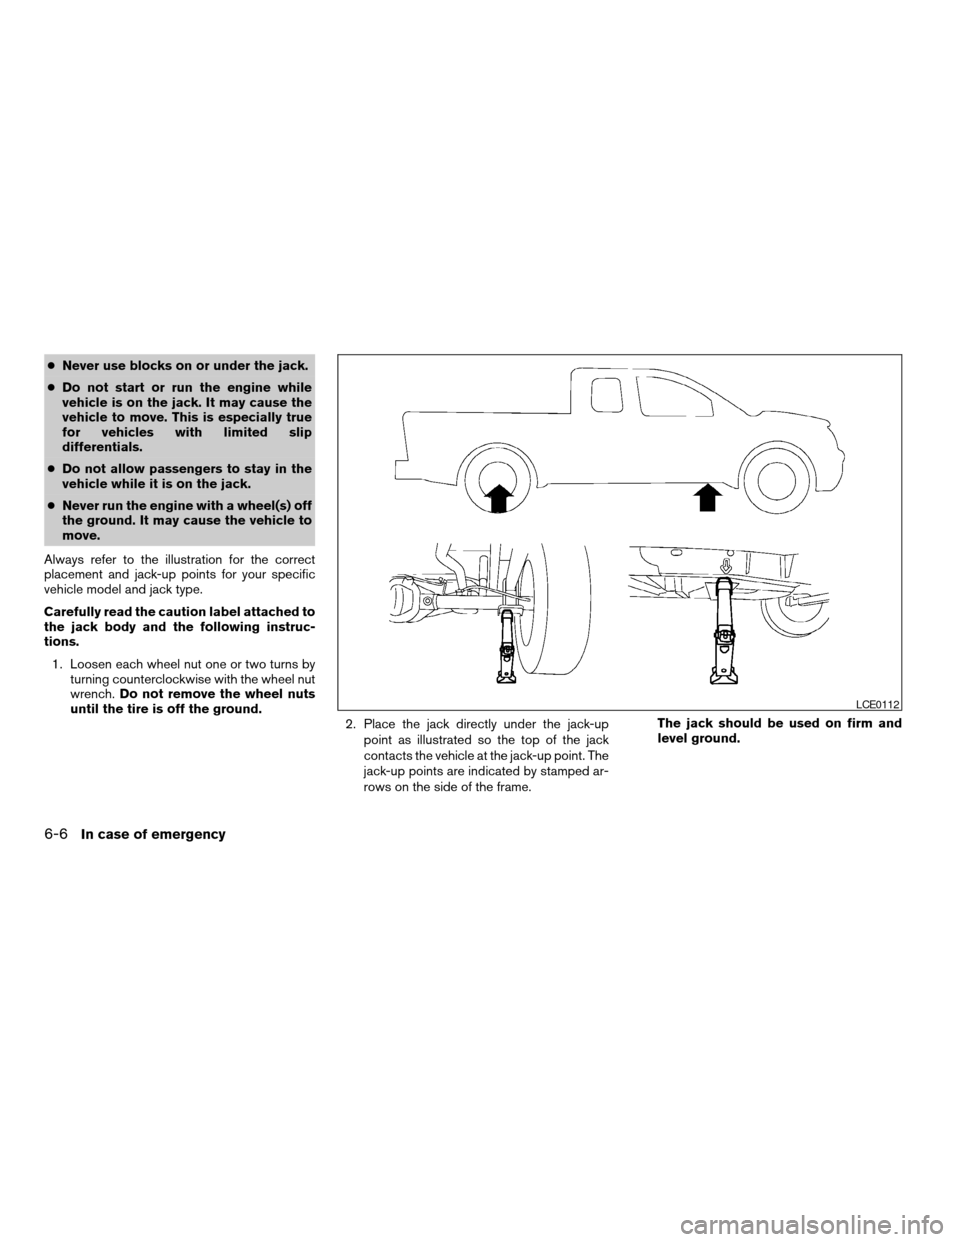
Always refer to the illustration for the correct
placement and jack-up points for your specific
vehicle model and jack type.
Carefully read the caution label attached to
the jack body and the following instruc-
tions.
1. Loosen each wheel nut one or two turns by
turning counterclockwise with the wheel nut
wrench.Do not remove the wheel nuts
until the tire is off the ground.
2. Place the jack directly under the jack-up
point as illustrated so the top of the jack
contacts the vehicle at the jack-up point. The
jack-up points are indicated by stamped ar-
rows on the side of the frame.The jack should be used on firm and
level ground.
LCE0112
6-6In case of emergency
ZREVIEW COPYÐ2006 Truck/Frontier(d22)
Owners ManualÐUSA_English(nna)
10/17/05Ðdebbie
X
Page 226 of 336
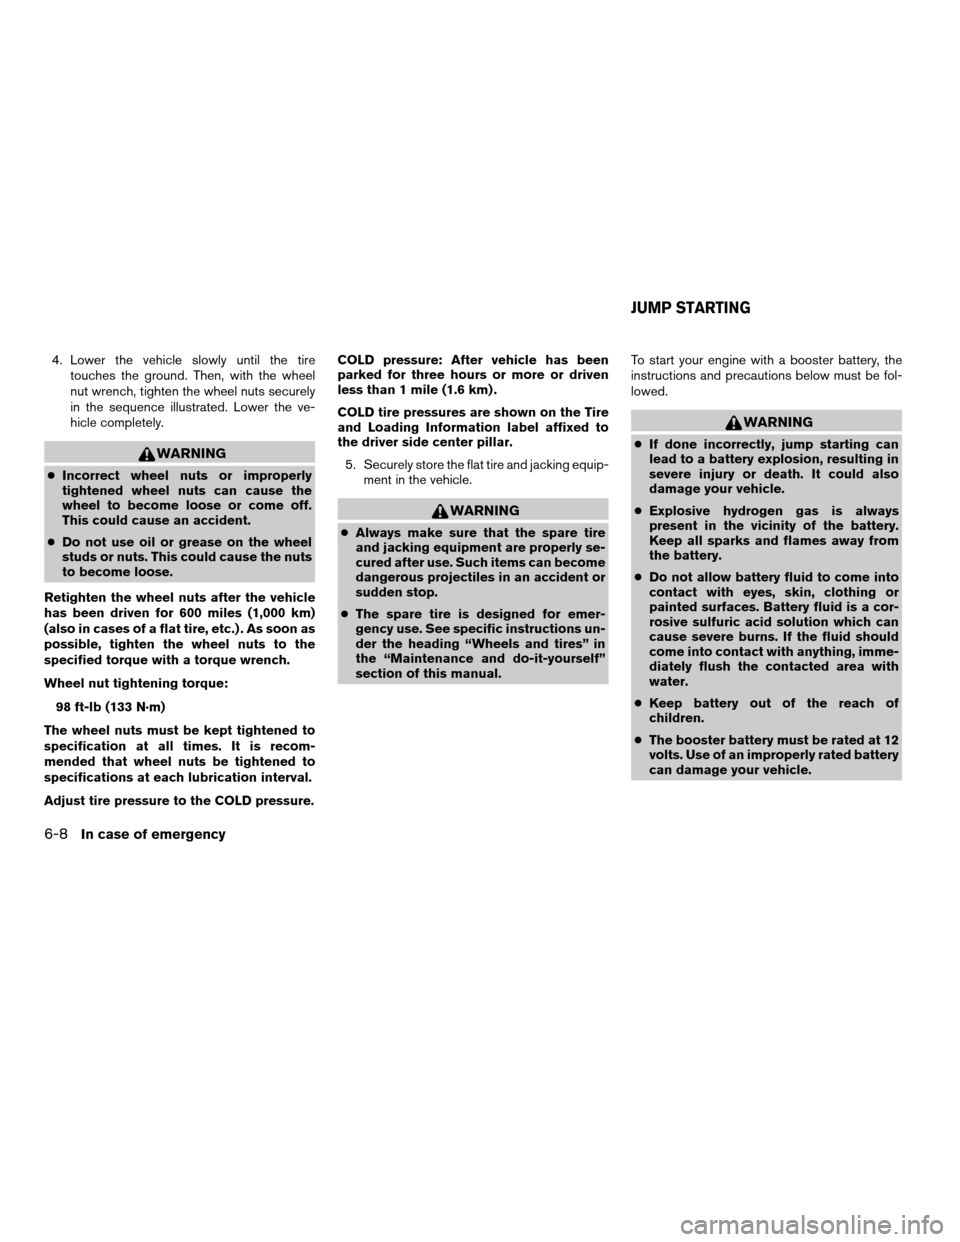
4. Lower the vehicle slowly until the tire
touches the ground. Then, with the wheel
nut wrench, tighten the wheel nuts securely
in the sequence illustrated. Lower the ve-
hicle completely.
WARNING
cIncorrect wheel nuts or improperly
tightened wheel nuts can cause the
wheel to become loose or come off.
This could cause an accident.
cDo not use oil or grease on the wheel
studs or nuts. This could cause the nuts
to become loose.
Retighten the wheel nuts after the vehicle
has been driven for 600 miles (1,000 km)
(also in cases of a flat tire, etc.) . As soon as
possible, tighten the wheel nuts to the
specified torque with a torque wrench.
Wheel nut tightening torque:
98 ft-lb (133 N·m)
The wheel nuts must be kept tightened to
specification at all times. It is recom-
mended that wheel nuts be tightened to
specifications at each lubrication interval.
Adjust tire pressure to the COLD pressure.COLD pressure: After vehicle has been
parked for three hours or more or driven
less than 1 mile (1.6 km) .
COLD tire pressures are shown on the Tire
and Loading Information label affixed to
the driver side center pillar.
5. Securely store the flat tire and jacking equip-
ment in the vehicle.
WARNING
cAlways make sure that the spare tire
and jacking equipment are properly se-
cured after use. Such items can become
dangerous projectiles in an accident or
sudden stop.
cThe spare tire is designed for emer-
gency use. See specific instructions un-
der the heading “Wheels and tires” in
the “Maintenance and do-it-yourself”
section of this manual.To start your engine with a booster battery, the
instructions and precautions below must be fol-
lowed.
WARNING
cIf done incorrectly, jump starting can
lead to a battery explosion, resulting in
severe injury or death. It could also
damage your vehicle.
cExplosive hydrogen gas is always
present in the vicinity of the battery.
Keep all sparks and flames away from
the battery.
cDo not allow battery fluid to come into
contact with eyes, skin, clothing or
painted surfaces. Battery fluid is a cor-
rosive sulfuric acid solution which can
cause severe burns. If the fluid should
come into contact with anything, imme-
diately flush the contacted area with
water.
cKeep battery out of the reach of
children.
cThe booster battery must be rated at 12
volts. Use of an improperly rated battery
can damage your vehicle.
JUMP STARTING
6-8In case of emergency
ZREVIEW COPYÐ2006 Truck/Frontier(d22)
Owners ManualÐUSA_English(nna)
10/17/05Ðdebbie
X