2006 NISSAN ARMADA child lock
[x] Cancel search: child lockPage 151 of 352
WARNING
cAlways have the doors locked while
driving. Along with the use of seat belts,
this provides greater safety in the event
of an accident by helping to prevent
persons from being thrown from the
vehicle. This also helps keep children
and others from unintentionally open-
ing the doors, and will help keep out
intruders.
cBefore opening any door, always look
for and avoid oncoming traffic.
cDo not leave children unattended inside
the vehicle. They could unknowingly ac-
tivate switches or controls. Unattended
children could become involved in seri-
ous accidents.
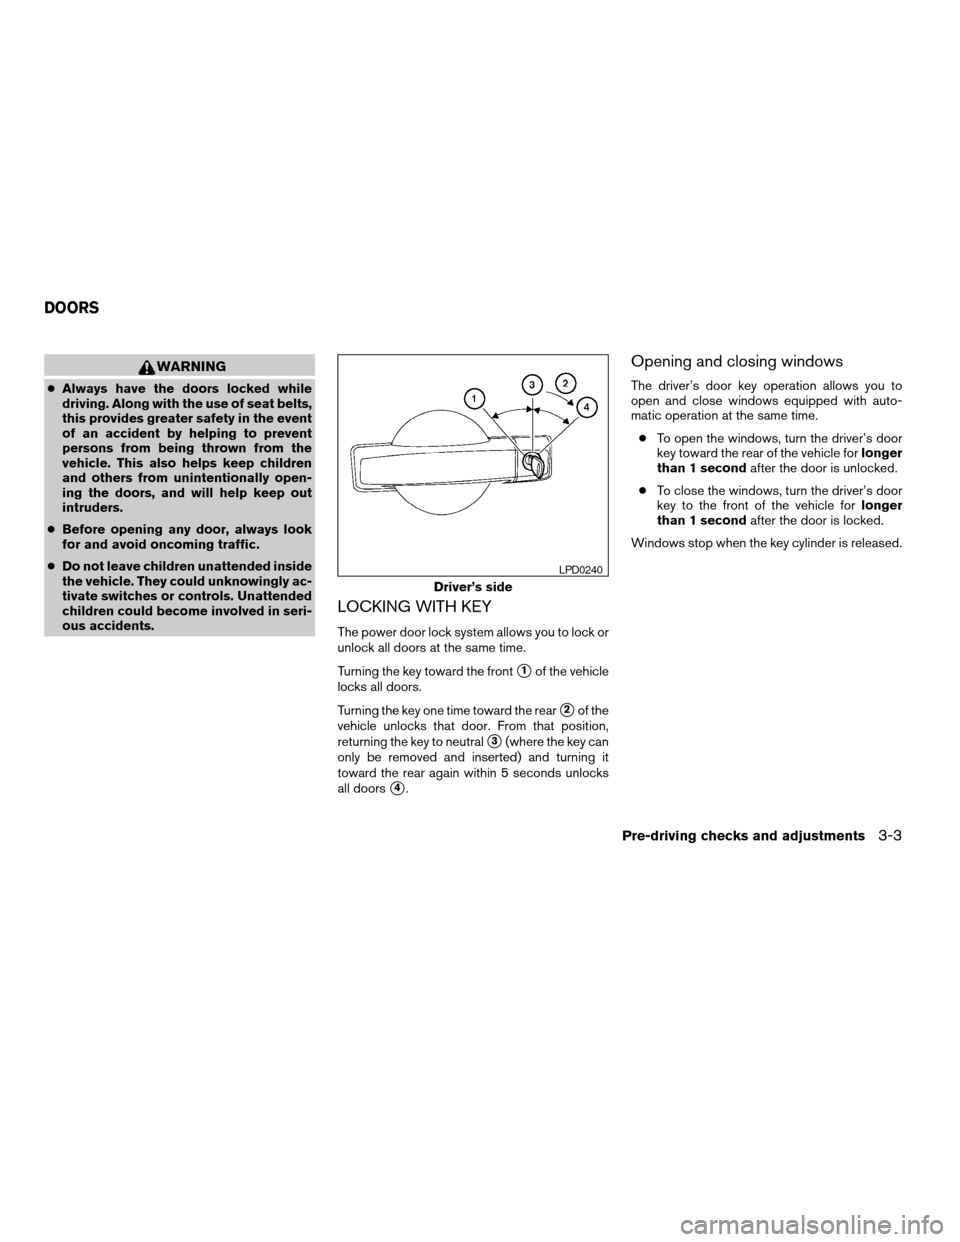
LOCKING WITH KEY
The power door lock system allows you to lock or
unlock all doors at the same time.
Turning the key toward the front
s1of the vehicle
locks all doors.
Turning the key one time toward the rear
s2of the
vehicle unlocks that door. From that position,
returning the key to neutral
s3(where the key can
only be removed and inserted) and turning it
toward the rear again within 5 seconds unlocks
all doors
s4.
Opening and closing windows
The driver’s door key operation allows you to
open and close windows equipped with auto-
matic operation at the same time.
cTo open the windows, turn the driver’s door
key toward the rear of the vehicle forlonger
than 1 secondafter the door is unlocked.
cTo close the windows, turn the driver’s door
key to the front of the vehicle forlonger
than 1 secondafter the door is locked.
Windows stop when the key cylinder is released.
Driver’s side
LPD0240
DOORS
Pre-driving checks and adjustments3-3
ZREVIEW COPYÐ2006 Armada(wzw)
Owners ManualÐUSA_English(nna)
06/15/05Ðdebbie
X
Page 153 of 352
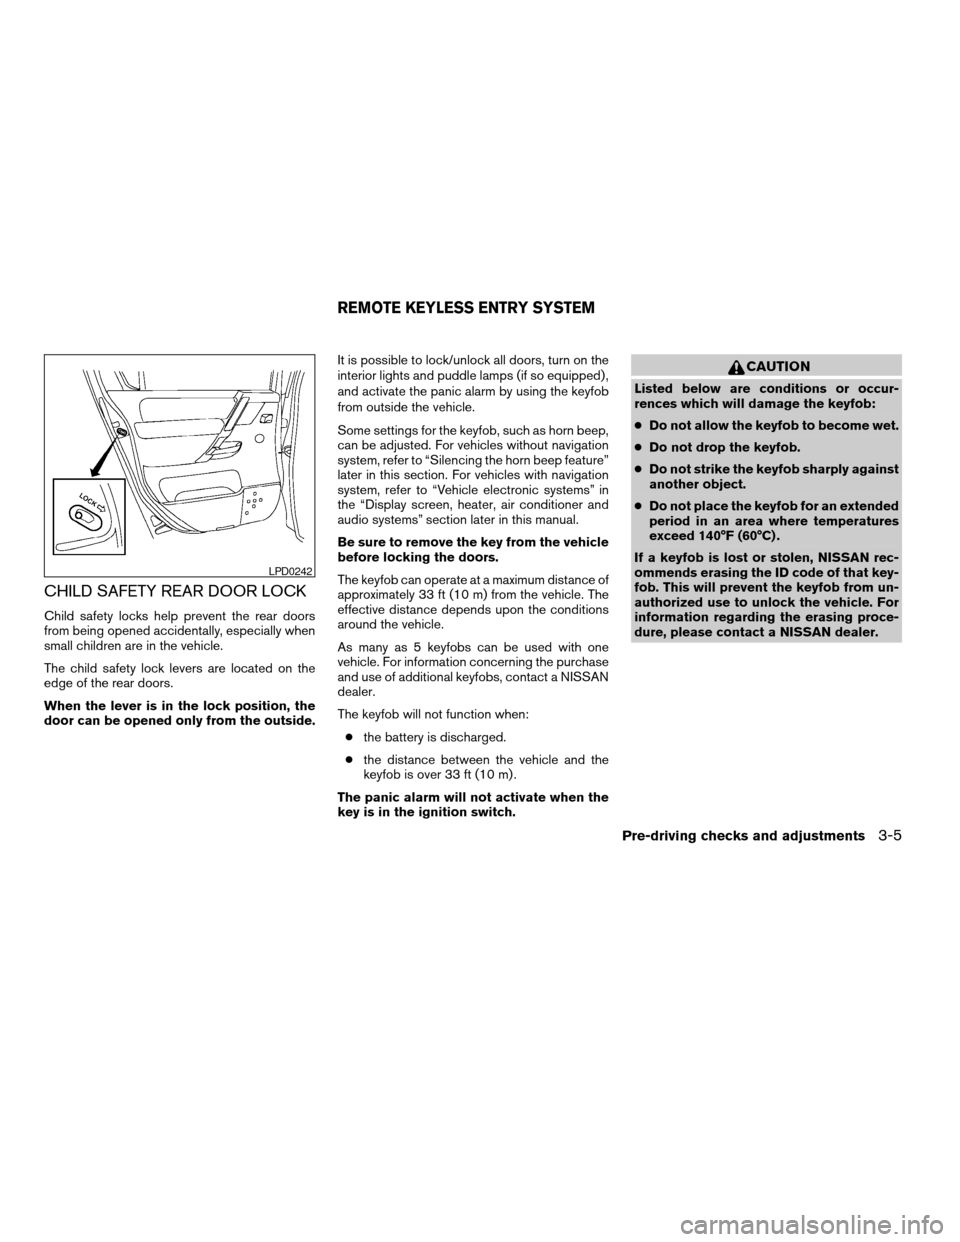
CHILD SAFETY REAR DOOR LOCK
Child safety locks help prevent the rear doors
from being opened accidentally, especially when
small children are in the vehicle.
The child safety lock levers are located on the
edge of the rear doors.
When the lever is in the lock position, the
door can be opened only from the outside.It is possible to lock/unlock all doors, turn on the
interior lights and puddle lamps (if so equipped) ,
and activate the panic alarm by using the keyfob
from outside the vehicle.
Some settings for the keyfob, such as horn beep,
can be adjusted. For vehicles without navigation
system, refer to “Silencing the horn beep feature”
later in this section. For vehicles with navigation
system, refer to “Vehicle electronic systems” in
the “Display screen, heater, air conditioner and
audio systems” section later in this manual.
Be sure to remove the key from the vehicle
before locking the doors.
The keyfob can operate at a maximum distance of
approximately 33 ft (10 m) from the vehicle. The
effective distance depends upon the conditions
around the vehicle.
As many as 5 keyfobs can be used with one
vehicle. For information concerning the purchase
and use of additional keyfobs, contact a NISSAN
dealer.
The keyfob will not function when:
cthe battery is discharged.
cthe distance between the vehicle and the
keyfob is over 33 ft (10 m) .
The panic alarm will not activate when the
key is in the ignition switch.
CAUTION
Listed below are conditions or occur-
rences which will damage the keyfob:
cDo not allow the keyfob to become wet.
cDo not drop the keyfob.
cDo not strike the keyfob sharply against
another object.
cDo not place the keyfob for an extended
period in an area where temperatures
exceed 140°F (60°C) .
If a keyfob is lost or stolen, NISSAN rec-
ommends erasing the ID code of that key-
fob. This will prevent the keyfob from un-
authorized use to unlock the vehicle. For
information regarding the erasing proce-
dure, please contact a NISSAN dealer.
LPD0242
REMOTE KEYLESS ENTRY SYSTEM
Pre-driving checks and adjustments3-5
ZREVIEW COPYÐ2006 Armada(wzw)
Owners ManualÐUSA_English(nna)
06/15/05Ðdebbie
X
Page 158 of 352
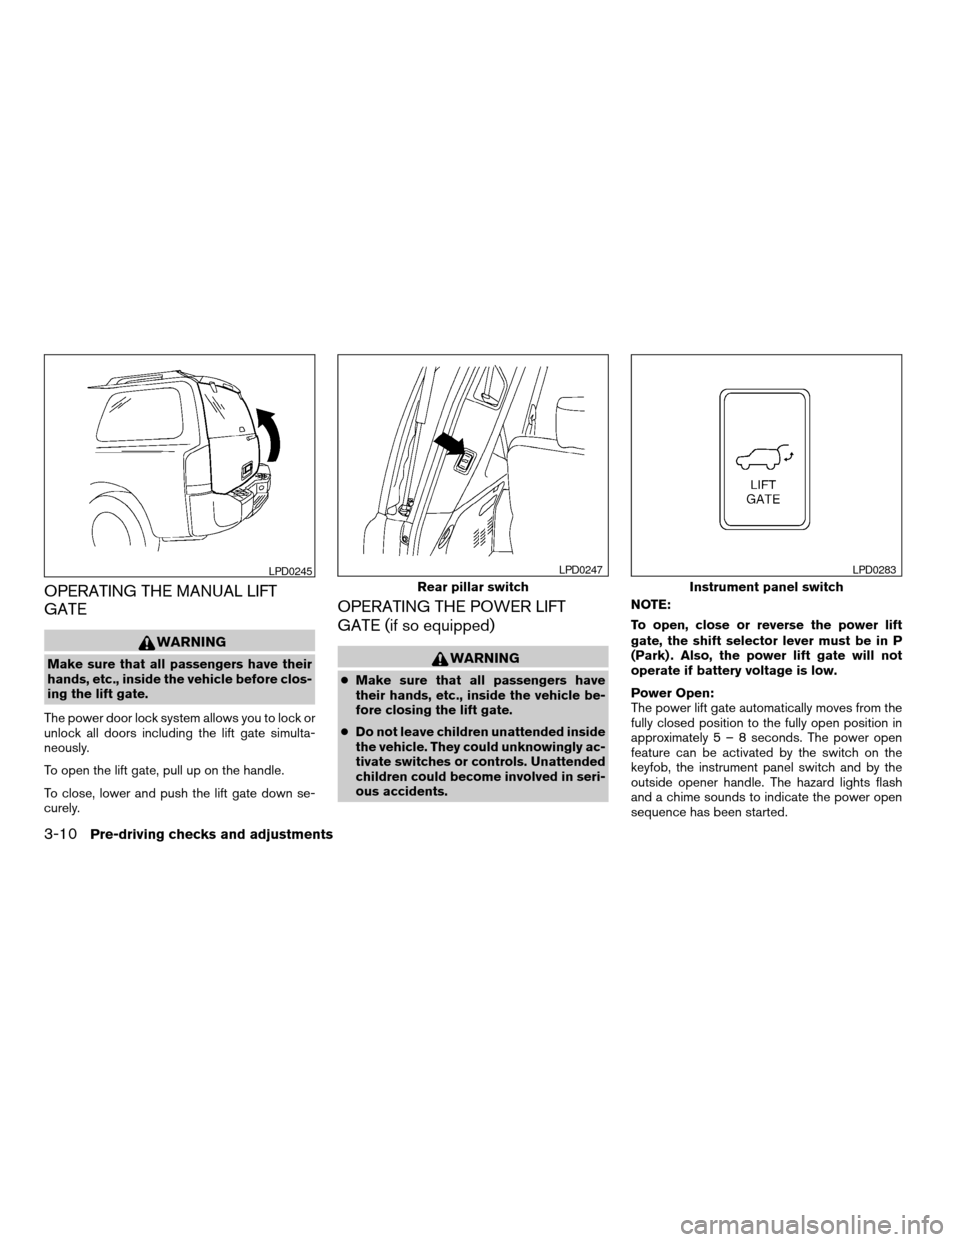
OPERATING THE MANUAL LIFT
GATE
WARNING
Make sure that all passengers have their
hands, etc., inside the vehicle before clos-
ing the lift gate.
The power door lock system allows you to lock or
unlock all doors including the lift gate simulta-
neously.
To open the lift gate, pull up on the handle.
To close, lower and push the lift gate down se-
curely.
OPERATING THE POWER LIFT
GATE (if so equipped)
WARNING
cMake sure that all passengers have
their hands, etc., inside the vehicle be-
fore closing the lift gate.
cDo not leave children unattended inside
the vehicle. They could unknowingly ac-
tivate switches or controls. Unattended
children could become involved in seri-
ous accidents.NOTE:
To open, close or reverse the power lift
gate, the shift selector lever must be in P
(Park) . Also, the power lift gate will not
operate if battery voltage is low.
Power Open:
The power lift gate automatically moves from the
fully closed position to the fully open position in
approximately5–8seconds. The power open
feature can be activated by the switch on the
keyfob, the instrument panel switch and by the
outside opener handle. The hazard lights flash
and a chime sounds to indicate the power open
sequence has been started.
LPD0245
Rear pillar switch
LPD0247
Instrument panel switch
LPD0283
3-10Pre-driving checks and adjustments
ZREVIEW COPYÐ2006 Armada(wzw)
Owners ManualÐUSA_English(nna)
06/15/05Ðdebbie
X
Page 228 of 352
To push the shift lock release, complete the fol-
lowing procedure:
1. Turn the ignition key to the LOCK position
and remove the key
2. Apply the parking brake.
3. Remove the shift lock release cover as
shown.
4. Insert a small screwdriver in the shift lock
release slot and push down.
5. Move the shift selector lever to the N (Neu-
tral) position while holding down the shift
lock release.
6. Turn the key to the ON position to unlock the
steering wheel. Now the vehicle may be
moved to the desired location.
If the shift selector lever cannot be moved out of
P (Park) , have a NISSAN dealer check the auto-
matic transmission system as soon as possible.
WARNING
If the selector lever cannot be moved from
the P (Park) position while the engine is
running and the brake pedal is depressed,
the stop lights may not work. Malfunction-
ing stop lights could cause an accident
injuring yourself and others.
Accelerator downshift
— in D position —
For passing or hill climbing, depress the accel-
erator pedal to the floor. This shifts the transmis-
sion down into a lower gear, depending on the
vehicle speed.
Fail-safe
When the fail-safe operation occurs, please note
that the transmission will be locked in any of the
forward gears according to the condition.
If the vehicle is driven under extreme con-
ditions, such as excessive wheel spinning
and subsequent hard braking, the fail-safe
system may be activated. This will occur
even if all electrical circuits are functioning
properly. In this case, turn the ignition key
OFF and wait for 3 seconds. Then turn the
key back to the ON position. The vehicle
should return to its normal operating con-
dition. If it does not return to its normal
operating condition, have a NISSAN dealer
check the transmission and repair it if nec-
essary.
WARNING
cBe sure the parking brake is fully re-
leased before driving. Failure to do so
can cause brake failure and lead to an
accident.
cDo not release the parking brake from
outside the vehicle.
cDo not use the gear shift in place of the
parking brake. When parking, be sure
the parking brake is fully engaged.
cDo not leave children unattended in a
vehicle. They could release the parking
brake and cause an accident.
PARKING BRAKE
5-14Starting and driving
ZREVIEW COPYÐ2006 Armada(wzw)
Owners ManualÐUSA_English(nna)
06/16/05Ðdebbie
X
Page 238 of 352
WARNING
cDo not stop or park the vehicle over
flammable materials such as dry grass,
waste paper or rags. They may ignite
and cause a fire.
cSafe parking procedures require that
both the parking brake be set and the
transmission placed into P (Park) . Fail-
ure to do so could cause the vehicle to
move unexpectedly or roll away and re-
sult in an accident. Make sure the shift
lever has been pushed as far forward as
it can go and cannot be moved without
depressing the foot brake pedal.cNever leave the engine running while
the vehicle is unattended.
cDo not leave children unattended inside
the vehicle. They could unknowingly ac-
tivate switches or controls. Unattended
children could become involved in seri-
ous accidents.
1. Firmly apply the parking brake.
2. Move the shift selector lever to the P (Park)
position.
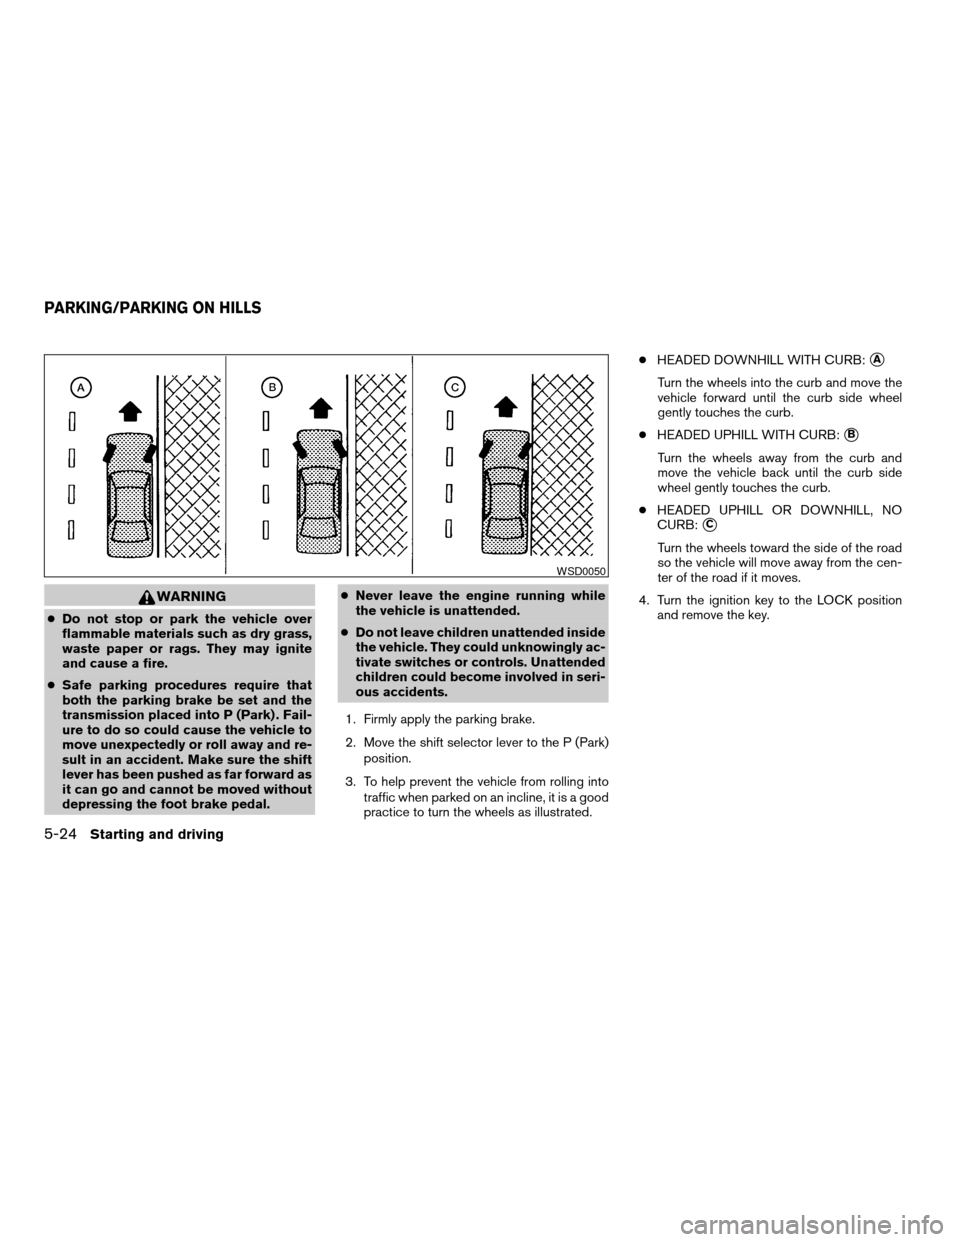
3. To help prevent the vehicle from rolling into
traffic when parked on an incline, it is a good
practice to turn the wheels as illustrated.cHEADED DOWNHILL WITH CURB:
sA
Turn the wheels into the curb and move the
vehicle forward until the curb side wheel
gently touches the curb.
cHEADED UPHILL WITH CURB:
sB
Turn the wheels away from the curb and
move the vehicle back until the curb side
wheel gently touches the curb.
cHEADED UPHILL OR DOWNHILL, NO
CURB:
sC
Turn the wheels toward the side of the road
so the vehicle will move away from the cen-
ter of the road if it moves.
4. Turn the ignition key to the LOCK position
and remove the key.
WSD0050
PARKING/PARKING ON HILLS
5-24Starting and driving
ZREVIEW COPYÐ2006 Armada(wzw)
Owners ManualÐUSA_English(nna)
06/16/05Ðdebbie
X
Page 275 of 352
CAUTION
Oil level should be checked regularly. Op-
erating the engine with an insufficient
amount of oil can damage the engine, and
such damage is not covered by warranty.
CHANGING ENGINE OIL
1. Park the vehicle on a level surface and apply
the parking brake.
2. Start the engine and let it idle until it reaches
operating temperature, then turn it off.
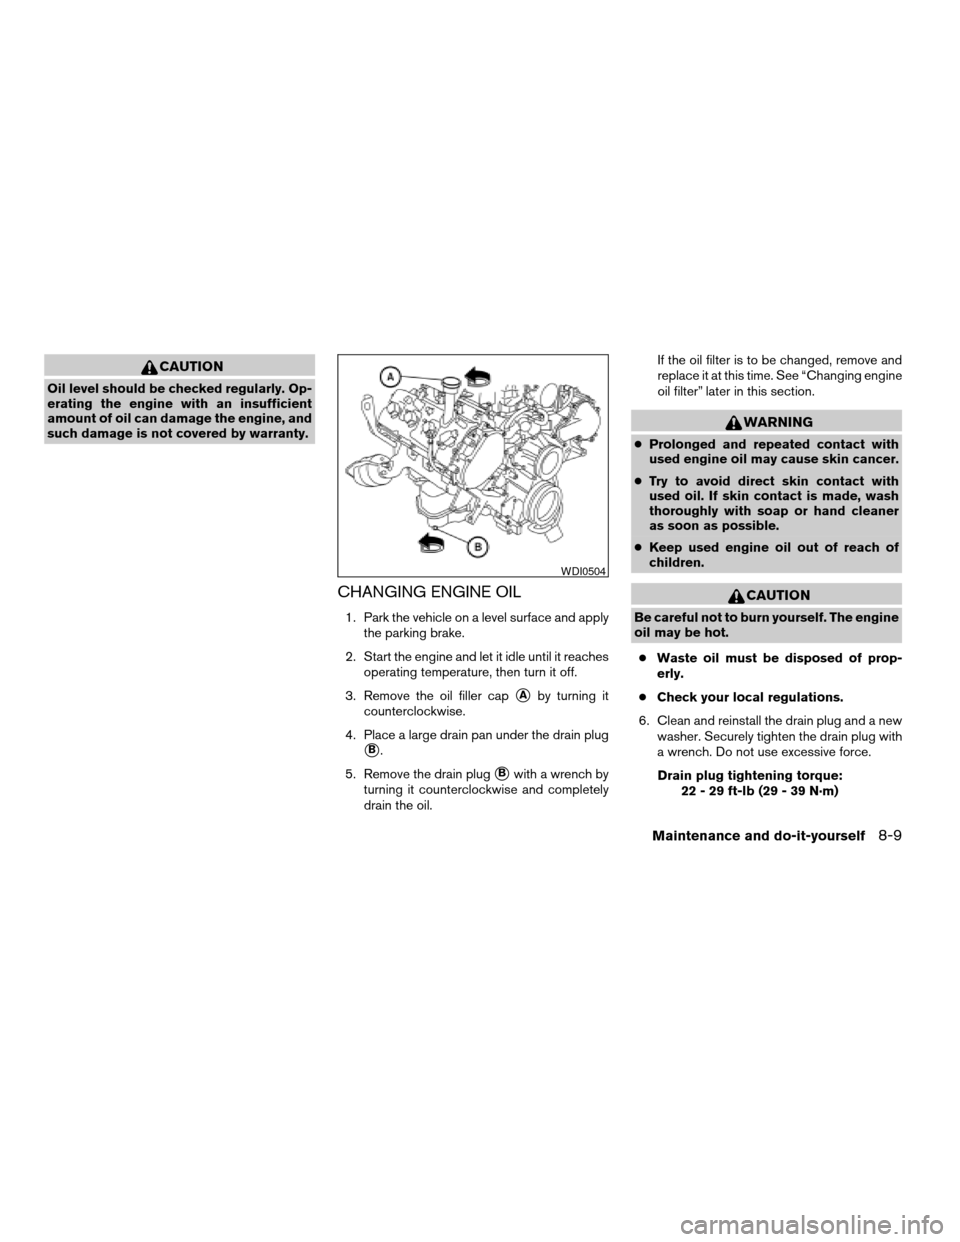
3. Remove the oil filler cap
sAby turning it
counterclockwise.
4. Place a large drain pan under the drain plug
sB.
5. Remove the drain plug
sBwith a wrench by
turning it counterclockwise and completely
drain the oil.If the oil filter is to be changed, remove and
replace it at this time. See “Changing engine
oil filter” later in this section.
WARNING
cProlonged and repeated contact with
used engine oil may cause skin cancer.
cTry to avoid direct skin contact with
used oil. If skin contact is made, wash
thoroughly with soap or hand cleaner
as soon as possible.
cKeep used engine oil out of reach of
children.
CAUTION
Be careful not to burn yourself. The engine
oil may be hot.
cWaste oil must be disposed of prop-
erly.
cCheck your local regulations.
6. Clean and reinstall the drain plug and a new
washer. Securely tighten the drain plug with
a wrench. Do not use excessive force.
Drain plug tightening torque:
22 - 29 ft-lb (29 - 39 N·m)
WDI0504
Maintenance and do-it-yourself8-9
ZREVIEW COPYÐ2006 Armada(wzw)
Owners ManualÐUSA_English(nna)
06/16/05Ðdebbie
X
Page 339 of 352

10 Index
4WD warning light...............2-15
A
Active head restraint...............1-9
Adjusting pedal position............3-16
Air bag (See supplemental restraint
system).....................1-57
Air bag system
Front (See supplemental front impact air
bag system).................1-64
Air bag warning labels.............1-71
Air bag warning light...........1-72, 2-16
Air cleaner housing filter............8-16
Air conditioner
Air conditioner service...........4-18
Air conditioner specification label.....9-11
Air conditioner system refrigerant and oil
recommendations..............9-6
Heater and air conditioner
controls................4-15, 4-15
Rear seat air conditioner..........4-17
Servicing air conditioner..........4-18
Alarm system
(See vehicle security system).........2-20
Anchor point locations.............1-46
Antenna.....................4-34
Anti-lock brake system (ABS).........5-26
Anti-lock brake warning light..........2-13
Audible reminders................2-19
Audio system..................4-18AM-FM-SAT radio with compact disc (CD)
changer...................4-26
Compact Disc (CD) changer.......4-28
Radio....................4-18
Rear audio controls.............4-33
Steering wheel audio control switch. . . .4-31
Autolight switch.................2-25
Automatic
Automatic drive positioner.........3-20
Automatic power window switch.....2-45
Automatic transmission position indicator
light.....................2-17
Driving with automatic transmission. . . .5-10
Transmission selector lever lock
release....................5-13
Automatic anti-glare inside mirror.......3-18
Automatic transmission fluid temperature
gauge.......................2-7
AUX jack.....................4-30
B
Battery......................8-13
Charge warning light............2-14
Before starting the engine............5-9
Belts (See drive belts).............8-14
Booster seats..................1-51
Brake
Anti-lock brake system (ABS).......5-26
Brake booster................8-22
Brake fluid..................8-11Brake light (See stop light).........8-27
Brake pedal.................8-21
Brake system................5-25
Brake warning light.............2-13
Brake wear indicators........2-19, 8-21
Parking brake check............8-21
Parking brake operation..........5-14
Self-adjusting brakes............8-21
Break-in schedule................5-17
Brightness control
Instrument panel..............2-27
Brightness/Contrast button..........4-11
Control panel buttons...........4-11
Bulb check/instrument panel..........2-12
Bulb replacement................8-27
C
Capacities and recommended
fuel/lubricants...................9-2
Captain’s chair adjustment (2nd row)......1-5
Car phone or CB radio.............4-43
Cargo light...................2-51
Cargo (See vehicle loading information) . . .9-12
CD care and cleaning.............4-31
CD changer (See audio system)........4-28
Child restraint with top tether strap......1-45
Child restraints.......1-17, 1-18, 1-25, 1-43
Precautions on child restraints . . .1-25, 1-51
Top tether strap anchor point locations . .1-46
Child safety rear door lock............3-5
ZREVIEW COPYÐ2006 Armada(wzw)
Owners ManualÐUSA_English(nna)
06/16/05Ðdebbie
X
Page 342 of 352

Bulb replacement..............8-27
Charge warning light............2-14
Fog light switch...............2-27
Headlight and turn signal switch......2-24
Headlight control switch..........2-24
Interior light.................2-49
Light bulbs..................8-26
Low tire pressure warning light......2-15
Low washer fluid warning light.......2-16
Passenger air bag and status light.....1-66
Personal lights...............2-50
Security indicator light...........2-18
Warning/indicator lights and audible
reminders..................2-12
Lights
Map lights..................2-50
Lock
Child safety rear door lock..........3-5
Door locks..................3-3
Lift gate release...............3-13
Power door locks...............3-4
Low fuel warning light.............2-15
Low tire pressure warning light........2-15
Low washer fluid warning light.........2-16
Luggage hook..................2-41
Luggage rack (see roof rack).........2-43
Luggage (See vehicle loading information) . .9-12
Luggage storage
(see vehicle loading information)........2-41
M
Maint (maintenance) button
Control panel buttons............4-4Maint (Maintenance) button, control
panel display...................4-4
Maintenance
General maintenance............8-2
Inside the vehicle...............8-3
Maintenance precautions..........8-5
Outside the vehicle..............8-2
Seat belt maintenance...........1-25
Under the hood and vehicle.........8-4
Malfunction indicator light...........2-18
Manual front seat adjustment..........1-2
Manual vent windows..............2-47
Map lights....................2-50
Map pocket...................2-36
Meters and gauges................2-3
Instrument brightness control.......2-27
Mirror
Automatic anti-glare inside mirror.....3-18
Outside mirror control...........3-18
Outside mirrors...............3-18
Vanity mirror.................3-17
N
NISSAN mobile entertainment system
(MES)......................4-34
NISSAN vehicle immobilizer
system................2-21, 3-2, 5-8
O
Octane rating (See fuel octane rating).....9-3
Odometer.....................2-4Oil
Capacities and recommended
fuel/lubricants.................9-2
Changing engine oil.............8-9
Changing engine oil filter..........8-10
Checking engine oil level..........8-8
Engine oil...................8-8
Engine oil and oil filter recommendation . .9-5
Engine oil pressure low/engine coolant
temperature high warning light.......2-14
Engine oil viscosity..............9-5
Outside mirror control.............3-18
Outside mirrors.................3-18
Overheat
If your vehicle overheats..........6-10
Owner’s manual order form..........9-28
Owner’s manual/service manual order
information....................9-28
P
Parking
Parking brake check............8-21
Parking brake operation..........5-14
Parking/parking on hills...........5-24
Pedal position adjustment...........3-16
Personal lights.................2-50
Power
Power door locks...............3-4
Power outlet.................2-31
Power rear windows............2-45
Power steering fluid.............8-11
Power steering system...........5-25
Power vent windows............2-46
Power windows...............2-44
10-4
ZREVIEW COPYÐ2006 Armada(wzw)
Owners ManualÐUSA_English(nna)
06/16/05Ðdebbie
X