2006 NISSAN ARMADA window
[x] Cancel search: windowPage 138 of 352

Depending on the environment or driving
conditions, the auto-reverse function may
be activated if an impact or load similar to
something being caught in the window oc-
curs.
WARNING
There are some small distances immedi-
ately before the closed position which
cannot be detected. Make sure that all
passengers have their hands, etc., inside
the vehicle before closing the window.
If the control unit detects something caught in a
window equipped with automatic operation as it
is closing, the window will be immediately low-
ered.
POWER VENT WINDOWS (if so
equipped)
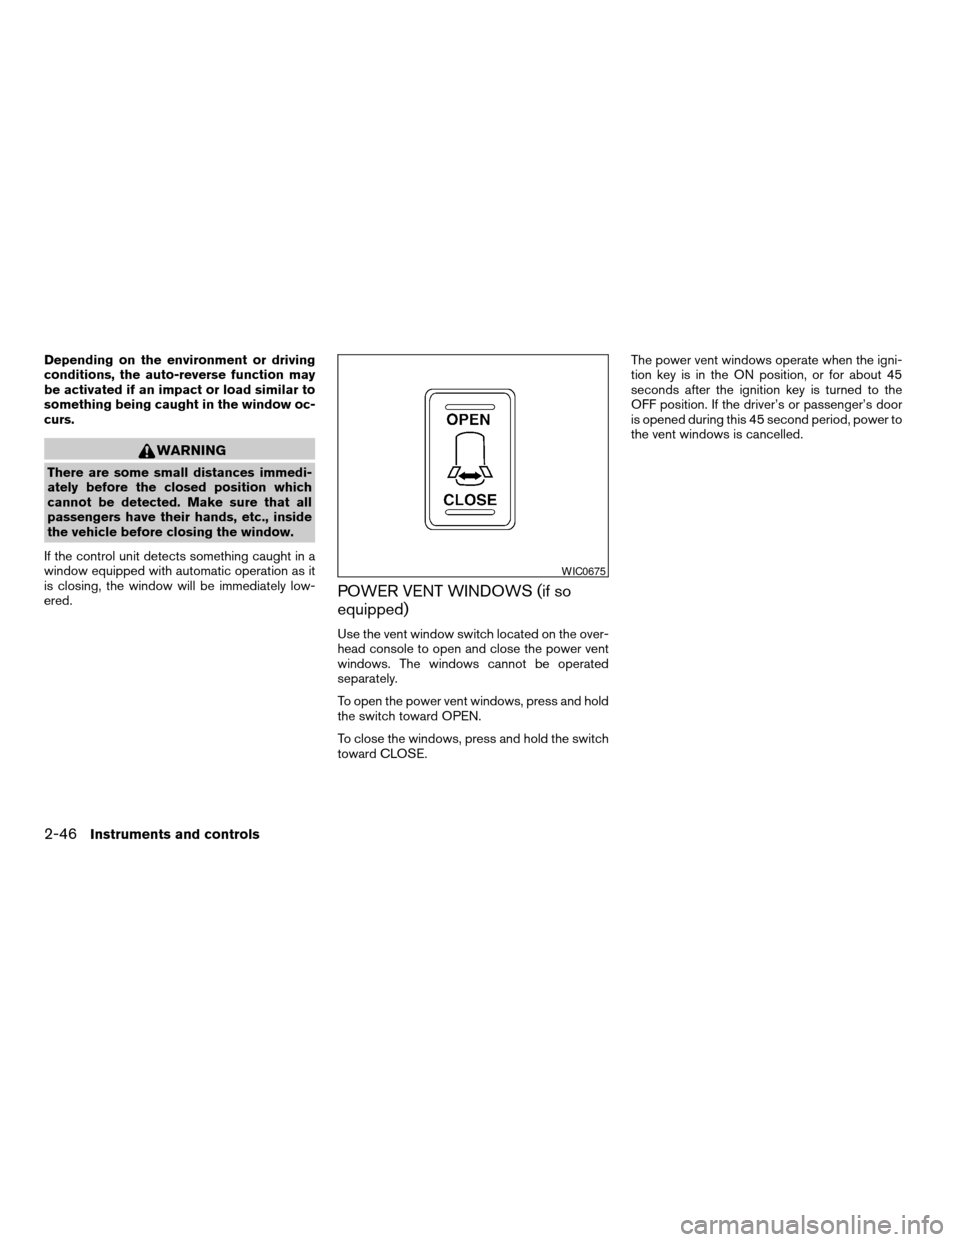
Use the vent window switch located on the over-
head console to open and close the power vent
windows. The windows cannot be operated
separately.
To open the power vent windows, press and hold
the switch toward OPEN.
To close the windows, press and hold the switch
toward CLOSE.The power vent windows operate when the igni-
tion key is in the ON position, or for about 45
seconds after the ignition key is turned to the
OFF position. If the driver’s or passenger’s door
is opened during this 45 second period, power to
the vent windows is cancelled.
WIC0675
2-46Instruments and controls
ZREVIEW COPYÐ2006 Armada(wzw)
Owners ManualÐUSA_English(nna)
06/15/05Ðdebbie
X
Page 139 of 352

MANUAL VENT WINDOWS (if so
equipped)
To open a manual vent window, pull the latch
handle toward you until it releases.
To lock the window in the open position, push the
latch handle rearward until it locks.
To close a manual vent window, pull the latch
handle toward you and push the rear portion of
the latch toward the rear of the vehicle until it
locks.
AUTOMATIC SUNROOF
The sunroof will only operate when the ignition
key is in the ON position. The automatic sunroof
is operational for about 45 seconds, even if the
ignition key is turned to the ACC or OFF position.
If the driver’s door or the front passenger’s door
is opened during this period of about 45 sec-
onds, power to the sunroof is canceled.
Sliding the sunroof
To fully open the sunroof, push the switch toward
the open position
s3.
To fully close the sunroof, push the switch toward
the close position
s4.To open or close the sunroof part way, push the
switch in any direction
s5while the roof is sliding
open or closed to stop it in the desired position.
Tilting the sunroof
To tilt the sunroof up, push the tilt switch toward
the up position
s1. When the sunroof is open, it
will automatically close and then tilt up.
To tilt the sunroof down, push the tilt switch
toward the down position
s2.
Restarting the sunroof sliding switch
The sliding switch will become inoperable after
the battery terminal is disconnected, the electri-
cal supply interrupted and/or some abnormality
detected. Use the following reset procedure to
return sunroof operation to normal.
1. If the sunroof lid is open, push the tilting
switch repeatedly toward the down position
s2to fully close the lid.
2. Finally, push and hold the tilting switch for
more than 2 seconds toward the down po-
sition
s2to reestablish the lid’s home posi-
tion.
The sunroof should now operate normally.
LIC0524WIC0812
SUNROOF (if so equipped)
Instruments and controls2-47
ZREVIEW COPYÐ2006 Armada(wzw)
Owners ManualÐUSA_English(nna)
06/15/05Ðdebbie
X
Page 151 of 352

WARNING
cAlways have the doors locked while
driving. Along with the use of seat belts,
this provides greater safety in the event
of an accident by helping to prevent
persons from being thrown from the
vehicle. This also helps keep children
and others from unintentionally open-
ing the doors, and will help keep out
intruders.
cBefore opening any door, always look
for and avoid oncoming traffic.
cDo not leave children unattended inside
the vehicle. They could unknowingly ac-
tivate switches or controls. Unattended
children could become involved in seri-
ous accidents.
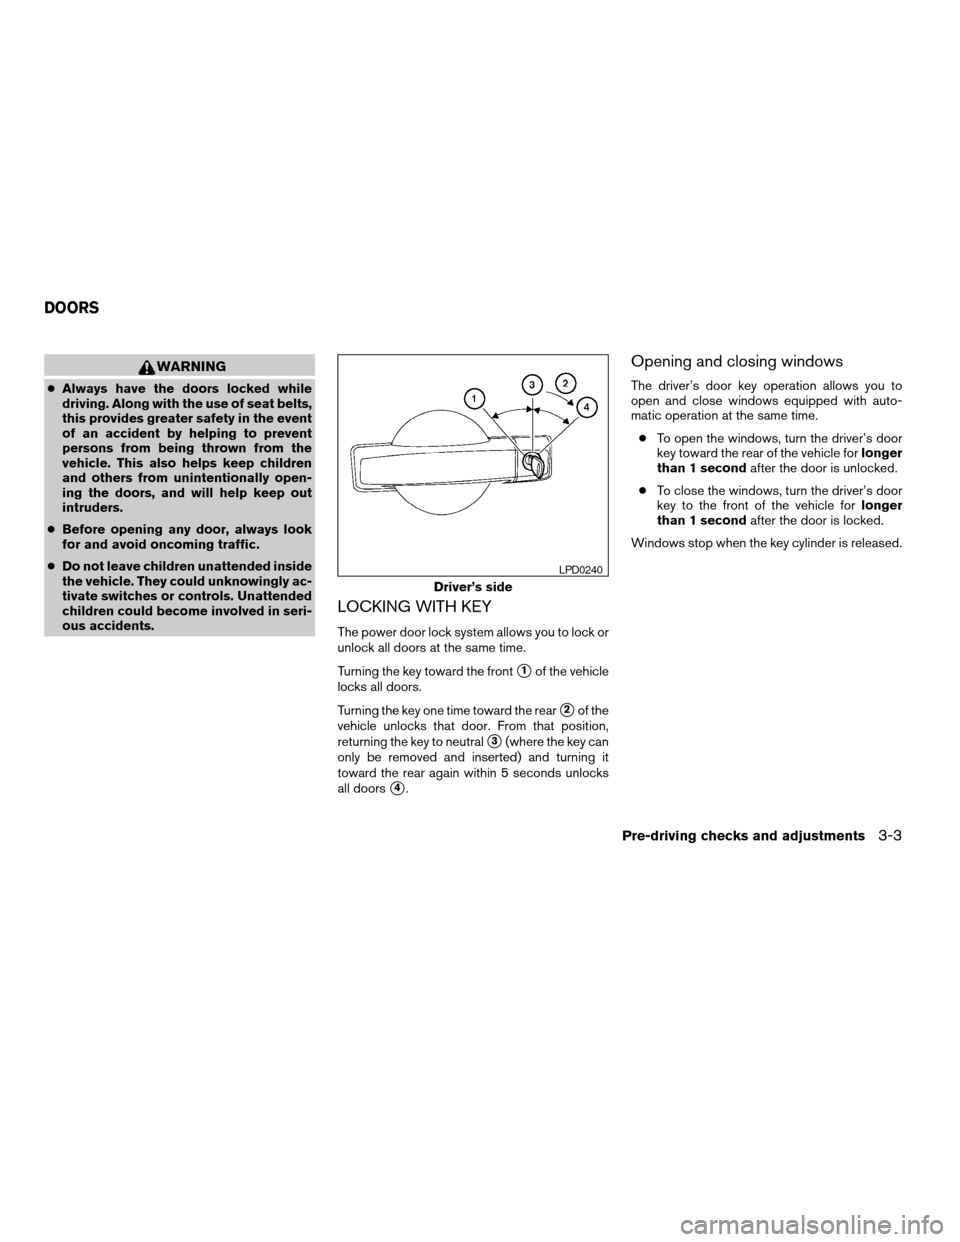
LOCKING WITH KEY
The power door lock system allows you to lock or
unlock all doors at the same time.
Turning the key toward the front
s1of the vehicle
locks all doors.
Turning the key one time toward the rear
s2of the
vehicle unlocks that door. From that position,
returning the key to neutral
s3(where the key can
only be removed and inserted) and turning it
toward the rear again within 5 seconds unlocks
all doors
s4.
Opening and closing windows
The driver’s door key operation allows you to
open and close windows equipped with auto-
matic operation at the same time.
cTo open the windows, turn the driver’s door
key toward the rear of the vehicle forlonger
than 1 secondafter the door is unlocked.
cTo close the windows, turn the driver’s door
key to the front of the vehicle forlonger
than 1 secondafter the door is locked.
Windows stop when the key cylinder is released.
Driver’s side
LPD0240
DOORS
Pre-driving checks and adjustments3-3
ZREVIEW COPYÐ2006 Armada(wzw)
Owners ManualÐUSA_English(nna)
06/15/05Ðdebbie
X
Page 154 of 352

HOW TO USE REMOTE KEYLESS
ENTRY SYSTEM
Locking doors
1. Close all windows.
2. Remove the key from the ignition switch.
3. Close the hood and all doors.
4. Push the
button on the keyfob. All
the doors lock. The hazard warning lights
flash twice and the horn beeps once to
indicate all doors are locked.cWhen the
button is pushed with all
doors locked, the hazard warning lights flash
twice and the horn beeps once as a re-
minder that the doors are already locked.
cIf a door is open and you push the
button, the doors will lock but the horn will
not beep and the hazard warning lights will
not flash.
The horn may or may not beep. For vehicles
without navigation system, refer to “Silencing the
horn beep feature” later in this section. For ve-
hicles with navigation system, refer to “Vehicle
electronic systems” in the “Display screen,
heater, air conditioner and audio systems” sec-
tion later in this manual.
Unlocking doors
Push thebutton on the keyfob once.
cOnly the driver’s door unlocks.
cThe hazard warning lights flash once if all
doors are completely closed with the ignition
key in any position except the ON position.
cThe interior lights and puddle lamps (if so
equipped) turn on and the light timer acti-
vates for 30 seconds when the interior light
switch is in the DOOR position with the
ignition key in any position except the ON
position.
LPD0209LPD0210
3-6Pre-driving checks and adjustments
ZREVIEW COPYÐ2006 Armada(wzw)
Owners ManualÐUSA_English(nna)
06/15/05Ðdebbie
X
Page 155 of 352

Push thebutton on the keyfob again within
5 seconds.
cAll doors unlock.
cThe hazard warning lights flash once if all
doors are completely closed.
The interior lights can be turned off without wait-
ing 30 seconds by inserting the key into the
ignition and turning to the ON or START position,
locking the doors with the keyfob or pushing the
interior light switch to the off position.
Auto relock
When thebutton on the keyfob is pushed,
all doors will lock automatically within 1 minute
unless one of the following operations is per-
formed:
cAny door is opened.
cA key is inserted into the ignition switch and
the key is turned from OFF to ON.
Opening windows
The keyfob allows you to open windows
equipped with automatic operation simulta-
neously.
cTo open the windows, press the
but-
ton on the keyfob forlonger than 3 sec-
ondsafter all doors are unlocked.The door windows will open while pressing
the
button on the keyfob.
The door windows cannot be closed by
using the keyfob.
Linking the keyfob to automatic drive
positioner memory
If the vehicle is equipped with automatic drive
positioner, the keyfob can be linked to a memory
setting.
See “Automatic driver positioner” later in this
section.
Operating the power lift gate (if so
equipped)
Push and hold the button on the keyfob for about
0.5 second to open or close the lift gate. The
hazard warning lights flash and a chime sounds
to indicate the power open or power close se-
quence has started.
The lift gate will reverse direction immediately
during power open or power close if the keyfob
button is pressed. A chime will sound to an-
nounce the reversal.
For more information, see “Lift gate” later in this
section.
LPD0243
Pre-driving checks and adjustments3-7
ZREVIEW COPYÐ2006 Armada(wzw)
Owners ManualÐUSA_English(nna)
06/15/05Ðdebbie
X
Page 168 of 352

Automatic anti-glare outside mirrors (if
so equipped)
The outside mirrors will automatically dim during
nighttime conditions to reduce the glare from the
headlights of trailing vehicles. The automatic anti-
glare feature operates only when the ignition
switch is in the ON position.
The automatic anti-glare feature will be on when
starting the vehicle. The indicator light on the
automatic anti-glare rearview mirror will illuminate
when the automatic anti-glare feature is operat-
ing.
To turn off the anti-glare feature, push the
button on the rearview mirror. The indicator light
will turn off.
To turn on the anti-glare feature again, push
the
button on the rearview mirror. The in-
dicator light will turn on.
For information on the automatic anti-glare rear-
view mirror, see “Automatic anti-glare rearview
mirror” earlier in this section.
Heated mirrors
The outside mirrors can be heated to defrost,
defog, or de-ice for improved visibility. For addi-
tional information, see “Rear window and outside
mirror defroster switch” in the “Instrument and
controls” section of this manual.The automatic drive positioner system has two
features:
cMemory storage function
cEntry/exit function
MEMORY STORAGE FUNCTION
Two positions for the driver’s seat, accelerator
and brake pedals, and outside mirrors can be
stored in the automatic drive positioner memory.
Follow these procedures to use the memory sys-
tem.
1. Set the automatic transmission selector le-
ver to the P (Park) position.
2. Turn the ignition ON.
LPD0260
AUTOMATIC DRIVE POSITIONER (if
so equipped)
3-20Pre-driving checks and adjustments
ZREVIEW COPYÐ2006 Armada(wzw)
Owners ManualÐUSA_English(nna)
06/16/05Ðdebbie
X
Page 183 of 352

ADJUSTING THE SCREEN
To adjust the quality of the screen, refer to HOW
TO USE THE“SETTING”BUTTON in this sec-
tion.
cWhen it is difficult to see in the rearward
direction due to shady conditions, press the
“ENTER”button to make objects in the
monitor brighter.
cTo change the brightness, press the“EN-
TER”button again, turn the key switch OFF
or shift to reverse and wait for 10 seconds.
OPERATING TIPS
cWhen the selector lever is shifted to R, the
monitor screen automatically changes to the
rear view monitor mode. However, the radio
can be heard.
cIt may take some time until the rear view
monitor is displayed after the selector lever
has been shifted to R. Objects may be dis-
torted momentarily until the rear view moni-
tor screen is displayed completely. When
the selector lever is returned to a position
other than R, it may take some time until the
screen changes. Objects on the screen may
be distorted until they are completely dis-
played.cWhen the temperature is extremely high or
low, the screen may not clearly display ob-
jects. This is not a malfunction.
cWhen strong light directly enters the cam-
era, objects may not be displayed clearly.
cVertical lines may be seen in objects on the
screen. This is due to strong reflected light
from the bumper. This is not a malfunction.
cThe screen may flicker under fluorescent
light. This is not a malfunction.
cThe colors of objects on the rear view moni-
tor may differ somewhat from those of the
actual object.
cWhen the contrast of objects is low at night,
pushing the“ENTER”button may not
change the brightness.
cObjects on the monitor may not be clear in a
dark place or at night.
cIf dirt, rain or snow attaches to the camera,
the rear view monitor may not display ob-
jects. Clean the camera.
cDo not use alcohol, benzine or thinner to
clean the camera. This will cause discolora-
tion. To clean the camera, wipe with a cloth
dampened with a diluted mild cleaning agent
and then wipe with a dry cloth.cDo not damage the camera as the monitor
screen may be adversely affected.
cDo not use body wax on the camera window.
Wipe off the wax with a clean cloth damp-
ened with mild detergent diluted with water.
Display screen, heater, air conditioner and audio systems4-13
ZREVIEW COPYÐ2006 Armada(wzw)
Owners ManualÐUSA_English(nna)
06/16/05Ðdebbie
X
Page 185 of 352

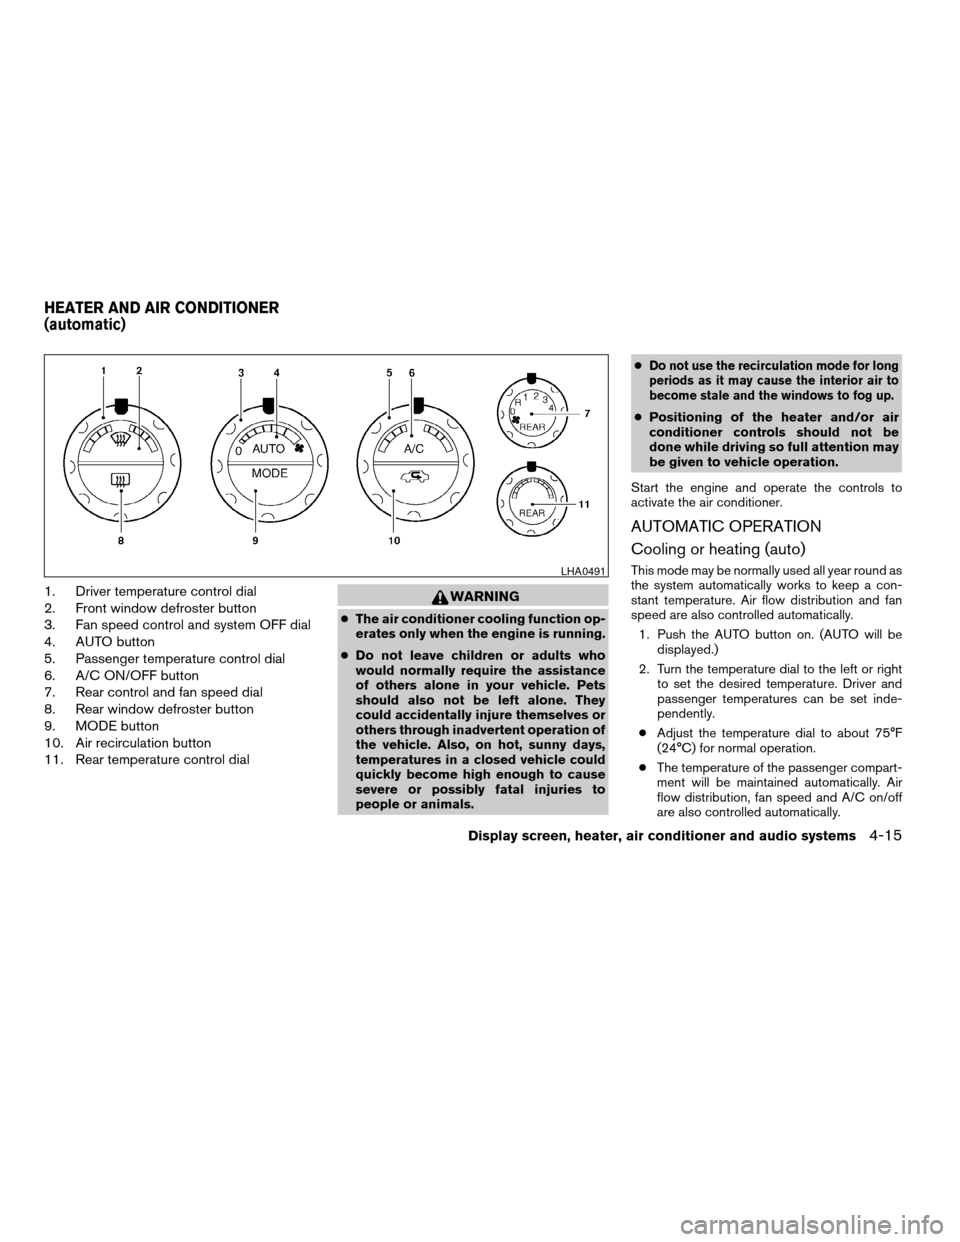
1. Driver temperature control dial
2. Front window defroster button
3. Fan speed control and system OFF dial
4. AUTO button
5. Passenger temperature control dial
6. A/C ON/OFF button
7. Rear control and fan speed dial
8. Rear window defroster button
9. MODE button
10. Air recirculation button
11. Rear temperature control dialWARNING
cThe air conditioner cooling function op-
erates only when the engine is running.
cDo not leave children or adults who
would normally require the assistance
of others alone in your vehicle. Pets
should also not be left alone. They
could accidentally injure themselves or
others through inadvertent operation of
the vehicle. Also, on hot, sunny days,
temperatures in a closed vehicle could
quickly become high enough to cause
severe or possibly fatal injuries to
people or animals.c
Do not use the recirculation mode for long
periods as it may cause the interior air to
become stale and the windows to fog up.
cPositioning of the heater and/or air
conditioner controls should not be
done while driving so full attention may
be given to vehicle operation.
Start the engine and operate the controls to
activate the air conditioner.
AUTOMATIC OPERATION
Cooling or heating (auto)
This mode may be normally used all year round as
the system automatically works to keep a con-
stant temperature. Air flow distribution and fan
speed are also controlled automatically.
1. Push the AUTO button on. (AUTO will be
displayed.)
2. Turn the temperature dial to the left or right
to set the desired temperature. Driver and
passenger temperatures can be set inde-
pendently.
cAdjust the temperature dial to about 75°F
(24°C) for normal operation.
cThe temperature of the passenger compart-
ment will be maintained automatically. Air
flow distribution, fan speed and A/C on/off
are also controlled automatically.LHA0491
HEATER AND AIR CONDITIONER
(automatic)
Display screen, heater, air conditioner and audio systems4-15
ZREVIEW COPYÐ2006 Armada(wzw)
Owners ManualÐUSA_English(nna)
07/01/05Ðarosenma
X