2006 NISSAN ARMADA instrument panel
[x] Cancel search: instrument panelPage 125 of 352
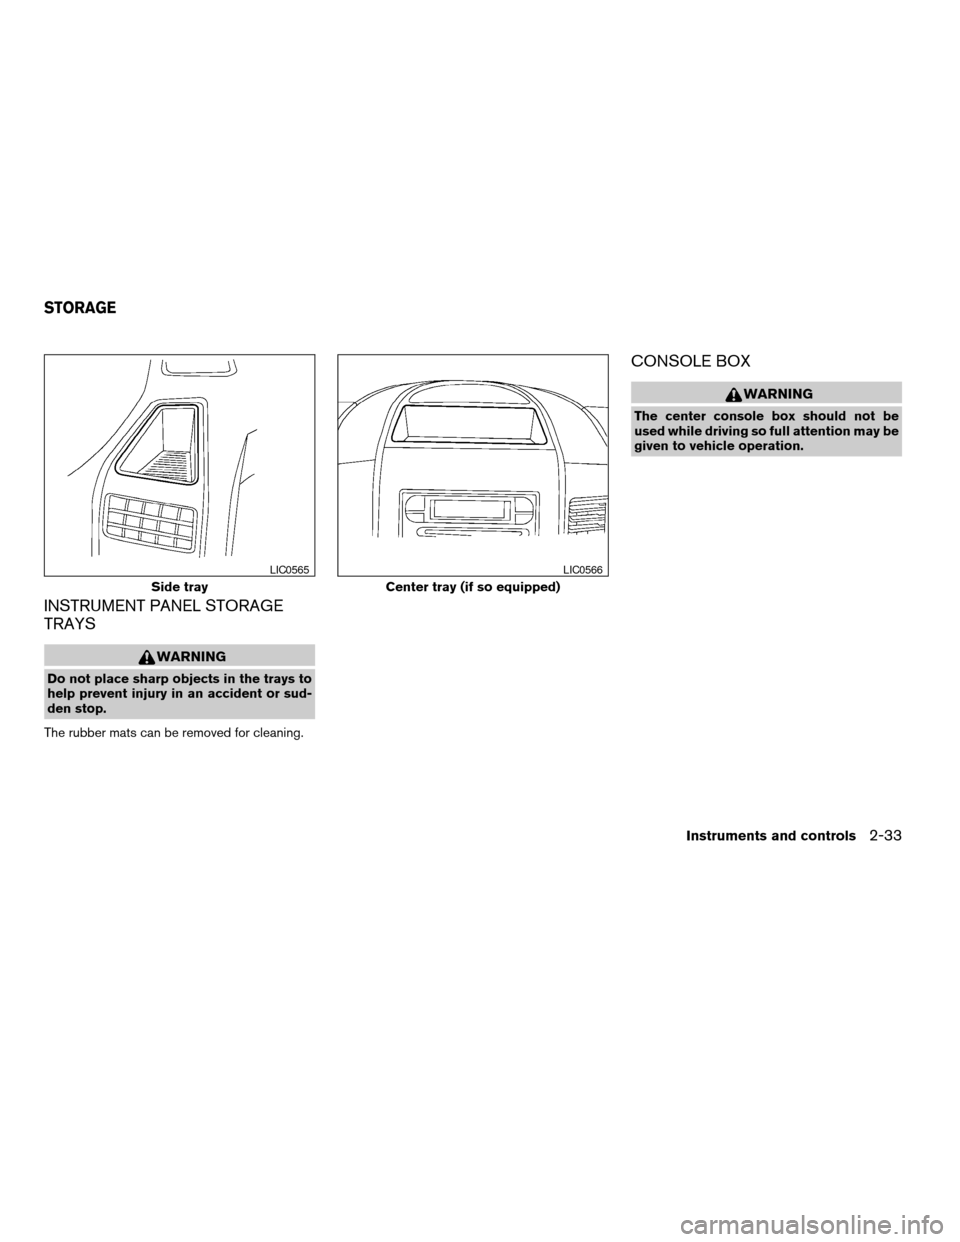
INSTRUMENT PANEL STORAGE
TRAYS
WARNING
Do not place sharp objects in the trays to
help prevent injury in an accident or sud-
den stop.
The rubber mats can be removed for cleaning.
CONSOLE BOX
WARNING
The center console box should not be
used while driving so full attention may be
given to vehicle operation.
Side tray
LIC0565
Center tray (if so equipped)
LIC0566
STORAGE
Instruments and controls2-33
ZREVIEW COPYÐ2006 Armada(wzw)
Owners ManualÐUSA_English(nna)
06/15/05Ðdebbie
X
Page 136 of 352
WARNING
Properly secure all cargo with ropes or
straps to help prevent it from sliding or
shifting. In a sudden stop or collision, un-
secured cargo could cause personal
injury.
CAUTION
Use care when placing or removing items
from the roof rack. If you cannot comfort-
ably lift the items onto the roof rack from
the ground, use a ladder or stool.
POWER WINDOWS
WARNING
cMake sure that all passengers have
their hands, etc. inside the vehicle while
it is in motion and before closing the
windows. Use the window lock switch
to prevent unexpected use of the power
windows.
cDo not leave children unattended inside
the vehicle. They could unknowingly ac-
tivate switches or controls and become
trapped in a window. Unattended chil-
dren could become involved in serious
accidents.
The power windows operate when the ignition
switch is in the ON position, or for about 45
seconds after the ignition switch is turned to the
OFF position. If the driver’s or passenger’s door
is opened during this period of about 45 sec-
onds, power to the windows is canceled.
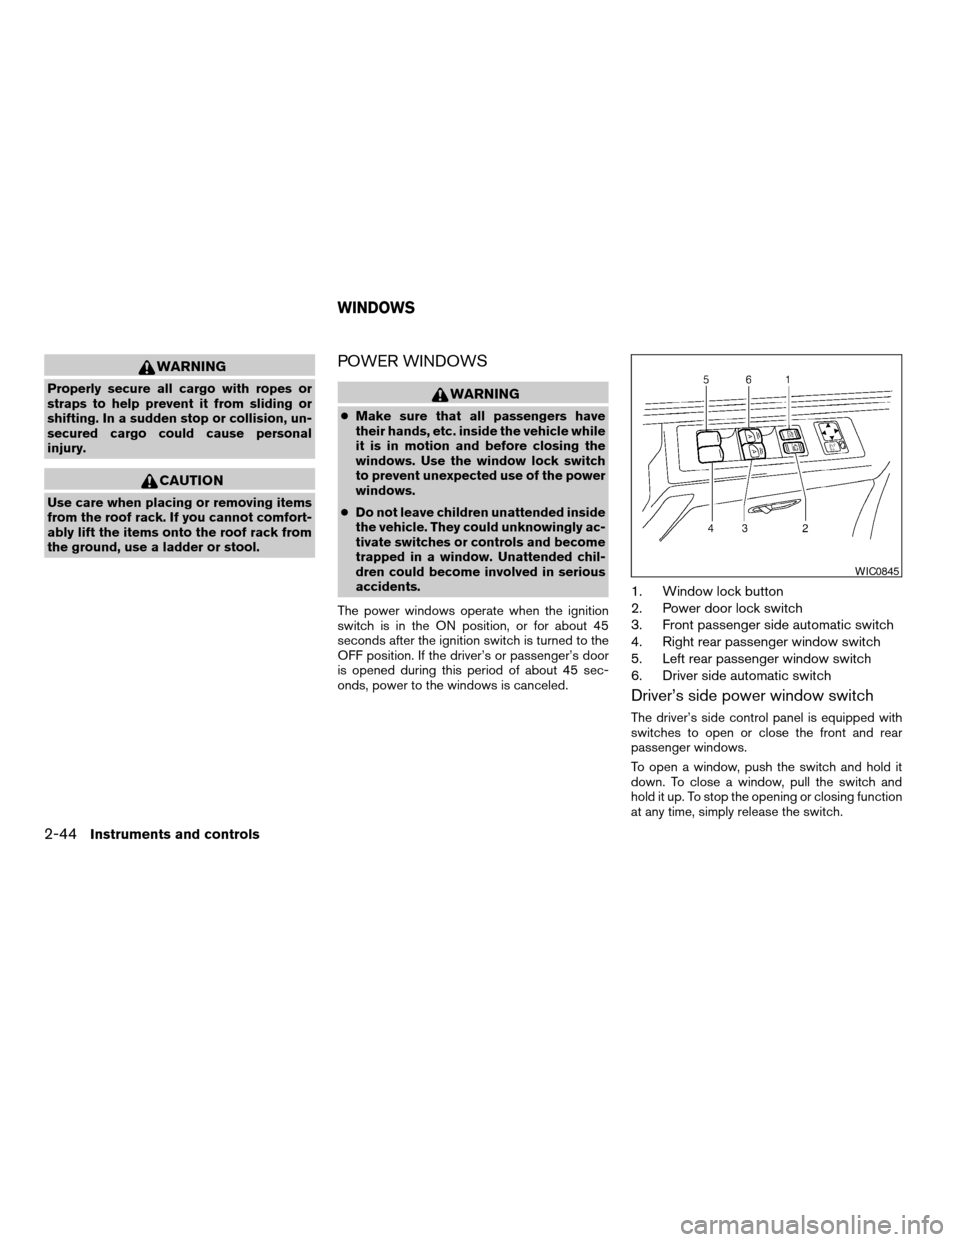
1. Window lock button
2. Power door lock switch
3. Front passenger side automatic switch
4. Right rear passenger window switch
5. Left rear passenger window switch
6. Driver side automatic switch
Driver’s side power window switch
The driver’s side control panel is equipped with
switches to open or close the front and rear
passenger windows.
To open a window, push the switch and hold it
down. To close a window, pull the switch and
hold it up. To stop the opening or closing function
at any time, simply release the switch.
WIC0845
WINDOWS
2-44Instruments and controls
ZREVIEW COPYÐ2006 Armada(wzw)
Owners ManualÐUSA_English(nna)
06/15/05Ðdebbie
X
Page 157 of 352
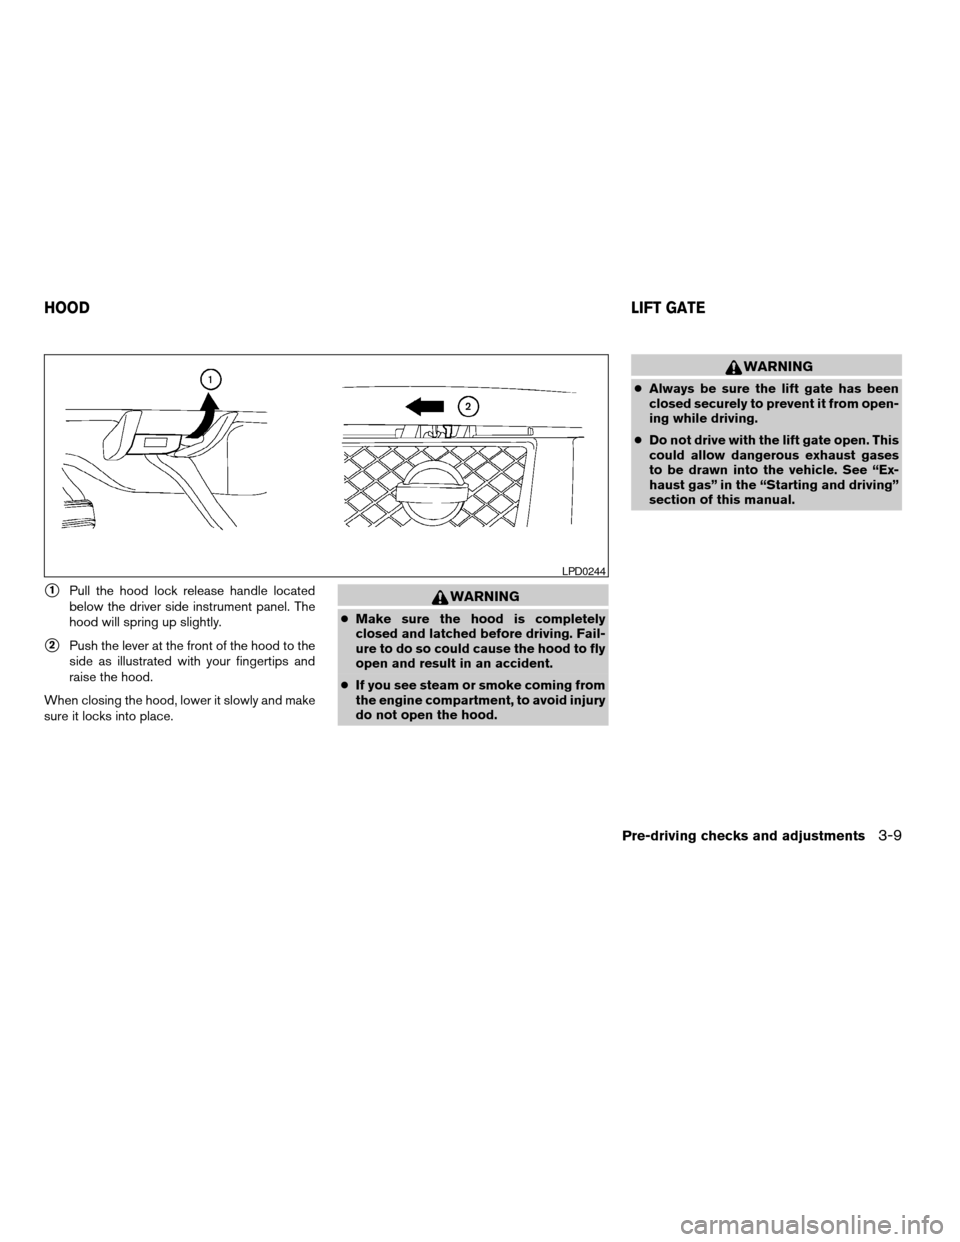
s1Pull the hood lock release handle located
below the driver side instrument panel. The
hood will spring up slightly.
s2Push the lever at the front of the hood to the
side as illustrated with your fingertips and
raise the hood.
When closing the hood, lower it slowly and make
sure it locks into place.
WARNING
cMake sure the hood is completely
closed and latched before driving. Fail-
ure to do so could cause the hood to fly
open and result in an accident.
cIf you see steam or smoke coming from
the engine compartment, to avoid injury
do not open the hood.
WARNING
cAlways be sure the lift gate has been
closed securely to prevent it from open-
ing while driving.
cDo not drive with the lift gate open. This
could allow dangerous exhaust gases
to be drawn into the vehicle. See “Ex-
haust gas” in the “Starting and driving”
section of this manual.
LPD0244
HOODLIFT GATE
Pre-driving checks and adjustments3-9
ZREVIEW COPYÐ2006 Armada(wzw)
Owners ManualÐUSA_English(nna)
06/15/05Ðdebbie
X
Page 158 of 352
OPERATING THE MANUAL LIFT
GATE
WARNING
Make sure that all passengers have their
hands, etc., inside the vehicle before clos-
ing the lift gate.
The power door lock system allows you to lock or
unlock all doors including the lift gate simulta-
neously.
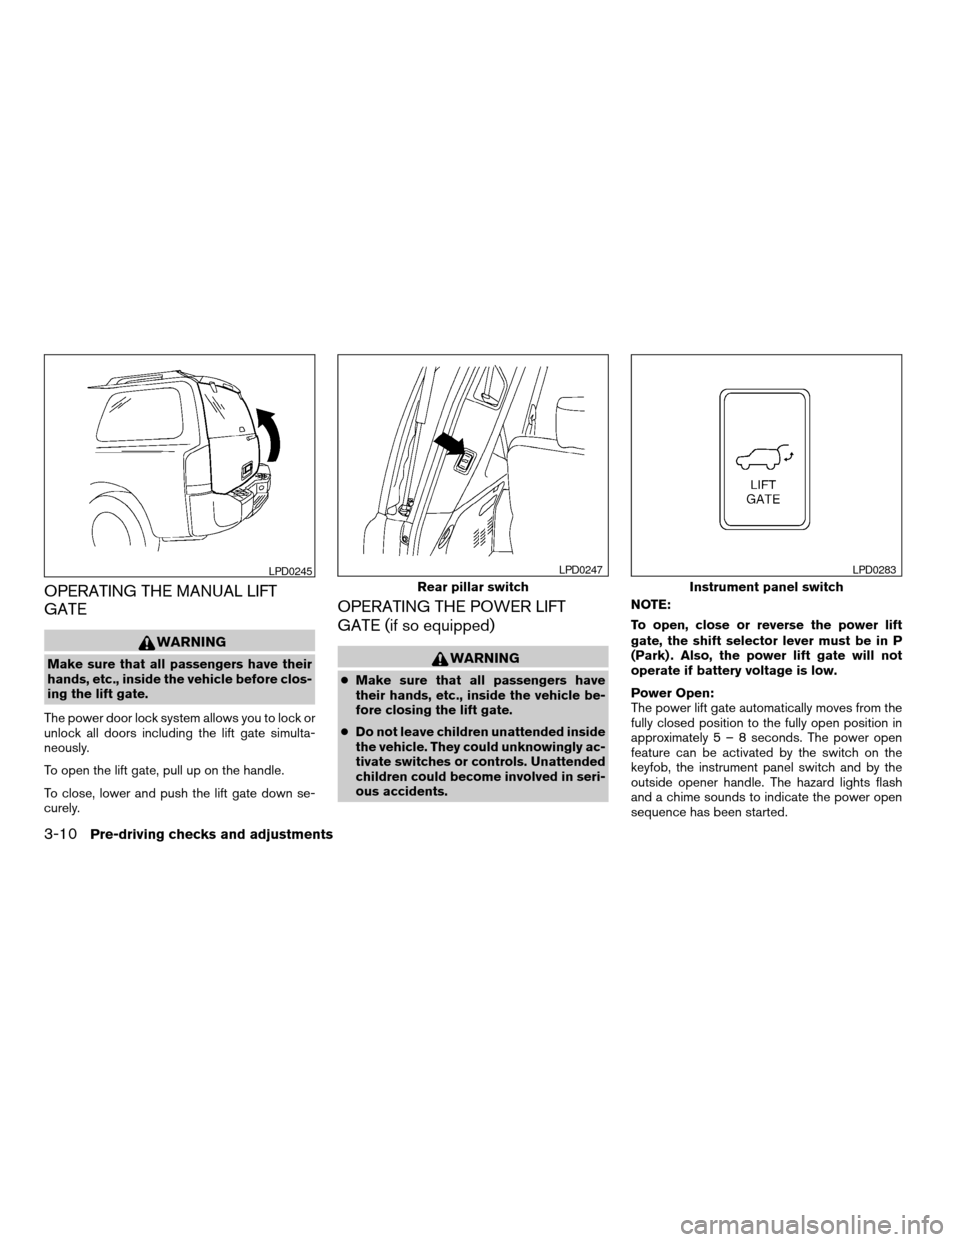
To open the lift gate, pull up on the handle.
To close, lower and push the lift gate down se-
curely.
OPERATING THE POWER LIFT
GATE (if so equipped)
WARNING
cMake sure that all passengers have
their hands, etc., inside the vehicle be-
fore closing the lift gate.
cDo not leave children unattended inside
the vehicle. They could unknowingly ac-
tivate switches or controls. Unattended
children could become involved in seri-
ous accidents.NOTE:
To open, close or reverse the power lift
gate, the shift selector lever must be in P
(Park) . Also, the power lift gate will not
operate if battery voltage is low.
Power Open:
The power lift gate automatically moves from the
fully closed position to the fully open position in
approximately5–8seconds. The power open
feature can be activated by the switch on the
keyfob, the instrument panel switch and by the
outside opener handle. The hazard lights flash
and a chime sounds to indicate the power open
sequence has been started.
LPD0245
Rear pillar switch
LPD0247
Instrument panel switch
LPD0283
3-10Pre-driving checks and adjustments
ZREVIEW COPYÐ2006 Armada(wzw)
Owners ManualÐUSA_English(nna)
06/15/05Ðdebbie
X
Page 159 of 352
cThe lift gate can be opened by the instru-
ment panel switch and the keyfob even if the
vehicle is locked. The lift gate will individually
unlock and open. Once the lift gate is
closed, its lock will align to the vehicle’s lock
or unlock status.
cThe keyfob button must be held for 0.5 sec-
ond before the lift gate opens.
cThe lift gate must be unlocked to open it with
the outside opener handle.
cThe switch on the rear pillar cannot be used
to open the lift gate.
A warning chime will sound if the shift selector
lever is moved out of P (Park) during a power
open operation.
Power Close:
The power lift gate automatically moves from the
fully open position to the secondary position.
When the lift gate reaches the secondary posi-
tion, the cinching motor engages and pulls the lift
gate to its primary latch position. Power close
takes approximately7–10seconds. The power
close feature can be activated by the switch on
the keyfob, the instrument panel and the rear
pillar. The hazard lights flash and a chime sounds
to indicate the power close sequence has been
started.cIf the outside opener handle is activated
while the cinching motor is engaged, the
cinching motor will disengage and release
the latch.
cThe keyfob button must be held for 0.5 sec-
ond before the lift gate closes.
cThe switch on the rear pillar can only be used
to close the lift gate if the cancel switch is
not in the on position.
Reverse:
The power lift gate will reverse direction immedi-
ately during power open or power close if the
keyfob, instrument panel or rear pillar switch is
pressed or if the outside handle is lifted. A chime
will sound to announce the reversal.
Auto Reverse:
If an obstacle is detected during power open or
power close, a warning chime will sound and the
lift gate will reverse direction and return to the full
open or full close position. If a second obstacle is
detected, the lift gate motion will stop and the
drive motor will disengage. The lift gate will enter
manual mode.
A pinch strip is mounted on each side of the lift
gate. If an obstacle is detected by a pinch strip
during power close, the lift gate will reverse di-
rection and return to the full open position.NOTE:
If the pinch strip is damaged or removed,
the power close function will not operate.
WARNING
There are some small distances immedi-
ately before the closed position which
cannot be detected. Make sure that all
passengers have their hands, etc., inside
the vehicle before closing the lift gate.
Manual Mode:
If power operation is not available, the lift gate
may be operated manually. Power operation may
not be available if the cancel switch is in the on
position, if multiple obstacles have been de-
tected in a single power cycle, or if battery volt-
age is low.
Pre-driving checks and adjustments3-11
ZREVIEW COPYÐ2006 Armada(wzw)
Owners ManualÐUSA_English(nna)
06/15/05Ðdebbie
X
Page 160 of 352
Safe Mode:
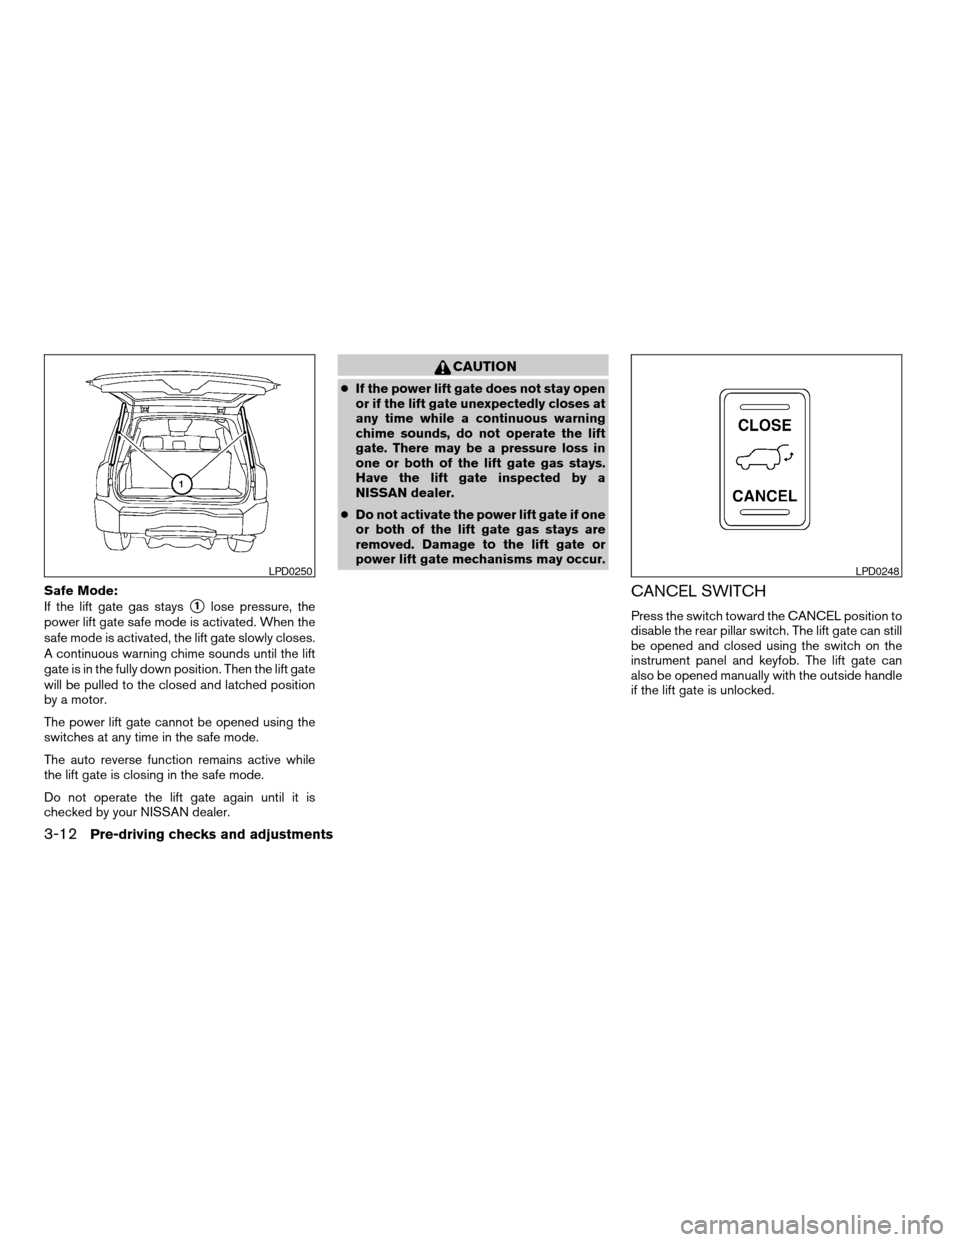
If the lift gate gas stays
s1lose pressure, the
power lift gate safe mode is activated. When the
safe mode is activated, the lift gate slowly closes.
A continuous warning chime sounds until the lift
gate is in the fully down position. Then the lift gate
will be pulled to the closed and latched position
by a motor.
The power lift gate cannot be opened using the
switches at any time in the safe mode.
The auto reverse function remains active while
the lift gate is closing in the safe mode.
Do not operate the lift gate again until it is
checked by your NISSAN dealer.
CAUTION
cIf the power lift gate does not stay open
or if the lift gate unexpectedly closes at
any time while a continuous warning
chime sounds, do not operate the lift
gate. There may be a pressure loss in
one or both of the lift gate gas stays.
Have the lift gate inspected by a
NISSAN dealer.
cDo not activate the power lift gate if one
or both of the lift gate gas stays are
removed. Damage to the lift gate or
power lift gate mechanisms may occur.
CANCEL SWITCH
Press the switch toward the CANCEL position to
disable the rear pillar switch. The lift gate can still
be opened and closed using the switch on the
instrument panel and keyfob. The lift gate can
also be opened manually with the outside handle
if the lift gate is unlocked.
LPD0250LPD0248
3-12Pre-driving checks and adjustments
ZREVIEW COPYÐ2006 Armada(wzw)
Owners ManualÐUSA_English(nna)
06/15/05Ðdebbie
X
Page 187 of 352

OPERATING TIPS
cWhen the engine coolant temperature and
outside air temperature are low, the air flow
from the foot outlets may not operate for a
maximum of 150 seconds. However, this is
not a malfunction. After the coolant tempera-
ture warms up, air flow from the foot outlets
will operate normally.
The sunload sensor
s1, located on the top center
of the instrument panel, helps the system main-
tain a constant temperature. Do not put anything
on or around this sensor.To operate the rear air conditioner, the engine
must be running.
The rear seat air conditioner can be turned on
and off from the front controls. If the rear seat fan
control dial is set to (0) , the air conditioner is
turned off. If it is set to any of the fan speed
positions, air is discharged from the rear vents at
the corresponding speed. When the rear seat fan
control dial is set to (R) , the rear seat passengers
control their own fan speed.
LIC0836
REAR SEAT AIR CONDITIONER
Display screen, heater, air conditioner and audio systems4-17
ZREVIEW COPYÐ2006 Armada(wzw)
Owners ManualÐUSA_English(nna)
07/01/05Ðarosenma
X
Page 229 of 352
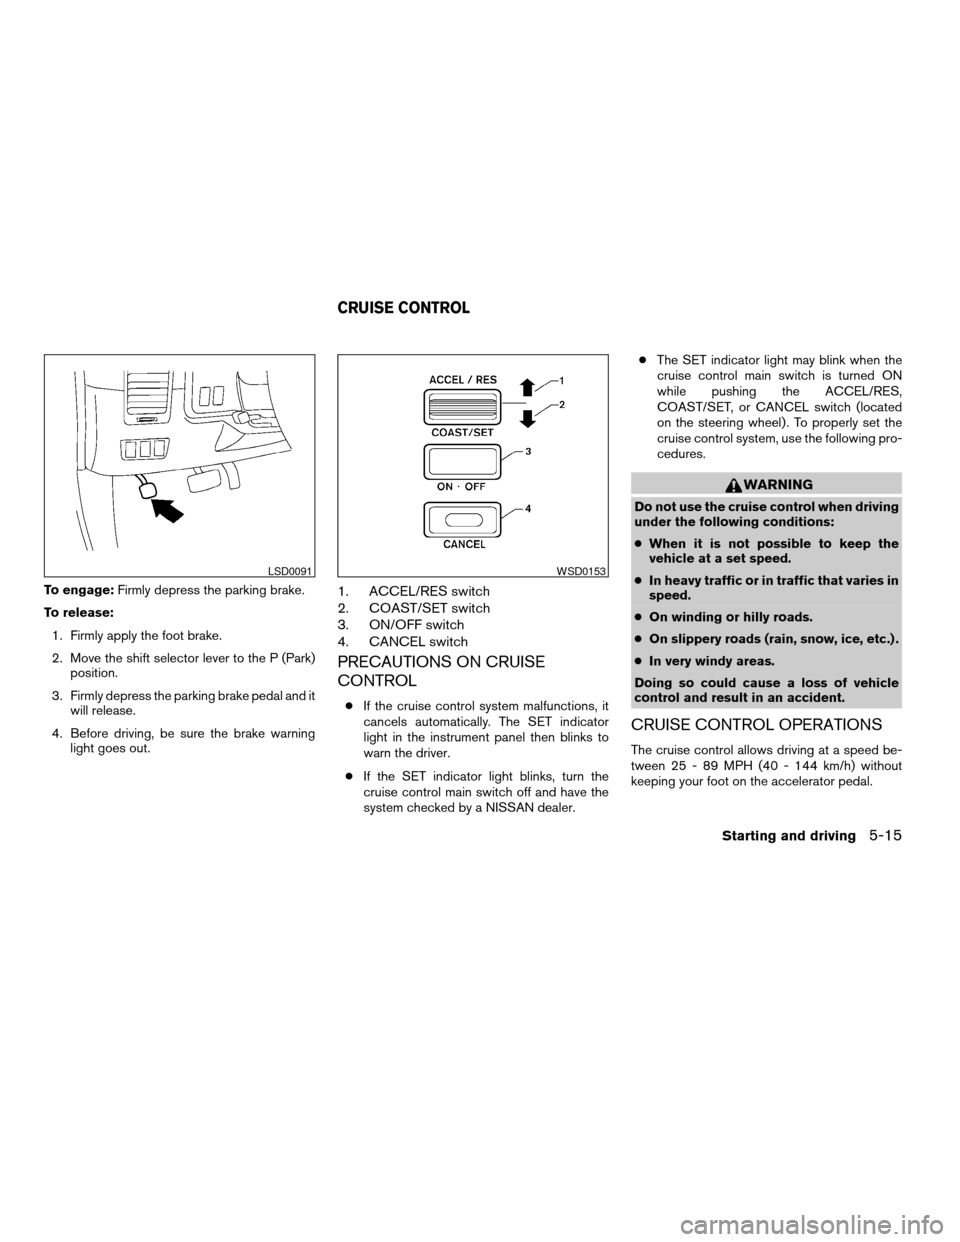
To engage:Firmly depress the parking brake.
To release:
1. Firmly apply the foot brake.
2. Move the shift selector lever to the P (Park)
position.
3. Firmly depress the parking brake pedal and it
will release.
4. Before driving, be sure the brake warning
light goes out.1. ACCEL/RES switch
2. COAST/SET switch
3. ON/OFF switch
4. CANCEL switch
PRECAUTIONS ON CRUISE
CONTROL
cIf the cruise control system malfunctions, it
cancels automatically. The SET indicator
light in the instrument panel then blinks to
warn the driver.
cIf the SET indicator light blinks, turn the
cruise control main switch off and have the
system checked by a NISSAN dealer.cThe SET indicator light may blink when the
cruise control main switch is turned ON
while pushing the ACCEL/RES,
COAST/SET, or CANCEL switch (located
on the steering wheel) . To properly set the
cruise control system, use the following pro-
cedures.
WARNING
Do not use the cruise control when driving
under the following conditions:
cWhen it is not possible to keep the
vehicle at a set speed.
cIn heavy traffic or in traffic that varies in
speed.
cOn winding or hilly roads.
cOn slippery roads (rain, snow, ice, etc.) .
cIn very windy areas.
Doing so could cause a loss of vehicle
control and result in an accident.
CRUISE CONTROL OPERATIONS
The cruise control allows driving at a speed be-
tween 25 - 89 MPH (40 - 144 km/h) without
keeping your foot on the accelerator pedal.
LSD0091WSD0153
CRUISE CONTROL
Starting and driving5-15
ZREVIEW COPYÐ2006 Armada(wzw)
Owners ManualÐUSA_English(nna)
06/16/05Ðdebbie
X