2006 NISSAN ARMADA buttons
[x] Cancel search: buttonsPage 171 of 352

4 Display screen, heater, air conditioner
and audio systems
Control panel buttons (if so equipped)...............4-2
Names of the components.......................4-3
How to use joystick and “ENTER” button..........4-3
How to use “BACK” button......................4-3
Setting up the start-up screen...................4-3
How to use the “TRIP” button....................4-3
How to use the “SETTING” button................4-6
Setting the display (Audio or HVAC display):......4-7
button..................................4-11
Rearview monitor (if so equipped)..................4-12
How to read the displayed lines.................4-12
Adjusting the screen...........................4-13
Operating tips.................................4-13
Ventilators.......................................4-14
Heater and air conditioner (automatic)..............4-15
Automatic operation...........................4-15
Manual operation..............................4-16
Rear control button............................4-16
Operating tips.................................4-17
Rear seat air conditioner..........................4-17
Controls......................................4-18
Servicing air conditioner...........................4-18Audio system....................................4-18
Radio........................................4-18
FM radio reception............................4-19
AM radio reception............................4-19
Satellite radio reception (if so equipped).........4-19
Audio operation precautions....................4-20
FM-AM-SAT radio with compact disc (CD)
changer (Type A, B and C) (if so equipped).......4-26
CD care and cleaning..........................4-31
Steering wheel switch for audio control
(if so equipped)...............................4-31
Rear audio controls (if so equipped).............4-33
Antenna......................................4-34
NISSAN mobile entertainment system (MES)
(if so equipped)..................................4-34
Digital video disc (DVD) player controls..........4-35
Remote control................................4-36
Flip-down screen..............................4-36
Playing a digital video disc (DVD)...............4-38
Care and maintenance.........................4-40
How to handle the DVD........................4-41
Car phone or CB radio............................4-43
ZREVIEW COPYÐ2006 Armada(wzw)
Owners ManualÐUSA_English(nna)
07/01/05Ðarosenma
X
Page 172 of 352

WARNING
cPositioning of the heating or air condi-
tioning controls and display controls
should not be done while driving in or-
der that full attention may be given to
the driving operation.
cDo not disassemble or modify this sys-
tem. If you do, it may result in accidents,
fire, or electrical shock.
cDo not use this system if you notice any
abnormality, such as a frozen screen or
lack of sound. Continued use of the
system may result in accident, fire or
electric shock.
cIn case you notice any foreign object in
the system hardware, spill liquid on it,
or notice smoke or smell coming from
it, stop using the system immediately
and contact your nearest NISSAN
dealer. Ignoring such conditions may
lead to accidents, fire or electrical
shock.
When you use this system, make sure the engine
is running.
If you use the system with the engine not
running (ignition ON or ACC) for a long
time, it will use up all the battery power,
and the engine will not start.Reference symbols:
“ENTER”button — This is a button on the con-
trol panel.
“Display”key — This is a select key on the
screen. By selecting this key you can proceed to
the next function.
LHA0581
CONTROL PANEL BUTTONS (if so
equipped)
4-2Display screen, heater, air conditioner and audio systems
ZREVIEW COPYÐ2006 Armada(wzw)
Owners ManualÐUSA_English(nna)
06/16/05Ðdebbie
X
Page 173 of 352

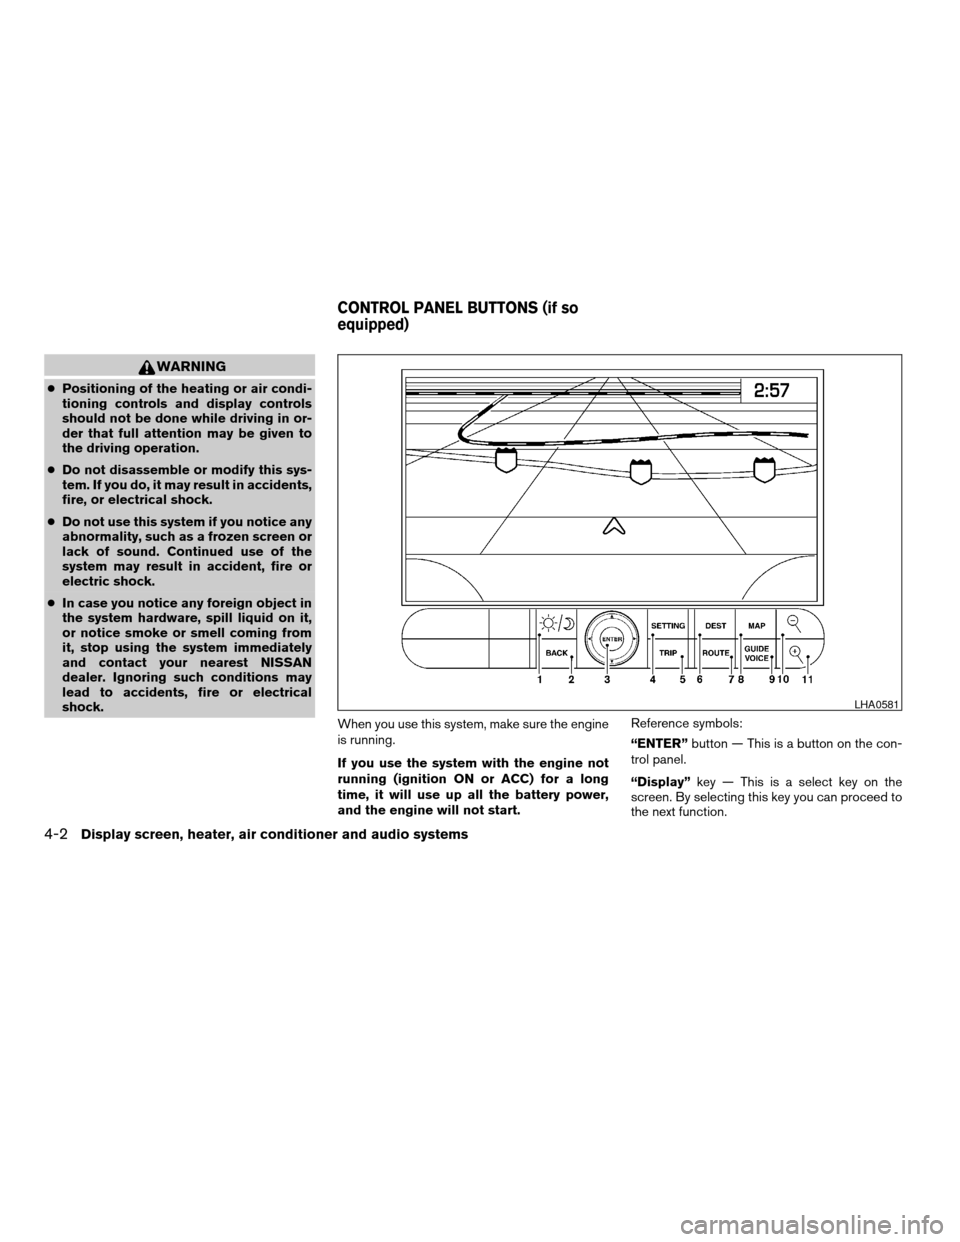
NAMES OF THE COMPONENTS
1.brightness control button (P. 4-7)
2. BACK (previous) button (P. 4-3)
3. Joystick and ENTER push button (P. 4-3)
4. SETTING button (P. 4-6)
5. TRIP drive computer button (P. 4-3)
6. DEST button*
7. ROUTE button*
8. MAP button*
9. GUIDE VOICE button*
10.
zoom out button*
11.
zoom in button*
*For Navigation system control buttons, refer to
the separate Navigation System Owner’s
Manual.
HOW TO USE JOYSTICK AND
“ENTER” BUTTON
Choose an item on the display using the joystick
and push the“ENTER”button for operation.
HOW TO USE “BACK” BUTTON
This button has two functions.
cGo back to the previous display (cancel) .
If you press the“BACK”button during setup, the
setup will be canceled and/or the display will
return to the previous screen.
cFinish setup.
If you press this button after the setup is com-
pleted, the setup will start over, and the display
will return to the climate control or audio mode
and Navigation screen.
SETTING UP THE START-UP
SCREEN
When you turn the ignition key to ACC or ON, the
SYSTEM START-UP warning is displayed on the
screen. Read the warning and select the “I
AGREE” (English) or “ENTER” (Français) key
then push the“ENTER”button.
If you do not push the“ENTER”button, the
Navigation system will not proceed to the next
step display.
If you do not touch the button or screen key for
more than 1 minute on the TRIP, SETTING or
START-UP screen, the screen will change to
TRIP screen automatically.
To proceed to the next step, refer to the separate
Navigation System Owner’s Manual.HOW TO USE THE “TRIP” BUTTON
When the“TRIP”button is pushed, the following
modes will display on the screen.
Warning message (if there are any)!TRIP 1
(Elapsed Time, Driving Distance, Average
Speed)!TRIP 2!FUEL ECONOMY (Average
Fuel Economy, Distance to Empty)!MAINTE-
NANCE (Engine Oil, Tire Rotation and Tire Pres-
sure — if so equipped)!OFF.
LHA0572
Display screen, heater, air conditioner and audio systems4-3
ZREVIEW COPYÐ2006 Armada(wzw)
Owners ManualÐUSA_English(nna)
06/16/05Ðdebbie
X
Page 186 of 352

Dehumidified defrosting or defogging
1. Push the defroster control buttonto
turn the system on. The display will show the
defrost icon.
2. Turn the temperature dial to the left or right
to set the desired temperature.
cTo quickly remove ice from the outside of the
windows, turn the manual fan control dial to
the maximum position
.
cAs soon as possible after the windshield is
clean, push the AUTO button to return to the
auto mode.
c
When the DEF controlis activated, the
air conditioner will automatically be turned on
at outside temperatures above 36°F (2°C) . If
in defrost mode for more than one minute, the
air conditioning system will continue to oper-
ate until the fan control is turned OFF or the
vehicle is shut off, even if the air flow MODE
control button is used to select a position
other than the
position. This dehumidi-
fies the air which helps defog the windshield.
The air recirculation mode automatically turns
off, allowing outside air to be drawn into the
passenger compartment to further improve
the defogging performance.
MANUAL OPERATION
Fan speed control dial
The fan speed control dialmanually con-
trols the fan speed or turns the system on or off.
Push the AUTO button to return to automatic
control of the fan speed.
Air recirculation
Themode automatically turns off, allowing
outside air to be drawn into the passenger com-
partment to prevent fogging.
Push the air recirculation button
to recir-
culate interior air inside the vehicle. Push the
AUTO button to return to automatic mode.
The air recirculation button will not be activated
when the air conditioner is in DEF, floor, or
floor/defrost mode.
Air flow control
Pushing the MODE button manually controls air
flow and selects the air outlet to:
— Air flows from center and side
ventilators.
— Air flows from center and side ventila-
tors and foot outlets.
— Air flows mainly from foot outlets.
—Air flows from defroster and foot
outlets.
—Air flows mainly from defroster outlets.
To turn system off
Push and hold the fan down button until the
system turns off.1. Rear fan speed control dial.
2. Rear temperature control dial.
REAR CONTROL BUTTON
You can adjust the climate control system for rear
seat passengers using the buttons on the main
control panel. Front passengers can control the
rear functions by placing the controls on any
setting other than the “R”.
WHA0509
4-16Display screen, heater, air conditioner and audio systems
ZREVIEW COPYÐ2006 Armada(wzw)
Owners ManualÐUSA_English(nna)
07/01/05Ðarosenma
X
Page 193 of 352

1. SEEK/TRACK change button
2. CAT FOLDER button
3. DISP button
4. SCAN RPT button
5. PRESET A-B-C select button6. CD DVD play button
7. RADIO button*
8. AUX button
9. REAR ON OFF button
10.
speaker control button11. LOAD button
12. CD insert slot
13. CD eject button
14. POWER/VOLUME control knob
15. Station and CD select buttons (1 - 6)
16. Tuning and AUDIO control knob
(BASS, MID, TREBLE, FADE and BAL-
ANCE)
*No satellite radio reception is available
and “NO SAT” is displayed when the
RADIO button is pressed to access
satellite radio stations unless optional
satellite receiver and antenna are in-
stalled and an XMTor SIRIUS™ satellite
radio service subscription is active. Sat-
ellite radio is not available in Alaska,
Hawaii and Guam.
Type A
LHA0570
Display screen, heater, air conditioner and audio systems4-23
ZREVIEW COPYÐ2006 Armada(wzw)
Owners ManualÐUSA_English(nna)
06/16/05Ðdebbie
X
Page 194 of 352

1. SEEK/TRACK change button
2. CAT FOLDER button
3. DISP button
4. SCAN RPT button
5. PRESET A-B-C select button6. CD play button
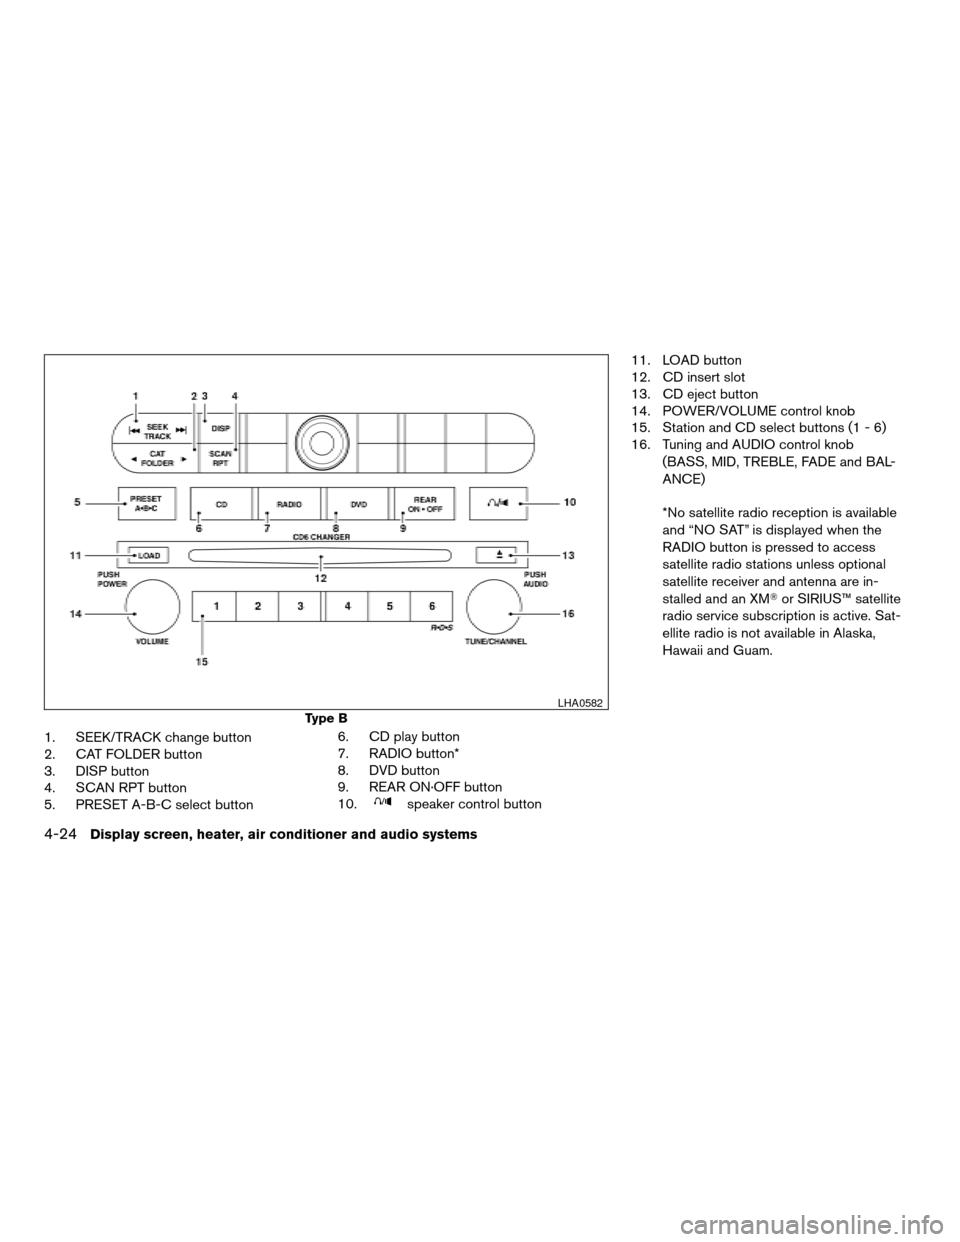
7. RADIO button*
8. DVD button
9. REAR ON·OFF button
10.
speaker control button11. LOAD button
12. CD insert slot
13. CD eject button
14. POWER/VOLUME control knob
15. Station and CD select buttons (1 - 6)
16. Tuning and AUDIO control knob
(BASS, MID, TREBLE, FADE and BAL-
ANCE)
*No satellite radio reception is available
and “NO SAT” is displayed when the
RADIO button is pressed to access
satellite radio stations unless optional
satellite receiver and antenna are in-
stalled and an XMTor SIRIUS™ satellite
radio service subscription is active. Sat-
ellite radio is not available in Alaska,
Hawaii and Guam.
Type B
LHA0582
4-24Display screen, heater, air conditioner and audio systems
ZREVIEW COPYÐ2006 Armada(wzw)
Owners ManualÐUSA_English(nna)
06/16/05Ðdebbie
X
Page 195 of 352

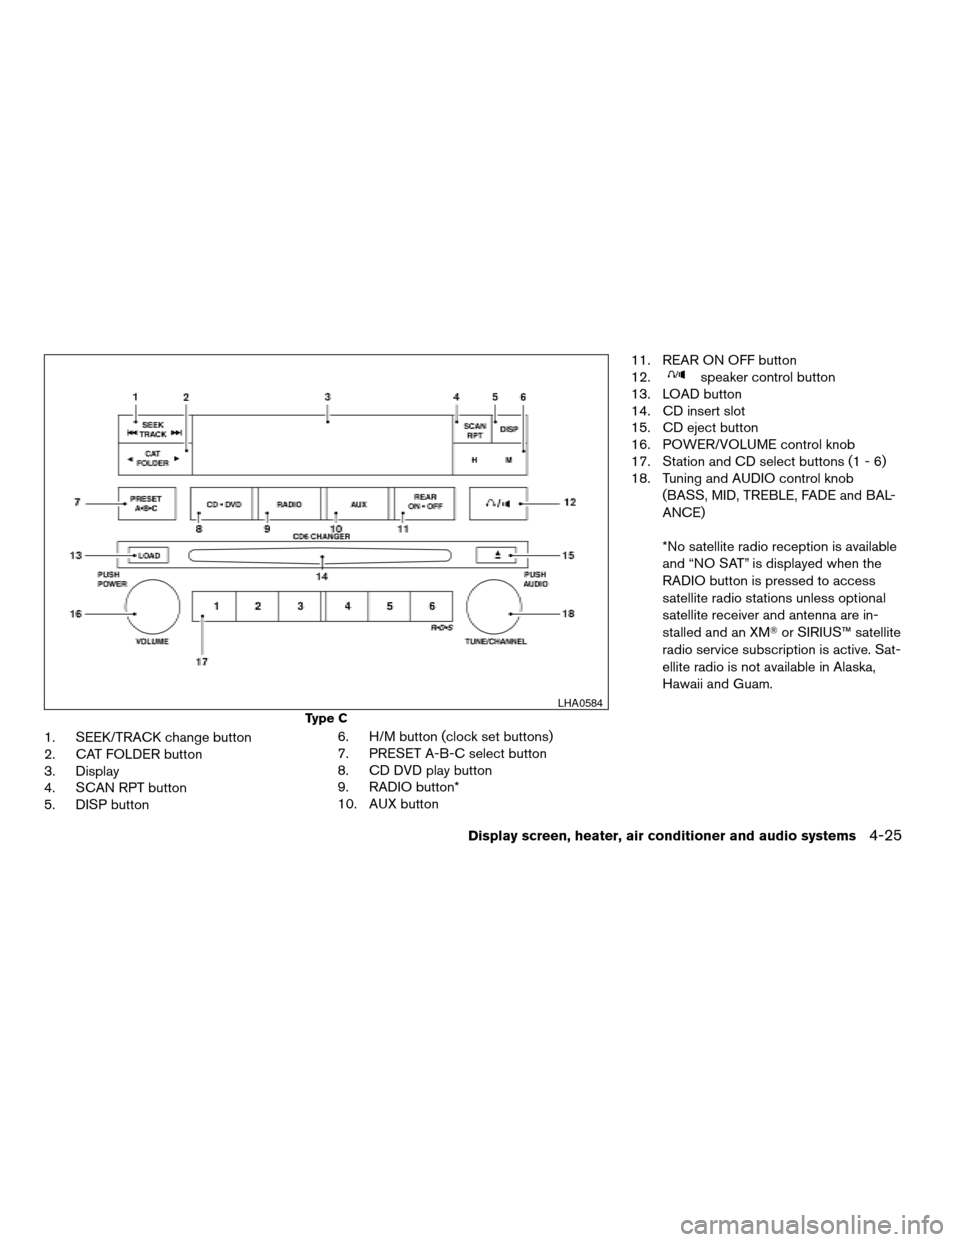
1. SEEK/TRACK change button
2. CAT FOLDER button
3. Display
4. SCAN RPT button
5. DISP button6. H/M button (clock set buttons)
7. PRESET A-B-C select button
8. CD DVD play button
9. RADIO button*
10. AUX button11. REAR ON OFF button
12.
speaker control button
13. LOAD button
14. CD insert slot
15. CD eject button
16. POWER/VOLUME control knob
17. Station and CD select buttons (1 - 6)
18. Tuning and AUDIO control knob
(BASS, MID, TREBLE, FADE and BAL-
ANCE)
*No satellite radio reception is available
and “NO SAT” is displayed when the
RADIO button is pressed to access
satellite radio stations unless optional
satellite receiver and antenna are in-
stalled and an XMTor SIRIUS™ satellite
radio service subscription is active. Sat-
ellite radio is not available in Alaska,
Hawaii and Guam.
Type C
LHA0584
Display screen, heater, air conditioner and audio systems4-25
ZREVIEW COPYÐ2006 Armada(wzw)
Owners ManualÐUSA_English(nna)
06/16/05Ðdebbie
X
Page 198 of 352

CAT FOLDER (Tuning):
WARNING
The radio should not be tuned while driv-
ing so full attention may be given to ve-
hicle operation.
To manually tune the radio, push the CAT
FOLDER tune button (
or) or turn
the tuning knob to right or left.
To move quickly through the channels, hold either
the
orbutton down for more than
1.5 seconds.
SEEK tuning:
Push the SEEK/TRACK button (
or)
for less than 1.5 seconds to tune from high to low
or low to high frequencies and stop at the next
broadcasting station.
SCAN RPT tuning:
Push the SCAN RPT button for more than 1.5
seconds to stop at each broadcasting station
(AM, FM or SAT if so equipped) for 5 seconds.
Pushing the button again during this 5 second
period will stop SCAN tuning and the radio will
remain tuned to that station. If the SCAN RPT
button is not pushed within 5 seconds, SCAN
tuning moves to the next station.PRESET A-B-C (Station memory opera-
tions):
18 stations can be set for the FM, AM and SAT
(Satellite-if so equipped) radio to the A, B and C
preset button in any combination of FM, AM or
SAT stations.
1. Choose preset channel A, B or C using the
preset select button.
2. Select the desired FM, AM or SAT station
band.
3. Tune to the desired station using manual,
SEEK or SCAN tuning. Push and hold any of
the desired station memory buttons (1 – 6)
until a beep sound is heard.
4. The channel indicator will then come on and
the sound will resume. Memorizing is now
complete.
5. Other buttons can be set in the same man-
ner.
If the battery cable is disconnected, or if the fuse
opens, the radio memory will be canceled. In that
case, reset the desired stations.
Radio data system (RDS):
RDS stands for Radio Data System, and is a data
information service transmitted by some radio
stations on the FM band (not AM band) . Cur-rently, most RDS stations are in large cities, but
many stations are now considering broadcasting
RDS data.
RDS can display:
cStation call sign, such as “WHFR 98.3”.
cStation name, such as “The Groove”.
If the station broadcasts RDS information, the
RDS icon is displayed.
Compact disc (CD) changer operation
CAUTION
cDo not force a compact disc into the CD
insert slot. This could damage the CD
and/or CD changer/player.
cTrying to load a CD with the CD door
closed could damage the CD and/or CD
changer.
Turn the ignition key to the ACC or ON position
and insert the compact disc into the slot with the
label side facing up. The compact disc will be
guided automatically into the slot and start play-
ing. To insert the disc, first push the LOAD button.
If the radio is already operating, it will automati-
cally turn off and the compact disc will play.
4-28Display screen, heater, air conditioner and audio systems
ZREVIEW COPYÐ2006 Armada(wzw)
Owners ManualÐUSA_English(nna)
06/16/05Ðdebbie
X