2006 NISSAN ARMADA power steering fluid
[x] Cancel search: power steering fluidPage 14 of 352

1. Battery (P. 8-13)
2. Fuse/fusible link box (P. 8-22)
3. Transmission dipstick (P. 8-11)
4. Engine oil filler cap (P. 8-8)
5. Brake fluid reservoir (P. 8-12)
6. Windshield washer fluid reservoir
(P. 8-12)
7. Air cleaner (P. 8-16)
8. Drive belt location (P.8-14)
9. Radiator cap (P. 8-7)
10. Power steering fluid reservoir (P. 8-11)
11. Engine oil dipstick (P. 8-8)
12. Engine coolant reservoir (P. 8-7)
See the page number indicated in paren-
theses for operating details.
WDI0491
ENGINE COMPARTMENT CHECK
LOCATIONS
0-8Illustrated table of contents
ZREVIEW COPYÐ2006 Armada(wzw)
Owners ManualÐUSA_English(nna)
06/15/05Ðdebbie
X
Page 95 of 352

17. Heated seat switch (if so equipped)
(P. 2-29)
18. Power outlet/cigarette lighter
(accessory) (P. 2-31/P. 2-32)
19. Vehicle dynamic control (VDC) off
switch (P. 2-29)
20. Tow mode switch (P. 2-30)
21. Shift selector lever (P. 5-10)
22. Power outlet (P. 2-31)
23. Front passenger air bag status light
(P. 1-66)
24. Hazard lights (P. 2-28)
25. 4WD shift switch (if so equipped)
(P. 5-18)
26. Tilt steering wheel control (P. 3-16)
27. Rear sonar system off switch (P. 2-30)
28. Pedal position adjustment switch
(P. 3-16)
29. Lift gate open/close switch
(if so equipped) (P. 3-9)
*: Refer to the separate Navigation System Own-
er’s Manual (if so equipped) .
See the page number indicated in paren-
theses for operating details.
1. Warning/indicator lights
2. Tachometer
3. Speedometer
4. Engine coolant temperature gauge
5. Fuel gauge
6. Engine oil pressure gauge7. Automatic transmission fluid tempera-
ture gauge (if so equipped)
8. Odometer/Twin trip odometer
9. Voltmeter
LIC0540
METERS AND GAUGES
Instruments and controls2-3
ZREVIEW COPYÐ2006 Armada(wzw)
Owners ManualÐUSA_English(nna)
06/15/05Ðdebbie
X
Page 267 of 352

8 Maintenance and do-it-yourself
Maintenance requirements..........................8-2
General maintenance..............................8-2
Explanation of general maintenance items.........8-2
Maintenance precautions...........................8-5
Engine compartment check locations................8-6
Engine cooling system.............................8-7
Checking engine coolant level...................8-7
Changing engine coolant........................8-8
Engine oil.........................................8-8
Checking engine oil level........................8-8
Changing engine oil............................8-9
Changing engine oil filter.......................8-10
5-speed automatic transmission fluid...............8-11
Power steering fluid...............................8-11
Brake fluid.......................................8-11
Brake fluid....................................8-12
Window washer fluid.............................8-12
Window washer fluid reservoir..................8-12
Battery..........................................8-13
Jump starting.................................8-14
Drive belts.......................................8-14
Spark plugs......................................8-15
Replacing spark plugs.........................8-15Air cleaner.......................................8-16
In-cabin microfilter.............................8-16
Windshield wiper blades..........................8-18
Cleaning.....................................8-18
Replacing....................................8-18
Parking brake and brake pedal.....................8-21
Checking parking brake........................8-21
Checking brake pedal..........................8-21
Brake booster.................................8-22
Fuses...........................................8-22
Engine compartment...........................8-23
Passenger compartment.......................8-24
Keyfob battery replacement........................8-25
Lights...........................................8-26
Headlights....................................8-26
Fog lights (if so equipped)......................8-26
Exterior and interior lights.......................8-27
Wheels and tires.................................8-31
Tire pressure..................................8-31
Tire labeling...................................8-36
Types of tires..................................8-38
Tire chains....................................8-39
Changing wheels and tires.....................8-39
ZREVIEW COPYÐ2006 Armada(wzw)
Owners ManualÐUSA_English(nna)
06/16/05Ðdebbie
X
Page 270 of 352

Windshield defrosterCheck that the air
comes out of the defroster outlets properly and in
sufficient quantity when operating the heater or
air conditioner.
Under the hood and vehicle
The maintenance items listed here should be
checked periodically (for example, each time you
check the engine oil or refuel) .
Battery*Check the fluid level in each cell. It
should be between the MAX and MIN lines. Ve-
hicles operated in high temperatures or under
severe conditions require frequent checks of the
battery fluid level.
Brake fluid levels*Make sure that the brake
fluid level is between the MIN and MAX lines on
the reservoir.
Engine coolant level*Check the coolant level
when the engine is cold.
Engine drive belts*Make sure the drive belts
are not frayed, worn, cracked or oily.
Engine oil level*Check the level after parking
the vehicle on a level surface with the engine off.
Wait more than 10 minutes for the oil to drain
back into the oil pan.
Exhaust systemMake sure there are no loose
supports, cracks or holes. If the sound of the
exhaust seems unusual or there is a smell ofexhaust fumes, immediately have the exhaust
system inspected by a NISSAN dealer. See the
carbon monoxide warning in the “Starting and
driving” section of this manual.
Fluid leaksCheck under the vehicle for fuel, oil,
water or other fluid leaks after the vehicle has
been parked for a while. Water dripping from the
air conditioner after use is normal. If you should
notice any leaks or if gasoline fumes are evident,
check for the cause and have it corrected imme-
diately.
Power steering fluid level* and linesCheck
the level when the fluid is cold, with the engine
off. Check the lines for proper attachment, leaks,
cracks, etc.
Radiator and hosesCheck the front of the
radiator and clean off any dirt, insects, leaves,
etc., that may have accumulated. Make sure the
hoses have no cracks, deformation, rot or loose
connections.
UnderbodyThe underbody is frequently ex-
posed to corrosive substances such as those
used on icy roads or to control dust. It is very
important to remove these substances from the
underbody, otherwise rust may form on the floor
pan, frame, fuel lines and exhaust system. At the
end of winter, the underbody should be thor-
oughly flushed with plain water, in those areaswhere mud and dirt may have accumulated. See
the “Appearance and care” section of this
manual.
Windshield washer fluid*Check that there is
adequate fluid in the reservoir.
8-4Maintenance and do-it-yourself
ZREVIEW COPYÐ2006 Armada(wzw)
Owners ManualÐUSA_English(nna)
06/16/05Ðdebbie
X
Page 272 of 352

1. Battery
2. Fuse/fusible link box
3. Transmission dipstick
4. Engine oil filler cap
5. Brake fluid reservoir
6. Windshield washer fluid reservoir
7. Air cleaner
8. Drive belt location
9. Radiator cap
10. Power steering fluid reservoir
11. Engine oil dipstick
12. Engine coolant reservoir
NOTE:
Engine cover removed for clarity.
WDI0491
ENGINE COMPARTMENT CHECK
LOCATIONS
8-6Maintenance and do-it-yourself
ZREVIEW COPYÐ2006 Armada(wzw)
Owners ManualÐUSA_English(nna)
06/16/05Ðdebbie
X
Page 277 of 352

When checking or replacement is required, we
recommend your NISSAN dealer for servicing.
WARNING
cUse only Genuine NISSAN Matic J ATF.
Do not mix with other fluids.
cUsing automatic transmission fluid
other than Genuine NISSAN Matic J ATF
will cause deterioration in driveability
and automatic transmission durability,
and may damage the automatic trans-
mission, which is not covered by the
NISSAN new vehicle limited warranty.
The specified automatic transmission fluid is also
described on caution labels located in the engine
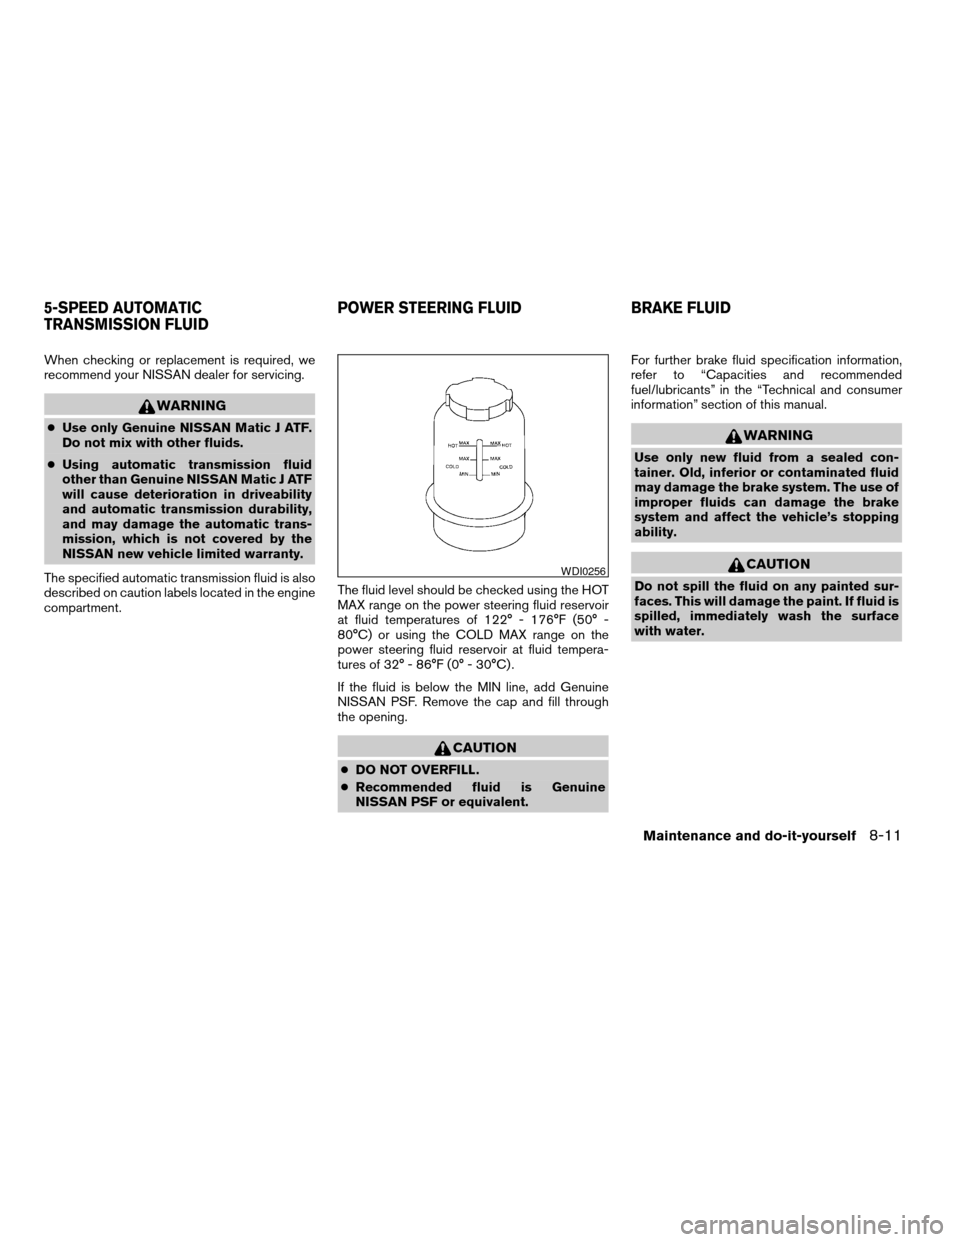
compartment.The fluid level should be checked using the HOT
MAX range on the power steering fluid reservoir
at fluid temperatures of 122° - 176°F (50° -
80°C) or using the COLD MAX range on the
power steering fluid reservoir at fluid tempera-
tures of 32° - 86°F (0° - 30°C) .
If the fluid is below the MIN line, add Genuine
NISSAN PSF. Remove the cap and fill through
the opening.
CAUTION
cDO NOT OVERFILL.
cRecommended fluid is Genuine
NISSAN PSF or equivalent.For further brake fluid specification information,
refer to “Capacities and recommended
fuel/lubricants” in the “Technical and consumer
information” section of this manual.
WARNING
Use only new fluid from a sealed con-
tainer. Old, inferior or contaminated fluid
may damage the brake system. The use of
improper fluids can damage the brake
system and affect the vehicle’s stopping
ability.
CAUTION
Do not spill the fluid on any painted sur-
faces. This will damage the paint. If fluid is
spilled, immediately wash the surface
with water.WDI0256
5-SPEED AUTOMATIC
TRANSMISSION FLUIDPOWER STEERING FLUID BRAKE FLUID
Maintenance and do-it-yourself8-11
ZREVIEW COPYÐ2006 Armada(wzw)
Owners ManualÐUSA_English(nna)
06/16/05Ðdebbie
X
Page 280 of 352

2. Check the fluid level in each cell If it is
necessary to add fluid, add only distilled
water to bring the level up to the bottom of
the filler opening.Do not overfill.Vehicles operated in high temperatures or under
severe conditions require frequent checks of the
battery fluid level.
JUMP STARTING
If jump starting is necessary, see “Jump starting”
in the “In case of emergency” section of this
manual. If the engine does not start by jump
starting, the battery may have to be replaced.
Contact a NISSAN dealer.
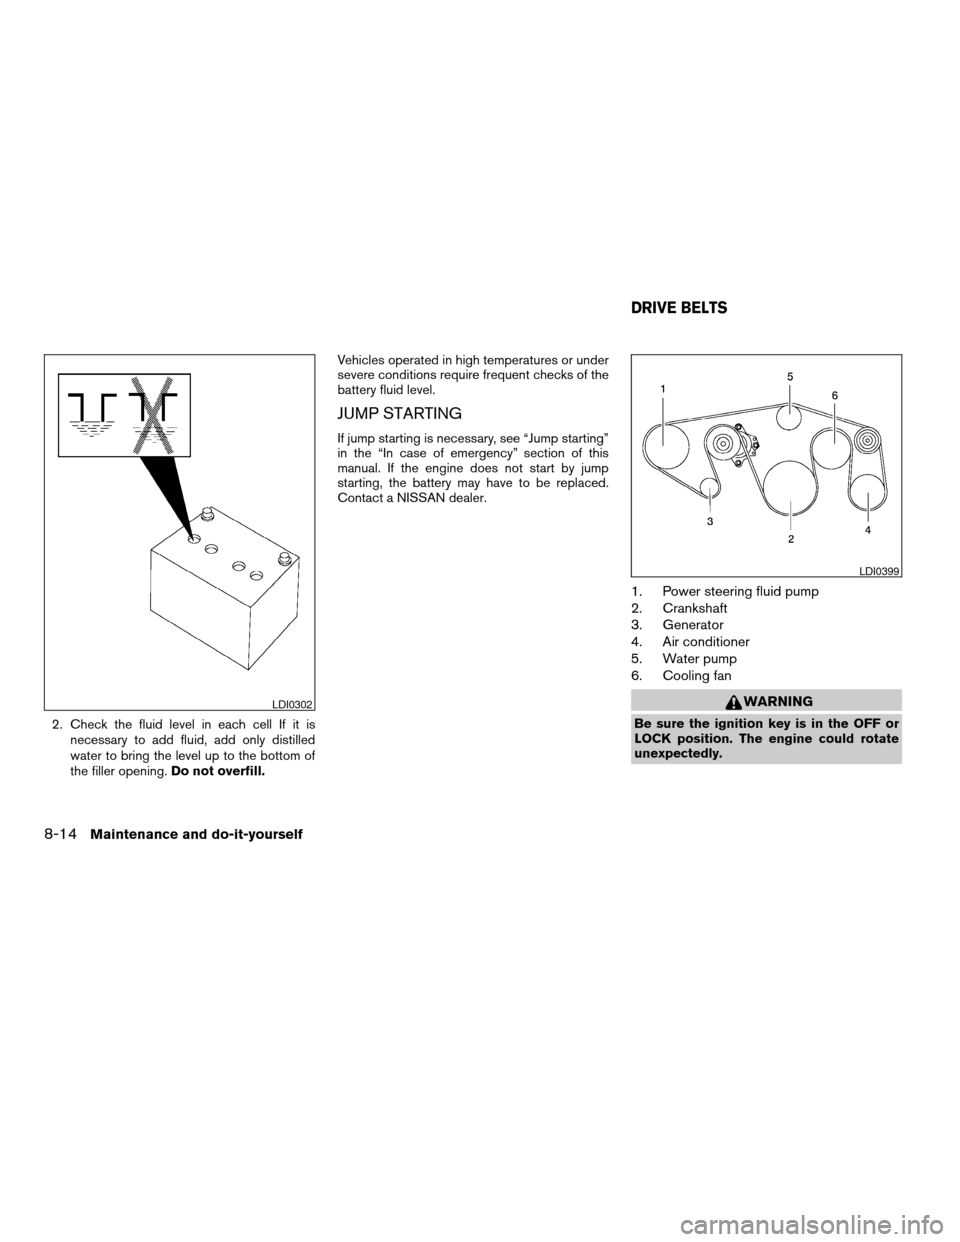
1. Power steering fluid pump
2. Crankshaft
3. Generator
4. Air conditioner
5. Water pump
6. Cooling fan
WARNING
Be sure the ignition key is in the OFF or
LOCK position. The engine could rotate
unexpectedly.
LDI0302
LDI0399
DRIVE BELTS
8-14Maintenance and do-it-yourself
ZREVIEW COPYÐ2006 Armada(wzw)
Owners ManualÐUSA_English(nna)
06/16/05Ðdebbie
X
Page 310 of 352

The following are approximate capacities. The actual refill capacities may be a little different. When refilling, follow the procedure
described in the “Maintenance and do-it-yourself” section to determine the proper refill capacity.
Capacity (Approximate) Recommended Fluids and Lubricants
US measure Imp measure Liter
Fuel 28 gal 23-1/4 gal 105.8 Unleaded gasoline with an octane rating of at least 87 AKI (RON 91)*1
Engine oil *7
Drain and Refill
With oil filter change 6-1/2 qt 5-1/2 qt 6.2 • API Certification Mark *2 *3
• API grade SG, Energy Conserving II or API grade SH, SJ or SL*2 *3
• ILSAC grade GF-II or GF-III*2 *3 Without oil filter change 6-1/4 qt 5-1/4 qt 5.9
Cooling system
With reservoir 3-3/4 gal 3-1/8 gal 14.4 50% Genuine NISSAN Long Life Antifreeze/Coolant or equivalent
50% Demineralized or distilled water
Automatic transmission fluid Refill to the proper level according to the instructions in
the “Maintenance and do-it-yourself” section.Genuine NISSAN Matic J ATF *4
Power steering fluid (PSF)Genuine NISSAN PSF or equivalent.*8
Brake fluidGenuine NISSAN Super Heavy Duty Brake Fluid*5 or equivalent DOT 3
Multi-purpose grease — — — NLGI No. 2 (Lithium Soap base)
Air conditioning system refrigerant — — — HFC-134a (R-134a)*6
Air conditioning system oil — — — NISSAN A/C System Oil Type S (DH-PS) or equivalent*6
Transfer fluid — — — Genuine NISSAN Matic D ATF (Continental U.S. and Alaska) or Canada
NISSAN Automatic Transmission Fluid*8, *10
Front final drive oil — — — API GL-5 Viscosity SAE 80W-90*9, *10
Rear final drive oil — — — API GL-5 Viscosity SAE 80W-90*9, *10
Windshield washer fluid (shared between
front and rear wipers)1-1/4 gal 1 gal 4.5 Genuine NISSAN Windshield Washer Concentrate Cleaner & Antifreeze fluid
or equivalent
*1: For further details, see “Fuel recommendation.”
*2: For further details, see “Engine oil and oil filter recommendations.”
*3: For further details, see “Recommended SAE viscosity number.”
*4: Using automatic transmission fluid other than Genuine NISSAN Matic J ATF will cause deterioration in driveability and automatic transmission durability, and may damage the auto-
matic transmission, which is not covered by the NISSAN new vehicle limited warranty.
*5: Available in mainland USA through your NISSAN dealer.
*6: For further details, see “Air conditioner specification label.”
*7: For further details, see “Changing engine oil.”
*8: For Canada, NISSAN Automatic Transmission Fluid (ATF) , DEXRON™ III/MERCON™, or equivalent ATF may also be used.
*9: For hot climates, viscosity SAE 90 is suitable for ambient temperatures above 0° C (32° F) .
*10: See your NISSAN dealer for service.
CAPACITIES AND RECOMMENDED
FUEL/LUBRICANTS
9-2Technical and consumer information
ZREVIEW COPYÐ2006 Armada(wzw)
Owners ManualÐUSA_English(nna)
06/16/05Ðdebbie
X