Page 124 of 297

vehicle body.
�Do not place anything in the top stor-
age area. The top will not fit there
properly, and this could damage the
top and/or the vehicle body.
�Do not sit or place excessive weight
on the top and the storage lid, espe-
cially when the top is being operated.
The top may be damaged.
�Do not drive the vehicle with the top
partially opened. Always make sure
the top is either fully opened or
closed before driving.
�Secure items so that they cannot be
blown from the vehicle while driving
with the top open.
�When a child restraint is installed in
the passenger seat, be sure to turn
the seatback tilt cancel switch (lo-
cated on the passenger seatback) to
the CANCEL position, or the child
restraint may be damaged.
Make sure the trunk lid is securely closed before
operating the top.
WHEN OPERATING THE TOP
WARNING
Keep hands and other parts of the body
away from moving parts such as the top,
storage lid and power windows.
CAUTION
Keep all parts of the top linkage clear of
obstructions, or the top latch may not be
securely locked.NOTE:
�In case of low battery or low tempera-
ture, the top may temporarily stop mov-
ing during the operation. This functions
to protect the top control mechanism,
and it is not a malfunction.
�If the top is opened and closed repeat-
edly in a short period of time, it may
stop moving to protect the top motor.
Wait for a few minutes before operating
the top again.
Pre-driving checks and adjustments
3-15
�
05.10.18/Z33-D/V5.0
�
Page 128 of 297
 position (for the
automatic transmission model) or the shift
lever to the N (Neutral) position (for the
manual t")
CLOSING THE TOP1. Apply the parking brake and move the selec-
tor lever to the P (Park) position (for the
automatic transmission model) or the shift
lever to the N (Neutral) position (for the
manual transmission model).
2. Start the engine.
3. Depress the foot brake pedal.
4. Push CLOSE on the soft top operating
switch and hold it until the top is fully closed.
•The soft top indicator light will illuminate
while the top is in motion. (In about 20seconds, the closing movement will fin-
ish.)
•Windows will automatically be fully
opened.
•The passenger seatback will automatically
move forward, unless the seatback tilt
cancel switch is in the CANCEL position.
It will return to the original position after
the top operation. (See “Automatic pas-
senger seatback tilt function” shown on
the previous page of this section.)
5. Release the switch when the top is fully
closed. (The indicator light, which is illumi-
nated, will begin to flash.)
6. Securely engage the front edge of the top to
the vehicle body with the top latch lever. (The
indicator light turns off.)
IF THE TOP DOES NOT OPEN OR
CLOSE ELECTRICALLYIf you cannot operate the soft top with the
operating switch, first check whether all the
following operating conditions are completed:
�foot brake pedal is depressed
�vehicle is stopped
�ignition switch is ON (Run the engine when
operating the top.)If the top still does not move under the above
conditions or has any system malfunction, see a
NISSAN dealer as soon as possible. When you
must close the top by yourself, in the event of
emergency or when an immediate dealer service
is not available, close the top manually according
to the procedures shown in this section.
When closing the soft top manually:
�Move the vehicle to a safe place, away from
traffic.
�Two people should perform this procedure,
as some of the top parts are extremely heavy.
The top cannot be opened manually.
WARNING
�Do not drive with the top partially
opened.
�If the top cannot be operated prop-
erly, see a NISSAN dealer as soon as
possible to have your vehicle
checked.
SPA1693
Pre-driving checks and adjustments
3-19
�
05.10.18/Z33-D/V5.0
�
Page 131 of 297

and falls simultaneously. Support the
top by hand so it does not strike the
body.
b. Lower the rear part of the top and push it
onto the top storage lid. The top is locked to
the storage lid, but the bottom of the rear part
is not closed tightly.
CAUTION
�After closing the top manually, have
the system checked and/or repaired
by a NISSAN dealer as soon as pos-
sible.
�Avoid leaving the vehicle outside for
long periods or driving at high
speeds. The rear of the top is not
locked completely, and this may al-
low wind and rain to get into your
vehicle.CARE OF THE SOFT TOP AND THE
VEHICLE BODYTo use your Roadster safely and comfortably,you need to observe all the warnings and cau-
tions shown in the previous pages. Also, to
maintain a good appearance of the soft top and
the vehicle body, you need to care for them by
cleaning and/or washing properly.
CAUTION
�Do not use an automatic car wash or
a high-pressure car wash to clean
your vehicle. The top may be dam-
aged and water may leak into the
inside of the vehicle.
�Store the vehicle with the top closed
if it is not to be used for long periods.
Keeping the top stowed for long pe-
riods may cause wrinkles on the sur-
face of the top.
See “Cleaning exterior” in the “7. Appearance
and care” section for detailed instructions.
�A protective clear tape is applied to the top
storage lid painted surface where the soft top
contacts the surface. When the top is fully
closed, the tape may transmit some light,
visible from the inside of the vehicle. This
does not affect the water and air tightness of
the seal.�The inner surface of the trunk and top storage
lids may show a fibrous, or marbled pattern.
This is the normal appearance of the material
used in these parts.
3-22
Pre-driving checks and adjustments
�
05.10.18/Z33-D/V5.0
�
Page 132 of 297
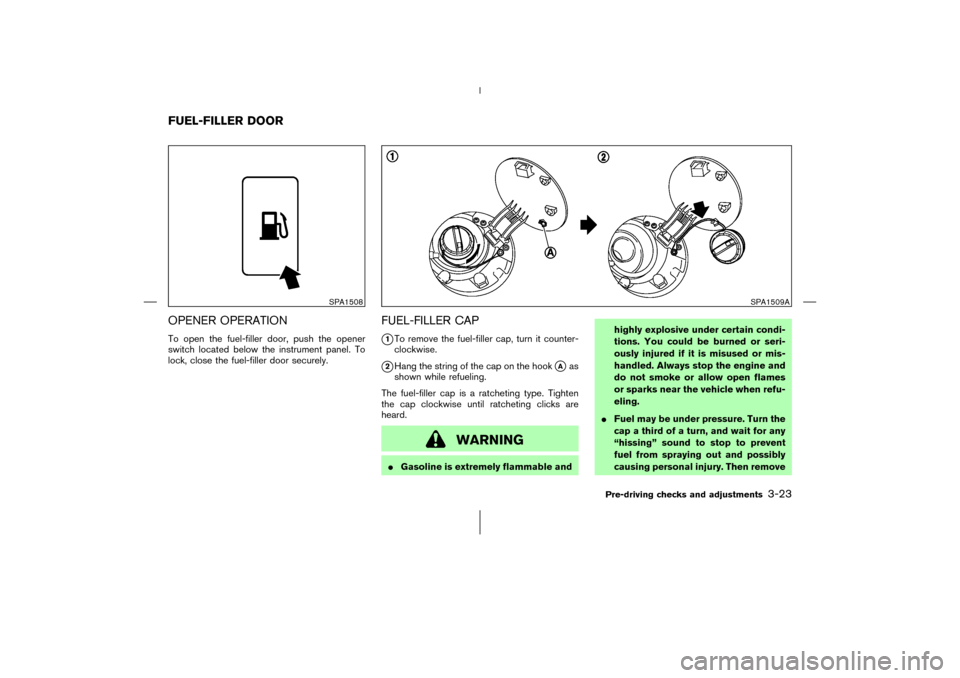
OPENER OPERATIONTo open the fuel-filler door, push the opener
switch located below the instrument panel. To
lock, close the fuel-filler door securely.
FUEL-FILLER CAP
�1To remove the fuel-filler cap, turn it counter-
clockwise.
�2Hang the string of the cap on the hook
�Aas
shown while refueling.
The fuel-filler cap is a ratcheting type. Tighten
the cap clockwise until ratcheting clicks are
heard.
WARNING
�Gasoline is extremely flammable andhighly explosive under certain condi-
tions. You could be burned or seri-
ously injured if it is misused or mis-
handled. Always stop the engine and
do not smoke or allow open flames
or sparks near the vehicle when refu-
eling.
�Fuel may be under pressure. Turn the
cap a third of a turn, and wait for any
“hissing” sound to stop to prevent
fuel from spraying out and possibly
causing personal injury. Then remove
SPA1508
SPA1509A
FUEL-FILLER DOOR
Pre-driving checks and adjustments
3-23
�
05.10.18/Z33-D/V5.0
�
Page 134 of 297
TILT OPERATIONPush the lock lever down and adjust the steering
wheel up or down to the desired position.
Push the lock lever up securely to lock the
steering wheel in place.
WARNING
Do not adjust the steering wheel while
driving. You could lose control of your
vehicle and cause an accident.1. To block out glare from the front, swing down
the main sun visor
�1.
2. To block glare from the side, remove the main
sun visor from the center mount and swing it
to the side
�2.
3. To use the extension sun visor
�3
(if so
equipped), pull it out from the main sun visor
as shown.
CAUTION
Do not store the main sun visor before
storing the extension sun visor.
SPA1510
SPA2176
STEERING WHEEL SUN VISORS
Pre-driving checks and adjustments
3-25
�
05.10.18/Z33-D/V5.0
�
Page 135 of 297
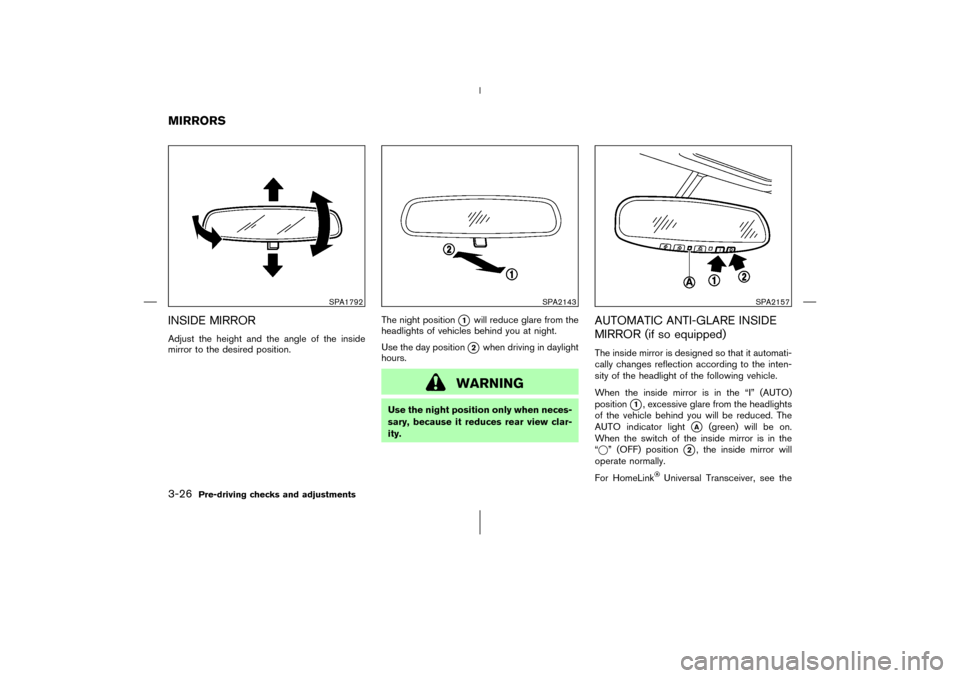
INSIDE MIRRORAdjust the height and the angle of the inside
mirror to the desired position.The night position
�1
will reduce glare from the
headlights of vehicles behind you at night.
Use the day position�2when driving in daylight
hours.
WARNING
Use the night position only when neces-
sary, because it reduces rear view clar-
ity.
AUTOMATIC ANTI-GLARE INSIDE
MIRROR (if so equipped)The inside mirror is designed so that it automati-
cally changes reflection according to the inten-
sity of the headlight of the following vehicle.
When the inside mirror is in the “I” (AUTO)
position
�1, excessive glare from the headlights
of the vehicle behind you will be reduced. The
AUTO indicator light
�A
(green) will be on.
When the switch of the inside mirror is in the
“�” (OFF) position
�2, the inside mirror will
operate normally.
For HomeLink
Universal Transceiver, see the
SPA1792
SPA2143
SPA2157
MIRRORS3-26
Pre-driving checks and adjustments
�
05.10.18/Z33-D/V5.0
�
Page 136 of 297
description in the “2. Instruments and controls”
section.
OUTSIDE MIRRORS
WARNING
Objects viewed in the outside mirror on
the passenger side are closer than they
appear. Be careful when moving to the
right. Using only this mirror could cause
an accident. Use the inside mirror or
glance over your shoulder to properly
judge distances to other objects.The outside mirror will operate only when the
ignition switch is in the ACC or ON position.
Turn the control knob(located on the driver side
door armrest) to right or left to select the right or
left outside mirror, then adjust using the knob.
SPA1390
Pre-driving checks and adjustments
3-27
�
05.10.18/Z33-D/V5.0
�
Page 139 of 297

WARNING
�Positioning of the heating or air con-
ditioning controls and display con-
trols should not be done while driv-
ing, in order that full attention may
be given to driving operation.
�Do not disassemble or modify this
system. If you do, it may result in
accidents, fire, or electric shock.
�Do not use this system if you notice
any abnormality, such as a frozen
screen or lack of sound. Continued
use of the system may result in acci-
dent, fire or electric shock.
�In case you notice any foreign object
in the system hardware, spill liquid
on it, or notice smoke or smell com-
ing from it, stop using the system
immediately and contact a NISSAN
dealer. Ignoring such conditions may
lead to accidents, fire, or electric
shock.When you use this system, make sure the engine
is running.
If you use the system with the engine not
running (ignition ONor ACC) for a long
time, it will use up all the battery power,
and the engine will not start.
Reference symbols:
“ENTER”button
This is a button on the control panel.
“Display”key
This is a select key on the screen. By selecting
this key you can proceed to the next function.
NAMES OF THE COMPONENTS1. JOYSTICK and “ENTER” button
2. “INFO” button
3. “SETTING” button
4. “BACK” button
5. “
” brightness control button
For Navigation System control buttons (other
than above), refer to the separate Navigation
System Owner’s Manual.
SAA1289
SAFETY NOTE
CONTROL PANEL BUTTONS —
WITH NAVIGATION SYSTEM4-2
Display screen, heater, air conditioner and audio systems
�
05.10.18/Z33-D/V5.0
�