Page 290 of 800
Page 293 of 800
Page 294 of 800

WINDOW GLASS
BODY42-22
INSTALLATION SERVICE POINTS
>>A<< GASKET/CLIP/DUAL LOCK FAS-
TENER INSTALLATION
1. Carry out the following procedure to re-install quarter window glass.
CAUTION
Do not forget gasket.
(1) Fit clips into body.
AC103606 AC
Cut off these convex parts
(2) Cut away clip fitting convex on quarter window
glass.
NOTE: Convex gets broken when quarter win-
dow glass is removed.
CAUTION
Leave the degreased parts for 3 or more minutes
to dry well, before starting on the next step. Do
not touch the degreased parts.
2. Use isopropyl alcohol to degrease the inside and
outside of the quarter window glass and the body
flanges.
AC304793AB
Dual lock fastener
Install the dual lock fastener
with aligning it onto the bumps
of the body flange.
3. Assemble the dual lock fastener according to the standard location of the body flange.
4. Assemble the dual lock fastener to the quarter window glass relative to the body flange dual lock
fastener.
>>B<< QUARTER WINDOW GLASS
INSTALLATION
Remove the quarter window glass using the same
procedure as for the windshield removal (Refer to
P.42-12).
Page 299 of 800

DOOR
BODY42-27
ON-VEHICLE SERVICE
DOOR FIT ADJUSTMENT
M1423001100175
CAUTION
•Attach protection tape to the fender and door
edges where the hinge is installed.
•Do not rotate special tool door adjusting
wrench (MB991164) with a torque of over 98
N
⋅m
AC000592
MB990900
or
MB991164
AB
1. Use the special tool door adjusting Wrench (MB990900 or MB991164) to loosen the hinge
mounting bolts on the body side, and then adjust
the clearance around the door so that it is uniform
on all sides.
2. If a door is not flush with its surrounding panels,
loosen the door-side d oor hinge mounting bolts
and obtain the flushness by moving the door.
NOTE:
AC206498
Washer Bolts
Washer
Door hinge
AF
Weld point
Weld point
If the door hinge mounting bolt washers are
welded, grind off the welding according to the pro
-
cedure below beforehand.
.
1. Remove the door hinge (Refer to P.42-31).
2. Use a chisel or grinder to release the door
hinge mounting bolt washers, which are
welded to the door hinge.
3. On completion, paint the affected area with a suitable touch-in brush to prevent corrosion.
4. Install the door hinge (Refer to P.42-31).
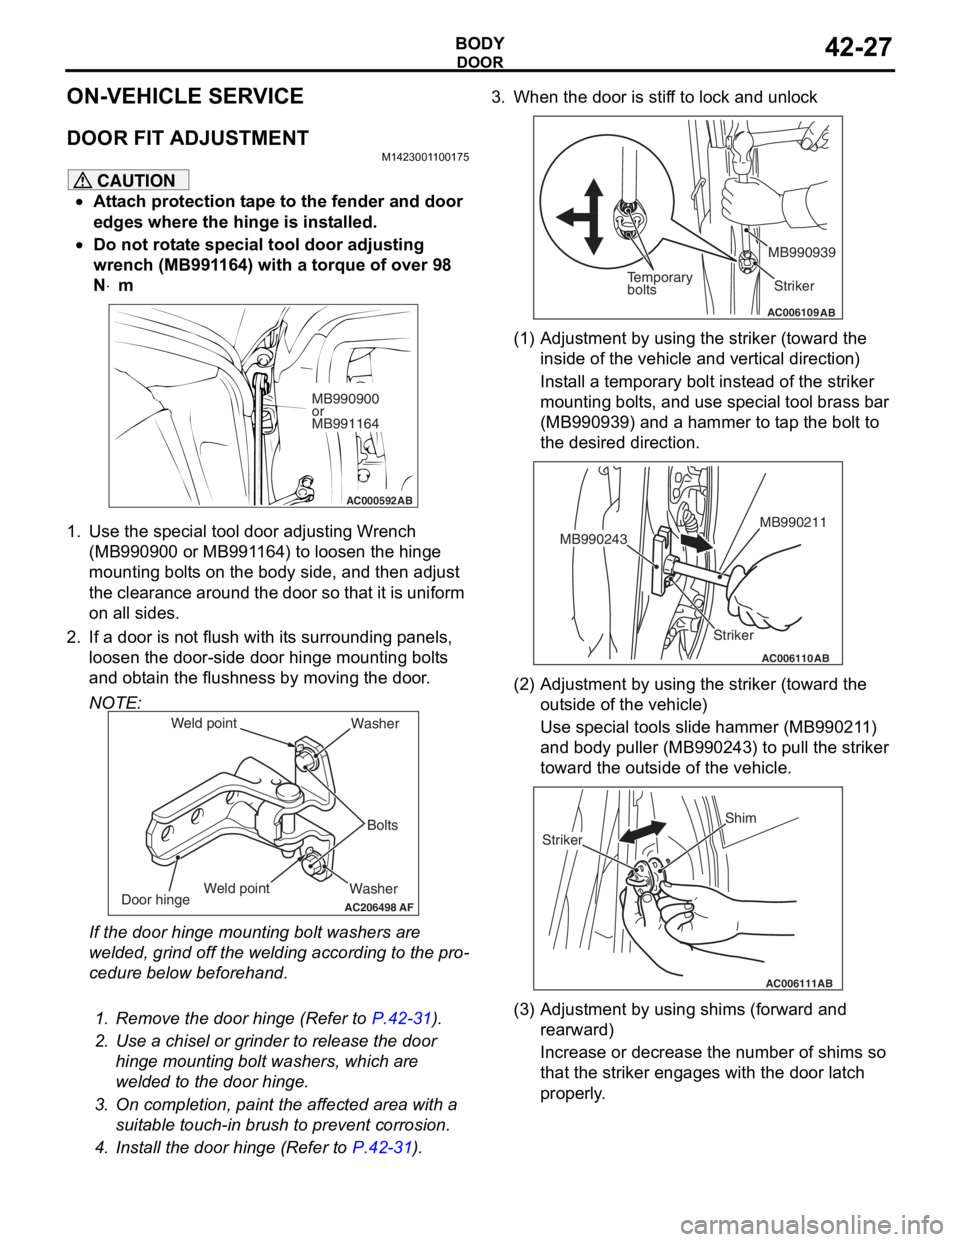
3. When the door is stiff to lock and unlock
AC006109AB
Temporary
bolts Striker
MB990939
(1) Adjustment by using the striker (toward the
inside of the vehicle and vertical direction)
Install a temporary bolt instead of the striker
mounting bolts, and use special tool brass bar
(MB990939) and a hammer to tap the bolt to
the desired direction.
AC006110
Striker MB990211
MB990243
AB
(2) Adjustment by using the striker (toward the
outside of the vehicle)
Use special tools slide hammer (MB990211)
and body puller (MB990243) to pull the striker
toward the outside of the vehicle.
AC006111AB
Shim
Striker
(3) Adjustment by using shims (forward and rearward)
Increase or decrease the number of shims so
that the striker engages with the door latch
properly.
Page 304 of 800
DOOR
BODY42-32
INSTALLATION SERVICE POINT
>>A<< STRIKER INSTALLATION
AC305098AB
Striker centreStriker Latch centre
Latch
+1.5 mm
-1.5 mm
Align the centre o f the striker and latch within ±1.5
mm,
and inst
all.
INSPECTION
M1423 0060 0032 2
DOOR SWITCH CHECK
AC211414
123
AC
Switch
positionTester
connectionSpecified
condition
Released (ON)1 − switch body,
2
− switch body,
3
− switch body
Less than 2
ohms
Depressed
(OFF)1 − switch body,
2
− switch body,
3
− switch body
Open circuit
DOOR GLASS AND REGULA T O R
REMOVA L AND INST ALLA TIONM14290013 0031 5
Post-installation Operation
•Door Window Glass Adjustment (Refer to P.42-28).
AC212124AB
1
23
12
3
4
5
6
Page 306 of 800
Page 313 of 800
Page 318 of 800
TAILGATE
BODY42-46
TA I L G AT E
SERVICE SPECIFICATIONSM1421000300288
ItemStandard value
Tailgate handle play (mm)2.3 − 5.9
SEALANTS
M1424000500098
ItemSpecified sealant
Tailgate waterproof film3M ATD Part No.8633 or equivalent
Tailgate hinge3M ATD Part No.8531 Heavy drip check sealer, 3M
ATD Part No.8646 Automotive joint and seam sealer
or equivalent
SPECIAL TOOLM1424000600170
ToolNumberNameUse
MB991223
A
D C
B
AZ
DO NOT USE
MB991223
A: MB9912 19
B: MB991220
C: MB99122 1
D: MB991222
Harness set
A: Te st harn e ss
B: LED harness
C: LED harness
adapt er
D: Probe
Te rminal volt a ge measu r emen t
A: For che cking connector pin
cont act pressure
B: For che cking po we r sup p ly
circuit
C: Fo r checking po we r supp ly
circuit
D: Fo r conn ecting a loca lly
sourced tester
MB992006
MB992 006Extra fine probeCont inuity check an d vo lt age
measurement at
harness wire or
conn
ector