Page 127 of 409

126 Controls in detailControl systemSettings menu
In the
Settings
menu there are two func-
tions:
�
The To reset:
Press reset button for
3 seconds
function with which you can
reset all the settings to those set at the
factory.
�
A collection of submenus with which
you can make individual settings for
your vehicle.
�
Press button è or ÿ repeatedly
until the
Settings...
menu appears in
the left display.
The following settings and submenus are
available:Resetting all settings
You can reset all the functions of all sub-
menus to the factory settings.
�
Press the reset button in the instru-
ment cluster (
�page 113) for approxi-
mately 3 seconds.
In the right display you will see the re-
quest to press the reset button again to
confirm.
�
Press the reset button again.
The functions of all the submenus will
reset to factory settings.
Function
Page
Resetting all settings
126
Submenus in the Settings menu
127
Resetting the functions of a sub-
menu
127
Instrument cluster submenu
129
Time submenu
131
Lighting submenu
132
Vehicle submenu
136
iThe settings you have changed will not
be reset unless you confirm the action
by pressing the reset button a second
time. After approximately 5 seconds,
the
Settings...
menu reappears in
the multifunction display.
For safety reasons, the
Light circuit
Headlamp mode
in the
Lighting
sub-
menu is not reset while driving.
Page 133 of 409

132 Controls in detailControl systemSelecting time display�
Move the selection marker with button
æ or ç to the
Time
submenu.
�
Press button j or k repeatedly
until you see this message in the left
display:
Clock
.
The selection marker is on the current
setting.
�
Press button æ or ç to set the 12-hour
or
24-hour
time display mode.Lighting submenu
Access the
Lighting
submenu via the
Settings
menu. Use the
Lighting
sub-
menu to change the lamp and lighting set-
tings on your vehicle.
The following functions are available:Setting daytime running lamp mode
(USA only)
�
Move the selection marker with button
æ or ç to the
Lighting
sub-
menu.
�
Press button j or k repeatedly
until you see this message in the left
display:
Light circuit Headlamp
mode
.
The selection marker is on the current
setting.
Function
Page
Setting daytime running lamp
mode (USA only)
132
Setting locator lighting
133
Setting night security illumina-
tion (Headlamps delayed
switch-off)
134
Interior lighting delayed
switch-off
135
iThis function is not available in
countries where the daytime running
lamp mode is mandatory and therefore
in a constant mode.
Page 134 of 409
 or daytime
running lamp mode (
Constant
)
activated.
With daytime running lamp mode activated
and")
133 Controls in detail
Control system
�
Press buttonæ orç to select
manual operation (
Manual
) or daytime
running lamp mode (
Constant
)
activated.
With daytime running lamp mode activated
and the exterior lamp switch in
positionM orU, the low beam
headlamps are switched on when the
engine is running.
In low ambient light conditions the
following lamps will switch on additionally:
�
Parking lamps
�
Tail lamps
�
License plate lamps
�
Side marker lampsFor more information on the daytime
running lamp mode, see “Daytime running
lamp mode” (
�page 107).Setting locator lighting
With the locator lighting feature activated
and the exterior lamp switch in
positionU, the following lamps will
switch on during darkness when the vehi-
cle is unlocked with the SmartKey:
�
Parking lamps
�
Tail lamps
�
License plate lamps
�
Side marker lamps
�
Front fog lamps
The locator lighting switches off when the
driver’s door is opened.
If you do not open a door after unlocking
the vehicle with the SmartKey the lamps
will switch off automatically after approxi-
mately 40 seconds.
iIf you turn the exterior lamp switch to
another position, the corresponding
lamp(s) will switch on.
For safety reasons, resetting the Lighting
submenu to factory settings
(
�page 127) will not reset the daytime
running lamp mode.
The following message appears in the
right display:
Cannot be fully reset
to factory settings when driving
.
Page 135 of 409

134 Controls in detailControl system�
Move the selection marker with button
æ or ç to the
Lighting
sub-
menu.
�
Press button j or k repeatedly
until you see this message in the left
display:
Locator lighting
.
The selection marker is on the current
setting.
�
Press button æ or ç to switch
the locator lighting function
On.
�
Turn the exterior lamp switch to
positionU when exiting the vehicle
(�page 105).
The locator lighting feature is
activated.Setting night security illumination
(Headlamps delayed switch-off)
Use this function to set whether or not the
exterior lamps to illuminate during dark-
ness after exiting the vehicle and all doors
closed.
With the delayed shut-off feature activated
and the exterior lamp switch in
positionU before the engine is turned
off, the following lamps will switch on
when the engine is turned off and remain
lit for approximately 15 seconds:
�
Parking lamps
�
Tail lamps
�
License plate lamps
�
Side marker lamps
�
Front fog lamps
If after turning off the engine you do not
open a door or do not close an opened
door, the lamps will automatically switch
off after 60 seconds.
�
Move the selection marker with button
æ or ç to the
Lighting
sub-
menu.
�
Press button j or k repeatedly
until you see this message in the left
display:
Headlamps delayed
switch-off
.
The selection marker is on the current
setting.
�
Press button æ or ç to switch
the function
On or
Off
.
iYou can reactivate this function within
10 minutes by opening a door.
Page 136 of 409
.
The headlamps delayed switch-off
feature is activated.
You can tempor")
135 Controls in detail
Control system
�
Turn the exterior lamp switch to
positionU before turning off the en-
gine (
�page 105).
The headlamps delayed switch-off
feature is activated.
You can temporarily deactivate the de-
layed switch-off feature:
�
Before leaving the vehicle turn the
SmartKey in the starter switch to
position0.
�
Then turn it to position2 and back
to0.
The delayed switch-off feature is deac-
tivated. It will reactivate as soon as you
reinsert the SmartKey in the starter
switch.Interior lighting delayed switch-off
Use this function to set whether or not the
interior lighting to remain lit during dark-
ness for approximately 10 seconds after
the SmartKey is removed from the starter
switch.
�
Move the selection marker with button
æ or ç to the
Lighting
sub-
menu.
�
Press button j or k repeatedly
until you see this message in the left
display:
Int. lighting delayed
switch-off
.
The selection marker is on the current
setting.
�
Press button æ or ç to switch
the function
On or
Off
.
Page 180 of 409
 and adjusting the mirrors,
see (�page 44).
Headlamp cleaning system
The switch is lo")
179 Controls in detail
Good visibility
�Good visibility
For information on the windshield wipers,
see (
�page 54) and adjusting the mirrors,
see (�page 44).
Headlamp cleaning system
The switch is located on the left side of the
dashboard.
1To clean the headlamps�
Switch on the ignition (
�page 40).
�
Press switch 1.
The headlamps are cleaned with a
high-pressure water jet.For information on filling up the washer
reservoir, see “Windshield washer system
and headlamp cleaning system”
(
�page 252).
Rear view mirrors
For more information on setting the rear
view mirrors, see “Mirrors” (
�page 44).
Auto-dimming mirror
The reflection brightness of the interior
rear view mirror will respond automatically
to glare when
�
the ignition is switched on
and
�
incoming light from headlamps falls on
the sensor in the interior rear view
mirror.
The rear view mirror will not react if
�
reverse gearR is engaged
�
the interior lighting is turned on
Warning!
G
The auto-dimming function does not react if
incoming light is not aimed directly at sen-
sors in the interior rear view mirror.
Glare can endanger you and others.Warning!
G
In case of an accident, liquid electrolyte may
escape from the mirror housing if the mirror
glass breaks.
Electrolyte has an irritating effect. Do not
allow the liquid to come into contact with
eyes, skin, clothing, or respiratory system.
In case it does, immediately flush affected
area with water, and seek medical help if
necessary.
Page 244 of 409
243 Operation
At the gas station
Windshield washer and headlamp
cleaning system
For more information on filling up the
washer reservoir, see “Windshield washer
system and headlamp cleaning system”
(�page 252).Vehicle lighting
Check function and cleanliness. For more
information on replacing light bulbs, see
“Replacing bulbs” (
�page 348).
Exterior lamp switch (�page 105).Tire inflation pressure
For more information on tire inflation pres-
sure, see “Checking tire inflation pressure
manually” (
�page 266).
Page 247 of 409
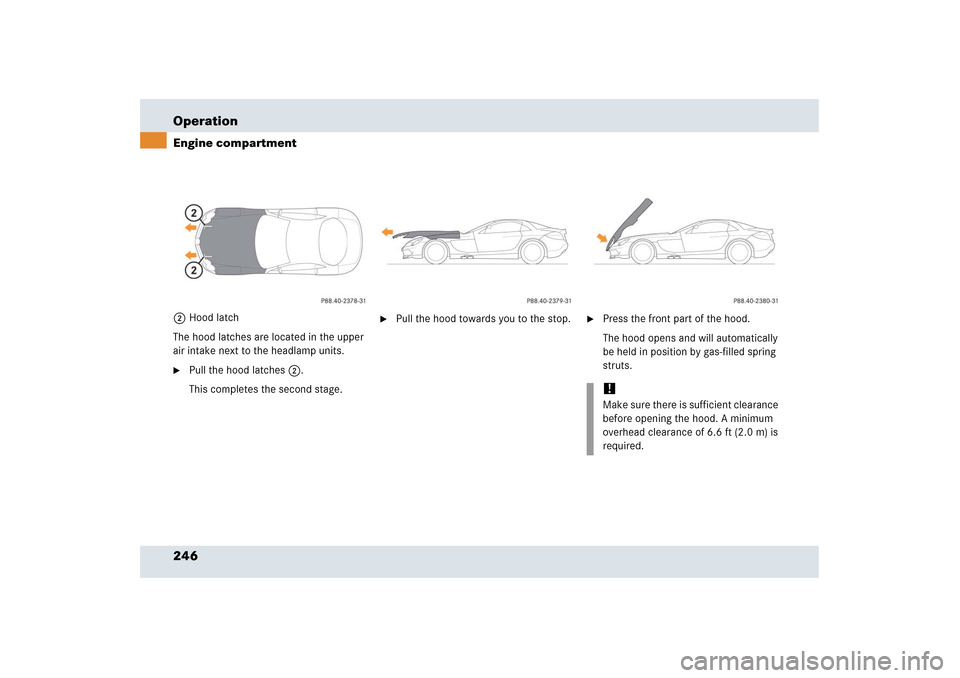
246 OperationEngine compartment2Hood latch
The hood latches are located in the upper
air intake next to the headlamp units. �
Pull the hood latches2.
This completes the second stage.
�
Pull the hood towards you to the stop.
�
Press the front part of the hood.
The hood opens and will automatically
be held in position by gas-filled spring
struts.!Make sure there is sufficient clearance
before opening the hood. A minimum
overhead clearance of 6.6 ft (2.0 m) is
required.