Page 196 of 409

195 Controls in detail
Power windows
Stopping the windows�
Press or pull respective switch again.
Synchronizing power windows
The power windows must be resynchro-
nized each time�
after the battery has been
disconnected.
�
if the power windows cannot be fully
opened (Express-open) or closed
(Express-close).
�
Switch on the ignition (
�page 40).
�
Pull the power window switches until
the windows are closed.
Hold the switches for approximately
1 second.
The power windows are synchronized.
Summer opening feature
If the weather is warm, you can ventilate
the vehicle before driving off by opening
the side windows. �
Aim transmitter eye of the SmartKey at
the rear quarter window.
The SmartKey must be in close proxim-
ity to the rear quarter window.
�
Press and hold button Πuntil the
windows have reached the desired po-
sition.
�
Release button Πto interrupt pro-
cedure.
!If the upward movement of the window
is blocked during the closing
procedure, the window will stop and
open slightly.
Remove the obstruction, pull the
switch again past the resistance point
and release.
If the window still does not close when
there is no obstruction, then pull and
hold the switch again. The window will
then close without the obstruction sen-
sor function.
Page 206 of 409
205 Controls in detail
Useful features
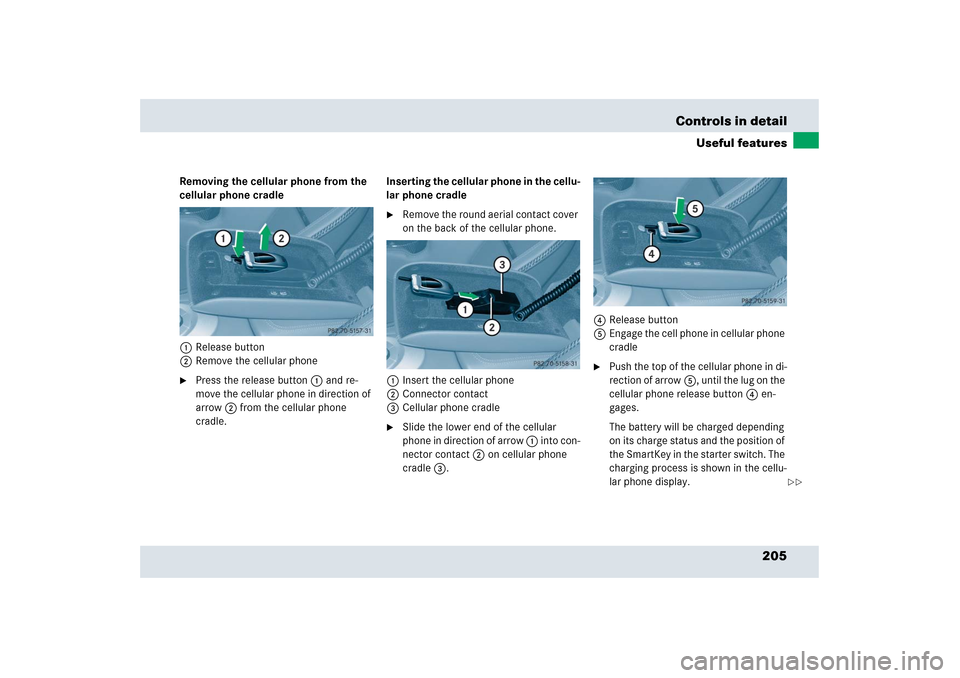
Removing the cellular phone from the
cellular phone cradle
1Release button
2Remove the cellular phone�
Press the release button1 and re-
move the cellular phone in direction of
arrow 2 from the cellular phone
cradle.Inserting the cellular phone in the cellu-
lar phone cradle
�
Remove the round aerial contact cover
on the back of the cellular phone.
1Insert the cellular phone
2Connector contact
3Cellular phone cradle
�
Slide the lower end of the cellular
phone in direction of arrow 1 into con-
nector contact2 on cellular phone
cradle3.4Release button
5Engage the cell phone in cellular phone
cradle
�
Push the top of the cellular phone in di-
rection of arrow5, until the lug on the
cellular phone release button4 en-
gages.
The battery will be charged depending
on its charge status and the position of
the SmartKey in the starter switch. The
charging process is shown in the cellu-
lar phone display.
��
Page 347 of 409
346 Practical hintsReplacing SmartKey batteriesIf the batteries in the SmartKey are dis-
charged, the vehicle can no longer be
locked or unlocked. It is recommended to
have the batteries replaced at an autho-
rized Mercedes-Benz Center.Batteries contain materials that can harm
the environment if disposed of improperly.
Recycling of batteries is the preferred
method of disposal. Many states require
sellers of batteries to accept old batteries
for recycling.
Replacement batteries: Lithium, type
CR 2025 or equivalent.
�
Remove the mechanical key out of the
SmartKey (
�page 344).
Warning!
G
Batteries contain poisonous and corrosive
substances. Therefore keep the batteries
out of reach of children.
If a battery is swallowed, seek medical help
immediately.
iWhen inserting the batteries, make
sure they are clean and free of lint.iWhen replacing batteries, always re-
place both batteries. The required re-
placement batteries are available at
any Mercedes-Benz Center.
Page 348 of 409
347 Practical hints
Replacing SmartKey batteries
1Mechanical key
2Unlocking the battery compartment
3Removing the battery compartment
4Slide�
Insert mechanical key1in side
opening, push gray slide4 in direction
of arrow2.
The battery compartment is unlatched.
�
Pull battery compartment2 out of the
housing in direction of arrow3.5Battery
6Contact spring
�
Remove the discharged batteries.
�
Using a lint-free cloth, insert new
batteries5 under the contact
spring6 with the plus (+) side facing
up.
�
Return battery compartment into hous-
ing until it locks into place.
�
Slide mechanical key1 back into the
SmartKey.
�
Check the operation of the SmartKey.
Page 358 of 409

357 Practical hints
Batteries
Warning!
G
Do not place metal objects on the battery as
this could result in a short circuit.
Use leak-proof batteries only to avoid the
risk of acid burns in the event of an
accident.
Warning!
G
The brake system requires electrical power
to operate.
A malfunction in the vehicle’s power supply
or electrical system may impair brake sys-
tem operation and switch it into its emer-
gency operation mode. The same applies if
battery is disconnected. To brake, the driver
must then apply significantly greater brake
pedal pressure and depress the pedal much
further to obtain the expected braking ef-
fect. If necessary, apply full pressure to the
brake pedal. Brakes are only applied to the
front wheels. Stopping distance is in-
creased! Adjust your driving style according-
ly. For more information, see
“Electrohydraulic brake system”
(�page 84).
Warning!
G
With a disconnected battery�
you will no longer be able to turn the
SmartKey in the starter switch
�
the gear selector lever will remain
locked in positionP
Page 359 of 409

358 Practical hintsBatteriesCharging the batteries
You can obtain detailed information on
charging the battery from your authorized
Mercedes-Benz Center.Charging with the battery charger
Only use the battery charge unit approved
by Mercedes-Benz and supplied with your
vehicle. This charger is designed to auto-
matically control the charge rate, and
charge the battery or maintain the existing
charge in the battery while the vehicle is
parked and not being driven for long peri-
ods of time (on average approximately
3 weeks or more). Not driving the vehicle
for such extended periods may cause the
charge in the vehicle battery to drop. Using the charging point
The charging point for the battery charger
is located next to the CD-changer on the
left-hand side in the trunk.
1Charging point
�
Remove the SmartKey from the starter
switch.
�
Open the cover of the charging
point1.
�
Connect the battery charger with the
charging point 1.
Warning!
G
Never charge a battery while still installed in
the vehicle unless the battery charge unit
approved by Mercedes-Benz (supplied with
your vehicle) is being used. Gases may es-
cape during charging and cause explosions
that may result in paint damage, corrosion
or personal injury.
A battery charge unit specially adapted for
Mercedes-Benz vehicles and tested and ap-
proved by Mercedes-Benz is available, per-
mitting the charging of the battery in its
installed position. Contact an authorized
Mercedes-Benz Center for information and
availability. Charge battery in accordance
with the separate operating instructions for
the battery charger.
Page 363 of 409
.1Towing eye bolt
�
Remove cover from the access hole.")
362 Practical hintsTowing the vehicleInstalling/reinstalling towing eye bolt�
Take the towing eye bolt1 from its
storage compartment (
�page 342).1Towing eye bolt
�
Remove cover from the access hole.
�
Screw towing eye bolt1 in to its stop.
�
Remove the towing eye bolt when you
no longer need it. To do this, carry out
the above steps in reverse order.
Points to bear in mind�
The vehicle must not be tow-started.
�
If the vehicle is to be towed, only tow it
with all wheels on the ground.
�
If the vehicle has suffered transmission
damage, only tow it with the propeller
shaft disconnected.
�
Before towing the vehicle, make sure
the battery is connected and charged.
Otherwise you will not be able to switch
on the ignition and move the selector
lever to N. There will then be no power
assistance when steering and braking.
Transporting the vehicle
The towing eye bolt can be used to pull the
vehicle onto a trailer or transporter for
transporting purposes.�
Move the selector lever to N.
iThe gear selector lever will remain
locked in positionP and the SmartKey
will not turn in the starter switch if the
battery is disconnected or discharged.
See notes on the battery (
�page 356).
!Only secure the tow bar to the towing
eye bolt. The vehicle could otherwise
be damaged.!Your vehicle is equipped with a front
towing eye bolt only (
�page 362).
You cannot tow other vehicles with
your vehicle.
!Due to the low clearance height of the
SLR, care must be taken when loading
and unloading from a transporter to
avoid damaging the vehicle body work.
To secure the vehicle, only tie it down
by the wheels or tires. Otherwise it
could be damaged.
Page 393 of 409

392 IndexAutomatic climate control 182
Adjusting air volume 186
Air conditioning refrigerant 378
Air conditioning, Cooling 192
Air distribution 187
Air recirculation mode 188
Air vents 183
Control panel 184
Deactivating system 191
Defrosting 181, 188
MAXCOOL 187
Residual heat utilization 190
Side air vents 31
Temperature 185
Temperature sensor 33
Automatic headlamp mode 106
Automatic lighting control, Interior
lighting 111Automatic transmission 167
Accelerator position 173
Damage 362
Driving tips 173
Emergency operation (Limp Home
Mode) 178
Gear ranges 170
Gear selector lever 32, 167
Gear selector lever position 167, 171
Gear shifting malfunctions 178
Kickdown 173
Manual gearshift program 176
Manual shifting 168
One-touch gearshifting 168
Shift program mode selector
switch 173
Starting the engine 49
Steering wheel gearshift control 174
Towing 362
Transmission fluid level 249
Automatic transmission fluid 249B
BabySmart
TM
Airbag deactivation system 75, 385
Compatible child seats 385
Self-test 75
Backup lamp 349
Messages in the multifunction
display 332
Bar 281
BAS 81, 385
Batteries, SmartKey
Checking battery condition 99
Replacing 346
Batteries, Vehicle 251
Charging 358
Consumer battery 356
Jump starting 356
Maintenance 356
Messages in the multifunction
display 315
Starter battery 251
Batteries, vehicle
Consumer battery 251
Battery charger 358
Bead 281
Bi-Xenon headlamps 385