Page 415 of 481
.
The jack ta")
414 Practical hintsFlat tire
1Wheel wrench�
On wheel to be changed, loosen but do
not yet remove the wheel bolts in direc-
tion of arrow (approximately one full
turn with wheel wrench1).
The jack take-up brackets are located di-
rectly behind the front wheel housings and
in front of the rear wheel housings.2Jack
3Take-up bracket
�
Place jack2 on firm ground.
�
Position jack2 under take-up
bracket3 so that it is always vertical
(plumb-line) as seen from the side,
even if the vehicle is parked on an
incline.
Warning!
G
The jack is designed exclusively for jacking
up the vehicle at the jack take-up brackets
built into either side of the vehicle. To help
avoid personal injury, use the jack only to lift
the vehicle during a wheel change. Never
get beneath the vehicle while it is supported
by the jack. Keep hands and feet away from
the area under the lifted vehicle. Always
firmly set parking brake and block wheels
before raising vehicle with jack.
Do not disengage parking brake while the
vehicle is raised. Be certain that the jack is
always vertical (plumb line) when in use, es-
pecially on hills. Always try to use the jack
o n l e v e l s u r f a c e . B e s u r e t h e j a c k a r m i s f u l l y
seated in the jack take-up bracket. Always
lower the vehicle onto sufficient capacity
jackstands before working under the
vehicle.
Warning!
G
Position the jack only on the jack take-up
brackets designed for this purpose.
If the jack is not properly positioned, the ve-
hicle may fall off of the jack.
Page 416 of 481
415 Practical hints
Flat tire
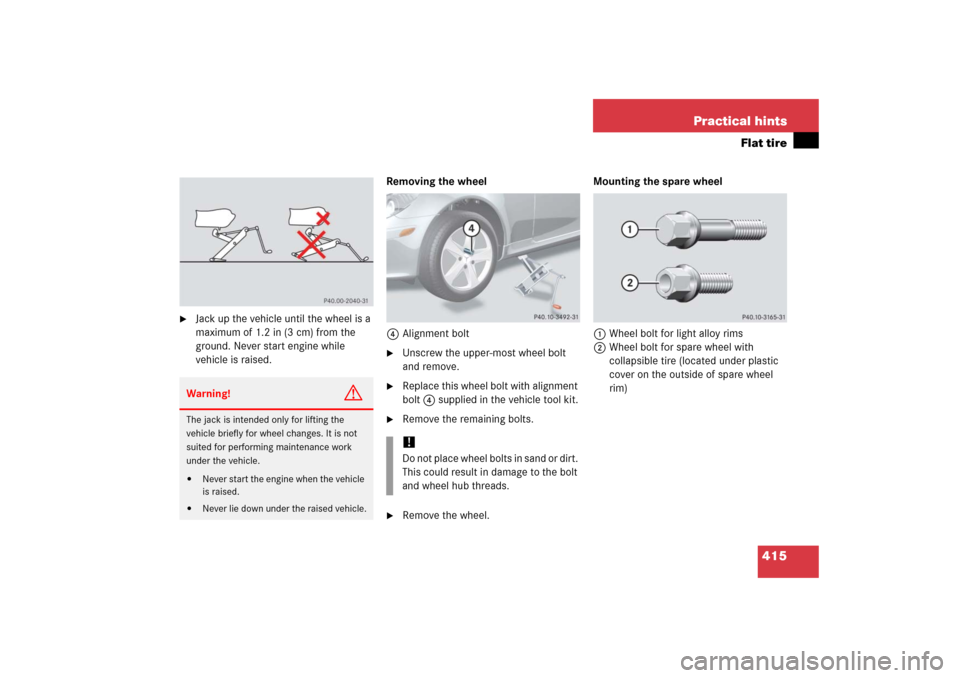
�
Jack up the vehicle until the wheel is a
maximum of 1.2 in (3 cm) from the
ground. Never start engine while
vehicle is raised.Removing the wheel
4Alignment bolt
�
Unscrew the upper-most wheel bolt
and remove.
�
Replace this wheel bolt with alignment
bolt4 supplied in the vehicle tool kit.
�
Remove the remaining bolts.
�
Remove the wheel.Mounting the spare wheel
1Wheel bolt for light alloy rims
2Wheel bolt for spare wheel with
collapsible tire (located under plastic
cover on the outside of spare wheel
rim)
Warning!
G
The jack is intended only for lifting the
vehicle briefly for wheel changes. It is not
suited for performing maintenance work
under the vehicle.�
Never start the engine when the vehicle
is raised.
�
Never lie down under the raised vehicle.
!Do not place wheel bolts in sand or dirt.
This could result in damage to the bolt
and wheel hub threads.
Page 417 of 481
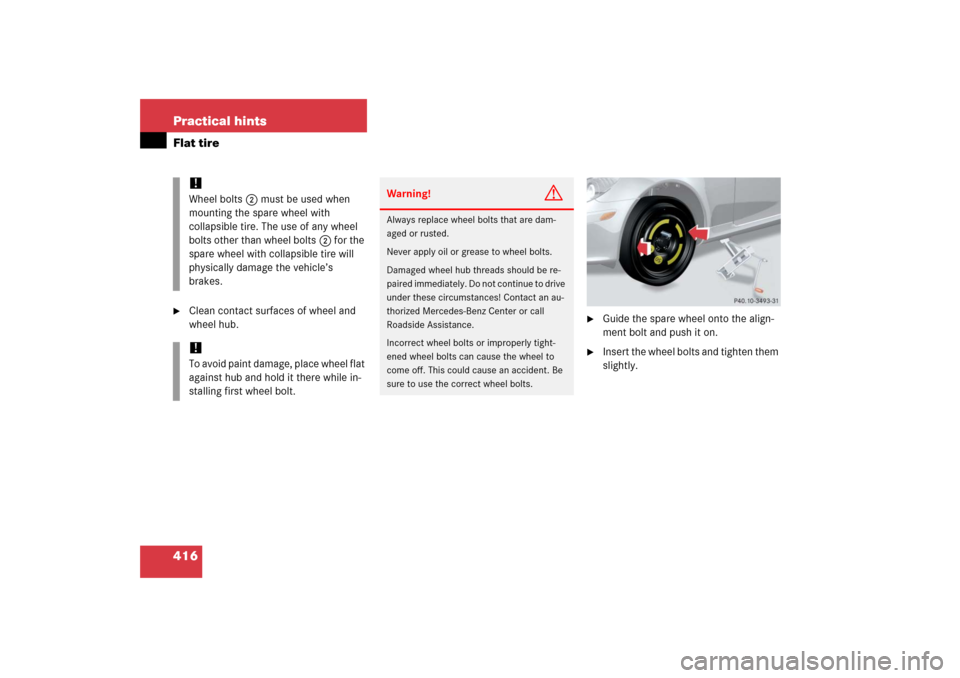
416 Practical hintsFlat tire�
Clean contact surfaces of wheel and
wheel hub.
�
Guide the spare wheel onto the align-
ment bolt and push it on.
�
Insert the wheel bolts and tighten them
slightly.
!Wheel bolts2 must be used when
mounting the spare wheel with
collapsible tire. The use of any wheel
bolts other than wheel bolts2 for the
spare wheel with collapsible tire will
physically damage the vehicle’s
brakes. !To avoid paint damage, place wheel flat
against hub and hold it there while in-
stalling first wheel bolt.
Warning!
G
Always replace wheel bolts that are dam-
aged or rusted.
Never apply oil or grease to wheel bolts.
Damaged wheel hub threads should be re-
paired immediately. Do not continue to drive
under these circumstances! Contact an au-
thorized Mercedes-Benz Center or call
Roadside Assistance.
Incorrect wheel bolts or improperly tight-
ened wheel bolts can cause the wheel to
come off. This could cause an accident. Be
sure to use the correct wheel bolts.
Page 418 of 481
417 Practical hints
Flat tire
�
Unscrew the alignment bolt, install last
wheel bolt and tighten slightly.
�
Inflate the collapsible tire
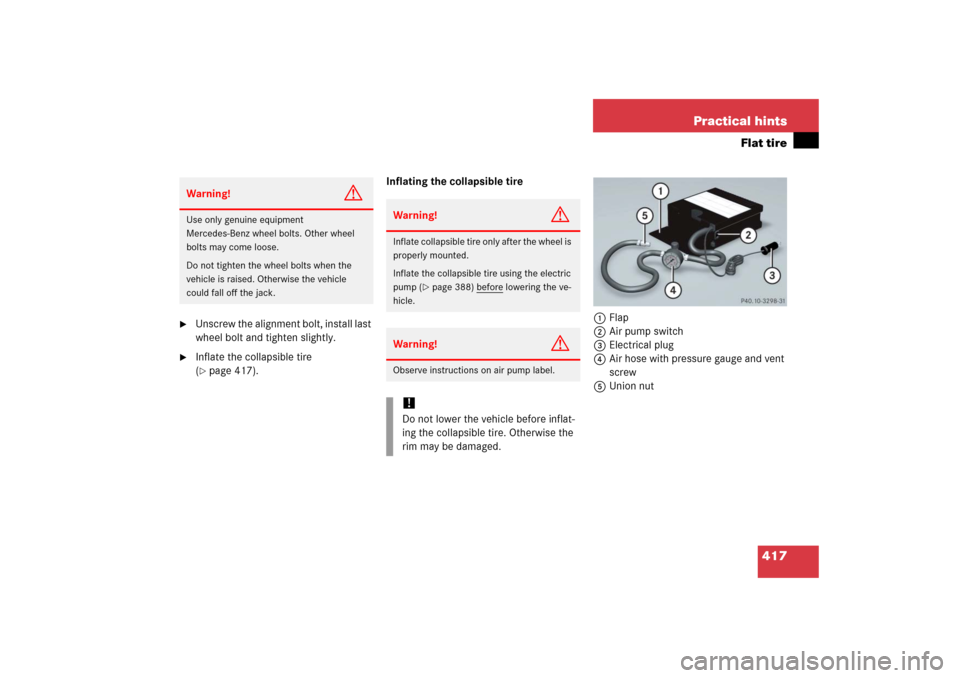
(�page 417).Inflating the collapsible tire
1Flap
2Air pump switch
3Electrical plug
4Air hose with pressure gauge and vent
screw
5Union nut
Warning!
G
Use only genuine equipment
Mercedes-Benz wheel bolts. Other wheel
bolts may come loose.
Do not tighten the wheel bolts when the
vehicle is raised. Otherwise the vehicle
could fall off the jack.
Warning!
G
Inflate collapsible tire only after the wheel is
properly mounted.
Inflate the collapsible tire using the electric
pump (
�page 388) before
lowering the ve-
hicle.
Warning!
G
Observe instructions on air pump label.!Do not lower the vehicle before inflat-
ing the collapsible tire. Otherwise the
rim may be damaged.
Page 419 of 481
.
�
Open flap1 on air pump.
�
Pull out electrical plug3 and air hose
with pressure gauge4.
�
Close vent screw on")
418 Practical hintsFlat tire�
Take the electric air pump out of the
trunk (
�page 388).
�
Open flap1 on air pump.
�
Pull out electrical plug3 and air hose
with pressure gauge4.
�
Close vent screw on air hose4.
�
Remove the valve cap from the tire
valve.
�
Screw air hose4 with union nut5
onto the collapsible tire valve.
�
Make sure electric air pump switch2
is set to0.
�
Insert electrical plug3 into the power
outlet in the passenger footwell
(�page 271).
�
Turn the SmartKey in the starter switch
to position1.
�
PressI on electric air pump switch2.
The electric air pump switches on and
inflates the collapsible tire.
�
Inflate the collapsible tire to approxi-
mately 51 psi (3.5 bar).
This takes about 5 minutes for the col-
lapsible tire. Air hose4 and union
nut5 can become hot during infla-
tion. Exercise proper caution to avoid
burning yourself when using the equip-
ment.
�
Press0 on electric air pump switch2.
�
Turn the SmartKey in the starter switch
to position0.
The electric air pump should now be
switched off.
�
If the tire inflation pressure is above
51 psi (3.5 bar), release excess tire in-
flation pressure using the vent screw
on air hose4.
!The cigarette lighter (
�page 270) is
not designed for use with the electric
air pump. Use the power outlet in the
passenger footwell (
�page 271) for
electric air pump operation.
!Do not operate the electric air pump
longer than 6 minutes without interrup-
tion. Otherwise it may overheat.
You may operate the electric air pump
again after it has cooled off.
Page 420 of 481

419 Practical hints
Flat tire
�
Detach the electric air pump.
�
Reinstall collapsible tire valve cap.
�
Store electrical plug3 and air
hose4 behind flap 1 and place the
electric air pump back in the trunk.
�
Lower the vehicle (
�page 419).Lowering the vehicle
�
Lower vehicle by turning the crank
counterclockwise until vehicle is rest-
ing fully on its own weight.
�
Remove the jack.
1-5 Wheel bolts
�
Tighten the five wheel bolts evenly in
the direction of the arrow, following the
diagonal sequence illustrated
(1to5), until all bolts are tight.
Observe a tightening torque of
80 lb-ft (110 Nm).
Warning!
G
Follow recommended tire inflation
pressures.
Do not underinflate tires. Underinflated tires
wear excessively and / or unevenly,
adversely affect handling and fuel economy,
and are more likely to fail from being over-
heated.
Do not overinflate tires. Overinflated tires
can adversely affect handling and ride
comfort, wear unevenly, increase stopping
distance, and result in sudden deflation
(blowout) because they are more likely to
become punctured or damaged by road
debris, potholes etc.
Warning!
G
Inflate the collapsible tire using the electric
pump (
�page 417) before
lowering the ve-
hicle.
��
Page 421 of 481
420 Practical hintsFlat tire
�
Fully collapse the jack.
�
Place the vehicle tool kit, electric air
pump, and the jack back in the storage
compartment underneath the trunk
floor.
�
Wrap the damaged wheel in the protec-
tive sheet provided with the spare
wheel and put the wheel in the trunk.
Warning!
G
Have the tightening torque checked after
changing a wheel. The wheels could come
loose if they are not tightened to a torque of
80 lb-ft (110 Nm).
iThe flat tire may be transported in the
trunk when the retractable hardtop is
closed.
��
Page 440 of 481

439 Technical data
Rims and tires
�Rims and tires
!
Only use tires which have been tested
and approved for your vehicle by
Mercedes-Benz. Tires approved by
Mercedes-Benz are developed to pro-
vide best possible performance in con-
junction with the driving safety
systems on your vehicle such as ABS or
ESP
®. Tires specially developed for
your vehicle and tested and approved
by Mercedes-Benz can be identified by
finding the following on the tire’s side-
wall:
�
MO = M
ercedes-Benz O
riginal
equipment tires
�
MOE = M
ercedes-Benz O
riginal
E
xtended (tires with limited run-flat
characteristics) original equipment
tires
Using tires other than those approved
by Mercedes-Benz may result in dam-
age that is not covered by the
Mercedes-Benz Limited Warranty.
iFor information on driving with
MOExtended tires, see
“MOExtendedsystem*” (
�page 333).
!Using tires other than those approved
by Mercedes-Benz can have detrimen-
tal effects, such as�
poor handling characteristics
�
increased noise
�
increased fuel consumption
Moreover, tires and rims not approved
by Mercedes-Benz may, under load,
exhibit dimensional variations and dif-
ferent tire deformation characteristics
that could cause them to come into
contact with the vehicle body or axle
parts. Damage to the tires or the vehi-
cle may be the result.
iFurther information on tires and rims is
available at any authorized
Mercedes-Benz Center. A placard with
the recommended tire inflation pres-
sures is located on the driver’s door
B-pillar. Some vehicles may have sup-
plemental tire inflation pressure infor-
mation for driving at high speeds
(�page 328) or for vehicle loads less
than the maximum loaded vehicle con-
dition (
�page 328). If such information
is provided, it can be found on the plac-
ard located on the inside of the fuel fill-
er flap. The tire inflation pressure
should be checked regularly and
should only be adjusted on cold tires.
Follow tire manufacturer’s mainte-
nance recommendation included with
vehicle.