Page 270 of 481

269 Controls in detail
Useful features
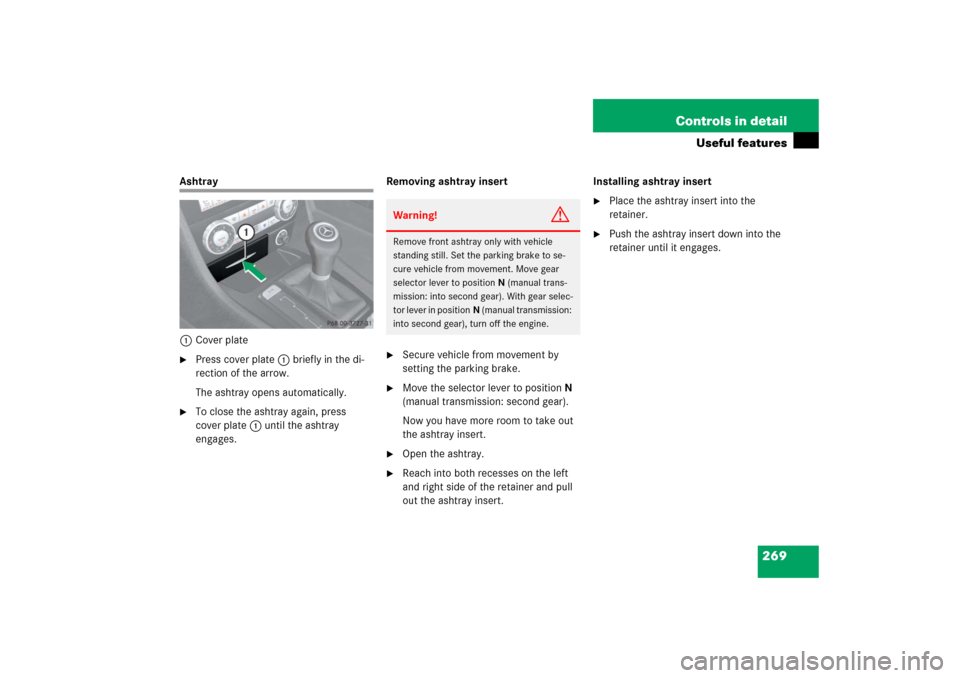
Ashtray
1Cover plate�
Press cover plate1 briefly in the di-
rection of the arrow.
The ashtray opens automatically.
�
To close the ashtray again, press
cover plate1 until the ashtray
engages.Removing ashtray insert
�
Secure vehicle from movement by
setting the parking brake.
�
Move the selector lever to positionN
(manual transmission: second gear).
Now you have more room to take out
the ashtray insert.
�
Open the ashtray.
�
Reach into both recesses on the left
and right side of the retainer and pull
out the ashtray insert.Installing ashtray insert
�
Place the ashtray insert into the
retainer.
�
Push the ashtray insert down into the
retainer until it engages.
Warning!
G
Remove front ashtray only with vehicle
standing still. Set the parking brake to se-
cure vehicle from movement. Move gear
selector lever to positionN (manual trans-
mission: into second gear). With gear selec-
tor lever in positionN (manual transmission:
into second gear), turn off the engine.
Page 295 of 481

294 OperationDriving instructionsBrakesTo help prevent brake disc corrosion after
driving on wet road surfaces (particularly
salted roads), it is advisable to brake the
vehicle with considerable force prior to
parking. The heat generated serves to dry
the brakes.
If your brake system is normally only sub-
jected to moderate loads, you should occa-
sionally test the effectiveness of the
brakes by applying above-normal braking
pressure at higher speeds. This will also
enhance the grip of the brake pads.If the parking brake is released and the
brake warning lamp in the instrument clus-
ter stays on, the brake fluid level in the res-
ervoir is too low.
Brake pad wear or a leak in the system may
be the reason for low brake fluid in the res-
ervoir.
Have the brake system inspected immedi-
ately. Contact an authorized
Mercedes-Benz Center.
All checks and service work on the brake
system should be carried out by qualified
technicians only. Contact an authorized
Mercedes-Benz Center.
Install only brake pads and brake fluid
recommended by Mercedes-Benz.Warning!
G
After driving in heavy rain for some time
without applying the brakes or through wa-
ter deep enough to wet brake components
or salty road conditions, the first braking ac-
tion may be somewhat reduced and in-
creased pedal pressure may be necessary to
obtain expected braking effect. Maintain a
safe distance from vehicles in front.
Resting your foot on the brake pedal will
cause excessive and premature wear of the
brake pads.
It can also result in the brakes overheating,
thereby significantly reducing their effec-
tiveness. It may not be possible to stop the
vehicle in sufficient time to avoid an acci-
dent.
!Be very careful not to endanger other
road users when you apply the brakes.
Refer to the description of the Brake
Assist System (BAS) (
�page 83).
Page 297 of 481

296 OperationDriving instructionsDriving off
Apply the brakes to test them briefly after
driving off. Perform this procedure only
when the road is clear of other traffic.
Warm up the engine smoothly. Do not
place full load on the engine until the oper-
ating temperature has been reached.
When starting off on a slippery surface, do
not allow a drive wheel to spin for an ex-
tended period with the ESP
® switched off.
Doing so may cause serious damage to the
drivetrain which is not covered by the
Mercedes-Benz Limited Warranty.
Parking
!Simultaneously depressing the acceler-
ator pedal and applying the brake re-
duces engine performance and causes
premature brake and drivetrain wear.
Warning!
G
Do not park this vehicle in areas where com-
bustible materials such as grass, hay or
leaves can come into contact with the hot
exhaust system, as these materials could be
ignited and cause a vehicle fire.
To reduce the risk of personal injury as a re-
sult of vehicle movement, before
turning off
the engine and leaving the vehicle always:
�
Keep right foot on brake pedal.
�
Pull the parking brake lever up as many
notches as possible.
�
Move the selector lever to positionP
(manual transmission: first or reverse
gear).
�
Slowly release brake pedal.
�
When parked on an incline, turn front
wheels towards the road curb.
�
Turn the SmartKey in the starter switch
to position0 and remove the SmartKey
from the starter switch.
�
Take the SmartKey and lock vehicle
when leaving.!Set the parking brake whenever park-
ing or leaving the vehicle. In addition,
place gear selector lever* in positionP
(manual transmission: move gearshift
lever to first or reverse gear).
In addition, when parking on hills, turn
front wheel towards the road curb.
Page 364 of 481

363 Practical hints
What to do if …
Problem
Possible cause/consequence
Suggested solution
;
3
(USA only)
(Canada only)
The red brake warning
lamp comes on while driv-
ing and you hear a warning
sound.
You are driving with the parking brake
set.
�
Release the parking brake
(�page 52).
The red brake warning
lamp comes on while driv-
ing.
There is insufficient brake fluid in the
reservoir.
�
Risk of accident! Carefully stop the
vehicle and notify an authorized
Mercedes-Benz Center. Do not add
brake fluid! This will not solve the
problem.
Warning!
G
Driving with the brake warning lamp illumi-
nated can result in an accident. Have your
brake system checked immediately if the
brake warning lamp stays on. Do not add
brake fluid before checking the brake
system. Overfilling the brake fluid reservoir
can result in spilling brake fluid on hot
engine parts and the brake fluid catching
fire. You can be seriously burned.
!If you find that the brake fluid in the
brake fluid reservoir has fallen to the
minimum mark or below, have the
brake system checked for brake pad
thickness and leaks.
Page 376 of 481

375 Practical hints
What to do if …
Display symbol
Display message
Possible cause/consequence
Possible solution
USA only:;Canada only:!
Release
parking brake
You are driving with the parking
brake set.
�
Release parking brake (
�page 52).
USA only:;Canada only:3
Brake fluid
Visit workshop
There is insufficient brake fluid in
the reservoir.
�
Risk of accident! Stop the vehicle and notify
an authorized Mercedes-Benz Center. Do
not add brake fluid! This will not solve the
problem.
2
Brake wear
Visit workshop
The brake pads have reached their
wear limit.
�
Have the brake pads replaced as soon as
possible.
Warning!
G
Driving with the message
Brake fluid
Visit workshop
displayed can result in an
accident. Have your brake system checked
immediately. Do not add brake fluid before
checking the brake system.
Overfilling the brake fluid reservoir can re-
sult in spilling brake fluid on hot engine
parts and the brake fluid catching fire. You
can be seriously burned.
!If you find that the brake fluid in the
brake fluid reservoir has fallen to the
minimum mark or below, have the
brake system checked for brake pad
thickness and leaks.
!Brake pad thickness must be visually
checked by a qualified technician at the
intervals specified in the Maintenance
Booklet.
Page 390 of 481

389 Practical hints
Where will I find...?
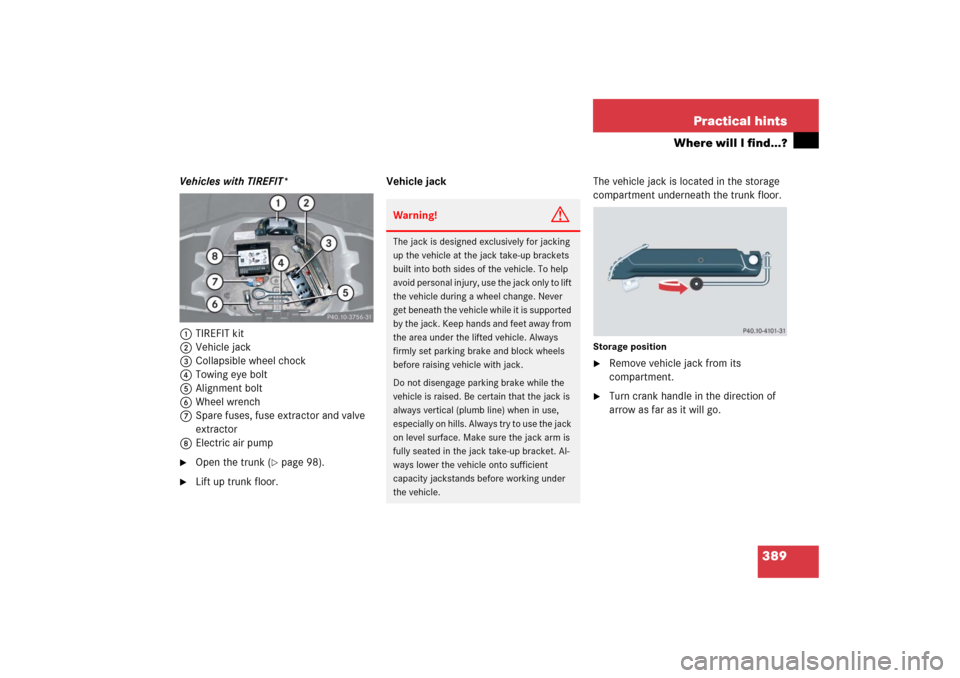
Vehicles with TIREFIT*
1TIREFIT kit
2Vehicle jack
3Collapsible wheel chock
4Towing eye bolt
5Alignment bolt
6Wheel wrench
7Spare fuses, fuse extractor and valve
extractor
8Electric air pump�
Open the trunk (
�page 98).
�
Lift up trunk floor.Vehicle jackThe vehicle jack is located in the storage
compartment underneath the trunk floor.
Storage position�
Remove vehicle jack from its
compartment.
�
Turn crank handle in the direction of
arrow as far as it will go.
Warning!
G
The jack is designed exclusively for jacking
up the vehicle at the jack take-up brackets
built into both sides of the vehicle. To help
avoid personal injury, use the jack only to lift
the vehicle during a wheel change. Never
get beneath the vehicle while it is supported
by the jack. Keep hands and feet away from
the area under the lifted vehicle. Always
firmly set parking brake and block wheels
before raising vehicle with jack.
Do not disengage parking brake while the
vehicle is raised. Be certain that the jack is
always vertical (plumb line) when in use,
especially on hills. Always try to use the jack
on level surface. Make sure the jack arm is
fully seated in the jack take-up bracket. Al-
ways lower the vehicle onto sufficient
capacity jackstands before working under
the vehicle.
Page 402 of 481
401 Practical hints
Replacing bulbs
Bulbs Front lamps Rear lamps
Lamp
Type
1
Additional turn signal
lamp
LED
2
Turn signal lamp
PY 21 W
3
Halogen headlamp:
Low beam
H7 (55 W)
Bi-Xenon* headlamp:
Low and high beam
1
1Vehicles with Bi-Xenon* headlamps: Low beam
and high beam use the same D2S-35W lamp. Do
not replace the Bi-Xenon* bulbs yourself. See an
authorized Mercedes-Benz Center.
D2S-35W
4
Front fog lamp
HB4 (51 W)
5
Parking and standing
lamp
W5W
6
Halogen headlamp:
High beam/high beam
flasher
H7 (55 W)
Bi-Xenon* headlamp:
High beam flasher
H7 (55 W)
7
Side marker lamp
W5W
Lamp
Type
8
Rear fog lamp (driver’s
side only)
P21W
9
High mounted brake
lamp
LED
a
Tail, parking, standing,
side marker lamp and
brake lamp
LED
b
License plate lamps
C5W
c
Backup lamp
P21W
d
Turn signal lamp
PY 21 W
iVehicles equipped with
corner-illuminating front fog lamps*:
Front fog lamps use H7 (55 W) lamps.
Page 403 of 481

402 Practical hintsReplacing bulbs
Notes on bulb replacement�
Only use 12-volt bulbs of the same type
and with the specified watt rating.
�
Switch lights off before changing a bulb
to prevent short circuits.
�
Always use a clean lint-free cloth when
handling bulbs.
�
Your hands should be dry and free of oil
and grease.
�
If the newly installed bulb does not
come on, visit an authorized
Mercedes-Benz Center.Have the LEDs and bulbs for the following
lamps replaced by an authorized
Mercedes-Benz Center:
�
Additional turn signal lamps in the
exterior rear view mirrors
�
Bi-Xenon* lamps
�
Front fog lamps
�
High mounted brake lamp
�
Brake lamps
�
Front and rear side marker lamps
�
Parking/standing lamps in the tail
lamp assemblies
Warning!
G
Bulbs and bulb sockets can be very hot. Al-
low the lamp to cool down before changing
a bulb.
Keep bulbs out of reach of children.
Halogen lamps contain pressurized gas.
A bulb can explode if you:�
touch or move it when hot
�
drop the bulb
�
scratch the bulb
Wear eye and hand protection.
Because of high voltage in Xenon lamps, it is
dangerous to replace the bulb or repair the
lamp and its components. We recommend
that you have such work done by a qualified
technician.
iHave the headlamp adjustment
checked regularly.