Page 108 of 481

107 Controls in detail
Memory function*
�Memory function*
Prior to operating the vehicle, the driver
should check and adjust the seat height,
seat position fore and aft, and seat back-
rest angle if necessary, to ensure adequate
control, reach and comfort. The head re-
straint should also be adjusted for proper
height. See also the section on air bags for
proper seat positioning (
�page 65).
In addition, adjust the steering wheel to
ensure adequate control, reach, operation
and comfort. Both the interior and exterior
rear view mirrors should be adjusted for
adequate rear vision.
Fasten seat belts. Infants and small chil-
dren should be seated in a properly se-
cured restraint system that complies with
U.S. Federal Motor Vehicle Safety
Standards 213 and 255 and Canadian Mo-
tor Vehicle Safety Standards 213
and 210.2.The following settings are stored when
using the buttons on the outer side of the
respective seat:
Driver and passenger seat:
�
Seat and backrest position
Driver only:
�
Steering wheel position
�
Exterior rear view mirrorsThe memory button and memory position
switch are located on the outer side of
each seat.
1Memory buttonM
2Memory position switch
�
Switch on the ignition (
�page 36).
or
�
Open the respective door.
Warning!
G
Do not activate the memory function while
driving. Activating the memory function
while driving could cause the driver to lose
control of the vehicle.
Page 110 of 481
109 Controls in detail
Memory function*
The switches are located on the lower part
of the center console.
1Driver’s side exterior rear view mirror
switch
2Adjustment switch
3Passenger-side exterior rear view
mirror switch
�
Switch on the ignition (
�page 36).
�
Press switch3 to select the passen-
ger-side exterior rear view mirror.
�
Adjust the passenger-side exterior rear
view mirror with adjustment switch2
so that you see the rear wheel and the
road curb.
�
Press memory buttonM (
�page 107).
�
Within 3 seconds, press adjustment
switch2 forward, backward, left, or
right.
The parking position is stored if the
mirror does not move.iIf the mirror does move, repeat the
above steps. After the setting is stored,
you can move the mirror again.
Page 121 of 481
.
The multifunction display in the instrument
clu")
120 Controls in detailInstrument clusterA full view illustration of the instrument
cluster can be found in the “At a glance”
section (
�page 24).
The multifunction display in the instrument
cluster is activated when you
�
open a door
�
switch on exterior lighting
�
switch on ignition (
�page 36)
�
press reset buttonJ (
�page 24)
For information on changing the instru-
ment cluster settings, e.g. the language,
see “Instrument cluster submenu”
(
�page 137).
Instrument cluster illumination
Adjusting
The knobs for adjusting the instrument
cluster illumination are on the left side of
the instrument cluster (
�page 24).
1Brightening illumination (knob+)
2Dimming illumination (knob-)
3Reset buttonJ Brightening illumination
�
Press knob+ briefly.
The instrument cluster illumination
brightens.
Dimming illumination
�
Press knob- briefly.
The instrument cluster illumination
dims.
iOpening a door or pressing the reset
buttonJwithout switching on the ig-
nition or the exterior lighting activates
the multifunction display illumination
only for 30 seconds.
iThe instrument cluster illumination
automatically adjusts to the ambient
light.
You can only adjust the brightness of
the instrument cluster illumination
when it is dark outside.iWith the exterior lighting switched on,
the brightness of the switches in the
center console will be adjusted when
using knob+or-.
Page 174 of 481
173 Controls in detail
Good visibility
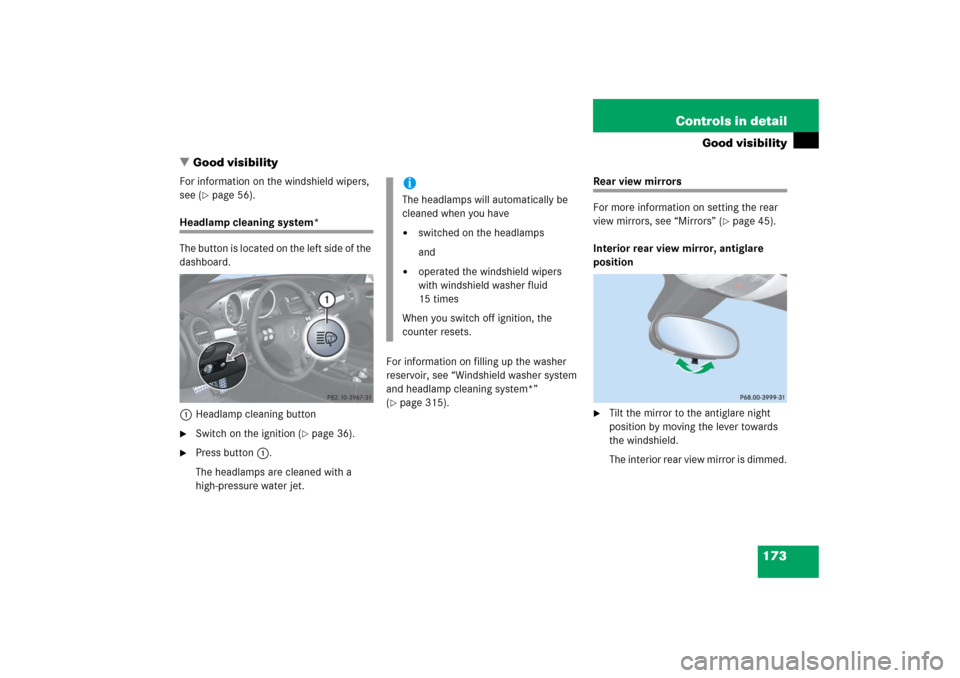
�Good visibility
For information on the windshield wipers,
see (
�page 56).
Headlamp cleaning system*
The button is located on the left side of the
dashboard.
1Headlamp cleaning button�
Switch on the ignition (
�page 36).
�
Press button1.
The headlamps are cleaned with a
high-pressure water jet.For information on filling up the washer
reservoir, see “Windshield washer system
and headlamp cleaning system*”
(
�page 315).
Rear view mirrors
For more information on setting the rear
view mirrors, see “Mirrors” (
�page 45).
Interior rear view mirror, antiglare
position
�
Tilt the mirror to the antiglare night
position by moving the lever towards
the windshield.
The interior rear view mirror is dimmed.
iThe headlamps will automatically be
cleaned when you have�
switched on the headlamps
and
�
operated the windshield wipers
with windshield washer fluid
15 times
When you switch off ignition, the
counter resets.
Page 175 of 481

174 Controls in detailGood visibilityAuto-dimming mirrors*
The reflection brightness of the exterior
rear view mirrors and the interior rear view
mirror will respond automatically to glare
when�
ignition is switched on
and
�
incoming light from headlamps falls on
the sensor in the interior rear view
mirror
The rear view mirrors will not react if
�
reverse gearR is engaged
�
interior lighting is switched on
Warning!
G
The auto-dimming function does not react if
incoming light is not aimed directly at sen-
sors in the interior rear view mirror.
The interior rear view mirror and the exterior
rear view mirror on the driver’s side do not
react, for example, if the wind screen is in-
stalled.
Glare can endanger you and others.Warning!
G
In case of an accident, liquid electrolyte may
escape from the mirror housing if the mirror
glass breaks.
Electrolyte has an irritating effect. Do not al-
low the liquid to come into contact with
eyes, skin, clothing, or the respiratory sys-
tem. In case it does, immediately flush af-
fected area with water, and seek medical
help if necessary.
!Electrolyte drops coming into contact
with the vehicle paint finish can only be
completely removed while in their
liquid state and by applying plenty of
water.Warning!
G
Exercise care when using the passen-
ger-side exterior rear view mirror. The mirror
surface is convex (outwardly curved surface
for a wider field of view). Objects in mirror
are closer than they appear. Check your in-
terior rear view mirror or glance over your
shoulder before changing lanes.
Page 176 of 481

175 Controls in detail
Good visibility
Activating exterior rear view mirror
parking position*
Follow these steps to activate the mirror
parking position so that the passen-
ger-side exterior rear view mirror will be
turned downward during parking maneu-
vers to the stored position.
The switches are located on the lower part
of the center console.
1Driver-side exterior rear view mirror
2Adjustment switch
3Passenger-side exterior rear view
mirror
�
Switch on the ignition (
�page 36).
�
Store a parking position* for the pas-
senger-side exterior rear view mirror
(�page 108).
�
Switch the
Mirror adjustment
Parking aid function* in the
Convenience
submenu of the control
system to ON (�page 148).
�
Press switch3 for the passenger-side
exterior rear view mirror.
�
Shift into reverse gearR.
The passenger-side exterior rear view
mirror turns downwards to the stored
position.The passenger-side exterior rear view mir-
ror returns to its previously stored driving
position:
�
10 seconds after you shifted out of re-
verse gearR
�
immediately once you exceed a vehicle
speed of approximately 6 mph
(10 km/h)
�
immediately when you press adjust-
ment switch2
Page 182 of 481
.
�
Set air volume control2 to any speed
(�page 179).
The previous setti")
181 Controls in detail
Climate control
Switching climate control system on/off
Switching on�
Switch on the ignition (
�page 36).
�
Set air volume control2 to any speed
(�page 179).
The previous settings are once again in
effect.
Switching off
�
Set air volume control2 (
�page 179)
to position0.
Setting the temperature
Use temperature controls1 and4
(�page 179) to separately adjust the air
temperature on each side of the passenger
compartment. You should raise or lower
the temperature setting in small incre-
ments, preferably starting at 72°F (22°C).
The climate control will adjust to the set
temperature as fast as possible.Increasing
�
Turn temperature control
1and/or4 (
�page 179) slightly
clockwise.
The climate control system will corre-
spondingly adjust the interior air tem-
perature.
Decreasing
�
Turn temperature control
1and/or4 (
�page 179) slightly
counterclockwise.
The climate control system will corre-
spondingly adjust the interior air tem-
perature.
iWhen the climate control system is
switched off, the outside air supply and
circulation are also switched off. Only
choose this setting for a short time.
Otherwise the windows could fog up.
Page 190 of 481
189 Controls in detail
Climate control
Activating�
Switch off the ignition (
�page 36).
�
Press button9 (
�page 179).
The indicator lamp on the button
comes on.Deactivating
�
Press button9 (
�page 179) again.
The indicator lamp on the button goes
out.
iHow long the system will provide heat-
ing depends on�
the coolant temperature
�
the temperature set by the operator
The blower will run at speed setting1
regardless of the air distribution con-
trol setting.
iThe residual heat is automatically
turned off�
when the ignition is switched on
(�page 36)
�
after about 30 minutes
�
if the battery voltage drops