Page 114 of 481
113 Controls in detail
Lighting
Locator lighting and night security illu-
mination
The locator lighting and the night security
illumination are described in the “Control
system” section, see (
�page 144) and
(
�page 145).Fog lamps
Warning!
G
In low ambient lighting or foggy conditions,
only switch from positionUtoB with
the vehicle at a standstill in a safe location.
Switching fromUtoB will briefly
switch off the headlamps. Doing so while
driving in low ambient lighting conditions
may result in an accident.
iFog lamps will operate with the parking
lamps and/or low beam headlamps on.
Fog lamps should only be used in con-
junction with low beam headlamps.
Consult your State or Province Motor
Vehicle Regulations regarding allow-
able lamp operation.iFog lamps cannot be switched on with
the exterior lamp switch in
positionU. To switch on the fog
lamps, turn the exterior lamp switch to
positionB first.
Page 115 of 481
.
�
With the exterior lamp switch in the low
beam headlamp position, pull out the
exterior lamp switch to")
114 Controls in detailLightingFront fog lamps�
Switch on the low beam headlamps
(�page 110).
�
With the exterior lamp switch in the low
beam headlamp position, pull out the
exterior lamp switch to first stop.
The front fog lamps switch on.
The green indicator lamp‡ in the
exterior lamp switch comes on
(�page 110).
�
Push in the exterior lamp switch.
The front fog lamps switch off.
The green indicator lamp‡ in the
exterior lamp switch goes out.Rear fog lamp (driver’s side only)
�
Switch on the front fog lamps
(�page 114).
�
Pull out the exterior lamp switch to sec-
ond stop.
The rear fog lamp switches on.
The yellow indicator lamp† in the
exterior lamp switch comes on
(�page 110).
�
Push in the exterior lamp switch to first
stop.
The rear fog lamp switches off.
The yellow indicator lamp† in the
exterior lamp switch goes out.
The front fog lamps remain lit.
Combination switch
The combination switch is located on the
left of the steering column.
1High beam
2High beam flasher
Page 116 of 481
.
�
Push the combination switch in direc-
tion of arrow1 to switch on the high
beam.
The high bea")
115 Controls in detail
Lighting
High beam�
Turn the exterior lamp switch to
positionBorU (
�page 110).
�
Push the combination switch in direc-
tion of arrow1 to switch on the high
beam.
The high beam headlamp indicator
lampA in the instrument cluster
comes on (
�page 24).
�
Pull the combination switch in direction
of arrow2 to its original position to
switch off the high beam.
The high beam headlamp indicator
lampA in the instrument cluster
goes out.
High beam flasher
�
Pull the combination switch briefly in
direction of arrow2.Corner-illuminating front fog lamps*
(SLK 280, SLK 350: with Bi-Xenon*
headlamps and without
Sport Package*)
The corner-illuminating front fog lamps im-
prove illumination of the road onto which
you are turning.
The corner-illuminating front fog lamps will
operate with the engine running and with�
the exterior lamp switch in
positionB (
�page 110)
or
�
the exterior lamp switch in
positionU (
�page 110)
or
�
the daytime running lamp mode
activated (
�page 112)Driving forward
Switching on corner-illuminating front
fog lamps
�
Depending on whether you are turning
left or right, switch on the left or right
turn signal (
�page 55).
The respective front fog lamp comes on
and illuminates the road onto which
you are turning.
iCorner-illuminating front fog lamps will
only come on in low ambient lighting
conditions.
The corner-illuminating front fog lamps
function is not available at a vehicle
speed above 25 mph (40 km/h).
��
Page 120 of 481
119 Controls in detail
Lighting
Reading lamps
The standard reading lamps are located to
the left and right of the overhead control
panel. Reading lamps as part of the interior
lighting package* are located on the lower
edge of the interior rear view mirror.�
Press reading lamp switch3or4 to
switch on the desired reading lamp.
�
Press reading lamp switch3or4
again to switch off the respective
reading lamp.
Door entry lamps
For better orientation in the dark, the cor-
responding door entry lamps will switch on
in darkness when you open a door and the
automatic control is activated.
The door entry lamps switch off when the
corresponding door is closed.
iIf you turn the SmartKey in the starter
switch to position0 and switch off the
exterior headlamps, the door entry
lamps will remain lit for approximately
5 minutes.
Page 144 of 481

143 Controls in detail
Control system
Lighting submenu
Access the
Lighting
submenu via the
Settings...
menu. Use the
Lighting
sub-
menu to change the lamp and lighting set-
tings on your vehicle.
The following functions are available:Daytime running lamp mode (USA only)
�
Move the selection marker with
buttonæorç to the
Lighting
submenu.
�
Press buttonjork repeatedly
until you see
Lamp circuit headlamp
mode
in the multifunction display.
The selection marker is on the current
setting.
�
Press buttonæorç to select
manual operation (
manual
) or daytime
running lamp mode (
constant
) activat-
ed.
With daytime running lamp mode activated
and the exterior lamp switch in
positionMorU, the low beam
headlamps are switched on when the en-
gine is running.
In low ambient light conditions the follow-
ing lamps will switch on additionally:
�
Parking lamps
�
Tail lamps
�
License plate lamps
�
Side marker lamps
For more information on the daytime run-
ning lamp mode, see “Lighting”
(
�page 110).
Function
Page
Daytime running lamp mode
(USA only)
143
Locator lighting
144
Night security illumination
145
Interior lighting delayed shut-off
146
iThis function is not available in coun-
tries where the daytime running lamp
mode is mandatory and therefore in a
constant mode.
Page 146 of 481

Use this function to set whether or not the
exterior lamps illuminate during darkness
after exiting th")
145 Controls in detail
Control system
Night security illumination (Headlamps
delayed shut-off)
Use this function to set whether or not the
exterior lamps illuminate during darkness
after exiting the vehicle and all doors
closed.
With the delayed shut-off feature activated
and the exterior lamp switch in
positionU before the engine is turned
off, the following lamps will switch on
when the engine is turned off and remain
lit for approximately 15 seconds:�
Parking lamps
�
Tail lamps
�
License plate lamps
�
Side marker lamps
�
Front fog lampsIf after turning off the engine you do not
open a door or do not close an opened
door, the lamps will automatically switch
off after 60 seconds.
�
Move the selection marker with
buttonæorç to the
Lighting
submenu.
�
Press buttonjork repeatedly
until you see
Headlamps delayed
shut-off
in the multifunction display.The selection marker is on the current
setting.
�
Press buttonæorç to set the
function to
On or
Off
.
�
Turn the exterior lamp switch to
positionU before turning off the en-
gine (
�page 55).
iYou can reactivate this function within
10 minutes by opening a door.
Page 174 of 481
173 Controls in detail
Good visibility
�Good visibility
For information on the windshield wipers,
see (
�page 56).
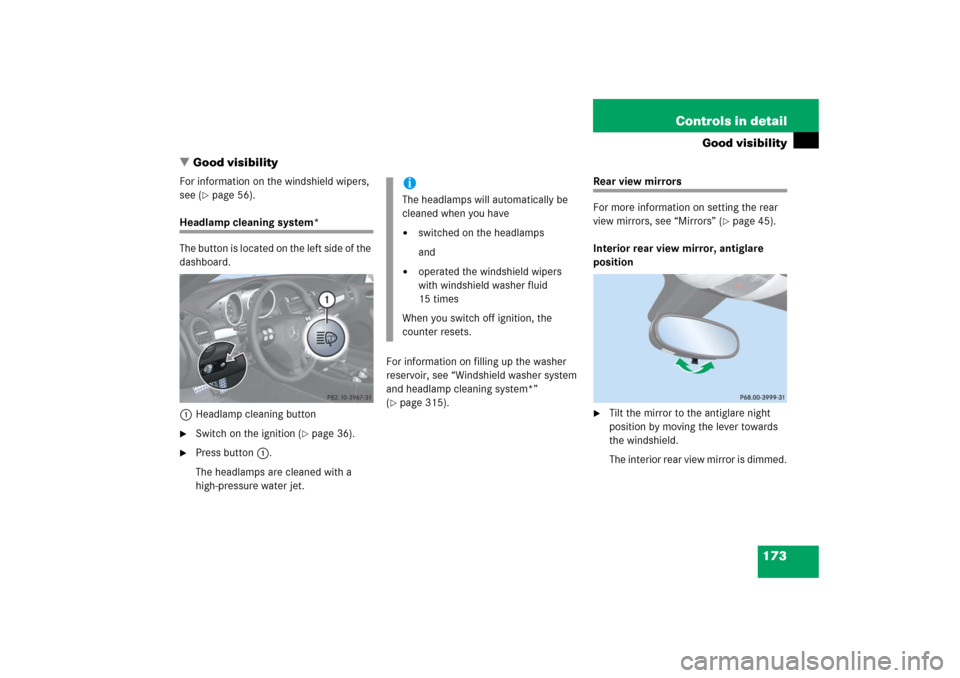
Headlamp cleaning system*
The button is located on the left side of the
dashboard.
1Headlamp cleaning button�
Switch on the ignition (
�page 36).
�
Press button1.
The headlamps are cleaned with a
high-pressure water jet.For information on filling up the washer
reservoir, see “Windshield washer system
and headlamp cleaning system*”
(
�page 315).
Rear view mirrors
For more information on setting the rear
view mirrors, see “Mirrors” (
�page 45).
Interior rear view mirror, antiglare
position
�
Tilt the mirror to the antiglare night
position by moving the lever towards
the windshield.
The interior rear view mirror is dimmed.
iThe headlamps will automatically be
cleaned when you have�
switched on the headlamps
and
�
operated the windshield wipers
with windshield washer fluid
15 times
When you switch off ignition, the
counter resets.
Page 175 of 481

174 Controls in detailGood visibilityAuto-dimming mirrors*
The reflection brightness of the exterior
rear view mirrors and the interior rear view
mirror will respond automatically to glare
when�
ignition is switched on
and
�
incoming light from headlamps falls on
the sensor in the interior rear view
mirror
The rear view mirrors will not react if
�
reverse gearR is engaged
�
interior lighting is switched on
Warning!
G
The auto-dimming function does not react if
incoming light is not aimed directly at sen-
sors in the interior rear view mirror.
The interior rear view mirror and the exterior
rear view mirror on the driver’s side do not
react, for example, if the wind screen is in-
stalled.
Glare can endanger you and others.Warning!
G
In case of an accident, liquid electrolyte may
escape from the mirror housing if the mirror
glass breaks.
Electrolyte has an irritating effect. Do not al-
low the liquid to come into contact with
eyes, skin, clothing, or the respiratory sys-
tem. In case it does, immediately flush af-
fected area with water, and seek medical
help if necessary.
!Electrolyte drops coming into contact
with the vehicle paint finish can only be
completely removed while in their
liquid state and by applying plenty of
water.Warning!
G
Exercise care when using the passen-
ger-side exterior rear view mirror. The mirror
surface is convex (outwardly curved surface
for a wider field of view). Objects in mirror
are closer than they appear. Check your in-
terior rear view mirror or glance over your
shoulder before changing lanes.