Page 76 of 481

75 Safety and Security
Occupant safety
Children in the vehicle
If an infant or child is traveling with you in
the vehicle:�
Secure the child using an infant or child
restraint appropriate to the age and
size of the child.
�
Ensure the infant or child is properly
secured at all times while the vehicle is
in motion.
Infant and child restraint seats and infor-
mation on choosing an appropriate re-
straint system can be obtained from any
Mercedes-Benz Center.Infant and child restraint systems
Use only a BabySmart
TM compatible child
restraint for the passenger seat in this
vehicle.
We recommend all infants and children be
properly restrained at all times while the
vehicle is in motion.
The passenger lap-shoulder belt has a spe-
cial seat belt retractor for secure fastening
of child restraints.
To fasten a child restraint, follow child re-
straint instructions for mounting. Then pull
the shoulder belt out completely and let it
retract. During seat belt retraction, a ratch-
eting sound can be heard to indicate that
the special seat belt retractor is activated.
The belt is now locked. Push down on child
restraint to take up any slack.
To deactivate, release seat belt buckle and
let seat belt retract completely. The seat
belt can again be used in the usual man-
ner.
!Do not place objects heavier than
20 lbs (9 kg) on the passenger seat.
This could cause the front air bag or
head-thorax air bag on the passenger
side and, with the seat belt fastened to
secure the object, the ETD to deploy in
a crash which exceeds the system’s
deployment threshold.
Page 78 of 481

77 Safety and Security
Occupant safety
BabySmart
TM air bag deactivation
system
175indicator lampSpecial BabySmart
TM compatible child
seats, designed for use with the
Mercedes-Benz system and available at
any authorized Mercedes-Benz Center are
required for use with the BabySmart
TM
air bag deactivation system. With the spe-
cial child seat properly installed, the pas-
senger front air bag will not deploy.
The 75indicator lamp will be il-
luminated, except with the SmartKey re-
moved or in starter switch position0.
Children too big for child restraint systems
should use regular seat belts. Position the
shoulder belt across chest and shoulder, not
face or neck. A booster seat may be neces-
sary to achieve proper belt positioning for
children from 41 lbs until they reach a
height where a lap/shoulder belt fits proper-
ly without a booster.
A child’s risk of serious or fatal injuries is
significantly increased if the child restraints
are not properly secured in the vehicle and
the child is not properly secured in the child
restraint.
When the child restraint is not in use, re-
move it from the vehicle or secure it with the
seat belt to prevent the child restraint from
becoming a projectile in the event of an ac-
cident.
Do not leave children unattended in the ve-
hicle; even if the children are secured in a
child restraint system. Unsupervised chil-
dren in a child restraint system may use ve-
hicle equipment and may cause serious
personal injury.
iThe system does not deactivate the
head-thorax air bag and the ETD (emer-
gency tensioning device).
Page 79 of 481

78 Safety and SecurityOccupant safetySelf-test BabySmart
TM without special
child seat installed
After turning the SmartKey in the starter
switch to position1or2, the
75indicator lamp comes on for
approximately 6 seconds and then goes
out.
If the 75indicator lamp should
not come on or is continuously lit, the sys-
tem is not functioning. You must see an au-
thorized Mercedes-Benz Center before
seating any child on the passenger seat.
For more information, see “Practical hints”
(
�page 367).
Warning!
G
The BabySmart
TM air bag deactivation sys-
tem will ONLY work with a special child seat
designed to operate with it. It will not work
with child seats which are not BabySmart
TM
compatible.
Never place anything between seat cushion
and child seat (e.g. pillow), since it reduces
the effectiveness of the deactivation sys-
tem. The bottom of the child seat must
make full contact with the passenger seat
cushion. An incorrectly mounted child seat
could cause injuries to the child in case of an
accident, instead of protecting the child.
Follow the manufacturer’s instructions for
installation of special child seats.
Warning!
G
When using a BabySmart
TM compatible child
seat on the passenger seat, the front pas-
senger air bag will not deploy only if the
75indicator lamp remains illumi-
nated.
Please be sure to check the
75indicator lamp every time you
use the special system child seat. Should
the 75indicator lamp go out while
the restraint is installed, please check instal-
lation. If the 75indicator lamp re-
mains out, do not use the BabySmart
TM
restraint to transport children on the pas-
senger seat until the system has been re-
paired.
Page 92 of 481
91 Controls in detail
Locking and unlocking
Seats
Memory function*
Lighting
Instrument cluster
Control system
Manual transmission
Automatic transmission*
Good visibility
Climate control
Automatic climate control*
Audio system
Power windows
Retractable hardtop
Driving systems
Useful features
Page 105 of 481
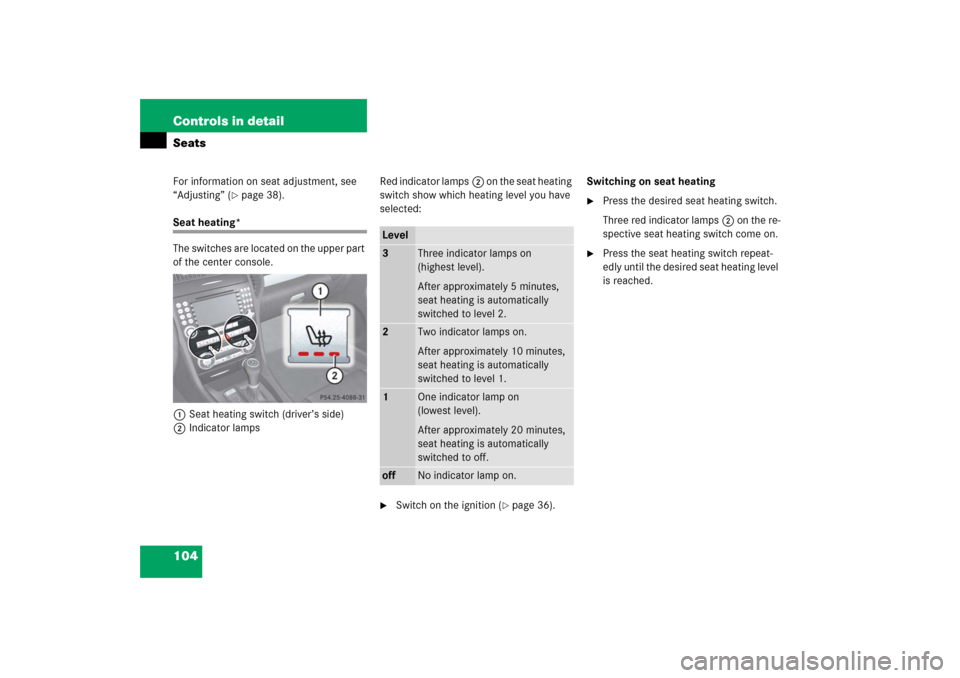
104 Controls in detailSeatsFor information on seat adjustment, see
“Adjusting” (
�page 38).
Seat heating*
The switches are located on the upper part
of the center console.
1Seat heating switch (driver’s side)
2Indicator lampsRed indicator lamps2 on the seat heating
switch show which heating level you have
selected:
�
Switch on the ignition (
�page 36).Switching on seat heating
�
Press the desired seat heating switch.
Three red indicator lamps2 on the re-
spective seat heating switch come on.
�
Press the seat heating switch repeat-
edly until the desired seat heating level
is reached.
Level3
Three indicator lamps on
(highest level).
After approximately 5 minutes,
seat heating is automatically
switched to level 2.
2
Two indicator lamps on.
After approximately 10 minutes,
seat heating is automatically
switched to level 1.
1
One indicator lamp on
(lowest level).
After approximately 20 minutes,
seat heating is automatically
switched to off.
off
No indicator lamp on.
Page 106 of 481

105 Controls in detailSeats
Switching off seat heating�
Press the desired seat heating switch
repeatedly until all indicator lamps2
on the seat heating switch go out.
AIRSCARF neck-level heating*
The AIRSCARF neck-level heating provides
the area surrounding the occupants’ necks
with a heated air stream flowing from
openings in the head restraints.
The switches are located on the upper part
of the center console.
1AIRSCARF switch (driver’s side shown)
2Indicator lamps
iIf one or more of indicator lamps2 on
the seat heating switch are flashing,
there is insufficient voltage available
since too many electrical consumers
are turned on. The seat heating switch-
es off automatically.
The seat heating will switch back on
again automatically as soon as suffi-
cient voltage is available.
Warning!
G
When switching on the AIRSCARF neck-level
heating, the air streaming from the openings
may be very hot. When in close proximity to
the openings, you could be seriously
burned. To help avoid serious personal
injuries, switch the AIRSCARF to a lower
heating level.
Page 107 of 481
.Switching on
�
Press the respective AIRSCARF")
106 Controls in detailSeatsRed indicator lamps2 on the AIRSCARF
switches show which heating level you
have selected:�
Switch on the ignition (
�page 36).Switching on
�
Press the respective AIRSCARF switch
for the desired side.
All three indicator lamps on the respec-
tive AIRSCARF switch come on. After
a preheating time of approximately
7 seconds, the blower starts.
�
Press the respective AIRSCARF switch
repeatedly until the desired AIRSCARF
heating level for the corresponding
seat is reached.Switching off
�
Press the respective AIRSCARF switch
repeatedly until all indicator lamps on
the AIRSCARF switch go out.
Level3
Three indicator lamps on
(highest heating level).
2
Two indicator lamps on.
1
One indicator lamp on
(lowest heating level).
off
No indicator lamp on.
iAfter switching off the AIRSCARF
neck-level heating, the AIRSCARF fan
continues to operate for approximately
10 seconds to cool down the heater
elements.iIf one or more of indicator lamps2 on
the AIRSCARF switch are flashing,
there is insufficient voltage available
since too many electrical consumers
are turned on. The AIRSCARF neck-lev-
el heating switches off automatically.
The AIRSCARF neck-level heating will
switch back on again automatically as
soon as sufficient voltage is available.
Page 109 of 481

108 Controls in detailMemory function*Storing positions into memory�
Adjust the seat, on the driver’s side
also the steering wheel and exterior
rear view mirrors, to the desired posi-
tions (
�page 38).
�
Press memory buttonM1.
�
Release memory buttonM1 and
press a memory position switch2
within 3 seconds.
All settings are stored to the selected
position.
Recalling positions from memory�
Press and hold desired memory posi-
tion switch2 until the seat, on the
driver’s side also the steering wheel
and exterior rear view mirrors, have
completely moved to the stored posi-
tions.Storing exterior rear view mirror
parking position (parking aid)
For easier parking, you can adjust the
passenger-side exterior rear view mirror so
that you can see the right rear wheel as
soon as you engage reverse gearR.
You can switch the parking position fea-
ture on and off via the control system
(�page 148).
For information on activating the parking
position feature, see “Activating exterior
rear view mirror parking position*”
(�page 175).
!Do not operate the power seats using
the memory position switches if the
seat backrest is in an excessively re-
clined position. Doing so could cause
damage to the seats.iReleasing the memory position switch-
es immediately stops movement to the
stored positions.