Page 126 of 481
125 Controls in detail
Control system
In the
Settings...
menu, you will find a
number of submenus instead of functions
for calling up and changing settings. For in-
structions on using these submenus, see
“Settings menu” (�page 134).
The number of menus available in the sys-
tem depends on which optional equipment
is installed in your vehicle.
iThe headings used in the menus table
are designed to facilitate navigation
within the system and are not neces-
sarily identical to those shown in the
control system displays.
The first function displayed in each
menu will automatically show you
which part of the system you are in.
iSLK 55 AMG:
The steering wheel in this vehicle will
vary from steering wheel shown. How-
ever, multifunction steering wheel sym-
bols and feature description apply to
AMG vehicles as well.
Page 133 of 481

132 Controls in detailControl systemNAV* menu
The
NAV
menu contains the functions need-
ed to operate your navigation system.
�
Press buttonèorÿ repeatedly
until you see the message
NAV
in the
multifunction display.
�
If the COMAND system is switched
off, the message
NAV off
is shown
in the multifunction display.
�
With COMAND switched on but
route guidance not activated, the
direction of travel and, if available,
the name of the street currently
traveled on appear in the multifunc-
tion display.
�
With COMAND switched on and
route guidance activated, the direc-
tion of travel and maneuver instruc-
tions appear in the multifunction
display.
Please refer to the COMAND* manual for
instructions on how to activate the route
guidance system.
Vehicle status message memory menu
Use the vehicle status message memory
menu to scan malfunction and warning
messages that may be stored in the sys-
tem. Such messages appear in the multi-
function display and are based on
conditions or system status the vehicle’s
system has recorded.
The vehicle status message memory menu
only appears if there are any messages
stored in the system.
Page 140 of 481

139 Controls in detail
Control system
Time/Date submenu
Access the
Time/Date
submenu via the
Settings...
menu. Use the
Time/Date
submenu to change the instrument cluster
display settings.
The following functions are available:Time and date synchronization with
head unit*
This function can only be seen on vehicles
with COMAND* and navigation module*.
�
Move the selection marker with
buttonæorç to the
Time/Date
submenu.
�
Press buttonjork repeatedly
until you see
Synchronization with
head unit
in the multifunction display.
The selection marker is on the current
setting.
�
Press buttonæorç to select
the desired setting.Setting the time (hours)
This function can be seen in vehicles with
audio system, or in vehicles with
COMAND* and navigation module*, if the
time and date synchronization with head
unit* feature was set to
Off
(�page 139).
Function
Page
Time synchronization with head
unit*
139
Setting the time (hours)
139
Setting the time (minutes)
140
Setting the date (month)
141
Setting the date (day)
141
Setting the date (year)
142
iVehicles with COMAND*:
For information on setting the time in
COMAND, refer to the separate
COMAND operating instructions.
Page 141 of 481

140 Controls in detailControl system�
Move the selection marker with
buttonæorç to the
Time/Date
submenu.
�
Press buttonjork repeatedly
until you see
Clock, hours
in the mul-
tifunction display.
The selection marker is on the hours.
�
Press buttonæorç to set the
correct hours displayed in the multi-
function display.
�
Press reset buttonJto confirm the
set hours.Setting the time (minutes)
This function can be seen in vehicles with
audio system, or in vehicles with
COMAND* and navigation module*, if the
time and date synchronization with head
unit* feature was set to
Off
(�page 139).
�
Move the selection marker with
buttonæorç to the
Time/Date
submenu.
�
Press buttonjork repeatedly
until you see
Clock, minutes
in the
multifunction display.
The selection marker is on the minutes.
�
Press buttonæorç to set the
correct minutes displayed in the multi-
function display.
�
Press reset buttonJto confirm the
set minutes.
iVehicles with COMAND*:
For information on setting the time in
COMAND, refer to the separate
COMAND operating instructions.
Page 142 of 481
141 Controls in detail
Control system
Setting the date (month)
This function can be seen in vehicles with
audio system, or in vehicles with
COMAND* and navigation module*, if the
time and date synchronization with head
unit* feature was set to
Off
(�page 139).
�
Move the selection marker with
buttonæorç to the
Time/Date
submenu.
�
Press buttonjork repeatedly
until you see
Set date month
in the
multifunction display.
The selection marker is on the month.
�
Press buttonæorç to set the
month.Setting the date (day)
This function can be seen in vehicles with
audio system, or in vehicles with
COMAND* and navigation module*, if the
time and date synchronization with head
unit* feature was set to
Off
(�page 139).
iVehicles with COMAND*:
For information on setting the time in
COMAND, refer to the separate
COMAND operating instructions.
iVehicles with COMAND*:
For information on setting the time in
COMAND, refer to the separate
COMAND operating instructions.
Page 143 of 481
142 Controls in detailControl system�
Move the selection marker with
buttonæorç to the
Time/Date
submenu.
�
Press buttonjork repeatedly
until you see
Set date day
in the mul-
tifunction display.
The selection marker is on the day.
�
Press buttonæorç to set the
day.Setting the date (year)
This function can be seen in vehicles with
audio system, or in vehicles with
COMAND* and navigation module*, if the
time and date synchronization with head
unit* feature was set to
Off
(�page 139).
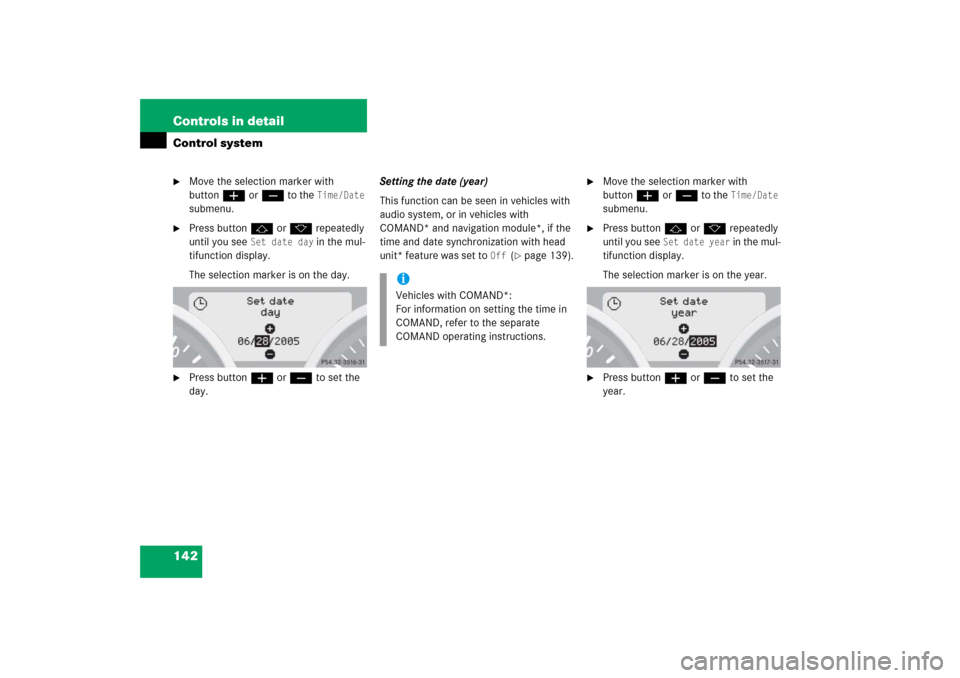
�
Move the selection marker with
buttonæorç to the
Time/Date
submenu.
�
Press buttonjork repeatedly
until you see
Set date year
in the mul-
tifunction display.
The selection marker is on the year.
�
Press buttonæorç to set the
year.
iVehicles with COMAND*:
For information on setting the time in
COMAND, refer to the separate
COMAND operating instructions.
Page 275 of 481

274 Controls in detailUseful features�
To activate, press the SOS button, the
Roadside Assistance button• or
the Information button¡, depend-
ing on the type of response required.System self-check
Initially, after switching on ignition, mal-
functions are detected and indicated (the
indicator lamps in the SOS button, the
Roadside Assistance button•, and the
Information button¡ stay on longer
than 10 seconds or do not come on). The
message
Malfunction. Drive to
workshop appears for approximately
10 seconds in the multifunction display.
iThe SOS button is located in the over-
head control panel.
The Roadside Assistance button•
and the Information button¡ are
located below the center armrest cov-
er.!The Tele Aid system utilizes the cellular
network for communication and the
GPS (Global Positioning System) satel-
lites for vehicle location. If either of
these signals are unavailable, the
Tele Aid system may not function and if
this occurs, assistance must be sum-
moned by other means.
iWhen a Tele Aid call has been initiated,
the audio system or COMAND* system
audio is muted and the selected mode
(radio, tape or CD) pauses. The optional
cellular phone* (if installed) and insert-
ed in cradle switches off. If you must
use this phone, we recommend that
you use it only with the vehicle at a
standstill in a safe location. Remove
the phone from the cradle and place
the call. The COMAND* navigation sys-
tem (if engaged) will continue to run.
The display in the instrument cluster is
available for use, and spoken com-
mands are only available by pressing
the RPT button on the COMAND* unit.
A pop-up window will appear in the
COMAND* display to indicate that a
Tele Aid call is in progress. After the
Tele Aid call has ended, the optional
cellular phone switches on again. A PIN
entry might be necessary.
Page 459 of 481

Data bus network serving to control ve-
hicle functions such as door locking or
windshield wiping.
Cockpit
All instruments, switches, button")
458 Technical termsCAN system
(C
ontroller A
rea N
etwork)
Data bus network serving to control ve-
hicle functions such as door locking or
windshield wiping.
Cockpit
All instruments, switches, buttons and
indicator/warning lamps in the passen-
ger compartment needed for vehicle
operation and monitoring.
Cold tire inflation pressure
(
�page 344)
Collapsible tire
An especially compact spare tire that
must be inflated with a provided air
pump before using. It should only be
used to bring the vehicle to the nearest
service station.COMAND*
(Co
ckpit Man
agement and
D
ata System)
Information and operating center for
vehicle sound and communications
systems, including the radio,
CD changer and navigation system, as
well as other optional equipment (e.g.
telephone).
Control system
The control system is used to call up
vehicle information and to change
component settings. Information and
messages appear in the multifunction
display. The driver uses the buttons on
the multifunction steering wheel to
navigate through the system and to ad-
just settings.
Cruise control
Driving convenience system for auto-
matically maintaining the vehicle speed
set by the driver.Curb weight
(
�page 344)
DOT
(Department o
f Transportation)
(
�page 344)
Engine number
The number set by the manufacturer
and placed on the cylinder block to
uniquely identify each engine pro-
duced.
Engine oil viscosity
Measurement for the inner friction (vis-
cosity) of the oil at different tempera-
tures. The higher the temperature an
oil can tolerate without becoming thin,
or the lower the temperature it can tol-
erate without becoming viscous, the
better the viscosity.
ESP®(Electronic S
tability Pr
ogram)
Improves vehicle handling and direc-
tional stability.


This function can be seen in vehicles with
audio system, or in vehicles with
COMAND* and navigation module*, if the
time and date sync")