Page 108 of 481

107 Controls in detail
Memory function*
�Memory function*
Prior to operating the vehicle, the driver
should check and adjust the seat height,
seat position fore and aft, and seat back-
rest angle if necessary, to ensure adequate
control, reach and comfort. The head re-
straint should also be adjusted for proper
height. See also the section on air bags for
proper seat positioning (
�page 65).
In addition, adjust the steering wheel to
ensure adequate control, reach, operation
and comfort. Both the interior and exterior
rear view mirrors should be adjusted for
adequate rear vision.
Fasten seat belts. Infants and small chil-
dren should be seated in a properly se-
cured restraint system that complies with
U.S. Federal Motor Vehicle Safety
Standards 213 and 255 and Canadian Mo-
tor Vehicle Safety Standards 213
and 210.2.The following settings are stored when
using the buttons on the outer side of the
respective seat:
Driver and passenger seat:
�
Seat and backrest position
Driver only:
�
Steering wheel position
�
Exterior rear view mirrorsThe memory button and memory position
switch are located on the outer side of
each seat.
1Memory buttonM
2Memory position switch
�
Switch on the ignition (
�page 36).
or
�
Open the respective door.
Warning!
G
Do not activate the memory function while
driving. Activating the memory function
while driving could cause the driver to lose
control of the vehicle.
Page 109 of 481

108 Controls in detailMemory function*Storing positions into memory�
Adjust the seat, on the driver’s side
also the steering wheel and exterior
rear view mirrors, to the desired posi-
tions (
�page 38).
�
Press memory buttonM1.
�
Release memory buttonM1 and
press a memory position switch2
within 3 seconds.
All settings are stored to the selected
position.
Recalling positions from memory�
Press and hold desired memory posi-
tion switch2 until the seat, on the
driver’s side also the steering wheel
and exterior rear view mirrors, have
completely moved to the stored posi-
tions.Storing exterior rear view mirror
parking position (parking aid)
For easier parking, you can adjust the
passenger-side exterior rear view mirror so
that you can see the right rear wheel as
soon as you engage reverse gearR.
You can switch the parking position fea-
ture on and off via the control system
(�page 148).
For information on activating the parking
position feature, see “Activating exterior
rear view mirror parking position*”
(�page 175).
!Do not operate the power seats using
the memory position switches if the
seat backrest is in an excessively re-
clined position. Doing so could cause
damage to the seats.iReleasing the memory position switch-
es immediately stops movement to the
stored positions.
Page 174 of 481
173 Controls in detail
Good visibility
�Good visibility
For information on the windshield wipers,
see (
�page 56).
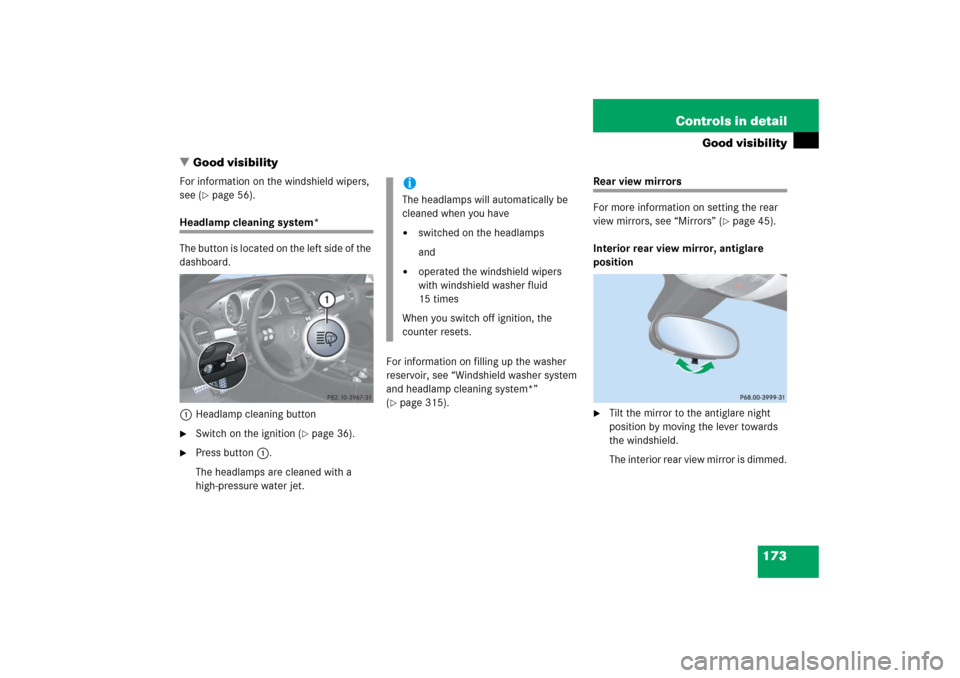
Headlamp cleaning system*
The button is located on the left side of the
dashboard.
1Headlamp cleaning button�
Switch on the ignition (
�page 36).
�
Press button1.
The headlamps are cleaned with a
high-pressure water jet.For information on filling up the washer
reservoir, see “Windshield washer system
and headlamp cleaning system*”
(
�page 315).
Rear view mirrors
For more information on setting the rear
view mirrors, see “Mirrors” (
�page 45).
Interior rear view mirror, antiglare
position
�
Tilt the mirror to the antiglare night
position by moving the lever towards
the windshield.
The interior rear view mirror is dimmed.
iThe headlamps will automatically be
cleaned when you have�
switched on the headlamps
and
�
operated the windshield wipers
with windshield washer fluid
15 times
When you switch off ignition, the
counter resets.
Page 175 of 481

174 Controls in detailGood visibilityAuto-dimming mirrors*
The reflection brightness of the exterior
rear view mirrors and the interior rear view
mirror will respond automatically to glare
when�
ignition is switched on
and
�
incoming light from headlamps falls on
the sensor in the interior rear view
mirror
The rear view mirrors will not react if
�
reverse gearR is engaged
�
interior lighting is switched on
Warning!
G
The auto-dimming function does not react if
incoming light is not aimed directly at sen-
sors in the interior rear view mirror.
The interior rear view mirror and the exterior
rear view mirror on the driver’s side do not
react, for example, if the wind screen is in-
stalled.
Glare can endanger you and others.Warning!
G
In case of an accident, liquid electrolyte may
escape from the mirror housing if the mirror
glass breaks.
Electrolyte has an irritating effect. Do not al-
low the liquid to come into contact with
eyes, skin, clothing, or the respiratory sys-
tem. In case it does, immediately flush af-
fected area with water, and seek medical
help if necessary.
!Electrolyte drops coming into contact
with the vehicle paint finish can only be
completely removed while in their
liquid state and by applying plenty of
water.Warning!
G
Exercise care when using the passen-
ger-side exterior rear view mirror. The mirror
surface is convex (outwardly curved surface
for a wider field of view). Objects in mirror
are closer than they appear. Check your in-
terior rear view mirror or glance over your
shoulder before changing lanes.
Page 177 of 481
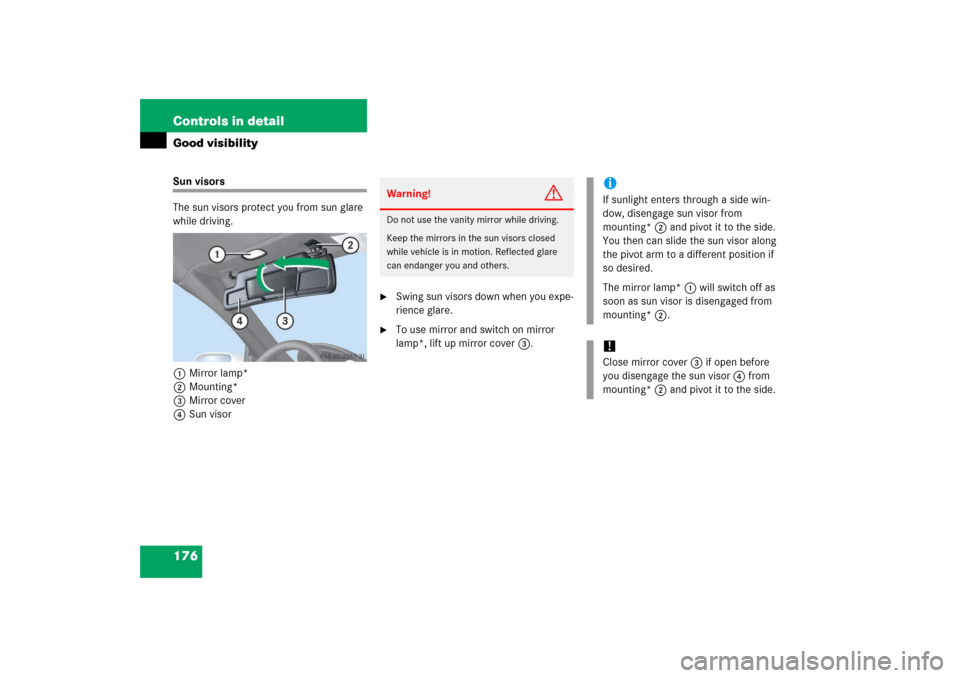
176 Controls in detailGood visibilitySun visors
The sun visors protect you from sun glare
while driving.
1Mirror lamp*
2Mounting*
3Mirror cover
4Sun visor
�
Swing sun visors down when you expe-
rience glare.
�
To use mirror and switch on mirror
lamp*, lift up mirror cover3.Warning!
G
Do not use the vanity mirror while driving.
Keep the mirrors in the sun visors closed
while vehicle is in motion. Reflected glare
can endanger you and others.
iIf sunlight enters through a side win-
dow, disengage sun visor from
mounting*2 and pivot it to the side.
You then can slide the sun visor along
the pivot arm to a different position if
so desired.
The mirror lamp*1 will switch off as
soon as sun visor is disengaged from
mounting*2.!Close mirror cover3 if open before
you disengage the sun visor4 from
mounting*2 and pivot it to the side.
Page 357 of 481

356 OperationVehicle careAutomatic car wash
You can have your car washed in an auto-
matic car wash from the start. Automatic
car washes without brushes are prefera-
ble.
If the vehicle is very dirty, prewash it be-
fore running it through the automatic car
wash.Ornamental moldings
For regular cleaning and care of very dirty
chrome-plated parts, use a chrome clean-
er.
!Due to the width of the vehicle, fold in
exterior rear view mirrors prior to run-
ning the vehicle through an automatic
car wash to prevent damage to the
mirrors.
Make sure that the windshield wiper
switch is set to0 (
�page 56). Other-
wise, the rain sensor could activate and
cause the wipers to move unintention-
ally. This may lead to vehicle damage.
iAfter running the vehicle through an au-
tomatic car wash, wipe any wax off of
the windshield (
�page 357). This will
prevent smears and reduce wiping
noise which can be caused by residual
wax on the windshield.
When leaving the car wash, make sure
that the mirrors are folded out. Other-
wise they may vibrate.
Page 403 of 481

402 Practical hintsReplacing bulbs
Notes on bulb replacement�
Only use 12-volt bulbs of the same type
and with the specified watt rating.
�
Switch lights off before changing a bulb
to prevent short circuits.
�
Always use a clean lint-free cloth when
handling bulbs.
�
Your hands should be dry and free of oil
and grease.
�
If the newly installed bulb does not
come on, visit an authorized
Mercedes-Benz Center.Have the LEDs and bulbs for the following
lamps replaced by an authorized
Mercedes-Benz Center:
�
Additional turn signal lamps in the
exterior rear view mirrors
�
Bi-Xenon* lamps
�
Front fog lamps
�
High mounted brake lamp
�
Brake lamps
�
Front and rear side marker lamps
�
Parking/standing lamps in the tail
lamp assemblies
Warning!
G
Bulbs and bulb sockets can be very hot. Al-
low the lamp to cool down before changing
a bulb.
Keep bulbs out of reach of children.
Halogen lamps contain pressurized gas.
A bulb can explode if you:�
touch or move it when hot
�
drop the bulb
�
scratch the bulb
Wear eye and hand protection.
Because of high voltage in Xenon lamps, it is
dangerous to replace the bulb or repair the
lamp and its components. We recommend
that you have such work done by a qualified
technician.
iHave the headlamp adjustment
checked regularly.
Page 466 of 481
 38
Air bags 65
BabySmart
TM
77, 457
Children 66
Front 70
Head-thorax 71, 459")
465 Index
A
ABS 82, 457
Display message 370
Indicator lamp 362
Accessory weight 344
Accident 58
Adjusting (Getting started) 38
Air bags 65
BabySmart
TM
77, 457
Children 66
Front 70
Head-thorax 71, 459
Kneebag 70
Passenger front air bag off indicator
lamp 78
Safety guidelines 68
Air conditioning
Automatic climate control* 200
Climate control 187
Air conditioning refrigerant 451
Air pressure see Tire inflation pressure
AIRSCARF neck level heating*
(Seats) 105, 457
Alarm system see Anti-theft systems
Alignment bolt (Vehicle tool kit) 388,
415, 457Anticorrosion/antifreeze 454
Antilock brake system see ABS
Anti-theft systems 87
Alarm system 87
Immobilizer 87
Tow-away alarm 88
Ashtray 269
Aspect ratio 344
AUDIO menu (Control system) 129
Audio system 203
Audio and telephone*, operation 203
CD changer* 223
CD operation 219
Introduction to satellite radio*
(USA only) 214
MP3 220
Operating and display elements 204
Auto-dimming* for rear view mirrors 174
Automatic climate control*
Air conditioning 200
Automatic mode, basic setting 194
Control panel 192
Deactivating 194
Overview 190Automatic locking
Control system 147
When driving 101
Automatic shift program* 163
Automatic transmission* 157
Automatic transmission fluid
(ATF) 313
Driving 53
Emergency operation
(Limp Home Mode) 172
Fluid level 313
Gear ranges 160
Gear selector lever 157
Gear selector lever (Unlocking
manually) 396
Gear shifting malfunctions 172
Gearshift pattern 51
Kickdown 162
Manual shifting 164
One-touch gearshifting 164
Program mode selector switch 163