Page 20 of 480
19 Introduction
Vehicle data recording
�Vehicle data recording
Information regarding electronic recording devices
(Including notice pursuant to California Code § 9951)
Please note that your vehicle is equipped with devices that can record vehicle systems data and, if equipped with the Tele Aid system,
may transmit some data in certain accidents.
This information helps, for example, to diagnose vehicle systems after a collision and to continuously improve vehicle safety.
DaimlerChrysler may access the information and share it with others�
for safety research or vehicle diagnosis purposes
�
with the consent of the vehicle owner or lessee
�
in response to an official request by law enforcement or other government agency
�
for use in dispute resolution involving DaimlerChrysler, its affiliates or sales/service organization and/or
�
as otherwise required or permitted by law.
Please check the Tele Aid subscription service agreement for details regarding the information that may be recorded or transmitted
via that system.
Page 53 of 480
52 Getting startedDriving�
Release the brake pedal.
�
Carefully depress the accelerator
pedal.Once the vehicle is in motion, the automat-
ic central locking system engages and the
locking knobs drop down.
After a cold start, the transmission engag-
es at a higher revolution. This allows the
catalytic converter to reach its operating
temperature earlier.Warning!
G
On slippery road surfaces, never downshift
in order to obtain braking action. This could
result in drive wheel slip and reduced vehi-
cle control. Your vehicle’s ABS will not pre-
vent this type of loss of control.!In order to avoid damage to the trans-
mission:�
Wait for the gear selection process
to complete before setting the vehi-
cle in motion.
�
Place the gear selector lever in
positionD orR only when the vehi-
cle is stopped.
!If you hear a warning signal and the
message
Release parking brake
appears in the multifunction display
when driving off, you have forgotten to
release the parking brake.
Release the parking brake.
!Do not run cold engine at high engine
speed. Running a cold engine at high
engine speed may shorten the service
life of the engine.
!Simultaneously depressing the acceler-
ator pedal and applying the brake re-
duces engine performance and causes
premature brake and drivetrain wear.iYou can open a locked door from the
inside. Open door only when conditions
are safe to do so.
You can deactivate the automatic lock-
ing using the control system
(�page 155).
��
Page 93 of 480
92 Safety and SecurityAnti-theft systemsThe alarm system will also be triggered
when �
someone attempts to raise the vehicle
�
unlocking and opening the driver’s
door with the mechanical key
�
someone opens a door from the inside
�
someone opens the trunk lid with the
emergency release buttonArming the alarm system
The alarm system is armed after locking
the vehicle with the SmartKey or
KEYLESS-GO*. The turn signal lamps flash
three times to indicate that the alarm sys-
tem is activated. The ‹indicator lamp
in the central locking switch (
�page 29)
begins to flash after arming the alarm sys-
tem.Disarming the alarm system
The alarm system is disarmed when you
unlock your vehicle with the SmartKey or
KEYLESS-GO*. The turn signal lamps flash
once to indicate that the alarm system is
disarmed.
iIf the alarm stays on for more than
30 seconds, a call to the Response
Center is initiated automatically by the
Tele Aid system (
�page 240) provided
Tele Aid service was subscribed to and
properly activated, and that necessary
cellular service and GPS coverage are
available.
iIf the turn signal lamps do not flash
three times, a door or the trunk lid may
not be properly closed.
Close the respective element and lock
the vehicle again.
iThe alarm system will rearm automati-
cally again after approximately 40 sec-
onds if no door was opened.
Page 94 of 480
93 Safety and Security
Anti-theft systems
Canceling the alarm
To cancel the alarm:
With the SmartKey�
Insert the SmartKey in the starter
switch.
or
�
Press theŒor‹button on the
SmartKey.
With KEYLESS-GO*
�
Grasp an outside door handle.
The SmartKey with KEYLESS-GO must
be within 3 ft. (1 m) of the vehicle.
or
�
Press the KEYLESS-GO start/stop but-
ton (
�page 37).
The SmartKey with KEYLESS-GO must
be inside the vehicle.
Tow-away alarm
Once the tow-away alarm is armed, a visual
and audible alarm will be triggered when
someone attempts to raise the vehicle. Arming tow-away alarm
When you lock your vehicle, the tow-away
alarm is automatically armed after about
30 seconds.
When you unlock your vehicle, the
tow-away protection disarms automatical-
ly.
Disabling tow-away alarm
To prevent triggering the tow-away alarm,
disable the tow-away alarm feature before
towing the vehicle, or when parking on a
surface subject to movement, such as a
ferry or auto train.
The button is located on the center con-
sole between the driver’s seat and the pas-
senger seat.
iThe tow-away protection alarm is trig-
gered, for example, if the vehicle is lift-
ed on one side.
If the alarm stays on for more than
30 seconds, a call to the Response
Center is initiated automatically by the
Tele Aid system (
�page 240) provided
Tele Aid service was subscribed to and
properly activated, and that necessary
cellular service and GPS coverage are
available.
Page 136 of 480
135 Controls in detail
Control system
�Control system
The control system is activated as soon as
the SmartKey in the starter switch is
turned to position1 or as soon as the
KEYLESS-GO start/stop button is in posi-
tion 1. The control system enables you to�
call up information about your vehicle
�
change vehicle settings
For example, you can use the control sys-
tem to find out when your vehicle is next
due for service, to set the language for
messages in the instrument cluster dis-
play, and much more.
The control system relays information to
the multifunction display.
Multifunction display
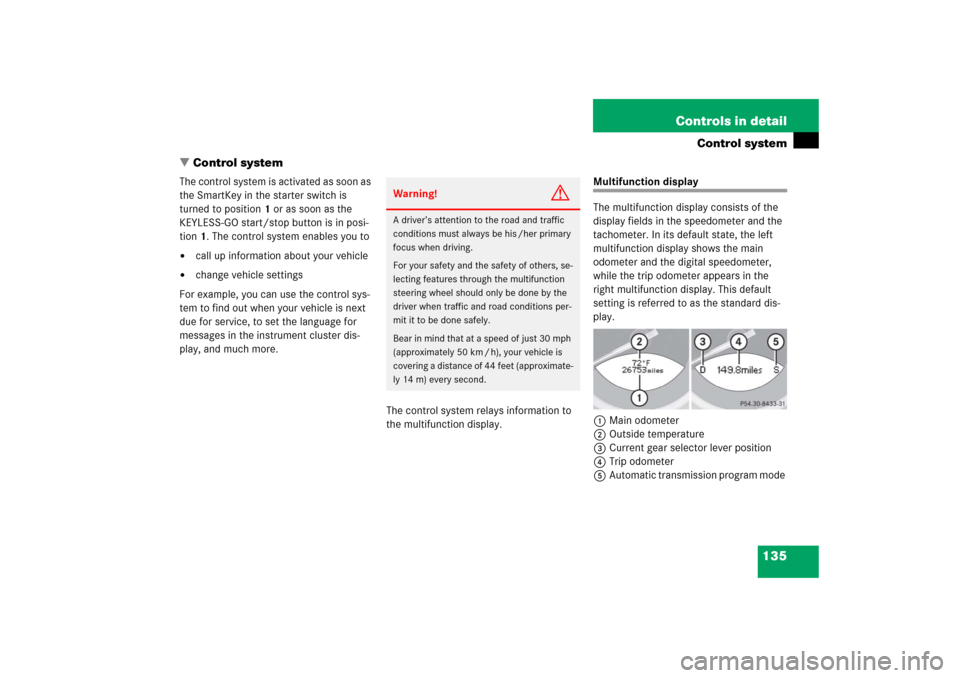
The multifunction display consists of the
display fields in the speedometer and the
tachometer. In its default state, the left
multifunction display shows the main
odometer and the digital speedometer,
while the trip odometer appears in the
right multifunction display. This default
setting is referred to as the standard dis-
play.
1Main odometer
2Outside temperature
3Current gear selector lever position
4Trip odometer
5Automatic transmission program mode
Warning!
G
A driver’s attention to the road and traffic
conditions must always be his /her primary
focus when driving.
For your safety and the safety of others, se-
lecting features through the multifunction
steering wheel should only be done by the
driver when traffic and road conditions per-
mit it to be done safely.
Bear in mind that at a speed of just 30 mph
(approximately 50 km / h), your vehicle is
covering a distance of 44 feet (approximate-
ly 14 m) every second.
Page 140 of 480
139 Controls in detail
Control system
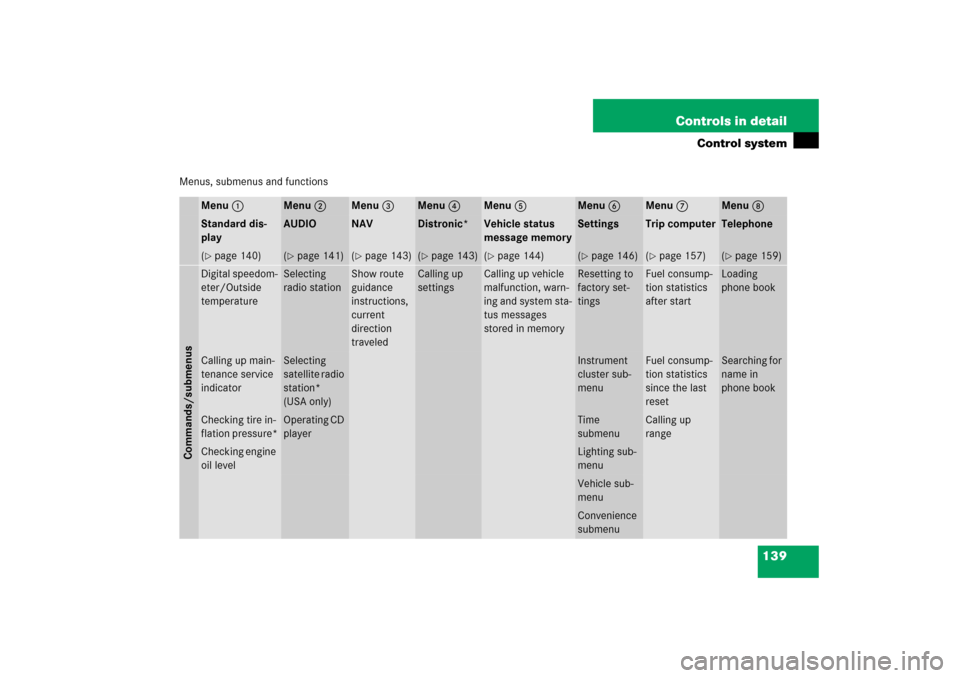
Menus, submenus and functions
Menu 1
Menu 2
Menu 3
Menu 4
Menu 5
Menu 6
Menu 7
Menu 8
Standard dis-
play
AUDIO
NAV
Distronic*
Vehicle status
message memory
Settings
Trip computer
Telephone
(�page 140)
(�page 141)
(�page 143)
(�page 143)
(�page 144)
(�page 146)
(�page 157)
(�page 159)
Commands/submenusDigital speedom-
eter/Outside
temperature
Selecting
radio station
Show route
guidance
instructions,
current
direction
traveled
Calling up
settings
Calling up vehicle
malfunction, warn-
ing and system sta-
tus messages
stored in memory
Resetting to
factory set-
tings
Fuel consump-
tion statistics
after start
Loading
phone book
Calling up main-
tenance service
indicator
Selecting
satellite radio
station*
(USA only)
Instrument
cluster sub-
menu
Fuel consump-
tion statistics
since the last
reset
Searching for
name in
phone book
Checking tire in-
flation pressure*
Operating CD
player
Time
submenu
Calling up
range
Checking engine
oil level
Lighting sub-
menuVehicle sub-
menuConvenience
submenu
Page 141 of 480
140 Controls in detailControl system
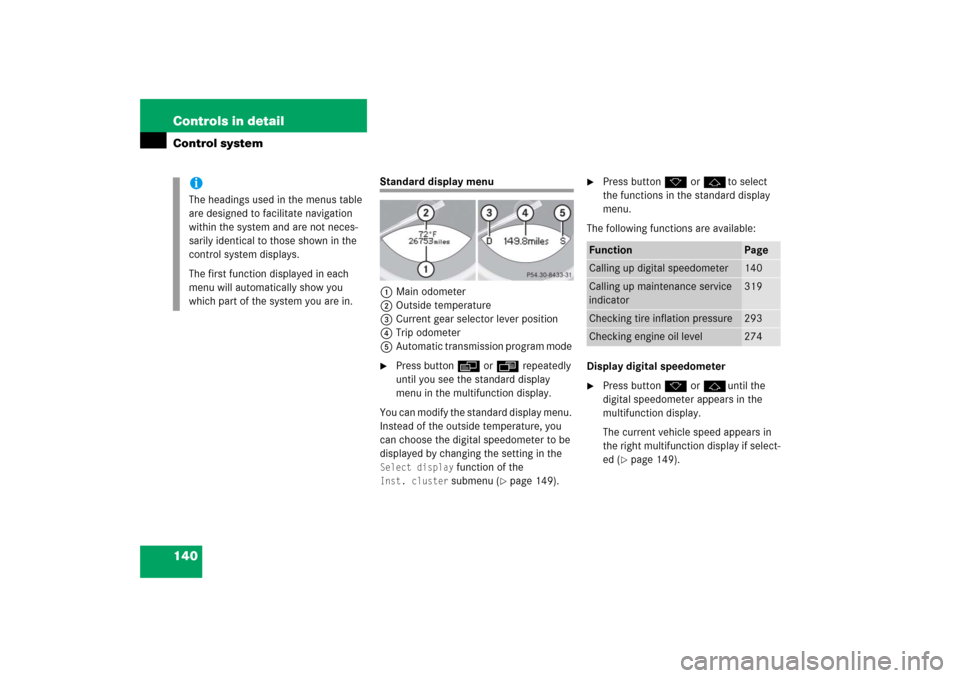
Standard display menu
1Main odometer
2Outside temperature
3Current gear selector lever position
4Trip odometer
5Automatic transmission program mode �
Press button è or ÿ repeatedly
until you see the standard display
menu in the multifunction display.
You can modify the standard display menu.
Instead of the outside temperature, you
can choose the digital speedometer to be
displayed by changing the setting in the
Select display
function of the
Inst. cluster
submenu (
�page 149).
�
Press button k or jto select
the functions in the standard display
menu.
The following functions are available:
Display digital speedometer
�
Press button k or juntil the
digital speedometer appears in the
multifunction display.
The current vehicle speed appears in
the right multifunction display if select-
ed (
�page 149).
iThe headings used in the menus table
are designed to facilitate navigation
within the system and are not neces-
sarily identical to those shown in the
control system displays.
The first function displayed in each
menu will automatically show you
which part of the system you are in.
Function
Page
Calling up digital speedometer
140
Calling up maintenance service
indicator
319
Checking tire inflation pressure
293
Checking engine oil level
274
Page 143 of 480
142 Controls in detailControl system
Operating the CD player
Selecting CD track�
Turn on COMAND and select CD. Refer
to the separate COMAND operating in-
structions.
�
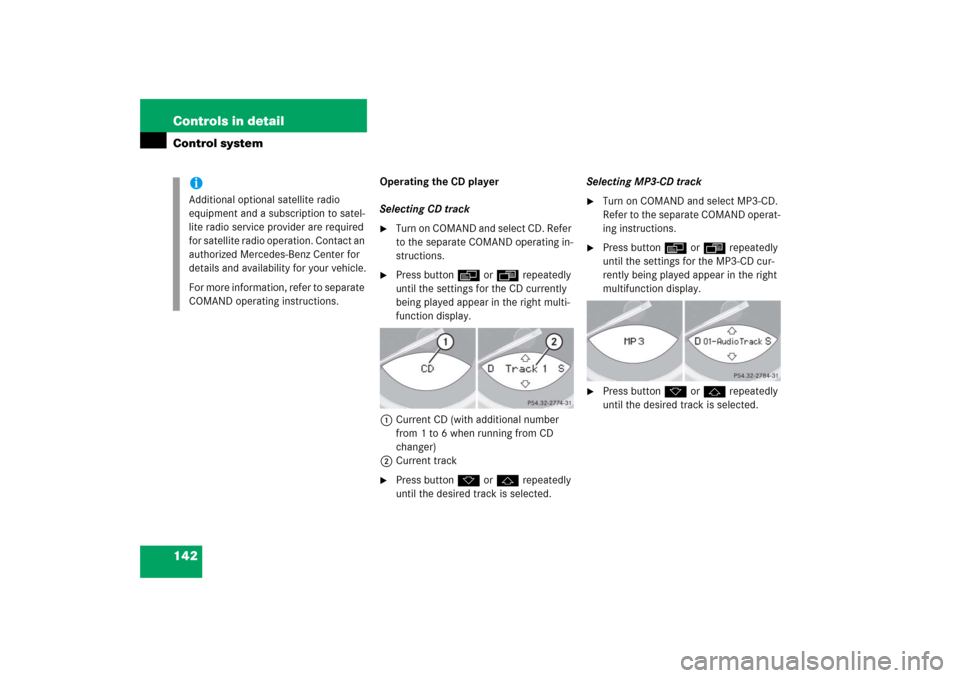
Press button è or ÿ repeatedly
until the settings for the CD currently
being played appear in the right multi-
function display.
1Current CD (with additional number
from 1 to 6 when running from CD
changer)
2Current track
�
Press button k or j repeatedly
until the desired track is selected.Selecting MP3-CD track
�
Turn on COMAND and select MP3-CD.
Refer to the separate COMAND operat-
ing instructions.
�
Press button è or ÿ repeatedly
until the settings for the MP3-CD cur-
rently being played appear in the right
multifunction display.
�
Press button k or j repeatedly
until the desired track is selected.
iAdditional optional satellite radio
equipment and a subscription to satel-
lite radio service provider are required
for satellite radio operation. Contact an
authorized Mercedes-Benz Center for
details and availability for your vehicle.
For more information, refer to separate
COMAND operating instructions.