Page 101 of 480
100 Controls in detailLocking and unlockingLoss of SmartKey or mechanical key
If you lose a SmartKey or mechanical key,
you should do the following:�
Have the SmartKey deactivated by an
authorized Mercedes-Benz Center.
�
Report the loss of the SmartKey or the
mechanical key to your car insurance
company immediately.
�
If necessary, have the mechanical lock
replaced.
Your authorized Mercedes-Benz Center
will be glad to supply you with a replace-
ment.
SmartKey with KEYLESS-GO*
Vehicles equipped with KEYLESS-GO come
with two SmartKeys with KEYLESS-GO,
each with remote controls and a remov-
able mechanical key.
The locking tabs for the mechanical key
portion of the two SmartKeys with
KEYLESS-GO are a different color to help
distinguish each SmartKey with
KEYLESS-GO unit.
The function of the SmartKey overrules the
KEYLESS-GO function.
The KEYLESS-GO function is integrated
into the SmartKey. On these vehicles, the
validity of the SmartKey with KEYLESS-GO
is checked every time you grasp a door
handle. If the SmartKey with KEYLESS-GO is valid,
your vehicle unlocks
�
the doors
�
the trunk lid
�
the glove box
�
the storage compartment under the
armrest
�
the storage compartment in the rear
�
the fuel filler flap
Page 105 of 480
104 Controls in detailLocking and unlockingGlobal locking�
Press lock button on an outside door
handle (
�page 62) or trunk
(
�page 105).
With the trunk and all doors closed, all
turn signals flash three times. The lock-
ing knobs in the doors move down.
The anti-theft alarm system is armed.
Selective setting
If you frequently travel alone, you may wish
to reprogram the SmartKey with
KEYLESS-GO so that grasping a door han-
dle only unlocks the driver’s door, interior
lockable storage compartments and the
fuel filler flap.
�
Press and hold buttons Œ and ‹
simultaneously for about 6 seconds
until battery check lamp5
(�page 101) flashes twice.
The SmartKey with KEYLESS-GO will
then function as follows:Unlocking the driver’s door and fuel fill-
er flap
�
Grasp the driver’s door handle.
All turn signals flash once. The locking
knob in the driver’s door moves up. The
anti-theft alarm system is disarmed.
Global unlocking
�
Grasp the door handle on the passen-
ger side.
All turn signals flash once. The locking
knobs in the doors move up. The
anti-theft alarm system is disarmed.
Global locking
�
Press lock button on an outside door
handle or trunk lid.
With the trunk and all doors closed, all
turn signals flash three times. The lock-
ing knobs in the doors move down.
The anti-theft alarm system is armed.Restoring to factory setting
�
Press and hold buttons Œ and ‹
simultaneously for about 6 seconds
until battery check lamp5
(�page 101) flashes twice.
!If you can no longer lock or unlock the
vehicle with the SmartKey with
KEYLESS-GO, then the battery in the
SmartKey is discharged, the SmartKey
with KEYLESS-GO is malfunctioning or
the vehicle battery is drained.�
Check the battery in the SmartKey
with KEYLESS-GO (
�page 99) and
replace it if necessary
(
�page 389).
Page 114 of 480
113 Controls in detail
Locking and unlocking
Locking and unlocking from the inside
You can lock or unlock the vehicle from in-
side using the central locking switches.
This can be useful, for example, if you want
to unlock the passenger door from the in-
side or want to lock the vehicle before
starting to drive.
The central locking switch does not lock or
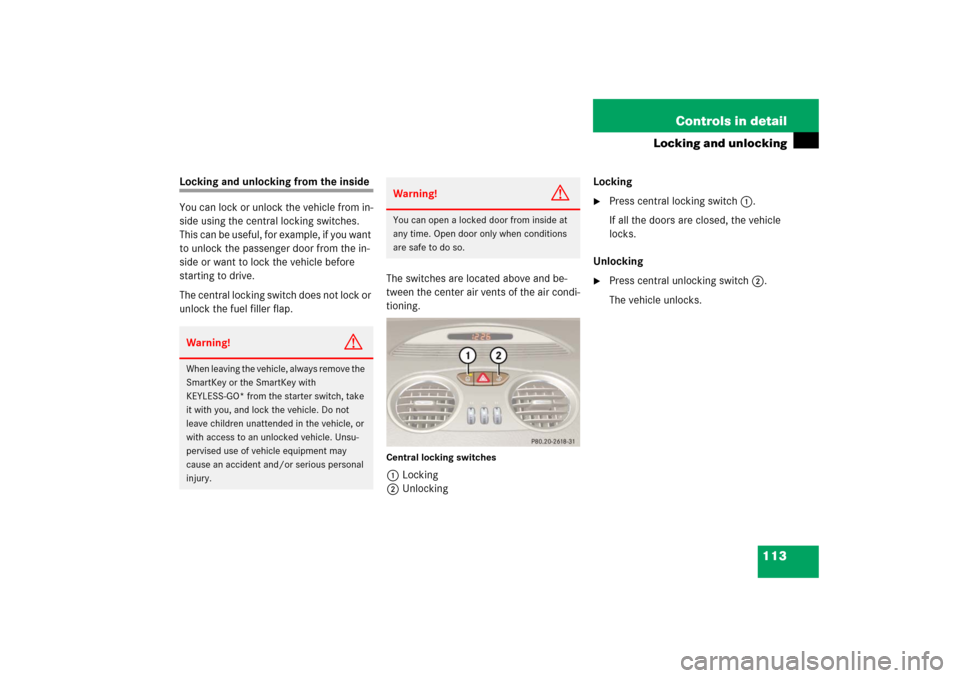
unlock the fuel filler flap.The switches are located above and be-
tween the center air vents of the air condi-
tioning.
Central locking switches1Locking
2UnlockingLocking
�
Press central locking switch1.
If all the doors are closed, the vehicle
locks.
Unlocking
�
Press central unlocking switch2.
The vehicle unlocks.
Warning!
G
When leaving the vehicle, always remove the
SmartKey or the SmartKey with
KEYLESS-GO* from the starter switch, take
it with you, and lock the vehicle. Do not
leave children unattended in the vehicle, or
with access to an unlocked vehicle. Unsu-
pervised use of vehicle equipment may
cause an accident and/or serious personal
injury.
Warning!
G
You can open a locked door from inside at
any time. Open door only when conditions
are safe to do so.
Page 134 of 480

133 Controls in detail
Instrument cluster
Coolant temperature gaugeDuring severe operating conditions, e.g.
stop-and-go traffic, the coolant tempera-
ture may rise close to 248°F (120°C).
The engine should not be operated with
the coolant temperature above 248°F
(120°C). Doing so may cause serious en-
gine damage which is not covered by the
Mercedes-Benz Limited Warranty.
Trip odometer�
Make sure you are viewing the trip
odometer display (
�page 135).
�
If it is not displayed, press the j or
k button on the multifunction
steering wheel repeatedly until the trip
odometer appears.
�
Press and hold reset button1
(�page 132) until the trip odometer is
reset.
Tachometer
The red marking on the tachometer de-
notes excessive engine speed.
To help protect the engine, the fuel supply
is interrupted if the engine is operated
within the red marking.
Warning!
G
�
Driving when your engine is badly over-
heated can cause some fluids which
may have leaked into the engine com-
partment to catch fire. You could be se-
riously burned.
�
Steam from an overheated engine can
cause serious burns an can occur just by
opening the hood. Stay away from the
engine if you see or hear steam coming
from it.
Turn off the engine, get out of the vehicle
and do not stand near the vehicle until the
engine has cooled down.!Excessive coolant temperature triggers
the coolant temperature warning lamp
(�page 336) and a warning in the
multifunction display (
�page 366).
!Avoid driving at excessive engine
speeds, as it may result in serious en-
gine damage that is not covered by the
Mercedes-Benz Limited Warranty.
Page 140 of 480
139 Controls in detail
Control system
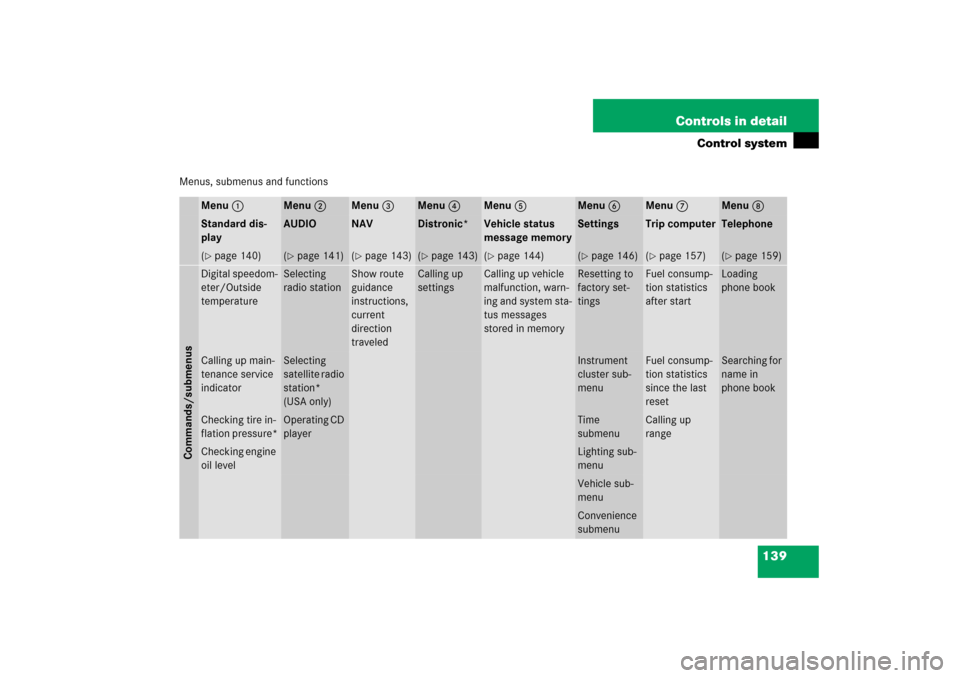
Menus, submenus and functions
Menu 1
Menu 2
Menu 3
Menu 4
Menu 5
Menu 6
Menu 7
Menu 8
Standard dis-
play
AUDIO
NAV
Distronic*
Vehicle status
message memory
Settings
Trip computer
Telephone
(�page 140)
(�page 141)
(�page 143)
(�page 143)
(�page 144)
(�page 146)
(�page 157)
(�page 159)
Commands/submenusDigital speedom-
eter/Outside
temperature
Selecting
radio station
Show route
guidance
instructions,
current
direction
traveled
Calling up
settings
Calling up vehicle
malfunction, warn-
ing and system sta-
tus messages
stored in memory
Resetting to
factory set-
tings
Fuel consump-
tion statistics
after start
Loading
phone book
Calling up main-
tenance service
indicator
Selecting
satellite radio
station*
(USA only)
Instrument
cluster sub-
menu
Fuel consump-
tion statistics
since the last
reset
Searching for
name in
phone book
Checking tire in-
flation pressure*
Operating CD
player
Time
submenu
Calling up
range
Checking engine
oil level
Lighting sub-
menuVehicle sub-
menuConvenience
submenu
Page 158 of 480

157 Controls in detail
Control system
Trip computer menu
Use the trip computer menu to call up sta-
tistical data on your vehicle. The following
information is available:Fuel consumption statistics after start
�
Press button ÿ or è repeatedly
until you see the first function of the
trip computer menu.
�
Press button j or k repeatedly
until you see this message in the left
multifunction display:
From start.
1Distance driven since start
2Average speed since start
3Time elapsed since start
4Average fuel consumption since start
Function
Page
Fuel consumption statistics after
start
157
Fuel consumption statistics
since last reset
158
Calling up range
(distancetoempty)
158
iThe last function called up will reap-
pear the next time you enter the trip
computer menu.
iAll statistics stored since the last en-
gine start will be reset approximately
4 hours after the SmartKey in the start-
er switch is turned to position0 or re-
moved from the starter switch.
Resetting will not occur if you turn the
SmartKey back to position1 or2 with-
in this time period.
Page 159 of 480
158 Controls in detailControl systemFuel consumption since last reset�
Press button ÿ or è repeatedly
until you see the first function of the
trip computer menu.
�
Press button j or k repeatedly
until you see this message in the left
multifunction display:
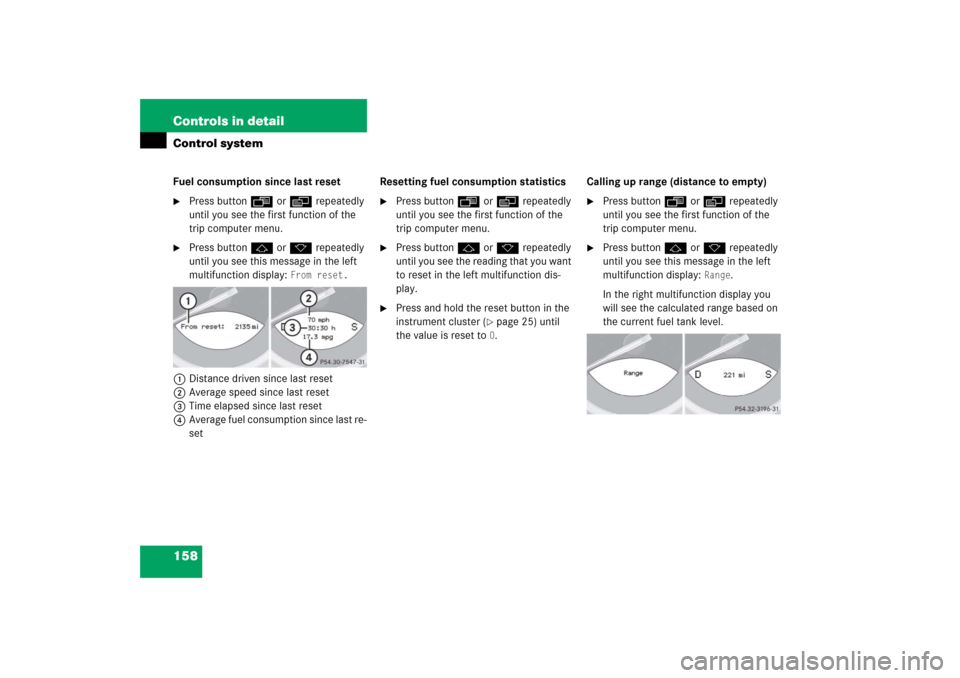
From reset.
1Distance driven since last reset
2Average speed since last reset
3Time elapsed since last reset
4Average fuel consumption since last re-
setResetting fuel consumption statistics
�
Press button ÿ or è repeatedly
until you see the first function of the
trip computer menu.
�
Press button j or k repeatedly
until you see the reading that you want
to reset in the left multifunction dis-
play.
�
Press and hold the reset button in the
instrument cluster (
�page 25) until
the value is reset to 0.Calling up range (distance to empty)
�
Press button ÿ or è repeatedly
until you see the first function of the
trip computer menu.
�
Press button j or k repeatedly
until you see this message in the left
multifunction display:
Range
.
In the right multifunction display you
will see the calculated range based on
the current fuel tank level.
Page 176 of 480
175 Controls in detail
Automatic transmission
Activating manual shift program�
Press program mode selector
switch1 repeatedly until the
M for
MANUAL program mode appears in
the right multifunction display.
The transmission switches to the
MANUAL program mode. Automatic
shifting is switched off. The gear range
is not limited.
You can change the gears manually when
the gear selector lever is in positionD. You
can upshift or downshift through the gears
in succession.Upshifting
�
Briefly press the gear selector lever to
the right in theD+direction.
or
�
Briefly press button2 on the right
side of the steering wheel
(�page 172).
The transmission shifts to the next
higher gear.
If, instead of the manual program mode
symbolM, the symbolp appears in the
right multifunction display (
�page 163),
shift to the next higher gear. The fuel
supply will otherwise be interrupted to
prevent the engine from overrevving.
iThe MANUAL program mode will not
be stored. When the engine is turned
off with the MANUAL program mode
selected, the transmission will go to
the automatic program mode (CorS)
when the engine is restarted.
!In the MANUAL program mode, the
transmission will not upshift, even if
the engine has reached its overrevving
range. Shift up to the next gear before
the engine has reached its overrevving
range. Make absolutely certain that the
engine speed does not reach the red
marking on the tachometer
(�page 24). Otherwise the engine
could be damaged which is not covered
by the Mercedes-Benz Limited
Warranty.