Page 339 of 480
338 Practical hintsWhat to do if …Problem
Possible cause/consequence
Suggested solution
E
The red DTR indicator lamp
comes on while driving and you
hear a warning sound.
�
You are gaining too rapidly on the vehicle
ahead of you.
�
The distance warning system has recog-
nized a stationary obstacle on your prob-
able line of travel.
�
Apply the brakes immediately.
�
Carefully observe the traffic situation.
You may need to brake or maneuver
to avoid hitting an obstacle.
E
The white DTR indicator lamp
comes on while driving.
The Distronic* distance sensor has recog-
nized a vehicle in front of you.
A
The yellow fuel tank reserve
warning lamp lights while driv-
ing.
The fuel level has dropped below the reserve
mark.
�
Refuel at the next gas station
(�page 269).
The fuel cap is not closed tightly.
�
Check the fuel cap (
�page 269).
Page 376 of 480

375 Practical hints
What to do if …
Left display
Right display
Possible cause/consequence
Possible solution
.
Brake lamp
Right
Substitute
bulb on
The right brake lamp is malfunction-
ing. A substitute bulb has been
brought into use.
�
Visit an authorized Mercedes-Benz Center as
soon as possible.
Brake lamp
!
Drive to
workshop!
Brake lamp illumination is delayed
or lamp is permanently on.
�
Visit an authorized Mercedes-Benz Center as
soon as possible.
Front foglamp
Left
The left front fog lamp is malfunc-
tioning.
�
Replace the bulb as soon as possible.
Front foglamp
Right
The right front fog lamp is malfunc-
tioning.
�
Replace the bulb as soon as possible.
High beam
Left
The left high beam lamp is malfunc-
tioning.
�
Replace the bulb as soon as possible.
High beam
Right
The right high beam lamp is mal-
functioning.
�
Replace the bulb as soon as possible.
Left turn signal
Mirror
The left turn signal in the side mirror
is malfunctioning. This message will
only appear if all light emitting di-
odes have stopped working.
�
Have the LEDs replaced as soon as possible.
Page 392 of 480
391 Practical hints
Replacing bulbs
�Replacing bulbs
Bulbs
Safe vehicle operation depends on proper
exterior lighting and signaling. It is there-
fore essential that all bulbs and lamp as-
semblies are in good working order at all
times.
Correct headlamp adjustment is extremely
important. Have headlamps checked and
readjusted at regular intervals and when a
bulb has been replaced. See an authorized
Mercedes-Benz Center for headlamp ad-
justment.
iIf the headlamps or front fog lamps are
fogged up on the inside as a result of
high humidity, driving the vehicle a dis-
tance with the lights on should clear up
the fogging.
iSubstitute bulbs will be brought into
use when the following lamps malfunc-
tion:�
Turn signal lamps
�
Brake lamps
�
Parking lamps
�
Tail lamps
Observe the messages in the multi-
function display (
�page 345).
Page 394 of 480
393 Practical hints
Replacing bulbs
Notes on bulb replacement�
Only use 12-volt bulbs of the same type
and with the specified watt rating.
�
Switch the lights off before changing a
bulb to prevent short circuits.
�
Always use a clean lint-free cloth when
handling bulbs.
�
Your hands should be dry and free of oil
and grease.
�
If the newly installed bulb does not
come on, visit an authorized
Mercedes-Benz Center.Have the LEDs and bulbs for the following
lamps replaced by an authorized
Mercedes-Benz Center:
�
the additional turn signals in the exteri-
or rear view mirrors
�
the high mounted brake lamp
�
the brake lamps
�
the parking lamps and the side marker
lamps in the tail lamp unit
�
the rear fog lamps
�
the low beam (Xenon or Bi-Xenon*)
lamps
�
the front fog lamps
�
the front side marker lamps
Warning!
G
Bulbs and bulb sockets can be very hot. Al-
low the lamp to cool down before changing
a bulb.
Keep bulbs out of reach of children.
Halogen lamps contain pressurized gas. A
bulb can explode if you:�
touch or move it when hot
�
drop the bulb
�
scratch the bulb
Wear eye and hand protection.
Because of high voltage in Xenon lamps, it is
dangerous to replace the bulb or repair the
lamp and its components. We recommend
that you have such work done by a qualified
technician.
iHave the headlamp adjustment
checked regularly.
Page 402 of 480
401 Practical hints
Flat tire
�
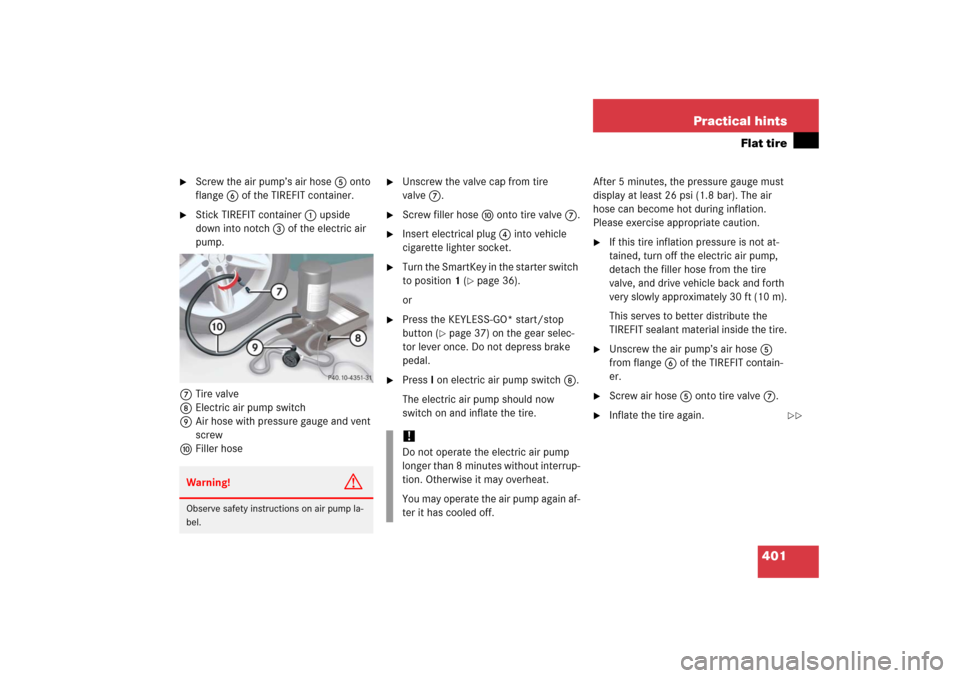
Screw the air pump’s air hose5 onto
flange6 of the TIREFIT container.
�
Stick TIREFIT container1 upside
down into notch3 of the electric air
pump.
7Tire valve
8Electric air pump switch
9Air hose with pressure gauge and vent
screw
aFiller hose
�
Unscrew the valve cap from tire
valve7.
�
Screw filler hosea onto tire valve7.
�
Insert electrical plug4 into vehicle
cigarette lighter socket.
�
Turn the SmartKey in the starter switch
to position1 (
�page 36).
or
�
Press the KEYLESS-GO* start/stop
button (
�page 37) on the gear selec-
tor lever once. Do not depress brake
pedal.
�
PressI on electric air pump switch8.
The electric air pump should now
switch on and inflate the tire.After 5 minutes, the pressure gauge must
display at least 26 psi (1.8 bar). The air
hose can become hot during inflation.
Please exercise appropriate caution.
�
If this tire inflation pressure is not at-
tained, turn off the electric air pump,
detach the filler hose from the tire
valve, and drive vehicle back and forth
very slowly approximately 30 ft (10 m).
This serves to better distribute the
TIREFIT sealant material inside the tire.
�
Unscrew the air pump’s air hose5
from flange6 of the TIREFIT contain-
er.
�
Screw air hose5onto tire valve7.
�
Inflate the tire again.
Warning!
G
Observe safety instructions on air pump la-
bel.
!Do not operate the electric air pump
longer than 8 minutes without interrup-
tion. Otherwise it may overheat.
You may operate the air pump again af-
ter it has cooled off.
��
Page 421 of 480
420 Practical hintsJump startingThe starter battery is located on the right
side of the engine compartment.�
Make sure the two vehicles do not
touch.
�
Turn off all electrical consumers.
�
Apply the parking brake (
�page 59).
�
Shift gear selector lever to positionP.
�
Open the hood (
�page 272).
�
Remove the red cover from positive ter-
minal on both vehicles (
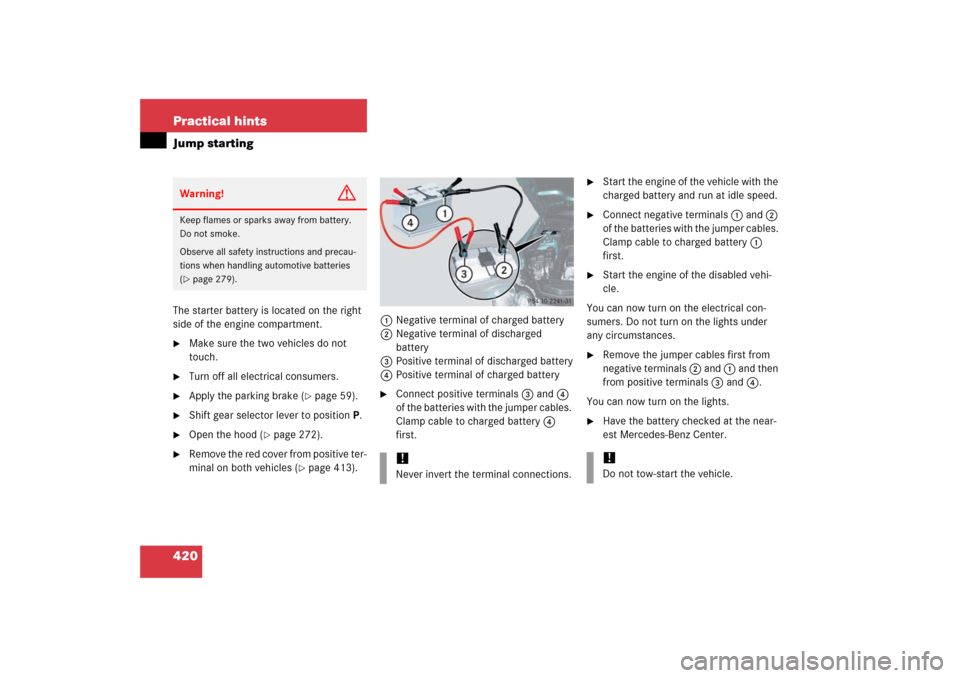
�page 413).1Negative terminal of charged battery
2Negative terminal of discharged
battery
3Positive terminal of discharged battery
4Positive terminal of charged battery
�
Connect positive terminals 3 and 4
of the batteries with the jumper cables.
Clamp cable to charged battery 4
first.
�
Start the engine of the vehicle with the
charged battery and run at idle speed.
�
Connect negative terminals 1 and 2
of the batteries with the jumper cables.
Clamp cable to charged battery 1
first.
�
Start the engine of the disabled vehi-
cle.
You can now turn on the electrical con-
sumers. Do not turn on the lights under
any circumstances.
�
Remove the jumper cables first from
negative terminals 2 and 1 and then
from positive terminals 3 and 4.
You can now turn on the lights.
�
Have the battery checked at the near-
est Mercedes-Benz Center.
Warning!
G
Keep flames or sparks away from battery.
Do not smoke.
Observe all safety instructions and precau-
tions when handling automotive batteries
(�page 279).
!Never invert the terminal connections.
!Do not tow-start the vehicle.
Page 454 of 480
453 Technical terms
ABS
(A
ntilock B
rake S
ystem)
Prevents the wheels from locking up
during braking so that the vehicle can
continue to be steered.
ABC
(A
ctive B
ody C
ontrol)
Active, computer-controlled system
that hydraulically adjusts the suspen-
sion at all four wheels in response to
various driving situations.
Accessory weight
(
�page 310)
Air pressure
(�page 310)
Alignment bolt
Metal pin with thread. The alignment
bolt, or centering bolt, is an aid used
when changing a tire to align the wheel
with the wheel hub.
Aspect ratio
(�page 310)BabySmart
TM airbag deactivation
system
This system detects if a special system
compatible child restraint seat is in-
stalled on the front passenger seat. The
system will automatically deactivate
the passenger front airbag when such a
seat is properly installed (indicator
lamp 7 on the glove box comes on
and remains illuminated).
BabySmartTM compatible child seats
Special restraint system for children.
The sensor system for the passenger
seat prevents deployment of the pas-
senger front airbag if a BabySmart
TM
compatible child seat is installed. See
your authorized Mercedes-Benz Center
for availability.
Bar
(
�page 310)BAS
(B
rake A
ssist S
ystem)
System for potentially reducing braking
distances in emergency braking situa-
tions. The system is activated when it
senses an emergency based on how
fast the brake is applied.
Bead
(
�page 310)
Bi-Xenon headlamps*
Headlamps which use an electric arc as
the light source and produce a more in-
tense light than filament headlamps.
Bi-Xenon headlamps produce low
beam and high beam.
CAC
(Customer A
ssistance C
enter)
Mercedes-Benz customer service cen-
ter, which can help you with any ques-
tions about your vehicle and provide
assistance in the event of a break-
down.
Page 462 of 480

461 Index
A
ABC 219, 453
Messages in display 347
Oil level 277
ABS 83, 453
Indicator lamp 27, 333
Messages in the multifunction
display 349
Warning lamp 25, 332
Accelerator position, automatic
transmission 166
Accessory weight 310
Accident 57
Active Body Control see ABC
Air conditioning system see Automatic cli-
mate control system
Air distribution 184, 185
Air pressure 310
Tire inflation pressure 291
Air pump 384, 408
Air recirculation mode 187
Air vents 181
Air volume 184, 186
AIRBAG OFF
Warning lamp 344Airbags 65
Children 66
Front 70
Head-thorax 70, 71
Knee bag 70
Passenger 70
Alarm system see Anti-theft systems
Alignment bolt (vehicle tool kit) 407, 453
Anticorrosion/antifreeze 446, 451
Antiglare, Interior rear view mirror 177
Antilock Brake System see ABS
Anti-theft systems
Anti-theft alarm system 91
Immobilizer 91
Tow-away alarm 93
Aquaplaning see Hydroplaning
Armrest 229
Ashtray 29, 233
Aspect ratio 310
ATF 277
Auto-dimming, Rear view mirrors 177
Automatic central locking 112
Control system 155Automatic climate control system 180
Air conditioning, Cooling 189
Air conditioning refrigerant 447
Air distribution 184, 185
Air recirculation mode 187
Air vents 181
Air volume 184, 186
Control panel 181
Deactivating system 183
Defrosting 179, 186
Residual heat utilization 190
Temperature 184
Temperature sensor 31
Automatic lighting control, Interior
lighting 130
Automatic locking when driving 112
Automatic shift program 168