Page 218 of 480
, especially at times of snow
and ice or heavy rain. In su")
217 Controls in detail
Driving systems
The most likely cause for a malfunctioning
system is a dirty sensor (located behind
the hood grille), especially at times of snow
and ice or heavy rain. In such a case, Dis-
tronic will switch off, and the message Distronic Currently unavailable. See
Oper. Manual
appears in the multifunction
display.
For cleaning and care of the Distronic sen-
sor, see “Cleaning the Distronic* system
sensor cover” (�page 325).Turns and bends
In turns or bends, Distronic may not detect
a moving vehicle in front, or it may detect
one too soon. This may cause your vehicle
to brake late or unexpectedly.
Distronic regulates only the distance be-
tween your vehicle and those directly ahead
of it, but does not register stationary objects
in the road, e.g.: �
a stopped vehicle in a traffic jam
�
a disabled vehicle
�
an oncoming vehicle
The driver must always be on the alert, ob-
serve all traffic and intercede as required by
steering or braking the vehicle.
Warning!
G
Distronic should not be used in snowy or icy
road conditions.
Page 221 of 480
220 Controls in detailDriving systemsVehicle level controlYour vehicle automatically adjusts its ride
height to:
�
increase vehicle safety
�
reduce fuel consumption
The vehicle chassis ride height is raised or
lowered according to the selected level
setting and to the vehicle speed:
�
With increasing speed, ride height is re-
duced by up to approximately 1 inch
(25 mm).
�
With decreasing speed, the ride height
is again raised to the selected vehicle
level.Select the level 1 and level 2 settings only
when required by current driving condi-
tions. Otherwise:
�
Fuel consumption may increase.
�
Handling may be impaired.
Warning!
G
To help avoid personal injury, keep hands
and feet away from wheel housing area, and
stay away from under the vehicle when low-
ering the vehicle chassis.
iThese height adjustments are so small
that you may not notice any change.
Page 224 of 480

The Parktronic system is an electronic aid
designed to assist the driver during park-
ing maneuvers. It visually and audibly indi-")
223 Controls in detail
Driving systems
Parktronic* (Parking assist)
The Parktronic system is an electronic aid
designed to assist the driver during park-
ing maneuvers. It visually and audibly indi-
cates the relative distance between the
vehicle and an obstacle.
The Parktronic system is automatically ac-
tivated when you switch on the ignition, re-
lease the parking brake, or place the gear
selector lever in position D, R, or N. The
Parktronic system deactivates at speeds
above 11 mph (18 km/h). At lower speeds
the Parktronic system turns on again.
The Parktronic system also deactivates
when you place the gear selector lever in
position P or depress the brake pedal.The Parktronic system monitors the sur-
roundings of your vehicle with six sensors
in the front bumper and four sensors in the
rear bumper.
1Sensors in the front bumperWarning!
G
Parktronic is a supplemental system. It is
not intended to, nor does it replace, the
need for extreme care. The responsibility
during parking and other critical maneuvers
always rests with the driver.
Special attention must be paid to objects
with smooth surfaces or low silhouettes
(e.g. trailer couplings, painted posts, or road
curbs). Such objects may not be detected by
the system and can damage the vehicle.
The operational function of the Parktronic
system can be affected by dirty sensors, es-
pecially at times of snow and ice. See
“Cleaning the Parktronic* system sensors”
(�page 326).
Interference caused by other ultrasonic sig-
nals (e.g. working jackhammers, car wash,
or the air brakes of trucks) can cause the
system to send erratic indications, and
should be taken into consideration.
Warning!
G
Make sure no persons or animals are in the
area in which you are maneuvering. Other-
wise you run the risk of causing injury.
Page 226 of 480

225 Controls in detail
Driving systems
Minimum distance
If the system detects an obstacle in this
range, all the distance warning segments
illuminate and you hear a warning signal. If
the obstacle is closer than the minimum
distance, the actual distance may no long-
er be indicated by the system.Warning indicators
Visual signals indicate to the driver the rel-
ative distance between the sensors and an
obstacle. The warning indicator for the
front area is located above the center air
vents in the dashboard. The warning indi-
cator for the rear area is integrated in the
rear trim.
Front area warning indicator1Left side of the vehicle
2Right side of the vehicleEach warning indicator is divided into six
yellow and two red distance segments for
either side of the vehicle. The Parktronic
system is ready when the border around
the indicator is illuminated.
The position of the gear selector lever de-
termines which warning indicators will be
activated.
Center
approx. 8 in (20 cm)
Corners
approx. 6 in (15 cm)
Gear selector
lever position
Warning indicator
D
Front area activated
R or N
Front and rear area
activated
P
Neither activated
Page 227 of 480

226 Controls in detailDriving systemsAs your vehicle approaches an object, one
or more distance segments will illuminate,
depending on the distance. When the
eighth distance segment illuminates, you
have reached the minimum distance.�
Front area: An intermittent acoustic
warning will sound as the first red dis-
tance segment illuminates and a con-
stant acoustic warning lasting a
maximum of two seconds will sound for
the second distance segment. The sig-
nal is canceled when the gear selector
lever is placed in position P or the park-
ing brake is set.
�
Rear area: An intermittent acoustic
warning will sound when the first dis-
tance segment illuminates. This signal
quickens with each additional distance
segment lit. When the eighth distance
segment illuminates, the acoustic
warning becomes a constant signal.
The signal is canceled when the gear
selector lever is placed in positionD
orP or the parking brake is set.Switching the Parktronic system
on/off
You can switch off the Parktronic system
manually.
The Parktronic switch is located in the low-
er part of the center console (
�page 30).
1Parktronic switch
2Indicator lampSwitching off the Parktronic system
�
Press Parktronic switch1.
Indicator lamp2 comes on.
Switching on the Parktronic system
�
Press Parktronic switch1 again.
Indicator lamp2 goes out.iThe Parktronic system switches on au-
tomatically when you switch on the ig-
nition (
�page 36).
Page 228 of 480
227 Controls in detail
Driving systems
Parktronic system malfunction
If only the red distance segments illumi-
nate and a warning sounds, there is a mal-
function in the Parktronic system. The
Parktronic system will automatically
switch off after 20 seconds and the indica-
tor lamp in the Parktronic switch comes
on.�
Have the Parktronic system checked
by an authorized Mercedes-Benz
Center as soon as possible.
If only the red distance segments illumi-
nate and no warning sounds, the Parktron-
ic system sensors are dirty or there is an
interference from other radio or ultrasonic
signals. The Parktronic system will auto-
matically switch off after 20 seconds and
the indicator lamp in the Parktronic switch
comes on.
�
Switch off the ignition.
�
Clean Parktronic system sensors
(�page 326).
�
Switch on the ignition (
�page 36).
or
�
Check the Parktronic system operation
at another location to rule out interfer-
ence from outside radio or ultrasonic
signals.
Page 229 of 480
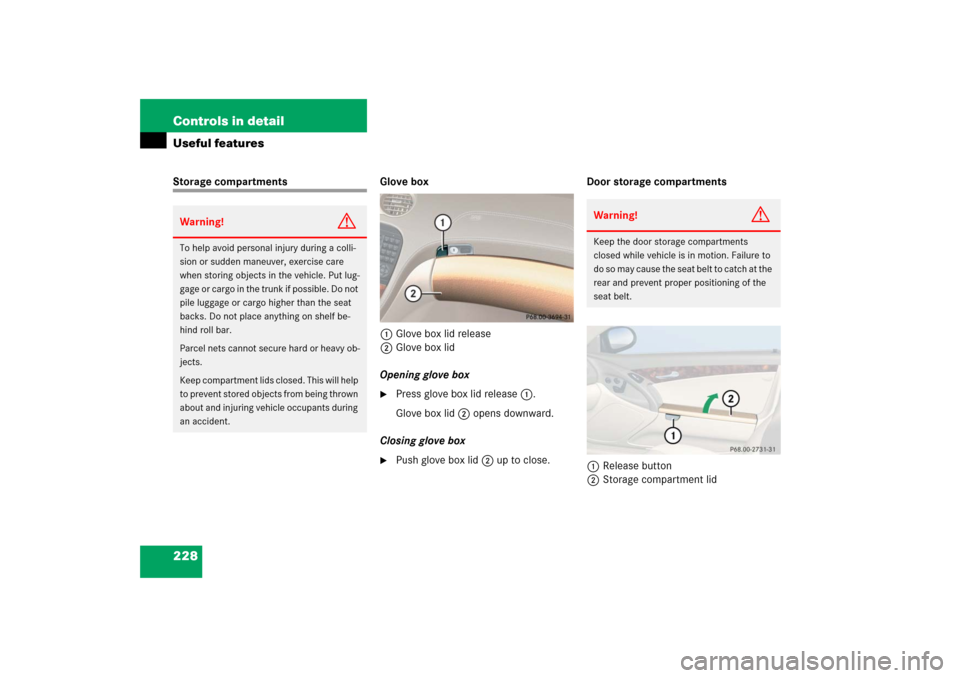
228 Controls in detailUseful featuresStorage compartments Glove box
1Glove box lid release
2Glove box lid
Opening glove box
�
Press glove box lid release1.
Glove box lid 2 opens downward.
Closing glove box
�
Push glove box lid 2 up to close.Door storage compartments
1Release button
2Storage compartment lid
Warning!
G
To help avoid personal injury during a colli-
sion or sudden maneuver, exercise care
when storing objects in the vehicle. Put lug-
gage or cargo in the trunk if possible. Do not
pile luggage or cargo higher than the seat
backs. Do not place anything on shelf be-
hind roll bar.
Parcel nets cannot secure hard or heavy ob-
jects.
Keep compartment lids closed. This will help
to prevent stored objects from being thrown
about and injuring vehicle occupants during
an accident.
Warning!
G
Keep the door storage compartments
closed while vehicle is in motion. Failure to
do so may cause the seat belt to catch at the
rear and prevent proper positioning of the
seat belt.
Page 232 of 480

231 Controls in detail
Useful features
Parcel net in passenger footwell
A small convenience parcel net is located
in the passenger footwell. It is for small
and light items, such as road maps, mail,
etc.Parcel net in trunk
There are three nets available in the trunk
to secure loads:
�
a pocket net on each side of the right
and left trunk side walls
�
a trunk floor net
�
Pull the trunk floor net from the trunk
back wall towards the front over the
luggage.
�
Hang the hooks of the net on the eyes
on the trunk floor.Luggage compartment in the rear
Warning!
G
The parcel net is intended for storing
light-weight items only.
Heavy objects, objects with sharp edges or
fragile objects may not be transported in the
parcel net. In an accident, during hard brak-
ing, or sudden maneuvers, they could be
thrown around inside the vehicle and cause
injury to vehicle occupants.
The parcel net cannot protect transported
goods in the event of an accident.
Warning!
G
Secure all pieces of luggage in the rear with
the luggage straps. Unsecured pieces of lug-
gage can otherwise cause injury during a
braking maneuver and can increase the risk
of injury in an accident.
Never allow anyone to ride in the rear.
The luggage straps can only secure light lug-
gage items. Carry heavy pieces of luggage in
the trunk.
The rear compartment area is not designed
or intended to accommodate occupants. Se-
vere personal injury or death may be the re-
sult in an accident.