Page 357 of 480
356 Practical hintsWhat to do if …Left display
Right display
Possible cause/consequence
Possible solution
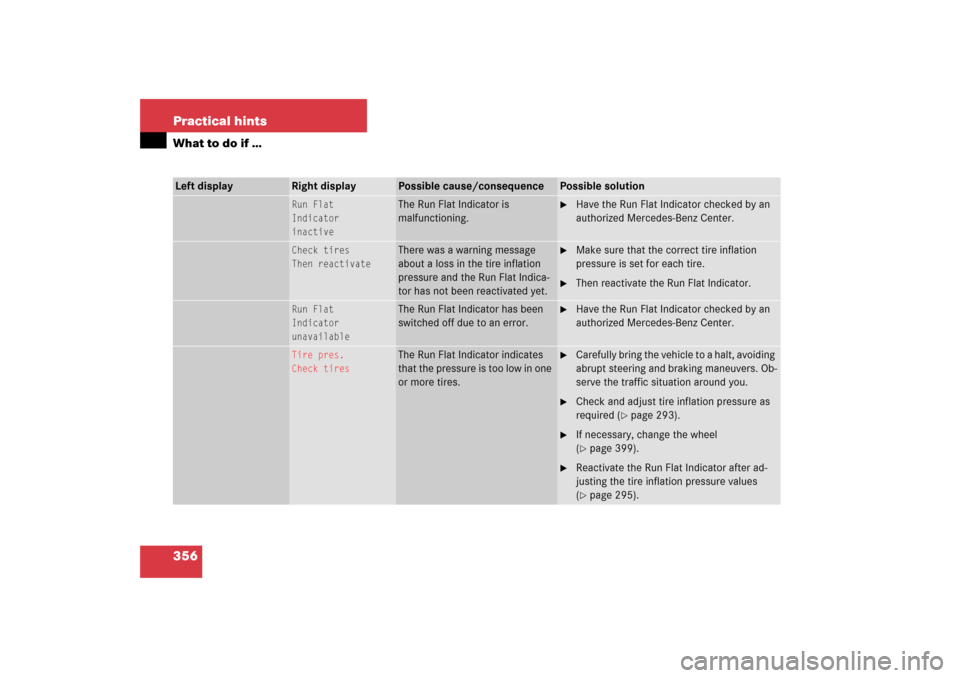
Run Flat
Indicator
inactive
The Run Flat Indicator is
malfunctioning.
�
Have the Run Flat Indicator checked by an
authorized Mercedes-Benz Center.
Check tires
Then reactivate
There was a warning message
about a loss in the tire inflation
pressure and the Run Flat Indica-
tor has not been reactivated yet.
�
Make sure that the correct tire inflation
pressure is set for each tire.
�
Then reactivate the Run Flat Indicator.
Run Flat
Indicator
unavailable
The Run Flat Indicator has been
switched off due to an error.
�
Have the Run Flat Indicator checked by an
authorized Mercedes-Benz Center.
Tire pres.
Check tires
The Run Flat Indicator indicates
that the pressure is too low in one
or more tires.
�
Carefully bring the vehicle to a halt, avoiding
abrupt steering and braking maneuvers. Ob-
serve the traffic situation around you.
�
Check and adjust tire inflation pressure as
required (
�page 293).
�
If necessary, change the wheel
(�page 399).
�
Reactivate the Run Flat Indicator after ad-
justing the tire inflation pressure values
(�page 295).
Page 381 of 480
380 Practical hintsWhat to do if …Left display
Right display
Possible cause/consequence
Possible solution
H
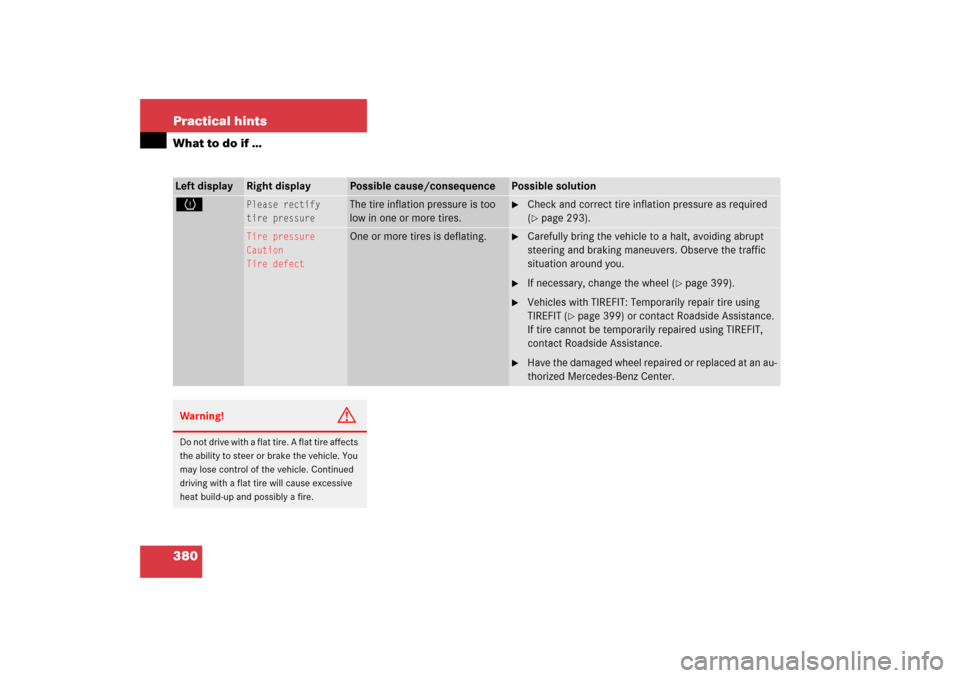
Please rectify
tire pressure
The tire inflation pressure is too
low in one or more tires.
�
Check and correct tire inflation pressure as required
(�page 293).
Tire pressure
Caution
Tire defect
One or more tires is deflating.
�
Carefully bring the vehicle to a halt, avoiding abrupt
steering and braking maneuvers. Observe the traffic
situation around you.
�
If necessary, change the wheel (
�page 399).
�
Vehicles with TIREFIT: Temporarily repair tire using
TIREFIT (
�page 399) or contact Roadside Assistance.
If tire cannot be temporarily repaired using TIREFIT,
contact Roadside Assistance.
�
Have the damaged wheel repaired or replaced at an au-
thorized Mercedes-Benz Center.
Warning!
G
Do not drive with a flat tire. A flat tire affects
the ability to steer or brake the vehicle. You
may lose control of the vehicle. Continued
driving with a flat tire will cause excessive
heat build-up and possibly a fire.
Page 382 of 480
381 Practical hints
What to do if …
Left display
Right display
Possible cause/consequence
Possible solution
H
Tire pressure
Check tires
The tire pressure in one or more
tires is already below the mini-
mum value.
�
Carefully bring the vehicle to a halt, avoiding abrupt
steering and braking maneuvers.
�
Check and adjust tire pressure as required.
�
If necessary, change the wheel.
Warning!
G
Do not drive with a flat tire. A flat tire affects
the ability to steer or brake the vehicle. You
may lose control of the vehicle. Continued
driving with a flat tire will cause excessive
heat build-up and possibly a fire.
Page 384 of 480

383 Practical hints
Where will I find ...?
�Where will I find ...?
First aid kit
The first aid kit is located in storage com-
partment under the passenger seat.
1Handle
2Lid�
Pull handle 1 up.
�
Fold lid 2 down.
You can now remove the first-aid kit.
Vehicle tool kit, jack, and spare wheel
The vehicle tool kit, jack, and spare wheel
are stored in the space underneath the
trunk floor.�
Lift up the trunk floor cover.
You can now remove the tools and ac-
cessories.
The vehicle tool kit includes�
One pair of universal pliers
�
Two open-end wrenches
�
One hex-socket wrench
�
One interchangeable slot/Phillips
screwdriver
�
One towing eye bolt
�
One alignment bolt
�
One fuse extractor
�
One fuse chart for the main fuse
box
�
Spare fuses
The jack is exclusively designed for lifting
the vehicle during a wheel change. Always
lower the vehicle on sufficient capacity
jack stands before working under the vehi-
cle.
iCheck expiration dates and contents
for completeness at least once a year
and replace missing/expired items.
Page 401 of 480
400 Practical hintsFlat tire�
Foreign objects (e.g. screws or nails)
should not be removed from the tire.
�
Take TIREFIT, the sticker, and the elec-
tric air pump out of the trunk.
�
Attach the sticker where it will be easily
seen by the driver on the instrument
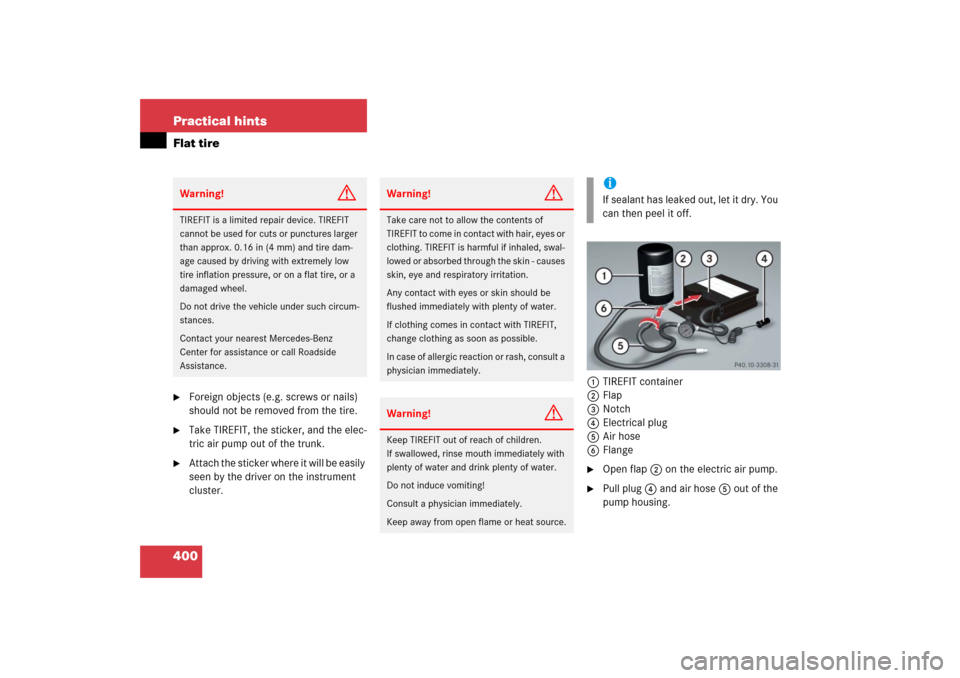
cluster.1TIREFIT container
2Flap
3Notch
4Electrical plug
5Air hose
6Flange
�
Open flap2 on the electric air pump.
�
Pull plug4 and air hose5 out of the
pump housing.
Warning!
G
TIREFIT is a limited repair device. TIREFIT
cannot be used for cuts or punctures larger
than approx. 0.16 in (4 mm) and tire dam-
age caused by driving with extremely low
tire inflation pressure, or on a flat tire, or a
damaged wheel.
Do not drive the vehicle under such circum-
stances.
Contact your nearest Mercedes-Benz
Center for assistance or call Roadside
Assistance.
Warning!
G
Take care not to allow the contents of
TIREFIT to come in contact with hair, eyes or
clothing. TIREFIT is harmful if inhaled, swal-
lowed or absorbed through the skin - causes
skin, eye and respiratory irritation.
Any contact with eyes or skin should be
flushed immediately with plenty of water.
If clothing comes in contact with TIREFIT,
change clothing as soon as possible.
In case of allergic reaction or rash, consult a
physician immediately.Warning!
G
Keep TIREFIT out of reach of children.
If swallowed, rinse mouth immediately with
plenty of water and drink plenty of water.
Do not induce vomiting!
Consult a physician immediately.
Keep away from open flame or heat source.
iIf sealant has leaked out, let it dry. You
can then peel it off.
Page 405 of 480
404 Practical hintsFlat tireMounting the spare wheel Preparing the vehicle
Prepare the vehicle as described
(
�page 399).
�
Turn spare wheel bracket counter-
clockwise to loosen.
�
Take the spare wheel out of the trunk.
Lifting the vehicle
�
Prevent the vehicle from rolling away
by blocking wheels with wheel chocks
(not included) or other sizable objects.
When changing wheel on a level sur-
face:�
Place one wheel chock or other
sizable object in front of and anoth-
er wheel chock or sizable object be-
hind the wheel that is diagonally
opposite to the wheel being
changed.Always try lifting the vehicle using the
jack on a level surface. However,
should circumstances require you to do
so on a hill, place a wheel chock or oth-
er sizable object and the other wheel
chock or sizeable object as follows:
�
Place wheel chocks or other sizable
objects on the downhill side block-
ing both wheels of the axle not be-
ing worked on.
�
Take the vehicle tool kit and the jack
out of the storage compartment under
the trunk floor (
�page 383).
Warning!
G
The dimensions of the spare wheel are dif-
ferent from those of the road wheels. As a
result, the vehicle handling characteristics
change when driving with a mounted spare
wheel. Adapt your driving style accordingly.
The spare wheel is for temporary use only.
When driving with spare wheel mounted, en-
sure proper tire inflation pressure and do
not exceed vehicle speed of 50 mph
(80 km/h).
Drive to the nearest Mercedes-Benz Center
as soon as possible to have the spare wheel
replaced with a regular road wheel.
Never operate the vehicle with more than
one spare wheel mounted.
Do not switch off the ESP
® when a spare
wheel is mounted.
Page 406 of 480
405 Practical hints
Flat tire
�
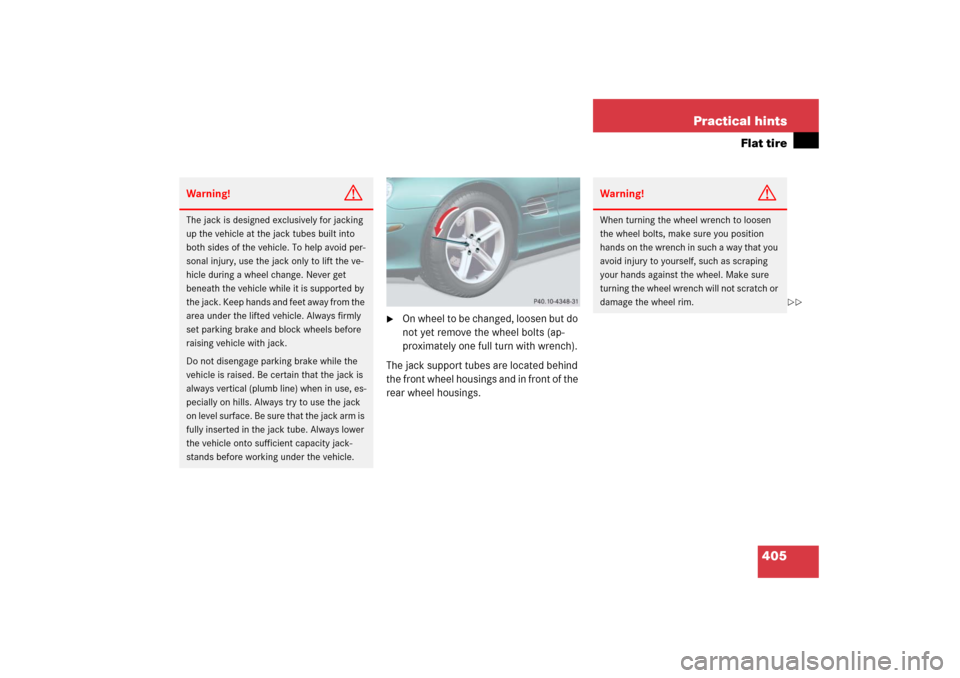
On wheel to be changed, loosen but do
not yet remove the wheel bolts (ap-
proximately one full turn with wrench).
The jack support tubes are located behind
the front wheel housings and in front of the
rear wheel housings.
Warning!
G
The jack is designed exclusively for jacking
up the vehicle at the jack tubes built into
both sides of the vehicle. To help avoid per-
sonal injury, use the jack only to lift the ve-
hicle during a wheel change. Never get
beneath the vehicle while it is supported by
the jack. Keep hands and feet away from the
area under the lifted vehicle. Always firmly
set parking brake and block wheels before
raising vehicle with jack.
Do not disengage parking brake while the
vehicle is raised. Be certain that the jack is
always vertical (plumb line) when in use, es-
pecially on hills. Always try to use the jack
on level surface. Be sure that the jack arm is
fully inserted in the jack tube. Always lower
the vehicle onto sufficient capacity jack-
stands before working under the vehicle.
Warning!
G
When turning the wheel wrench to loosen
the wheel bolts, make sure you position
hands on the wrench in such a way that you
avoid injury to yourself, such as scraping
your hands against the wheel. Make sure
turning the wheel wrench will not scratch or
damage the wheel rim.
��
Page 455 of 480

454 Technical termsCAN system
(C
ontroller A
rea N
etwork)
Data bus network serving to control ve-
hicle functions such as door locking or
windshield wiping depending on vehi-
cle settings and/or ambient condi-
tions.
Cockpit
All instruments, switches, buttons and
indicator/warning lamps in the passen-
ger compartment needed for vehicle
operation and monitoring.
Cold tire inflation pressure
(
�page 310)
Collapsible tire
An especially compact spare tire that
must be inflated with a provided air
pump before using. It should only be
used to bring the vehicle to the nearest
service station.COMAND
(Co
ckpit Man
agement and
D
ata System)
Information and operating center for
vehicle sound and communications
systems, including the radio, CD
changer and navigation system, as well
as other optional equipment (e.g. tele-
phone).
Control system
The control system is used to call up
vehicle information and to change
component settings. Information and
messages appear in the multifunction
display. The driver uses the buttons on
the multifunction steering wheel to
navigate through the system and to ad-
just settings.
Cruise control
Driving convenience system for auto-
matically maintaining the vehicle speed
set by the driver.
Curb weight
(�page 310)Distronic*
A driving convenience cruise control
system which helps the driver maintain
a pre-selected speed:
�
If there is no vehicle directly ahead,
the system operates in the same
way as conventional cruise control.
�
If a slower moving vehicle is ahead,
Distronic* will reduce your vehicle
speed to the extent permitted by re-
duced throttle and up to 20% brak-
ing power to maintain the preset
minimum following distance.
DOT
(Department o
f Transportation)
(
�page 311)
DTR
(->Distr
onic*)
Electro-hydraulic brake system
Electronically controlled hydraulic
braking system for increased braking
safety and comfort.