Page 403 of 480
, press0 on electric
air pump switch8.
The electric air pump should now be
switched off.
�
Turn the SmartK")
402 Practical hintsFlat tire�
After attaining a tire inflation pressure
of 26 psi (1.8 bar), press0 on electric
air pump switch8.
The electric air pump should now be
switched off.
�
Turn the SmartKey in the ignition to
position0 (
�page 36).
or
�
Press the KEYLESS-GO* start/stop
button (
�page 37) on the gear selec-
tor lever twice. Do not depress brake
pedal.
�
Detach the electric air pump.
The air hose may still be hot. Please ex-
ercise appropriate caution.
�
Place the electric air pump back in the
trunk.
�
Close the trunk lid.
�
Drive away immediately.
The TIREFIT sealant will distribute itself
evenly inside the tire.
Warning!
G
If a tire inflation pressure of 26 psi (1.8 bar)
is not attained, tire is too severely damaged
for TIREFIT to provide a reliable tire repair.
In this case, TIREFIT cannot properly seal
the tire.
Do not drive the vehicle.
Contact the nearest Mercedes-Benz Center
or call Roadside Assistance.
Warning!
G
Do not exceed vehicle speed of
50 mph (80 km / h). A TIREFIT repair is not
designed to operate at higher speeds.
The sticker must be attached on the instru-
ment cluster where it will be easily seen by
the driver.
Vehicle handling characteristics may
change. Adapt your driving accordingly.
��
Page 405 of 480
.
�
Turn spare wheel bracket counter-
clockwise to loosen.
�
Take the spare whe")
404 Practical hintsFlat tireMounting the spare wheel Preparing the vehicle
Prepare the vehicle as described
(
�page 399).
�
Turn spare wheel bracket counter-
clockwise to loosen.
�
Take the spare wheel out of the trunk.
Lifting the vehicle
�
Prevent the vehicle from rolling away
by blocking wheels with wheel chocks
(not included) or other sizable objects.
When changing wheel on a level sur-
face:�
Place one wheel chock or other
sizable object in front of and anoth-
er wheel chock or sizable object be-
hind the wheel that is diagonally
opposite to the wheel being
changed.Always try lifting the vehicle using the
jack on a level surface. However,
should circumstances require you to do
so on a hill, place a wheel chock or oth-
er sizable object and the other wheel
chock or sizeable object as follows:
�
Place wheel chocks or other sizable
objects on the downhill side block-
ing both wheels of the axle not be-
ing worked on.
�
Take the vehicle tool kit and the jack
out of the storage compartment under
the trunk floor (
�page 383).
Warning!
G
The dimensions of the spare wheel are dif-
ferent from those of the road wheels. As a
result, the vehicle handling characteristics
change when driving with a mounted spare
wheel. Adapt your driving style accordingly.
The spare wheel is for temporary use only.
When driving with spare wheel mounted, en-
sure proper tire inflation pressure and do
not exceed vehicle speed of 50 mph
(80 km/h).
Drive to the nearest Mercedes-Benz Center
as soon as possible to have the spare wheel
replaced with a regular road wheel.
Never operate the vehicle with more than
one spare wheel mounted.
Do not switch off the ESP
® when a spare
wheel is mounted.
Page 409 of 480
.
1Flap
2Air")
408 Practical hintsFlat tire�
Unscrew the alignment bolt, install last
wheel bolt and tighten slightly.Inflating the spare tire
�
Take the electric air pump out of the
trunk (
�page 383).
1Flap
2Air pump switch
3Electrical plug
4Air hose with pressure gauge and vent
screw
5Union nut
�
Open flap 1 on air pump.
�
Pull out electrical plug 3 and air hose
with the pressure gauge 4.
�
Remove the valve cap from the tire
valve.
�
Screw union nut 5 onto the tire valve.
�
Insert electrical plug 3 into vehicle ci-
gar lighter socket.
Damaged wheel hub threads should be re-
paired immediately. Do not continue to drive
under these circumstances! Contact an au-
thorized Mercedes-Benz Center or call
Roadside Assistance.
Incorrect wheel bolts or improperly tight-
ened wheel bolts can cause the wheel to
come off. This could cause an accident. Be
sure to use the correct wheel bolts.Warning!
G
Only use genuine equipment
Mercedes-Benz wheel bolts. They are identi-
fied by the Mercedes star. Other wheel bolts
may come loose.
Do not tighten the wheel bolts when the ve-
hicle is raised. Otherwise the vehicle could
fall off the jack.
!Do not lower the vehicle before inflat-
ing the spare wheel tire. Otherwise the
rim may be damaged.Warning!
G
Observe instructions on air pump label.
��
Page 411 of 480

410 Practical hintsFlat tire�
Detach the electric air pump.
�
Stow the electrical plug and the air
hose behind the flap and place the air
pump back in the trunk.Lowering the vehicle
�
Lower vehicle by turning crank coun-
terclockwise until the full weight of the
vehicle is resting on the ground.
�
Pull the jack out of the jack support
tube.
1 - 5 Wheel bolts
�
Tighten the five wheel bolts evenly, fol-
lowing the diagonal sequence illustrat-
ed (1 to 5), until all bolts are tight.
Observe a tightening torque of 96 lb-ft
(130 Nm).
Warning!
G
Follow recommend inflation pressures.
Do not overinflate tires. Overinflating tires
can result in sudden deflation (blowout) be-
cause they are more likely to become punc-
tured or damaged by road debris, potholes,
etc.
Do not underinflate tires. Underinflated tires
wear unevenly, adversely affect handling
and fuel economy, and are more likely to fail
from being overheated.
iThe flat tire may be transported in the
trunk when the retractable hardtop is
raised. Use the protective sheet provid-
ed with the spare wheel. Do not acti-
vate the tire inflation pressure monitor
until the deflated tire has been re-
moved from the vehicle.
��
Page 412 of 480

411 Practical hints
Flat tire
�
Before storing the jack in the trunk,
crank back to storage position and fold
in the arm.Replacing jack support tube cover
�
Slide tongue of cover under the upper
edge of the tube opening.
�
Applying even pressure, press cover
until it snaps into place.
Be careful not to damage the locking
tabs or clamp the plastic retaining
strap.
MOExtended system*
The MOExtended system allows you to
continue driving your vehicle even if there
is a total loss of pressure in one or more
tires.
You may only use the MOExtended system
in conjunction with the Run Flat Indicator*
(Canada vehicles) (
�page 293) or TPMS
(U.S. vehicles) (
�page 296).
Warning!
G
Have the tightening torque checked after
changing a wheel. The wheels could come
loose if they are not tightened to a torque of
96 lb-ft (130 Nm).Warning!
G
When turning the wheel wrench to tighten
the wheel bolts, make sure you position
hands on the wrench in such a way that you
avoid injury to yourself, such as scraping
your hands against the wheel. Make sure
turning the wheel wrench will not scratch or
damage the wheel rim.
!The maximum distance in emergency
mode depends on the vehicle’s load. It
is 30 miles (50 km) if the vehicle is par-
tially loaded and 18 miles (30 km) if the
vehicle is fully loaded.
The point at which the maximum driv-
ing distance begins in emergency
mode is when the warning message
appears in the multifunction display
indicating that there is a loss of tire
inflation pressure.
Do not exceed the maximum speed of
50 mph (80 km/h).
Page 425 of 480
424 Practical hintsTowing the vehicle�
Screw towing eye bolt in to its stop and
tighten with lug wrench.
To reinstall cover:
�
Fit locking tabs of cover under the low-
er edge of the opening in the bumper.
�
Apply even pressure on the upper part
of the cover until it snaps into place.
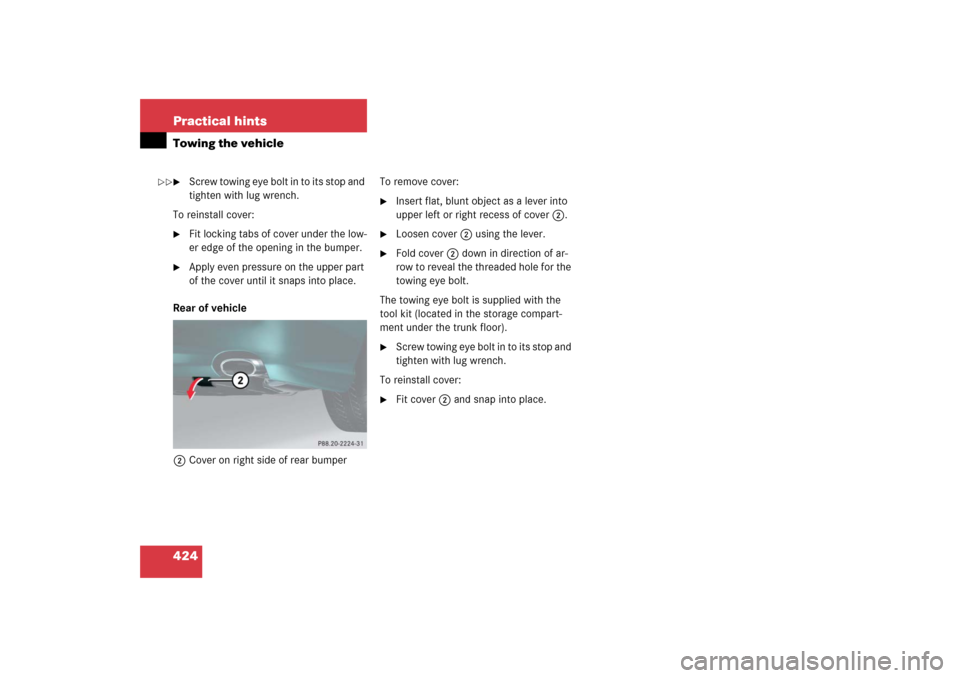
Rear of vehicle
2Cover on right side of rear bumperTo remove cover:
�
Insert flat, blunt object as a lever into
upper left or right recess of cover 2.
�
Loosen cover 2 using the lever.
�
Fold cover 2 down in direction of ar-
row to reveal the threaded hole for the
towing eye bolt.
The towing eye bolt is supplied with the
tool kit (located in the storage compart-
ment under the trunk floor).
�
Screw towing eye bolt in to its stop and
tighten with lug wrench.
To reinstall cover:
�
Fit cover 2 and snap into place.
��
Page 435 of 480

434 Technical dataRims and tires
!
Only use tires which have been tested
and approved by Mercedes-Benz. Tires
approved by Mercedes-Benz are devel-
oped to provide best possible perfor-
mance in conjunction with the driving
safety systems on your vehicle such as
ABS or ESP
®. Tires specially developed
for your vehicle and tested and ap-
proved by Mercedes-Benz can be iden-
tified by finding the following on the
tire’s sidewall:
�
MO = M
ercedes-Benz O
riginal
equipment tires
AMG vehicles:
Does not apply to all approved tires
on AMG vehicles. For information
on tested and approved tires for
AMG vehicles, contact an autho-
rized Mercedes-Benz Center.
�
MOE = M
ercedes-Benz O
riginal
E
xtended (tires with limited run-flat
characteristics) original equipment
tires
Using tires other than those approved
by Mercedes-Benz may result in dam-
age that is not covered by the
Mercedes-Benz Limited Warranty.iFor information on driving with
MOExtended tires, see “MOExtended
system*” (
�page 300).
!Using tires other than those approved
by Mercedes-Benz can have detrimen-
tal effects, such as�
poor handling characteristics
�
increased noise
�
increased fuel consumption
Moreover, tires and rims not approved
by Mercedes-Benz may, under load,
exhibit dimensional variations and dif-
ferent tire deformation characteristics
that could cause them to come into
contact with the vehicle body or axle
parts. Damage to the tires or the vehi-
cle may be the result.
Page 441 of 480
440 Technical dataRims and tiresMOExtended tires*
SL 500
SL 500 (Sport Package*)
SL 600
SL 600 (Sport Package*)
Front axle:
Rims (light alloy)
8.5 J x 18 H2
Wheel offset
1.18 in (30 mm)
Summer tires
1,2
1Radial-ply tires2Must be used in conjunction with Tire Pressure Monitoring System (U.S. vehicles) or Run Flat Indicator
(Canada vehicles) only.
255/40 R18 95Y MOExtended
Winter tires
1,2,4
255/40 R18 95V M+S .MOExtended
Rear axle:
Rims (light alloy)
9.5 J x 18 H2
Wheel offset
1.22 in (31 mm)
Summer tires
1,2,3
3Must not be used with snow chains.
285/35 R18 97Y MOExtended
Winter tires
1,2,3,4
4Not available as factory equipment.
285/35 R18 97V M+S .MOExtended

SL 600
SL 600 (Sport Package*)
Front axle:
Rims (light alloy)
8.5 J x 18 H2
Wheel offset
1.18 in (30 mm)
Summer tires
1")