Page 24 of 481
23 At a glance
Cockpit
Item
Page
1
Combination switch�
Turn signals
�
Windshield wipers
�
High beam
51
52
135
2
Cruise control lever�
Cruise control
�
Distronic*
222
215
218
3
Instrument cluster
24
4
Multifunction steering
wheel
26
5
Steering wheel gearshift
control (S 55 AMG and
S 65 AMG only)
181
Item
Page
6
Lever for voice control sys-
tem*, see separate operat-
ing instructions
7
Front Parktronic* warning
indicator for right front area
235
8
Overhead control panel
29
9
Glove box lock
242
a
Glove box lid release
242
b
Glove box
242
c
Center console
27, 28
d
Starter switch
34
e
Horn
Item
Page
f
Steering wheel adjustment
stalk
Heated steering wheel*
40
252
g
Parking brake pedal
48
h
Hood lock release
287
j
Parking brake release
48
k
Door control panel
30
l
Exterior lamp switch
131
m
Headlamp washer button*
186
n
Front Parktronic* warning
indicator for left front area
235
Page 286 of 481

285 Operation
At the gas station
�
Replace fuel cap by turning it clockwise
until it audibly engages.
�
Close the fuel filler flap.
Check regularly and before a long trip
1Windshield washer and headlamp
cleaning system*
2Coolant level
3Brake fluid
Warning!
G
Overfilling of the fuel tank may create pres-
sure in the system which could cause a gas
discharge. This could cause the gas to spray
back out when removing the fuel pump noz-
zle, which could cause personal injury.
iOnly use premium unleaded gasoline
with a minimum Posted Octane Rating
of 91 (average of 96 RON/86 MON).
Information on gasoline quality can
normally be found on the fuel pump.
More information on gasoline can be
found in the Factory Approved Service
Products pamphlet.iLeaving the engine running and the fuel
cap open can cause the yellow engine
malfunction indicator lamp ?
(USA only),
±
(Canada only)
to illuminate.
For more information, see the “Practi-
cal hints” section (
�page 343).
iOpening the hood, see (
�page 287).
Page 292 of 481

When checking the oil level�
the vehicle must be parked on level
ground")
291 Operation
Engine compartment
Checking the engine oil level with the
oil dipstick (S 350, S 430, S 500 and
S 55 AMG only)
When checking the oil level�
the vehicle must be parked on level
ground
�
with the engine at operating tempera-
ture, the vehicle must have been sta-
tionary for at least five minutes with the
engine turned off
To check the engine oil level with the oil
dipstick, do the following:
�
Open the hood (
�page 287).
S 350, S 430, S 500 and S 55 AMG1Oil dipstick (S 350, S 430, S 500 and
S 55 AMG only)
2Filler cap�
Pull out oil dipstick1.
�
Wipe oil dipstick1 clean.
�
Fully insert oil dipstick1 into the dip-
stick guide tube.
�
Pull out oil dipstick1 again after ap-
proximately three seconds to obtain
accurate reading.
Oil dipstickThe oil level is correct when it is between
the lower (min) and upper (max) mark of
the oil dipstick.
iThe engine oil level can be checked by
either the oil dipstick or via the multi-
function display in the instrument clus-
ter (
�page 289). The amount of engine
oil needed is shown more precisely in
the multifunction display.
iThe filling quantity between the upper
and lower marks on the oil dipstick is
approximately 2.1 US qt. (2.0 l).
��
Page 398 of 481
397 Practical hints
Replacing bulbs
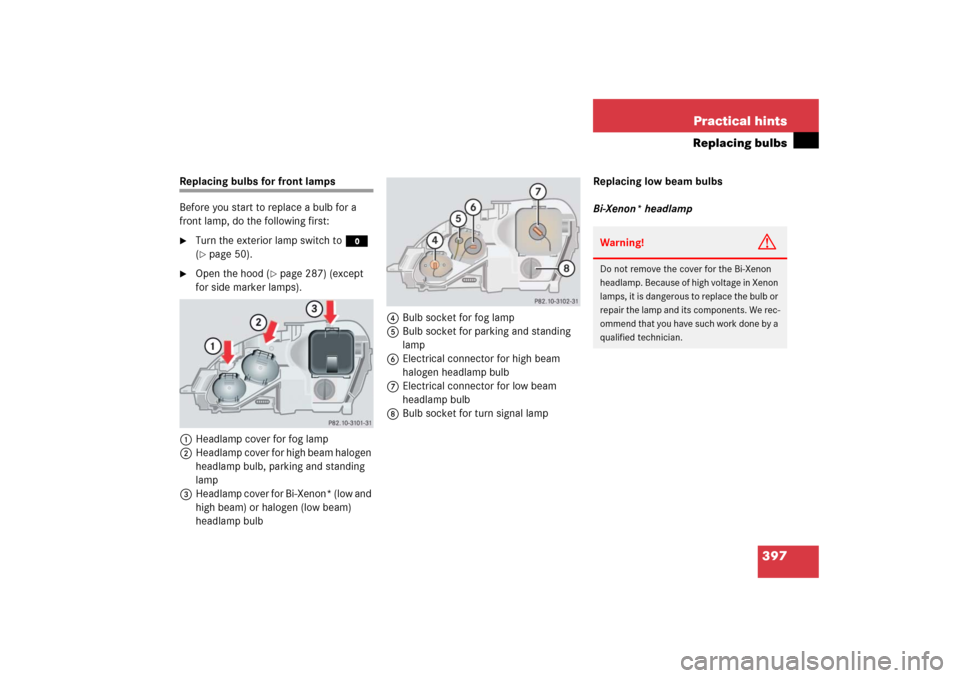
Replacing bulbs for front lamps
Before you start to replace a bulb for a
front lamp, do the following first:�
Turn the exterior lamp switch to M
(�page 50).
�
Open the hood (
�page 287) (except
for side marker lamps).
1Headlamp cover for fog lamp
2Headlamp cover for high beam halogen
headlamp bulb, parking and standing
lamp
3Headlamp cover for Bi-Xenon* (low and
high beam) or halogen (low beam)
headlamp bulb4Bulb socket for fog lamp
5Bulb socket for parking and standing
lamp
6Electrical connector for high beam
halogen headlamp bulb
7Electrical connector for low beam
headlamp bulb
8Bulb socket for turn signal lampReplacing low beam bulbs
Bi-Xenon* headlamp
Warning!
G
Do not remove the cover for the Bi-Xenon
headlamp. Because of high voltage in Xenon
lamps, it is dangerous to replace the bulb or
repair the lamp and its components. We rec-
ommend that you have such work done by a
qualified technician.