Page 24 of 481
23 At a glance
Cockpit
Item
Page
1
Combination switch�
Turn signals
�
Windshield wipers
�
High beam
51
52
135
2
Cruise control lever�
Cruise control
�
Distronic*
222
215
218
3
Instrument cluster
24
4
Multifunction steering
wheel
26
5
Steering wheel gearshift
control (S 55 AMG and
S 65 AMG only)
181
Item
Page
6
Lever for voice control sys-
tem*, see separate operat-
ing instructions
7
Front Parktronic* warning
indicator for right front area
235
8
Overhead control panel
29
9
Glove box lock
242
a
Glove box lid release
242
b
Glove box
242
c
Center console
27, 28
d
Starter switch
34
e
Horn
Item
Page
f
Steering wheel adjustment
stalk
Heated steering wheel*
40
252
g
Parking brake pedal
48
h
Hood lock release
287
j
Parking brake release
48
k
Door control panel
30
l
Exterior lamp switch
131
m
Headlamp washer button*
186
n
Front Parktronic* warning
indicator for left front area
235
Page 26 of 481

25 At a glance
Instrument cluster
Item
Page
1
Coolant temperature gauge
141
2
Fuel gauge with fuel tank
reserve warning lamp
343
3
LLeft turn signal
indicator lamp
51
KRight turn signal
indicator lamp
51
4
Speedometer with:vElectronic Stability
Program (ESP
®)
warning lamp
345
lDistance warning
lamp
Vehicles without Distronic*:
Distance warning lamp with-
out function. It illuminates
when the ignition is on. It
should go out when the en-
gine is running.
344
5
Tachometer
142
Item
Page
6
Right display with:
345
AHigh beam headlamp
indicator lamp
50
-Antilock Brake
System (ABS)
indicator lamp
340
7
JReset button
140
8
Display with:�
Gear selector lever
position
174
�
Program mode
174
�
Digital clock
(see COMAND operating
instructions)
9
Multifunction display with:�
Trip odometer
141
�
Main odometer
141
Item
Page
a
Outside temperature
indicator
142
b
Left display with:1Supplemental
Restraint System
(SRS) indicator lamp
347
;Brake warning lamp,
USA only
341
3Brake warning lamp,
Canada only
341
?Engine malfunction in-
dicator lamp,
USA only
342
±Engine malfunction in-
dicator lamp, Canada
only
342
HTire inflation pressure
warning lamp
346
c
Knob for instrument cluster il-
lumination
140
Page 35 of 481

34 Getting startedUnlockingStarter switch positions
SmartKeyStarter switch
0For removing SmartKey
1Power supply for some electrical con-
sumers, such as seat adjustment
2Ignition (power supply for all electrical
consumers) and driving position.
All lamps (except high beam headlamp
indicator lamp and turn signal indicator
lamps unless activated) in the instru-
ment cluster come on. If a lamp in the
instrument cluster fails to come on
when the ignition is switched on, have
it checked and replaced if necessary.
If a lamp in the instrument cluster re-
mains on after starting the engine or
comes on while driving, refer to “Lamps
in instrument cluster” (
�page 340).
3Starting position
Warning!
G
When leaving the vehicle, always remove the
SmartKey or SmartKey with KEYLESS-GO*
from the starter switch, take it with you, and
lock the vehicle. Do not leave children unat-
tended in the vehicle, or with access to an
unlocked vehicle. Unsupervised use of vehi-
cle equipment may cause an accident
and/or serious personal injury.
iWhen you switch on the ignition, the in-
dicator and warning lamps (except high
beam headlamp indicator lamp and
turn signal indicator lamps unless acti-
vated) in the instrument cluster come
on. The indicator and warning lamps
(except high beam headlamp indicator
lamp and turn signal indicator lamps if
activated) should go out when the en-
gine is running. This indicates that the
respective systems are operational.iThe SmartKey can only be removed
from the starter switch with the gear
selector lever in position P.
Page 37 of 481
.
Position 1�
Press KEYLESS-GO")
36 Getting startedUnlockingPosition 0
Before you press the KEYLESS-GO
start/stop button, the vehicle’s on-board
electronics have status 0 (as with
SmartKey removed).
Position 1�
Press KEYLESS-GO start/stop button
once.
This supplies power for some electrical
consumers, such as seat adjustment.Ignition (or position 2)
�
Press KEYLESS-GO start/stop button
twice.
This supplies power for all electrical
consumers.
All lamps (except high beam headlamp
indicator lamp and turn signal indicator
lamps unless activated) in the instru-
ment cluster come on. If a lamp in the
instrument cluster fails to come on
when the ignition is switched on, have
it checked and replaced if necessary.
If a lamp in the instrument cluster re-
mains on after starting the engine or
comes on while driving, refer to “Lamps
in instrument cluster” (
�page 340).
For information on starting the engine us-
ing the KEYLESS-GO start/stop button,
see “Starting with KEYLESS-GO*”
(
�page 47).
iIf you now press the KEYLESS-GO
start/stop button �
once again, the ignition (position2)
is switched on
�
twice, the power supply is again
switched off
iIf you now press the KEYLESS-GO
start/stop button once, the power sup-
ply is again switched off.iWhen you switch on the ignition, the in-
dicator and warning lamps (except high
beam headlamp indicator lamp and
turn signal indicator lamps unless acti-
vated) in the instrument cluster come
on. The indicator and warning lamps
(except high beam headlamp indicator
lamp and turn signal indicator lamps if
activated) should go out when the en-
gine is running. This indicates that the
respective systems are operational.
Page 51 of 481
50 Getting startedDrivingFor more information, see “Driving instruc-
tions” (
�page 273).
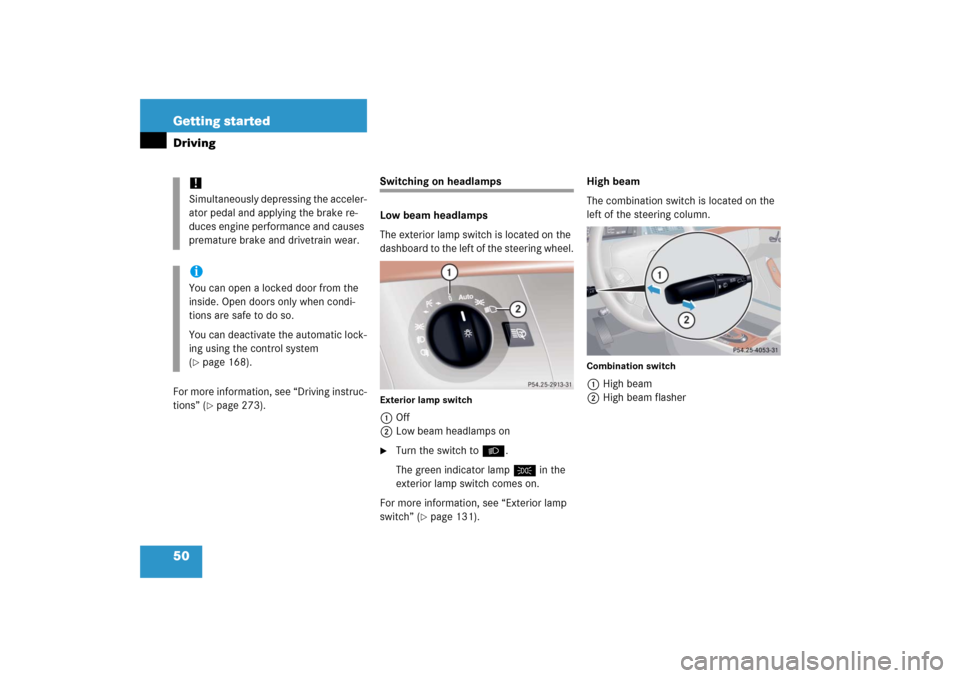
Switching on headlamps
Low beam headlamps
The exterior lamp switch is located on the
dashboard to the left of the steering wheel.Exterior lamp switch1Off
2Low beam headlamps on�
Turn the switch toB.
The green indicator lampC in the
exterior lamp switch comes on.
For more information, see “Exterior lamp
switch” (
�page 131).High beam
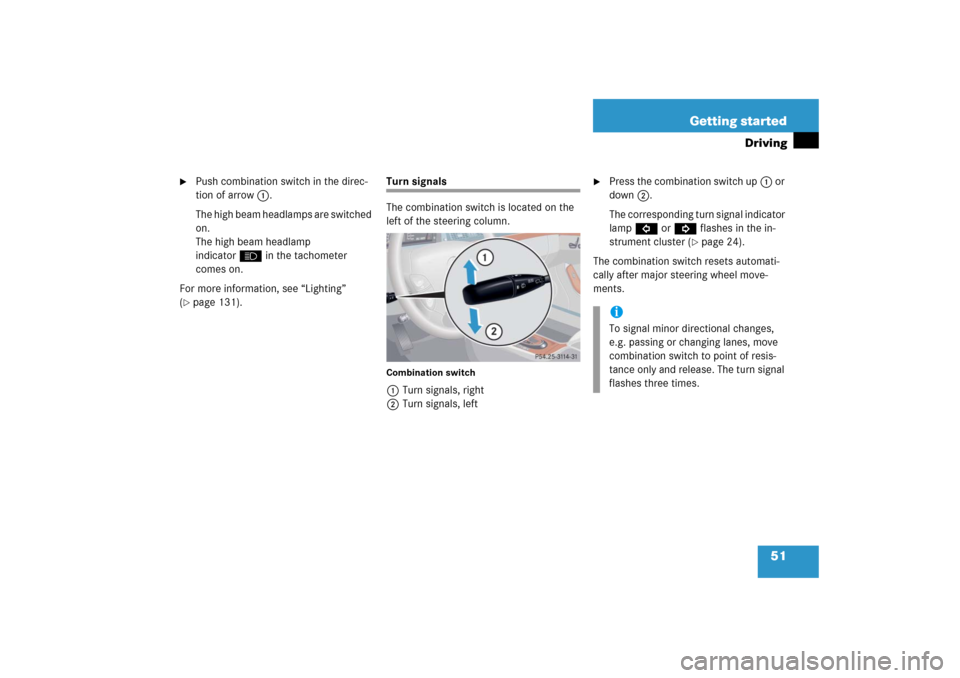
The combination switch is located on the
left of the steering column.
Combination switch1High beam
2High beam flasher
!Simultaneously depressing the acceler-
ator pedal and applying the brake re-
duces engine performance and causes
premature brake and drivetrain wear.iYou can open a locked door from the
inside. Open doors only when condi-
tions are safe to do so.
You can deactivate the automatic lock-
ing using the control system
(�page 168).
Page 52 of 481
51 Getting started
Driving
�
Push combination switch in the direc-
tion of arrow1.
The high beam headlamps are switched
on.
The high beam headlamp
indicatorA in the tachometer
comes on.
For more information, see “Lighting”
(
�page 131).
Turn signals
The combination switch is located on the
left of the steering column.Combination switch1Turn signals, right
2Turn signals, left
�
Press the combination switch up1 or
down2.
The corresponding turn signal indicator
lampL orK flashes in the in-
strument cluster (
�page 24).
The combination switch resets automati-
cally after major steering wheel move-
ments.
iTo signal minor directional changes,
e.g. passing or changing lanes, move
combination switch to point of resis-
tance only and release. The turn signal
flashes three times.
Page 132 of 481

and “Turn signals” (
�page 51)")
131 Controls in detail
Lighting
�Lighting
For information on how to switch on the
headlamps and use the turn signals, see
“Switching on headlamps” (
�page 50)
and “Turn signals” (
�page 51).
Exterior lamp switch
The exterior lamp switch is located on the
dashboard to the left of the steering wheel.
M
Off
Daytime running lamp mode
(�page 133)
U
Automatic headlamp mode
Daytime running lamp mode
(�page 133)
C
Parking lamps (also side marker
lamps, tail lamps, license plate
lamps, instrument panel lamps)
B
Low beam headlamps (or high
beam headlamps when the combi-
nation switch is pushed forward)
and parking lamps
ˆ
Standing lamps, right (turn left one
stop)
‚
Standing lamps, left (turn left two
stops)
C
Indicator lamp for parking lamps
‡
Indicator lamp for front fog lamps
†
Indicator lamp for rear fog lamp
iIf you drive in countries where vehicles
drive on the other side of the road than
the country in which the vehicle is reg-
istered, you must have the headlamps
modified for symmetrical low beams.
Relevant information can be obtained
at your authorized Mercedes-Benz Cen-
ter.
Page 134 of 481

133 Controls in detail
Lighting
�
Turn the exterior lamp switch to U.
With the SmartKey in starter switch po-
sition 1 or the KEYLESS-GO*
start/stop button pressed once, only
the parking lamps will switch on and off
automatically.
When the engine is running, the low
beam headlamps, the tail and parking
lamps, the license plate lamps, and the
side marker lamps will switch on and
off automatically.
Daytime running lamp mode
�
Turn exterior lamp switch to
positionM orU.
When the engine is running, the low
beam headlamps are switched on. In
low ambient light conditions, the fol-
lowing lamps will switch on additional-
ly: �
tail and parking lamps
�
license plate lamps
�
side marker lampsFor nighttime driving you should turn the
exterior lamp switch to positionB to
permit activation of the high beam head-
lamps.
Canada only
The daytime running lamp mode is manda-
tory and therefore in a constant mode.
When the engine is running, and you shift
from a driving position to positionN orP,
the low beam headlamps will switch off
with a three-minute delay.
When the engine is running, and you
�
turn the exterior lamp switch to
positionC, the parking lamps
switch on additionally.
�
turn the exterior lamp switch to
positionB, the manual headlamp
mode has priority over the daytime run-
ning lamp mode.
The corresponding exterior lamps
switch on (
�page 395).USA only
By default, the daytime running lamp mode
is deactivated. Activate the daytime run-
ning lamp mode using the control system,
see “Setting daytime running lamp mode
(USA only)” (
�page 165).
When the engine is running, and you turn
the exterior lamp switch to position C
orB, the manual headlamp mode has
priority over the daytime running lamp
mode.
The corresponding exterior lamps switch
on (
�page 395).
Locator lighting and night security illu-
mination
Locator lighting and night security illumi-
nation are described in the control system
section under “Setting locator lighting”
(
�page 166) and “Setting night security il-
lumination” (
�page 166).