Page 197 of 481

196 Controls in detailAutomatic climate controlAdjusting air distribution
Use air distribution controlsc and6
(�page 193) to separately adjust the air
distribution on each side of the passenger
compartment. The following symbols are
found on the controls:
Adjusting manually
�
Press left or right buttonU.
The buttonU will pop out.
The button emerges and theh,
», d and csymbols become
visible.
�
Turn the marking on the regulator to
the desired symbol.
The air will be directed to the vents cor-
responding to this symbol.
Adjusting automatically
�
Press left or right buttonU until it
clicks in.
Theh, », d and c sym-
bols are no longer visible.
The air distribution is adjusted auto-
matically.
Windows fogged on the inside
�
Press button± to switch on the air
conditioning (
�page 193).
The indicator lamp in the button goes
out.
�
Press button, to switch off the air
recirculation (
�page 193).
The indicator lamp on the button goes
out.
�
Make sure left and right buttonU
emerges.
Theh, », d and c sym-
bols become visible.
�
Press left and right buttond.
�
Set blower to the maximum speed.
�
Adjust left and right air vents1
and7 upwards (
�page 192).
�
Increase temperature setting.
�
Open side air vents9 and direct them
onto the side windows (
�page 192).
Windshield fogged on the outside
�
Switch the windshield wipers on
(�page 52).
�
Press on both buttons U until they
click in.
Theh, », d and c sym-
bols are no longer visible.
Symbol
Function
h
Directs air through the cen-
ter air vents
d
Directs air to the windows
»
Directs air into the entire
vehicle interior
c
Directs air to the footwells
Page 264 of 481

263 Controls in detail
Useful features
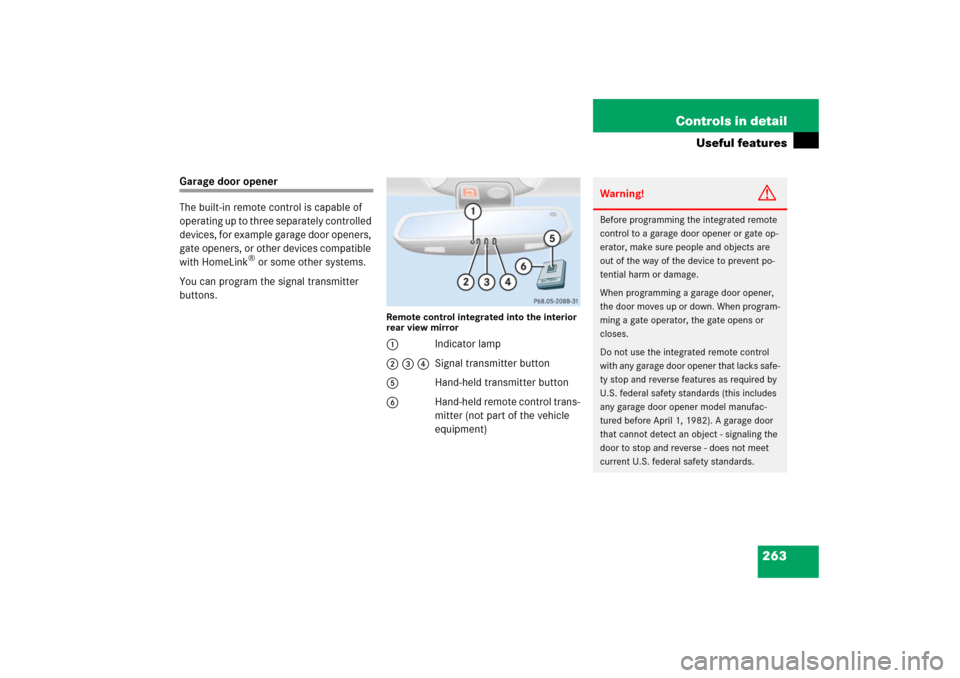
Garage door opener
The built-in remote control is capable of
operating up to three separately controlled
devices, for example garage door openers,
gate openers, or other devices compatible
with HomeLink
® or some other systems.
You can program the signal transmitter
buttons.
Remote control integrated into the interior
rear view mirror1Indicator lamp
2 3 4Signal transmitter button
5Hand-held transmitter button
6Hand-held remote control trans-
mitter (not part of the vehicle
equipment)
Warning!
G
Before programming the integrated remote
control to a garage door opener or gate op-
erator, make sure people and objects are
out of the way of the device to prevent po-
tential harm or damage.
When programming a garage door opener,
the door moves up or down. When program-
ming a gate operator, the gate opens or
closes.
Do not use the integrated remote control
with any garage door opener that lacks safe-
ty stop and reverse features as required by
U.S. federal safety standards (this includes
any garage door opener model manufac-
tured before April 1, 1982). A garage door
that cannot detect an object - signaling the
door to stop and reverse - does not meet
current U.S. federal safety standards.
Page 266 of 481

265 Controls in detail
Useful features
Programming or reprogramming the in-
tegrated remote control
Step 1:�
Switch on the ignition (
�page 34).
Step 2:
�
If you have previously programmed an
integrated signal transmitter button
and wish to retain its programming,
proceed to step 3. Otherwise, press
and hold the two outer signal transmit-
ter buttons2 and 4 and release
them only when the indicator lamp1
begins to flash after approximately
20 seconds (do not hold the button for
longer than 30 seconds). This proce-
dure erases any previous settings for
all three channels and initializes the
memory. If you later wish to program a
second and/or third hand-held trans-
mitter to the remaining two signal
transmitter buttons, do not repeat this
step and begin directly with step 3.Step 3:
�
Hold the end of the hand-held remote
control transmitter6 of the device
you wish to train approximately 2 to
5 in (5 to 12 cm) away from the surface
of the integrated remote control locat-
ed on the interior rear view mirror,
keeping the indicator lamp1 in view.
Step 4:
�
Using both hands, simultaneously
press the hand-held transmitter
button5 and the desired integrated
signal transmitter button (2, 3
or4). Do not release the buttons until
completing step 5.
The indicator lamp1 on the integrat-
ed remote control will flash, first slowly
and then rapidly.Step 5:
�
When the indicator lamp 1 flashes
rapidly, release both buttons.
Step 6:
�
Press and hold the just-trained inte-
grated signal transmitter button and
observe the indicator lamp1.
If the indicator lamp1 stays on con-
stantly, programming is complete and
your device should activate when the
integrated signal transmitter button is
pressed and released.iThe indicator lamp1 flashes the first
time the signal transmitter button is
programmed. If this button has already
been programmed, the indicator lamp
will only start flashing after 20 sec-
onds.
��