Page 170 of 481

169 Controls in detail
Control system
Limiting opening height of trunk lid*
This function is available in vehicles with
the trunk lid opening/closing system*.
Use this function to activate or deactivate
the limiting opening height of trunk lid.�
Move the selection marker with
theæ orç button to
VEHICLE
submenu.
�
Press buttonj ork repeatedly
until you see this message in the multi-
function display:OPENING LIMITER
TRUNK LIDThe selection marker is on the current
setting.
�
Press buttonæ orç to switch
the opening limiter for trunk lid
ON
or
OFF
.Convenience submenu
Access the
CONVENIENCE
submenu via the
SETTINGS
menu. Use the
CONVENIENCE
sub-
menu to change the settings for a number
of convenience features. The following
functions are available:Setting key-dependency
Use this function to set whether the mem-
ory settings for the seats, the steering
wheel, the mirrors, and the automatic cli-
mate control should be stored separately
for each SmartKey (
�page 128).
�
Move the selection marker with
theæ orç button to
the
CONVENIENCE
submenu.
�
Press buttonj ork repeatedly
until you see this message in the multi-
function display:
SETTINGS KEY-DEPEN-
DENT
.
The selection marker is on the current
setting.
�
Pressæ orç to set key-depen-
dency to
ON or
OFF
.
Function
Page
Setting key-dependency
169
Activating easy-entry/exit fea-
ture
170
Setting parking position for exte-
rior rear view mirror
170
Adjusting the drive-dynamic seat
171
Setting fold-in function for exteri-
or rear view mirrors
172
Page 171 of 481
.
�
Move the selection marker with
theæ")
170 Controls in detailControl systemActivating easy-entry/exit feature
Use this function to activate and deacti-
vate the easy-entry/exit feature
(�page 114).
�
Move the selection marker with
theæ orç button to
the
CONVENIENCE
submenu.
�
Press buttonj ork repeatedly
until you see this message in the multi-
function display:
EASY-ENTRY FEATURE
ACTIVATE
.
The selection marker is on the current
setting.
�
Pressæ orç to change the
easy-entry/exit setting.
The following settings are available for the
easy-entry/exit feature:
Setting parking position for exterior rear
view mirror
Use the
MIRROR SETTING WHEN PARKING
function to select whether the passen-
ger-side exterior rear view mirror should be
turned downward during parking maneu-
vers when reverse gearR is engaged. For
additional information, see “Activating ex-
terior rear view mirror parking position”
(
�page 187).
Warning!
G
You must make sure no one can become
trapped or injured by the moving steering
wheel and driver’s seat when the easy-en-
try/exit feature is activated.
To cancel seat/steering wheel movement,
do one of the following:�
Press seat adjustment switch
(�page 38).
�
Move steering column stalk
(�page 40).
�
Press the one of the memory position
buttons or the memory button M
(�page 129).
Do not leave children unattended in the ve-
hicle, or with access to an unlocked vehicle.
Children could open the driver’s door and
unintentionally activate the easy-entry/exit
feature, which could result in an accident
and/or serious personal injury.
OFF
The easy-entry/exit fea-
ture is deactivated.
STEER. COL
Only the steering column
is moved.
ST.COL+SEAT
Both the steering column
and the driver’s seat are
moved.
Page 172 of 481

171 Controls in detail
Control system
�
Move the selection marker to the CONVENIENCE
submenu using theæ
orç button.
�
Press buttonj ork repeatedly
until you see this message in the multi-
function display:
MIRROR SETTING WHEN
PARKING
.
The selection marker is on the current
setting.
�
Pressæ orç to switch function ON or
OFF
.
Depending on vehicle production date, this
feature has been deactivated at the facto-
ry. If deactivated, the screen shown above
does not appear in the multifunction dis-
play. To have this feature activated and ap-
pear in the multifunction display, contact
an authorized Mercedes-Benz Center.Without this screen appearing and set to
ON, the rear view mirror parking position
feature (
�page 187) is not available.
Adjusting drive-dynamic seats*
Use this function to adjust the settings for
the drive-dynamic seat (
�page 124).
�
Move the selection marker with
theæ orç button to
the
CONVENIENCE
submenu.
�
To adjust the drive-dynamic seat press
buttonj ork repeatedly until
you see this message in the multifunc-
tion display:
The selection marker is on the current
setting.
Message for the driver’s seat
Message for the front passenger seat:DRIV. DYN. SEAT ADJ.
FRONT PASSENGER
LEVEL 1
LEVEL 2�
Press buttonæ orç to select
the desired setting.
The following settings are available:
LEVEL 1
(Sporty) Strong lateral sup-
port and fast air pressure
build-up in the air chambers
of the backrest side bolsters
LEVEL 2
(Comfort) Less lateral sup-
port and slow air pressure
build-up in the air chambers
of the backrest side bolsters
Page 206 of 481

205 Controls in detail
Automatic climate control
Rear passenger compartment climate control*
The automatic climate control is operation-
al whenever the engine is running. You can
operate the climate control system in ei-
ther the automatic or manual mode. The
system cools or heats the interior depend-
ing on the selected interior temperature
and the current outside temperature.
The automatic climate control system is
adjustable individually for the rear passen-
ger compartment.
Nearly all dust particles, pollutants and
odors are filtered out before outside air en-
ters the passenger compartment through
the air distribution system.The control panel is located in the rear cen-
ter console.
Rear automatic climate control panel
iWhen the rear seats are not occupied
(rear seat belts unbuckled) the rear cli-
mate control system adopts the set-
tings of the front climate control
system.
Item
1
Left center air vent, adjustable
2
Display
3
Right center air vent, adjustable
4
Thumbwheel for air distribution
5
Temperature control, right
6
Air volume (automatic, manual)
7
Temperature control, left
8
Rear climate control system on/off
Residual engine heat utilization
(REST)
Warning!
G
Follow the recommended settings for heat-
ing and cooling as given in the instructions
for the front automatic climate control
(�page 192). Otherwise the windows could
fog up, impairing visibility for the driver and
endangering you and others.
Page 213 of 481

212 Controls in detailPower tilt/sliding sunroofOpening and closing the power tilt/sliding sunroof
The tilt/sliding sunroof is opened and
closed electrically. The switch for the
tilt/sliding sunroof is on the overhead con-
trol panel.
1Push up to raise sunroof at rear
2Pull down to lower sunroof at rear
3Push forward to slide sunroof closed
4Push back to slide sunroof openWith the sunroof closed or tilted open, a
screen can be slid into the roof opening to
help provide shade. When sliding the sun-
roof open, the screen will also retract.
Warning!
G
When closing the tilt/sliding sunroof, make
sure that there is no danger of anyone being
harmed by the closing procedure.
The closing procedure of the tilt/sliding sun-
roof can be immediately halted by releasing
the switch or, if the switch was moved past
the resistance point and released, by mov-
ing the switch in any direction.
The tilt/sliding sunroof is made out of glass.
In the event of an accident, the glass may
shatter. This may result in an opening in the
roof.
In a vehicle rollover, occupants not wearing
their seat belts or not wearing them properly
may be thrown out of the opening. Such an
opening also presents a potential for injury
for occupants wearing their seat belts
properly as entire body parts or portions of
them may protrude from the passenger
compartment.
Page 241 of 481

240 Controls in detailLoadingLoading instructions
The total load weight including vehicle oc-
cupants and luggage/cargo should not ex-
ceed the load limit or vehicle capacity
weight as indicated on the corresponding
placard located on the driver’s door B-pillar
(�page 300).
Cargo tie-down hooks
Six hooks are located in the trunk.�
Carefully secure cargo by applying
even load on all hooks with rope of suf-
ficient strength to hold down the cargo.
Warning!
G
Always fasten items being carried as secure-
ly as possible.
In an accident, during hard braking or sud-
den maneuvers, loose items will be thrown
around inside the vehicle and can cause in-
jury to vehicle occupants unless the items
are securely fastened in the vehicle.
To help avoid personal injury during a colli-
sion or sudden maneuver, exercise care
when transporting cargo. Put luggage or car-
go in the trunk if possible. Do not pile lug-
gage or cargo higher than the seat backs.
Do not place anything on the rear-window
shelf.
Never drive vehicle with trunk open. Deadly
carbon monoxide (CO) gases may enter ve-
hicle interior resulting in unconsciousness
and death.
Page 243 of 481

242 Controls in detailUseful featuresVanity mirror in the rear
The vanity mirrors are located in the roof
lining for the rear seat passengers.
Opening the vanity mirror�
Press the cover of the vanity mirror.
The vanity mirror folds down and the
mirror lamp comes on.
Closing the vanity mirror
�
Push the vanity mirror up until it engag-
es in place.
Storage compartmentsGlove box
1Unlocked
2Locked
3Glove box lid release
Locking the glove box
�
Insert mechanical key (
�page 388)
into the glove box lock.
�
Turn the mechanical key to
position2.
!Before tilting a front seat backrest from
the reclined position to an upright posi-
tion, close the respective vanity mirror
in the rear. Otherwise the vanity mirror
may get damaged.Warning!
G
To help avoid personal injury during a colli-
sion or sudden maneuver, exercise care
when storing objects in the vehicle. Put lug-
gage or cargo in the trunk if possible. Do not
pile luggage or cargo higher than the seat
backs.
Luggage nets cannot secure hard or heavy
objects.
Keep compartment lids closed. This will help
to prevent stored objects from being thrown
about and injuring vehicle occupants during
an accident.
Page 247 of 481
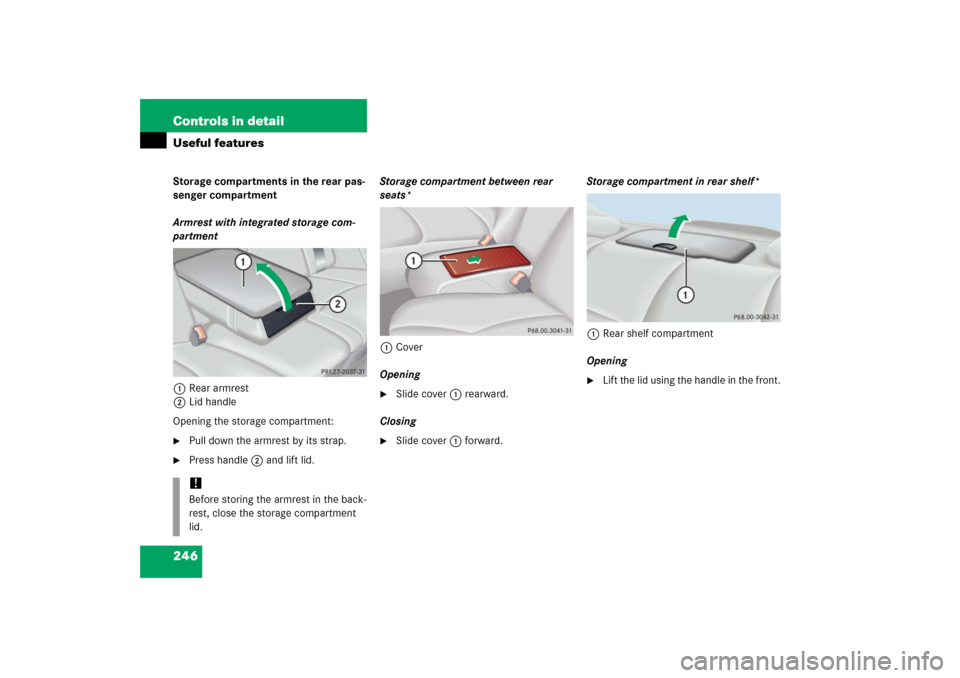
246 Controls in detailUseful featuresStorage compartments in the rear pas-
senger compartment
Armrest with integrated storage com-
partment
1Rear armrest
2Lid handle
Opening the storage compartment:�
Pull down the armrest by its strap.
�
Press handle2 and lift lid.Storage compartment between rear
seats*
1Cover
Opening
�
Slide cover1 rearward.
Closing
�
Slide cover1 forward.Storage compartment in rear shelf*
1Rear shelf compartment
Opening
�
Lift the lid using the handle in the front.
!Before storing the armrest in the back-
rest, close the storage compartment
lid.