Page 146 of 481

145 Controls in detail
Control system
Pressing any of the buttons on the multi-
function steering wheel will alter what is
shown in the multifunction display.
The information available in the multifunc-
tion display is arranged in menus, each
containing a number of functions or sub-
menus.
The individual functions are then found
within the relevant menu (radio or CD op-
erations under
AUDIO
, for example). These
functions serve to call up relevant informa-
tion or to customize the settings for your
vehicle.It is helpful to think of the menus, and the
functions within each menu, as being ar-
ranged in a circular pattern.
�
If you press buttonè orÿ
repeatedly, you will pass through each
menu one after the other.
�
If you press buttonk orj
repeatedly, you will pass through each
function display, one after the other, in
the current menu.In the
SETTINGS
menu, instead of functions
you will find a number of submenus for
calling up and changing settings. For in-
structions on using these submenus, see
“Settings menu” (�page 160).
The number of menus available in the sys-
tem depends on which optional equipment
is installed in your vehicle.
The menus are described on the following
pages.
Page 148 of 481

147 Controls in detail
Control system
Menus, submenus and functions
Menu1
Standard dis-
play
Menu2
AUDIO
Menu3
Telephone*
Menu4
NAVI
Menu5
Distronic*
Menu6
Trip computer
Menu7
Vehicle status
message memory
Menu8
Settings
(�page 148)
(�page 148)
(�page 153)
(�page 155)
(�page 156)
(�page 157)
(�page 159)
(�page 160)
Commands/submenusCall up mainte-
nance service
display
Select radio
station
Load phone
book
Show route
guidance in-
structions,
current direc-
tion traveled
Call up set-
tings
Fuel consump-
tion statistics
after start
Call up vehicle mal-
function, warning
and system status
messages stored in
memory
Reset to fac-
tory settings
Check tire in-
flation pres-
sure*
Select satel-
lite radio
station*
(USA only)
Search for
name in
phone book
Fuel consump-
tion statistics
since the last
reset
Instrument
cluster
submenu
Check engine
oil level
Select CD
track
Select
number last
dialed
Call up range
Lighting
submenu
Digital speed-
ometer
Select
MP3-CD track
Vehicle
submenuConvenience
submenu
Page 151 of 481
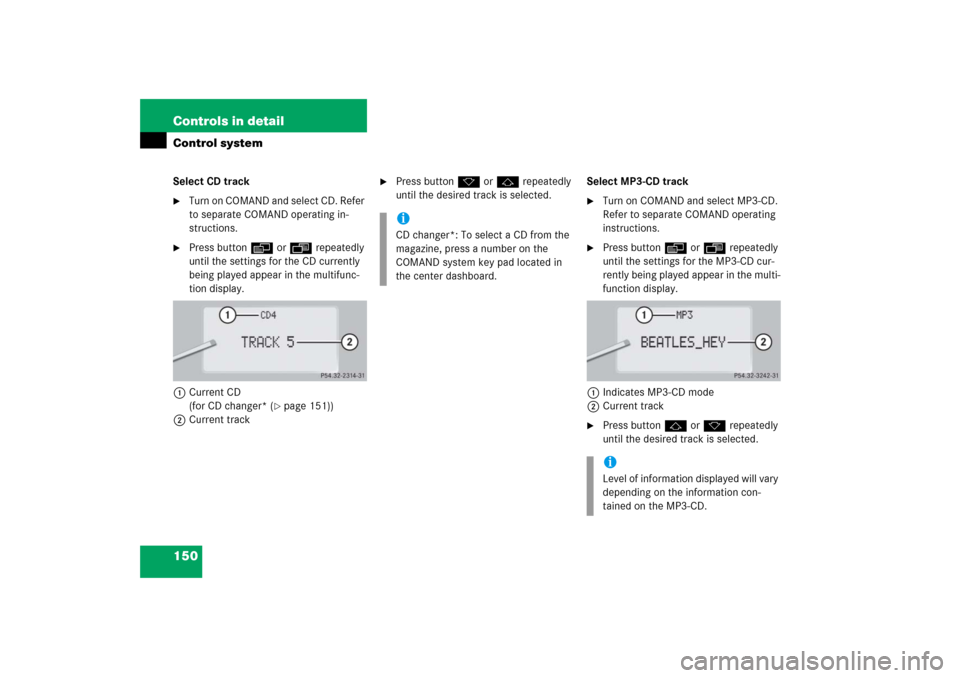
150 Controls in detailControl systemSelect CD track�
Turn on COMAND and select CD. Refer
to separate COMAND operating in-
structions.
�
Press buttonè orÿ repeatedly
until the settings for the CD currently
being played appear in the multifunc-
tion display.
1Current CD
(for CD changer* (
�page 151))
2Current track
�
Press buttonk orj repeatedly
until the desired track is selected.Select MP3-CD track
�
Turn on COMAND and select MP3-CD.
Refer to separate COMAND operating
instructions.
�
Press buttonè orÿ repeatedly
until the settings for the MP3-CD cur-
rently being played appear in the multi-
function display.
1Indicates MP3-CD mode
2Current track
�
Press buttonj ork repeatedly
until the desired track is selected.
iCD changer*: To select a CD from the
magazine, press a number on the
COMAND system key pad located in
the center dashboard.
iLevel of information displayed will vary
depending on the information con-
tained on the MP3-CD.
Page 157 of 481
156 Controls in detailControl systemDistronic* menu
Use the
DISTRONIC
menu to display the
current settings for your Distronic system.
What information is shown in the display
depends on whether the Distronic system
is active or inactive.
Please refer to the “Driving systems” sec-
tion of this manual (�page 218) for in-
structions on how to activate Distronic.
�
Press buttonè orÿ repeatedly
until you see one of the following two
pictures in the display.Distronic deactivated
When Distronic is deactivated you will see
the standard display in the display.
1Vehicle ahead, if detected
2Actual distance to vehicle ahead
3Preset distance threshold to vehicle
ahead
4Symbol for activated distance warning
function
5Your vehicleDistronic activated
When you activate Distronic, you will see
the set speed for about five seconds in the
Distronic display. The following display
then appears:
1Distronic activated
Page 158 of 481

157 Controls in detail
Control system
Trip computer menu
Use the trip computer menu to call up sta-
tistical data on your vehicle. The following
information is available:Fuel consumption statistics after start
�
Press buttonÿ orè repeatedly
until you see the first function of the
trip computer menu.
�
Press buttonj ork repeatedly
until you see this message in the left
display:
AFTER START
.
1Distance driven since start
2Time elapsed since start
3Average fuel consumption since start
4Average speed since startIncorporating statistics from the previ-
ous journey in the consumption statis-
tics
When you restart the engine, the
AFTER START
display flashes for:
�
a distance of approximately 1.25 miles
(two kilometers)
or
�
a duration of two minutes
During this period, the data from the previ-
ous journey can be incorporated as fol-
lows:
�
Press the reset buttonJ
(�page 140).
The statistics will be incorporated.
Function
Page
Fuel consumption statistics after
start
157
Fuel consumption statistics
since last reset
158
Resetting fuel consumption sta-
tistics
158
Calling up range (distance to
empty)
158
iEach time you call up the trip comput-
er, the last function used appears as
the first display.
iIf you do not press the reset buttonJ,
the consumption statistics will be reset
to
0.
Page 159 of 481

158 Controls in detailControl systemFuel consumption since last reset�
Press buttonÿ orè repeatedly
until you see the first function of the
trip computer menu.
�
Press buttonj ork repeatedly
until you see this message in the dis-
play:
AFTER RESET
.
1Distance driven since last reset
2Time elapsed since last reset
3Average fuel consumption since last re-
set
4Average speed since last resetResetting fuel consumption statistics
�
Press buttonÿ orè repeatedly
until you see the first function of the
trip computer menu.
�
Press buttonj ork repeatedly
until you see the reading that you want
to reset in the display.
�
Press and hold the reset buttonJ
(�page 140) until the value is reset
to0.Calling up range (distance to empty)
�
Press buttonÿ orè repeatedly
until you see the first function of the
trip computer menu.
�
Press buttonj ork repeatedly
until you see this message in the dis-
play:
RANGE
.
In the display you will see the calculat-
ed range based on the current fuel tank
level.
Page 161 of 481

160 Controls in detailControl systemSettings menu
In the
SETTINGS
menu there are two func-
tions:
�
The function
TO RESET PRESS R BUTTON
FOR 3 SEC., with which you can reset
all settings to the original factory set-
tings.
�
A collection of submenus with which
you can make individual settings for
your vehicle.
�
Press buttonè orÿ repeatedly
until the
SETTINGS
menu appears in
the multifunction display.The following settings and submenus are
available:Resetting all settings
You can reset all the functions of all sub-
menus to the factory settings.
�
Press the reset buttonJ(
�page 140)
for approximately three seconds.
In the multifunction display you will see
the request to press the reset
buttonJagain to confirm.
�
Press the reset buttonJagain.
The functions of all the submenus will
reset to factory settings.
Function
Page
Resetting all settings
160
Submenus in the Settings menu
161
Resetting the functions of a sub-
menu
161
Instrument cluster submenu
163
Lighting submenu
164
Vehicle submenu
168
Convenience submenu
169
iThe settings you have changed will not
be reset unless you confirm the action
by pressing the reset buttonJa sec-
ond time.
Due to safety reasons, resetting all of
the settings while driving will not reset
all of the values in the
LIGHTING
or the
VEHICLE
menu.
Page 162 of 481

161 Controls in detail
Control system
Submenus in the Settings menu�
Press buttonj.
In the multifunction display you will see
the collection of the submenus.
�
Press buttonç or æ.
The selection marker moves to the next
submenu.
The submenus are arranged by hierarchy.
S c r o l l d o w n w i t h t h eç button, scroll up
with theæ button.With the selection marker on the desired
submenu, use thej button to access
the individual functions within that sub-
menu. Once within the submenu, you can
use the buttonj to move to the next
function or the buttonk to move to the
previous function within that submenu.
The settings themselves are made with
buttonæ orç.Resetting the functions of a submenu
For each submenu you can reset all the
functions to the factory settings.
�
Move to a function in the submenu.
�
Press the reset buttonJ(
�page 140)
for approximately three seconds.
In the multifunction display you will see
the request to press the reset
buttonJagain to confirm.
�
Press the reset buttonJagain.
All functions of the submenu will reset
to factory settings.