Page 150 of 481

149 Controls in detail
Control system
Select radio station�
Turn on COMAND and select radio.
Refer to separate COMAND operating
instructions.
�
Press buttonè orÿ repeatedly
until you see the currently tuned sta-
tion in the multifunction display.
1Waveband
2Station frequency
�
Press buttonk orj repeatedly
until the desired station is found.Select satellite radio* station
(USA only)
The satellite radio is treated as a radio ap-
plication.
�
Turn on COMAND and select satellite
radio with the corresponding key on
the COMAND control panel (SAT).
�
Press buttonè orÿ repeatedly
until you see the currently tuned sta-
tion in the multifunction display.1SAT mode and preset number
2Channel name or number
�
Press buttonk orj repeatedly
until the desired channel is found.
iYou can only store new stations using
the corresponding feature on the radio.
Refer to separate COMAND operating
instructions.
You can also operate the radio in the
usual manner.
iAdditional optional satellite radio
equipment and a subscription to satel-
lite radio service provider are required
for satellite radio operation. Contact an
authorized Mercedes-Benz Center for
details and availability for your vehicle.
For more information, refer to separate
COMAND operating instructions.
Page 151 of 481
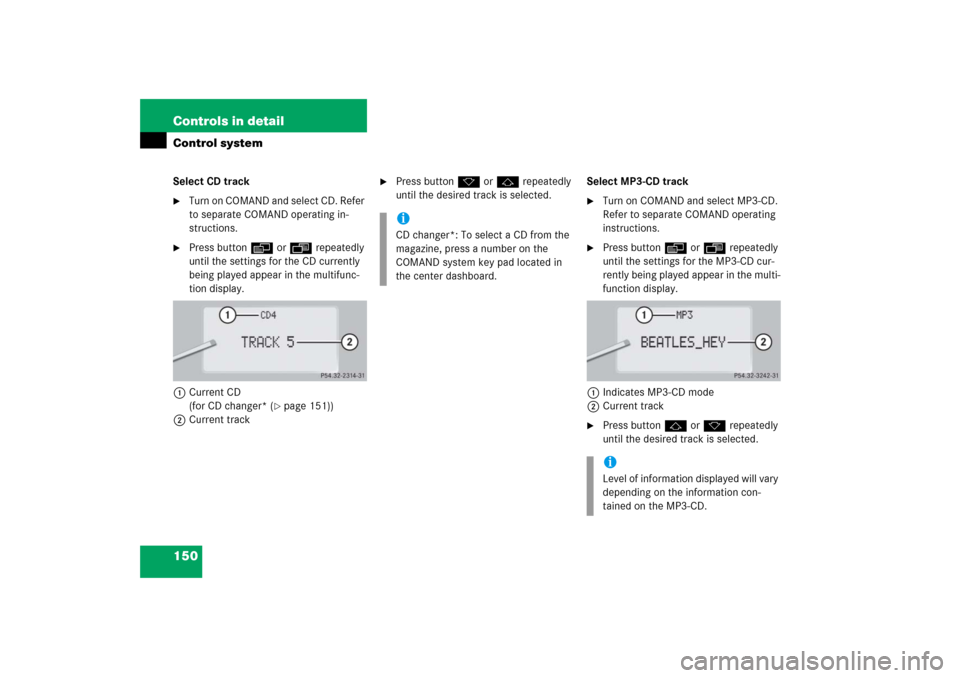
150 Controls in detailControl systemSelect CD track�
Turn on COMAND and select CD. Refer
to separate COMAND operating in-
structions.
�
Press buttonè orÿ repeatedly
until the settings for the CD currently
being played appear in the multifunc-
tion display.
1Current CD
(for CD changer* (
�page 151))
2Current track
�
Press buttonk orj repeatedly
until the desired track is selected.Select MP3-CD track
�
Turn on COMAND and select MP3-CD.
Refer to separate COMAND operating
instructions.
�
Press buttonè orÿ repeatedly
until the settings for the MP3-CD cur-
rently being played appear in the multi-
function display.
1Indicates MP3-CD mode
2Current track
�
Press buttonj ork repeatedly
until the desired track is selected.
iCD changer*: To select a CD from the
magazine, press a number on the
COMAND system key pad located in
the center dashboard.
iLevel of information displayed will vary
depending on the information con-
tained on the MP3-CD.
Page 152 of 481

151 Controls in detail
Control system
CD changer* operating mode
General notes
Should excessively high temperatures oc-
cur while in CD mode,
CD TEMP HIGH
will
appear on the multifunction display and
muting will take place. The unit will then
switch back to the last operating mode
used until the temperature has decreased
to a safe operating level.
Should excessively low temperatures oc-
cur while in CD mode,
CD TEMP LOW
will ap-
pear on the multifunction display, but the
CD will continue to play.
Handle CDs carefully to prevent interfer-
ence during playback. Avoid fingerprints
and dust on CDs. Do not write on CDs or
apply any label or other material to them.
Only use original CDs. Using copied CDs
may create problems during playback.Clean CDs from time to time with a com-
mercially available cleaning cloth. No sol-
vents, anti-static sprays, etc. should be
used for cleaning. Replace the CD in its
case after use. Protect CDs from heat and
direct sunlight.
Only use CDs which bear the label shown
and that conform to the compact disc dig-
ital audio standard (IEC 60908).
Use of CDs which do not meet this stan-
dard may cause damage to the CD chang-
er. Do not play single-CDs (80 mm) with an
adapter.For information on operating the CD
changer, refer to separate COMAND oper-
ating instructions.
!Your CD drive has been designed to
play CDs which correspond to the
IEC 60908 standard.
If you insert thicker data carriers,
e.g. ones that have data on both sides
(one side with DVD data, the other side
with audio data), they cannot be eject-
ed and will damage the drive.
Page 155 of 481

154 Controls in detailControl systemThe following functions are available:
Answering a call
When your telephone is ready to receive
calls, you can answer a call at any time. In
the display you will then see the message:�
Press buttons.
You have answered the call. In the dis-
play you see the duration of the call po-
sitioned above the number.Ending a call
�
Press buttont.
You have ended the call. In the display
you will again see the standby mes-
sage.
Dialing a number from the phone book
If your telephone is ready to receive calls,
you may select and dial a number from the
phone book at any time.
�
Press buttonÿ orè repeatedly
until you see the
TEL
menu in the dis-
play.
�
Press buttonj ork.
The control system reads the phone
book which is stored in the telephone.
The call transmission depends on the
number of entries in the phone book and can take up to 60 seconds. In the
display you will see the message:
PLEASE WAIT!
.
When the message:
PLEASE WAIT!
dis-
appears, the phone book has been
loaded.
�
Press buttonj ork repeatedly
until the desired name appears in the
display.
The stored names are displayed in as-
cending or descending alphabetical or-
der.
Function
Page
Answering a call
154
Ending a call
154
Dialing a number from the phone
book
154
Redialing
155
iIf you do not wish to accept a call,
press buttont.
iIf you press and holdj ork for
longer than one second, the system
scrolls rapidly through the list of names
until you release the button again.
Cancel the quick search mode by
pressingt.
Page 163 of 481
162 Controls in detailControl systemThe table below shows what settings can
be changed within the various menus. De-
tailed instructions on making individual
settings can be found on the following pag-
es.INSTRUMENT CLUSTER
LIGHTING
VEHICLE
CONVENIENCE
Select temperature display
mode
Set daytime running lamp mode
(USA only)
Set automatic locking
Set key-dependency
Select multifunction display
mode
Set locator lighting
Limiting opening height of trunk
lid*
Activate easy-entry/exit feature
Select language
Exterior lamps delayed shut-off
Set parking position for exterior
rear view mirror
Select tire inflation pressure
unit
Interior lighting delayed shut-off
Set fold-in function for exterior
rear view mirrorsAdjusting the drive-dynamic
seat
Page 164 of 481

163 Controls in detail
Control system
Instrument cluster submenu
Access the
INST. CLUS.
submenu via the
SETTINGS
menu. Use the
INST. CLUS.
submenu to change the instrument cluster
display settings. The following functions
are available:Selecting temperature display mode
�
Move the selection marker with
theæ orç button to the
INST.
CLUS.
submenu.
�
Press buttonj ork repeatedly
until you see this message in the multi-
function display:
TEMP. INDICATOR
.
The selection marker is on the current
setting.
�
Pressæ orç to set the temper-
ature unit to degrees Celsius (
°C) or de-
grees Fahrenheit (
°F).Selecting multifunction display mode
�
Move the selection marker with
theæ orç button to the
INST.
CLUS.
submenu.
�
Press buttonj ork repeatedly
until you see this message in the multi-
function display:
DISPLAY VALUES IN
.
The selection marker is on the current
setting.
�
Press æ or ç to set speedome-
ter unit to
MILES
or KM
.
Function
Page
Select temperature display
mode
163
Select multifunction display
mode
163
Select language
164
Select tire inflation pressure unit
164
Page 165 of 481

164 Controls in detailControl systemSelecting language�
Move the selection marker with
theæ orç button to the
INST.
CLUS.
submenu.
�
Press buttonj ork repeatedly
until you see this message in the multi-
function display:
LANGUAGE
.
The selection marker is on the current
setting.
�
Pressæ orç to select the lan-
guage to be used for the multifunction
display messages.Available languages:
�
German
�
English
�
French
�
Italian
�
Spanish
Selecting tire inflation pressure unit
Use this function to set the unit for the tire
inflation pressure display.
�
Move the selection marker with
theæ orç button to the
INST.
CLUS.
submenu.
�
Press buttonj ork repeatedly
until you see this message in the multi-
function display:
DISPLAY UNIT TIRE
PRESSURE
.
The selection marker is on the current
setting.
�
Press æ or ç to select the de-
sired tire inflation pressure unit.
Lighting submenu
Access the
LIGHTING
submenu via the
SET-
TINGS
menu. Use the
LIGHTING
submenu
to change the lamp and lighting settings on
your vehicle. The following functions are
available:
Function
Page
Set daytime running lamp mode
(USA only)
165
Set locator lighting
166
Exterior lamps delayed shut-off
166
Interior lighting delayed shut-off
167
Page 166 of 481
�
Move the selection marker with
theæ orç button to the
LIGHT-
ING
submenu.
�
Press buttonj ork repeatedly
unti")
165 Controls in detail
Control system
Setting daytime running lamp mode
(USA only)�
Move the selection marker with
theæ orç button to the
LIGHT-
ING
submenu.
�
Press buttonj ork repeatedly
until you see this message in the multi-
function display:
LIGHTING CIRCUIT
HEADLAMP MODE.
The selection marker is on the current
setting.
�
Pressæ orç to select manual
or daytime running lamp (constant)
mode. This function is not available in
countries where daytime running
lamps are mandatory.
With daytime running lamp mode selected
and the exterior lamp switch at position0,
the following lamps will come on automat-
ically when the engine is turned on:
�
Parking lamps and low beam head-
lamps
�
License plate lamps (in low ambient
light conditions)
iThis function is not available in coun-
tries where the daytime running lamp
mode is mandatory and therefore in a
constant mode.
iIf you turn the exterior lamp switch to
another position, the corresponding
lamp(s) will switch on.
For safety reasons, resetting the LIGHTING
submenu to factory settings
(
�page 161) while driving will not re-
set the daytime running lamp mode.
In the multifunction display you will
then see the message:
LIGHTING
CANNOT BE
COMPLETELY RESET
TO FACTORY SETTINGS
WHILE DRIVING