Page 231 of 481

230 Controls in detailDriving systems1Indicator lamps
2Damping button�
Start the engine.
�
Press the damping button2 until the
desired suspension style is set.�
If both indicator lamps are out, you
have chosen the automatic mode
for soft damping. The message:AIRMATIC
CONVENIENCEfor Comfort suspension tuning ap-
pears in the multifunction display.
�
If one indicator lamp is on, the con-
trol system supports a primarily dy-
namic style of driving. The
message:AIRMATIC
SPORTS 1for Sporty 1 suspension tuning ap-
pears in the multifunction display.
�
If both indicator lamps are on, the
system is set for a dynamic style of
driving. The message:AIRMATIC
SPORTS 2for Sporty 2 suspension tuning ap-
pears in the multifunction display.Vehicle level control with Airmatic
Your vehicle automatically adjusts its ride
height to:
�
reduce fuel consumption
�
increase vehicle safety
The vehicle chassis ride height is raised or
lowered according to the selected level
setting and to the vehicle speed:
�
With increasing speed, ride height is re-
duced by up to approximately 0.8 in
(20 mm).
�
With decreasing speed, the ride height
is again raised to the selected vehicle
level.
iThe selected suspension style is stored
in memory, even after the SmartKey is
removed from the starter switch.
iThese height adjustments are so small
that you may not notice any change.
Page 233 of 481
*
The ABC system automatically selects the
optimum suspension tuning and ride
height for your vehicle.
Suspension tuning
The suspension")
232 Controls in detailDriving systemsActive Body Control (ABC)*
The ABC system automatically selects the
optimum suspension tuning and ride
height for your vehicle.
Suspension tuning
The suspension tuning is set according to:�
your driving style
�
road surface conditions
�
the vehicle loading
�
your choice of suspension style
You can set following suspension style:
�
regular (convenience)
�
sportyThe ABC button with the indicator lamps is
located on the upper part of the front cen-
ter console.
1Indicator lamp
2ABC button
�
Start the engine.
Suspension for sporty driving style
The setting for sporty driving is selected
when indicator lamp1 is illuminated.
�
Press button2.
Indicator lamp1 comes on.The message:
ACTIVE BODY CONTROL
ABC
SPORTSappears in the multifunction display for
a short time.
Suspension for regular driving style
The setting for regular driving is selected
when indicator lamp1 is off.
�
Press button2.
Indicator lamp1 goes out.
The message:ACTIVE BODY CONTROL
ABC
CONVENIENCEappears in the multifunction display for
a short time.
iThe selected setting is stored, even if
the engine is turned off.
Page 235 of 481
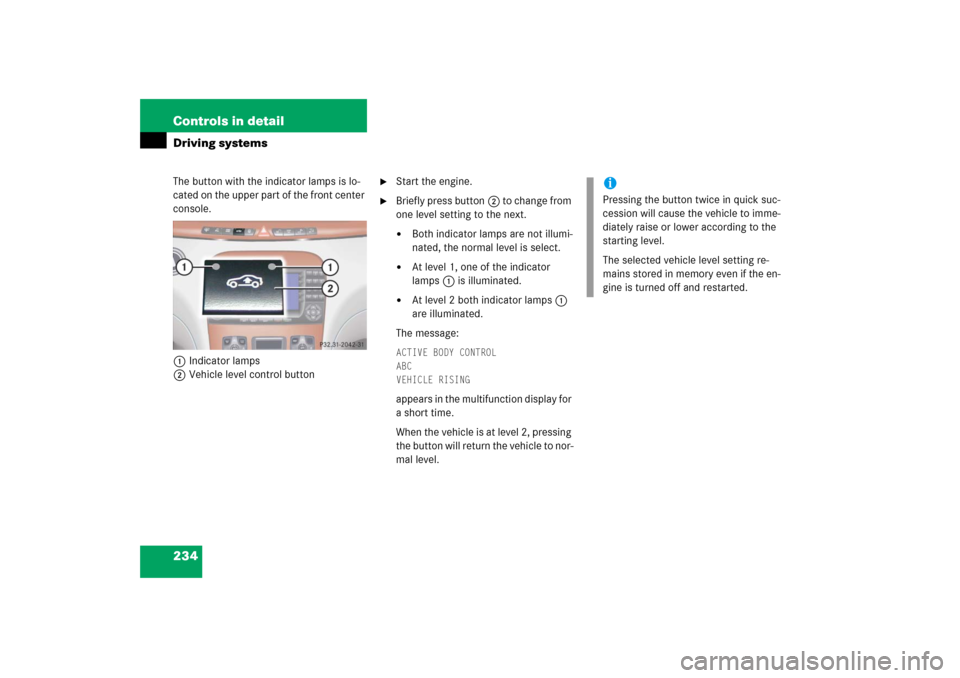
234 Controls in detailDriving systemsThe button with the indicator lamps is lo-
cated on the upper part of the front center
console.
1Indicator lamps
2Vehicle level control button
�
Start the engine.
�
Briefly press button2 to change from
one level setting to the next. �
Both indicator lamps are not illumi-
nated, the normal level is select.
�
At level 1, one of the indicator
lamps1 is illuminated.
�
At level 2 both indicator lamps1
are illuminated.
The message:
ACTIVE BODY CONTROL
ABC
VEHICLE RISINGappears in the multifunction display for
a short time.
When the vehicle is at level 2, pressing
the button will return the vehicle to nor-
mal level.
iPressing the button twice in quick suc-
cession will cause the vehicle to imme-
diately raise or lower according to the
starting level.
The selected vehicle level setting re-
mains stored in memory even if the en-
gine is turned off and restarted.
Page 239 of 481

238 Controls in detailDriving systemsSwitching the Parktronic system
on/off
The Parktronic system can be switched off
manually.
The Parktronic button is located in the up-
per part of the front center console.
1Indicator lamp
2Parktronic buttonSwitching off the Parktronic system
�
Press button 2.
Indicator lamp 1 comes on.
Switching on the Parktronic system
�
Press button 2 again.
Indicator lamp 1 goes out.
Parktronic system malfunction
If only the red distance segments illumi-
nate and an acoustic warning sounds,
there is a malfunction in the Parktronic
system. The Parktronic system will auto-
matically switch off after 20 seconds and
the indicator lamp in the Parktronic switch
comes on.
�
Have the Parktronic system checked
by an authorized Mercedes-Benz Cen-
ter as soon as possible.
If only the red distance segments illumi-
nate and no acoustic warning sounds, the
Parktronic system sensors are dirty or
there is an interference from other radio or
ultrasonic signals. The Parktronic system
will automatically switch off after 20 sec-
onds and the indicator lamp in the Park-
tronic switch comes on.
�
Switch off the ignition (
�page 34).
�
Clean Parktronic system sensors
(�page 335).
�
Switch on the ignition.
or
�
Check Parktronic system operation at
another location to rule out interfer-
ence from outside radio or ultrasonic
signals.
iThe Parktronic system is automatically
switched on when the ignition is
switched on (
�page 34).
Page 245 of 481
.
�
Lightly touch the chrome label on
pla")
244 Controls in detailUseful featuresStorage compartment in front of arm-
rest
1Storage compartment
Opening
The compartment contains a cup holder
(�page 248).
�
Lightly touch the chrome label on
plate1.
The cover opens automatically.
Closing
�
Lightly push cover plate1 up until it
engages.Storage compartment below the front
armrest
Depending on vehicle model and configu-
ration, your vehicle is equipped with a stor-
age compartment below the front armrest.
The storage compartment below the front
armrest is illuminated with the exterior
lamps switched on.
The buttons are located under the cushion
of the armrest.
1Button to open storage compartment
2Button to open storage trayOpening storage compartment
�
Press button1 and lift the armrest lid.iThe storage compartment can be heat-
ed or cooled.
The compartment can get very warm
due to its confined space. When storing
heat-sensitive objects in the compart-
ment, close the air vent (
�page 203)
while heating the passenger compart-
ment.
!Do not obstruct the air vent in the stor-
age compartment.
Page 246 of 481
245 Controls in detail
Useful features
Opening storage tray
The tray contains a coin holder.�
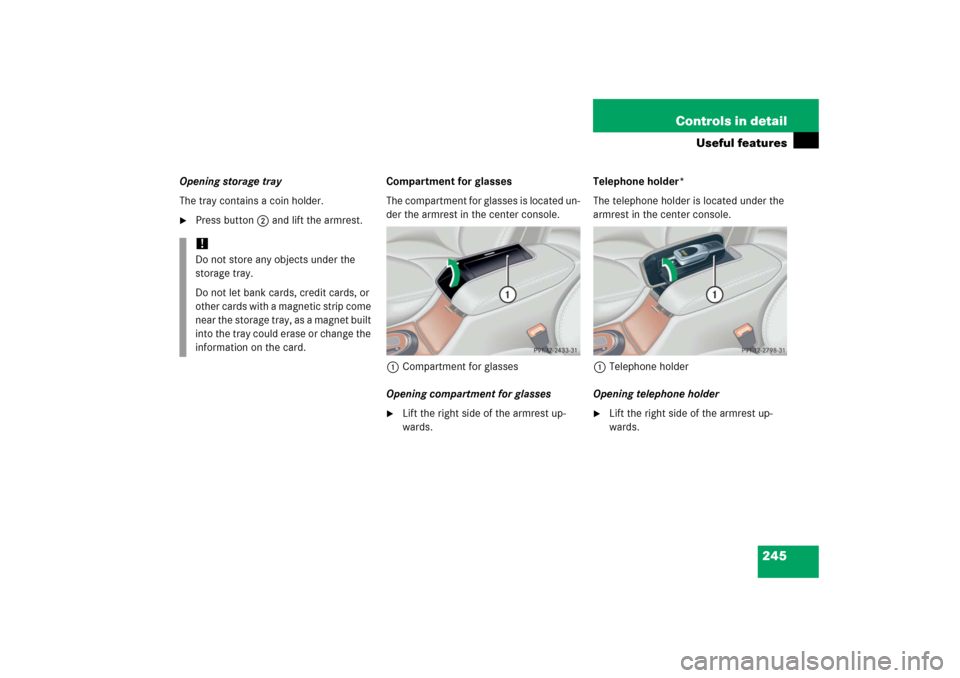
Press button2 and lift the armrest.Compartment for glasses
The compartment for glasses is located un-
der the armrest in the center console.
1Compartment for glasses
Opening compartment for glasses
�
Lift the right side of the armrest up-
wards.Telephone holder*
The telephone holder is located under the
armrest in the center console.
1Telephone holder
Opening telephone holder
�
Lift the right side of the armrest up-
wards.
!Do not store any objects under the
storage tray.
Do not let bank cards, credit cards, or
other cards with a magnetic strip come
near the storage tray, as a magnet built
into the tray could erase or change the
information on the card.
Page 248 of 481
247 Controls in detail
Useful features
Storage compartments under the front
seats
1Lid
2Buttons
Opening�
Press buttons2 together and fold
lid1 down.
Closing
�
Close lid1 until both buttons2 of
lock engage.Parcel net in front passenger footwell
A small convenience parcel net is located
in the front passenger footwell. It is for
small and light items, such as road maps,
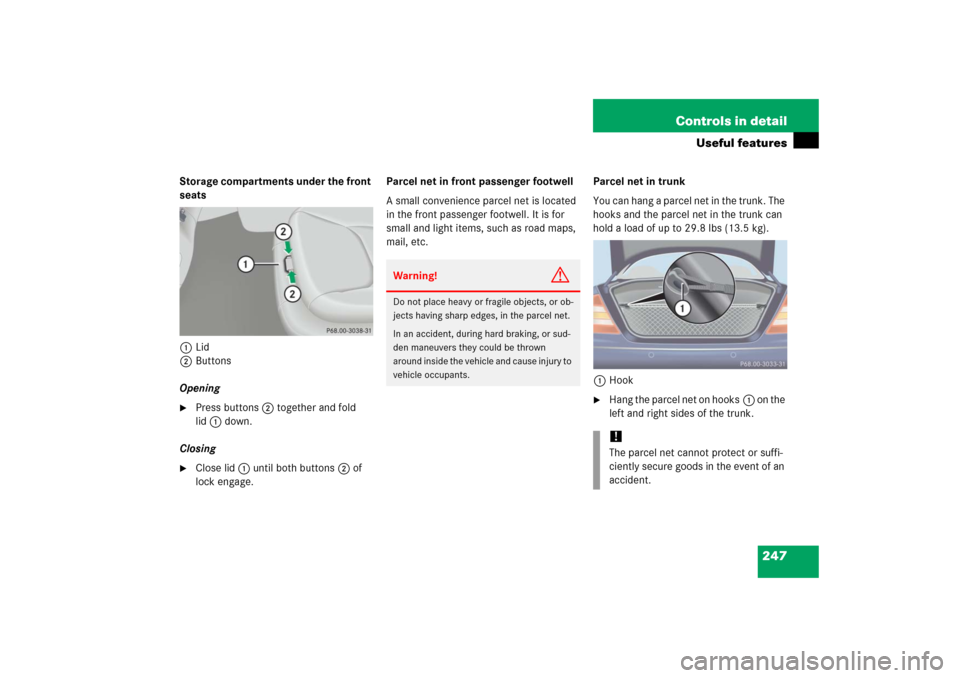
mail, etc.Parcel net in trunk
You can hang a parcel net in the trunk. The
hooks and the parcel net in the trunk can
hold a load of up to 29.8 lbs (13.5 kg).
1Hook
�
Hang the parcel net on hooks1 on the
left and right sides of the trunk.
Warning!
G
Do not place heavy or fragile objects, or ob-
jects having sharp edges, in the parcel net.
In an accident, during hard braking, or sud-
den maneuvers they could be thrown
around inside the vehicle and cause injury to
vehicle occupants.
!The parcel net cannot protect or suffi-
ciently secure goods in the event of an
accident.
Page 249 of 481

248 Controls in detailUseful featuresCup holders
Cup holder in front of seat armrestFolding out cup holder
The cup holder is located in the storage
compartment in front of the armrest.
1Button for folding out the cup holder
�
Open the storage compartment in front
of armrest (
�page 244).
�
Push button1.
The cup holder opens automatically.
Warning!
G
In order to help prevent spilling liquids on
vehicle occupants and/or vehicle equip-
ment, only use containers that fit into the
cup holder. Use lids on open containers and
do not fill containers to a height where the
contents, especially hot liquids, could spill
during braking, vehicle maneuvers, or in an
accident. Liquids spilled on vehicle occu-
pants may cause serious personal injury.
Liquids spilled on vehicle equipment may
cause damage not covered by the
Mercedes-Benz Limited Warranty.
When not in use, keep the cup holder
closed. An open cup holder may cause injury
to you or others when contacted during
braking, vehicle maneuvers, or in an acci-
dent.
Keep in mind that objects placed in the cup
holder may come loose during braking, vehi-
cle maneuvers, or in an accident and be
thrown around in the vehicle interior. Ob-
jects thrown around in the vehicle interior
may cause an accident and/or serious per-
sonal injury. !Only place containers with a maximum
diameter of 2
3/4in (72 mm) in the cup
holder. Larger containers could dam-
age the holder arm.