Page 358 of 481
357 Practical hints
What to do if …?
Display
Possible cause
Possible solution
MOVE SELECTOR LEVER
TO PARK
You have tried to turn off the engine with
the KEYLESS-GO* start/stop button
(�page 35) with the gear selector lever not
inP.
�
Place the gear selector lever in positionP.
PRE-SAFE INACTIVE
SEE OPERATORS MANUAL
If BAS or ESP
® malfunction messages are
displayed simultaneously, PRE-SAFE
® has
been deactivated as a result of these mal-
functions. All other occupant safety sys-
tems, such as the air bags, are still
available.
�
Visit an authorized Mercedes-Benz Center as
soon as possible.
PRE-SAFE
® itself has failed. All other occu-
pant safety systems, such as the air bags,
are still available.
�
Visit an authorized Mercedes-Benz Center as
soon as possible.
Page 369 of 481

368 Practical hintsWhat to do if …?Display
Possible cause
Possible solution
_
ENTRY POSITION
DO NOT DRIVE
Seat, exterior mirrors and steering wheel
have not yet moved to their preset driving
positions.
�
Wait until the seat, exterior mirrors and
steering wheel have moved to their driv-
ing positions.
The message will disappear.
Y
HOOD OPEN
You are driving with the hood open.
�
Close the hood (
�page 288).
I
REMOVE KEY
You have forgotten to remove the
SmartKey.
�
Remove the SmartKey from the starter
switch.
REPLACE KEY
DRIVE TO WORKSHOP
The SmartKey is malfunctioning.
�
Visit an authorized Mercedes-Benz Cen-
ter as soon as possible.
AUTOMATIC LIGHT ON
REMOVE KEY
SmartKey in starter switch position 1
or2.
�
Remove the SmartKey from the starter
switch.
KEY
CHECK BATTERY
The battery in the KEYLESS-GO* key is
discharged.
�
Replace the battery (
�page 392).
KEY
NOT RECOGNIZED
SmartKey with KEYLESS-GO* is not rec-
ognized while the engine is running be-
cause�
the SmartKey is not in the vehicle
�
there is strong radio-frequency inter-
ference
�
Stop the vehicle as soon as it is safe to do
so.
�
Search for the SmartKey.
Otherwise the vehicle cannot be centrally
locked nor can the engine be started again
after it has been stopped.
Page 370 of 481

369 Practical hints
What to do if …?
Display
Possible cause
Possible solution
F
KEY
NOT RECOGNIZED
The SmartKey with KEYLESS-GO* is mo-
mentarily not recognized.
�
Change the position of the SmartKey with
KEYLESS-GO* in the vehicle.
�
Operate the vehicle with the SmartKey in
the starter switch if necessary.
KEY
STILL IN VEHICLE
A SmartKey with KEYLESS-GO* left in the
vehicle was recognized while locking the
vehicle from the outside.
�
Take the SmartKey with KEYLESS-GO*
out of the vehicle.
KEY
DRIVE TO WORKSHOP
The KEYLESS-GO* system is malfunction-
ing.
�
Visit an authorized Mercedes-Benz Cen-
ter as soon as possible.
.
3RD BRAKE LIGHT
CHECK LIGHT
The high mounted brake lamp is malfunc-
tioning.
�
Visit an authorized Mercedes-Benz Cen-
ter as soon as possible.
STOP LIGHT
VISIT WORKSHOP
Brake lamp illumination is delayed or
lamp is permanently on.
�
Visit an authorized Mercedes-Benz Cen-
ter as soon as possible.
BRAKE LIGHT LEFT
CHECK LIGHT
SUBSTITUTE LAMP ON
The left brake lamp is malfunctioning. A
substitute bulb is being used.
�
Visit an authorized Mercedes-Benz Cen-
ter as soon as possible.
BRAKE LIGHT RIGHT
CHECK LIGHT
SUBSTITUTE LAMP ON
The right brake lamp is malfunctioning. A
substitute bulb is being used.
�
Visit an authorized Mercedes-Benz Cen-
ter as soon as possible.
DISPLAY DEFECTIVE
VISIT WORKSHOP
The display for the lamps or the system is
malfunctioning.
�
Visit an authorized Mercedes-Benz Cen-
ter as soon as possible.
Page 389 of 481
388 Practical hintsUnlocking/locking in an emergencyUnlocking the vehicle
If you are unable to unlock the vehicle with
the SmartKey or KEYLESS-GO*, open the
driver’s door and the trunk using the me-
chanical key. Removing the mechanical key
1Mechanical key locking tab
2Mechanical key
�
Move locking tab1 in the direction of
arrow.
�
Slide mechanical key2 out of the
housing.Unlocking the driver’s door
1Unlocking
�
Insert the mechanical key into the driv-
er’s door lock until it stops.
�
Turn the mechanical key counterclock-
wise to position1.
The driver’s door is unlocked.
iUnlocking the driver’s door and/or the
trunk with the mechanical key will trig-
ger the anti-theft alarm system.
To cancel the alarm, insert the
SmartKey or SmartKey with
KEYLESS-GO* in the starter switch.
Page 390 of 481
 is required to open the trunk lid.
The trunk lid lock is located next to the
ha")
389 Practical hints
Unlocking/locking in an emergency
Unlocking the trunk
A minimum height clearance of 6 ft.
(1.85 m) is required to open the trunk lid.
The trunk lid lock is located next to the
handle above the rear license plate recess.
1Unlocking and opening�
Insert the mechanical key into the
trunk lid lock until it stops.
�
Turn the mechanical key counterclock-
wise to position1.
The trunk opens.
�
Turn the mechanical key back and re-
move it from the trunk lid lock.
Locking the vehicle
If you cannot lock the vehicle with the
SmartKey or the SmartKey with
KEYLESS-GO*, do the following:�
Close the front passenger door, the
rear doors and the trunk lid.
�
Press the central locking switch in the
center console (
�page 113).
�
Check to see whether the locking
knobs on the doors have moved down.
�
If necessary, push them down manual-
ly.
Except for the driver’s door, the vehicle
should now be locked.
1Locking
�
Remove the mechanical key out of the
SmartKey (
�page 388).
�
Insert the mechanical key into the driv-
er’s door lock until it stops.
�
Turn the mechanical key clockwise to
position1.
The driver’s door is locked.
!The trunk lid swings open upwards au-
tomatically. Always make sure that
there is sufficient overhead clearance.
Page 393 of 481

392 Practical hintsReplacing SmartKey batteriesIf the batteries in the SmartKey or the
SmartKey with KEYLESS-GO* are dis-
charged, the vehicle can no longer be
locked or unlocked. It is recommended to
have the batteries replaced at an autho-
rized Mercedes-Benz Center.
Batteries contain materials that can harm
the environment if disposed of improperly.
Recycling of batteries is the preferred
method of disposal. Many states require
sellers of batteries to accept old batteries
for recycling.
SmartKey
Replacement batteries: Lithium, type
CR 2025 or equivalent.�
Remove the mechanical key out of the
SmartKey (
�page 388).1Mechanical key
2Slide
3Battery compartment
�
Insert mechanical key1 in the direc-
tion of arrow in side opening.
�
Using mechanical key1, push gray
slide 2 to unlatch battery compart-
ment 3.
�
Pull battery compartment3 out of the
housing in the direction of arrow.
Warning!
G
Batteries contain poisonous and corrosive
substances. Therefore keep the batteries
out of reach of children.
If a battery is swallowed, seek medical help
immediately.
iWhen inserting the batteries, make
sure they are clean and free of lint.iThe required replacement batteries are
available at any authorized
Mercedes-Benz Center.iWhen changing batteries, always re-
place both batteries.
Page 394 of 481

393 Practical hints
Replacing SmartKey batteries
4Battery
5Contact spring�
Remove the batteries4 in the direc-
tion of arrow.
�
Using a lint-free cloth, insert new
batteries4 under the contact
spring5 with the positive terminal (+)
side facing up.
�
Return battery compartment3
(�page 392) into housing until it locks
into place.
�
Slide mechanical key1 (
�page 388)
back into the SmartKey.
�
Check the operation of the SmartKey.
SmartKey with KEYLESS-GO*
Replacement battery: Lithium, type
CR 2025 or equivalent.�
Remove the mechanical key out of the
SmartKey with KEYLESS-GO
(�page 388).
�
Remove battery compartment3
(�page 392) out of the housing.
1Battery
2Tilt battery up
3Mechanical key
�
Using mechanical key3, apply pres-
sure to position2.
Battery1 tilts up slightly.
�
Pull out battery1 in the direction of
arrow.
�
Using a lint-free cloth, insert new
battery1 with the plus (+) side facing
up.
�
Return battery compartment3
(�page 392) into housing until it locks
into place.
�
Slide mechanical key1 (
�page 388)
back into the SmartKey with
KEYLESS-GO.
�
Check the operation of KEYLESS-GO.
Page 402 of 481
401 Practical hints
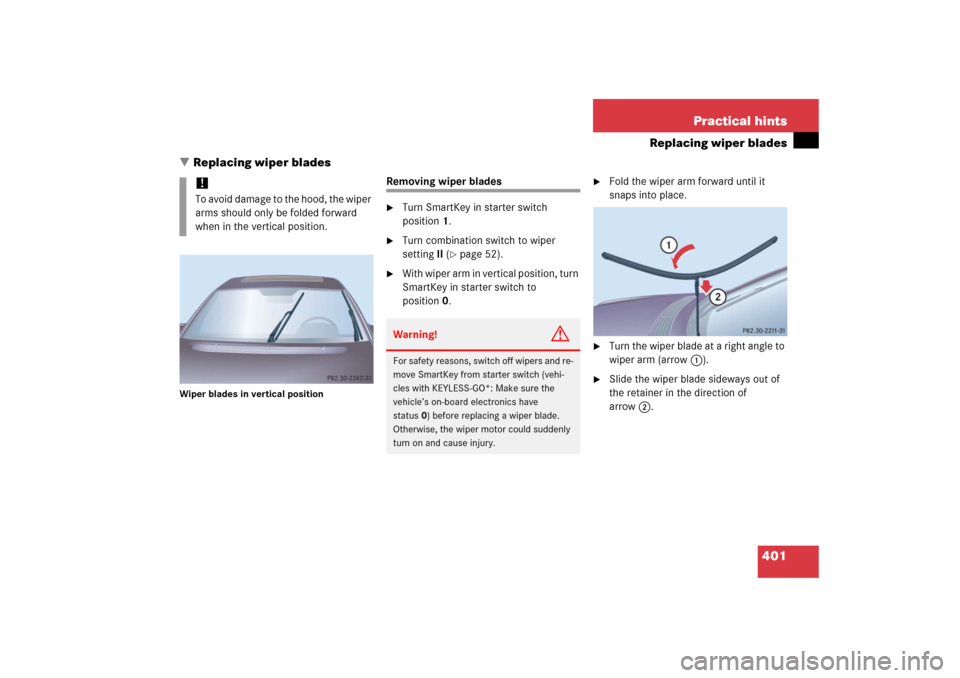
Replacing wiper blades
�Replacing wiper blades
Wiper blades in vertical position
Removing wiper blades�
Turn SmartKey in starter switch
position1.
�
Turn combination switch to wiper
settingII (
�page 52).
�
With wiper arm in vertical position, turn
SmartKey in starter switch to
position0.
�
Fold the wiper arm forward until it
snaps into place.
�
Turn the wiper blade at a right angle to
wiper arm (arrow 1).
�
Slide the wiper blade sideways out of
the retainer in the direction of
arrow2.
!To avoid damage to the hood, the wiper
arms should only be folded forward
when in the vertical position.
Warning!
G
For safety reasons, switch off wipers and re-
move SmartKey from starter switch (vehi-
cles with KEYLESS-GO*: Make sure the
vehicle’s on-board electronics have
status0) before replacing a wiper blade.
Otherwise, the wiper motor could suddenly
turn on and cause injury.