Page 204 of 481
.
The indicator lamp on buttonT
goes out.
The residual heat is automatically turned
off:
�
when the ignition")
203 Controls in detail
Automatic climate control
Deactivating�
Press buttonT (
�page 193).
The indicator lamp on buttonT
goes out.
The residual heat is automatically turned
off:
�
when the ignition is switched on
�
after approximately 30 minutes
(15 minutes when residual heat and
ventilation in the rear* are also
switched on)
�
if the battery voltage drops
Ventilated storage compartment
Depending on vehicle model and configu-
ration, your vehicle is equipped with a stor-
age compartment under the front armrest
(�page 244) which can be ventilated
when the automatic air conditioning is
switched on. If so equipped, the switch is
located inside the storage compartment in
the front. The air temperature is about the
same as that of the center air vents.
The air volume is dependent on the setting
of:
�
air distribution control
�
air volume control
�
air vents in the dashboard
The air temperature is about the same as
that of the dashboard air vents. It cannot
be regulated separately.Switching ventilation on
�
Open the storage compartment in front
of the armrest, see “Storage compart-
ment in front of armrest” (
�page 244).
�
Push upper portion of switch.
Switching ventilation off
�
Open the storage compartment in front
of the armrest, see “Storage compart-
ment in front of armrest” (
�page 244).
�
Push lower portion of switch.
iHow long the system will provide heat-
ing depends on the coolant tempera-
ture and the temperature set by the
operator. The blower will run at speed
setting 1 regardless of the air distribu-
tion control setting.
!Do not obstruct the air vent in the stor-
age compartment.iThe compartment can get very warm
due to its confined space. When storing
heat sensitive objects in the compart-
ment, close the air vent while heating
the passenger compartment.
Page 245 of 481
.
�
Lightly touch the chrome label on
pla")
244 Controls in detailUseful featuresStorage compartment in front of arm-
rest
1Storage compartment
Opening
The compartment contains a cup holder
(�page 248).
�
Lightly touch the chrome label on
plate1.
The cover opens automatically.
Closing
�
Lightly push cover plate1 up until it
engages.Storage compartment below the front
armrest
Depending on vehicle model and configu-
ration, your vehicle is equipped with a stor-
age compartment below the front armrest.
The storage compartment below the front
armrest is illuminated with the exterior
lamps switched on.
The buttons are located under the cushion
of the armrest.
1Button to open storage compartment
2Button to open storage trayOpening storage compartment
�
Press button1 and lift the armrest lid.iThe storage compartment can be heat-
ed or cooled.
The compartment can get very warm
due to its confined space. When storing
heat-sensitive objects in the compart-
ment, close the air vent (
�page 203)
while heating the passenger compart-
ment.
!Do not obstruct the air vent in the stor-
age compartment.
Page 246 of 481
245 Controls in detail
Useful features
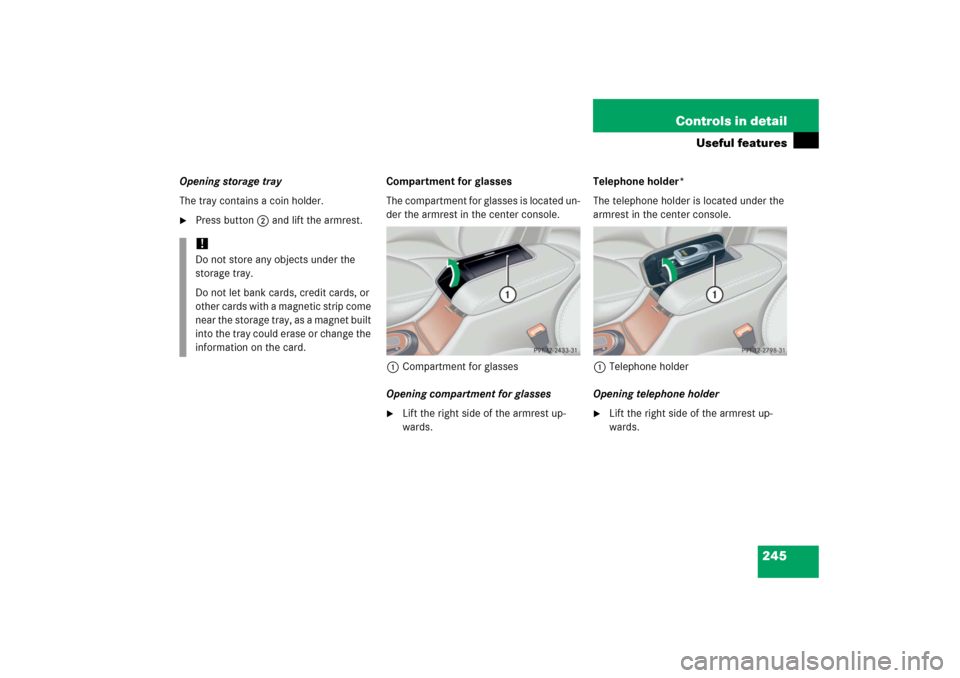
Opening storage tray
The tray contains a coin holder.�
Press button2 and lift the armrest.Compartment for glasses
The compartment for glasses is located un-
der the armrest in the center console.
1Compartment for glasses
Opening compartment for glasses
�
Lift the right side of the armrest up-
wards.Telephone holder*
The telephone holder is located under the
armrest in the center console.
1Telephone holder
Opening telephone holder
�
Lift the right side of the armrest up-
wards.
!Do not store any objects under the
storage tray.
Do not let bank cards, credit cards, or
other cards with a magnetic strip come
near the storage tray, as a magnet built
into the tray could erase or change the
information on the card.
Page 247 of 481
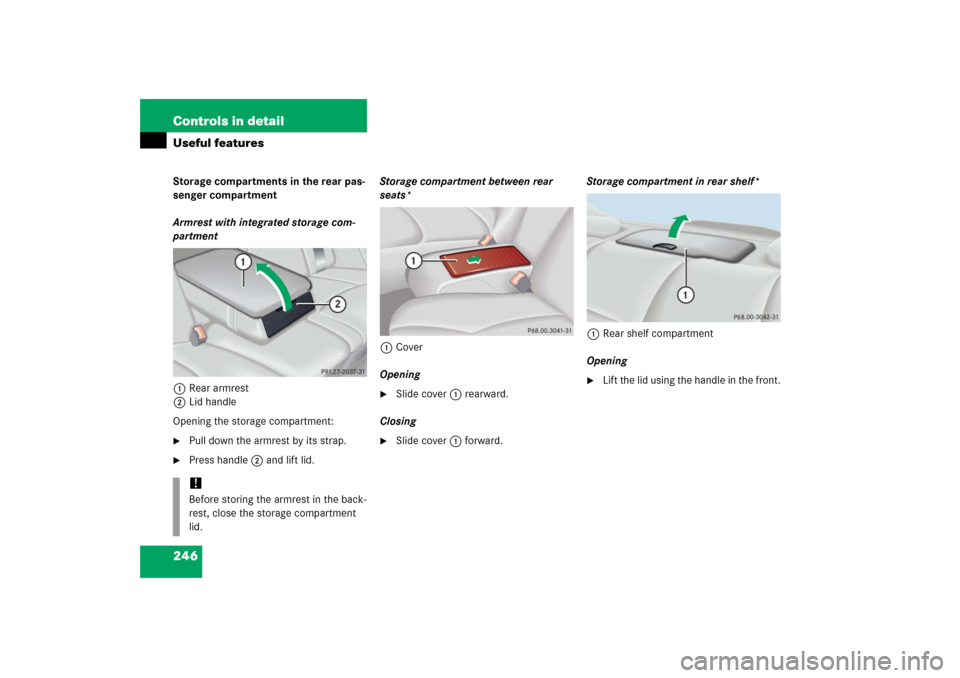
246 Controls in detailUseful featuresStorage compartments in the rear pas-
senger compartment
Armrest with integrated storage com-
partment
1Rear armrest
2Lid handle
Opening the storage compartment:�
Pull down the armrest by its strap.
�
Press handle2 and lift lid.Storage compartment between rear
seats*
1Cover
Opening
�
Slide cover1 rearward.
Closing
�
Slide cover1 forward.Storage compartment in rear shelf*
1Rear shelf compartment
Opening
�
Lift the lid using the handle in the front.
!Before storing the armrest in the back-
rest, close the storage compartment
lid.
Page 249 of 481

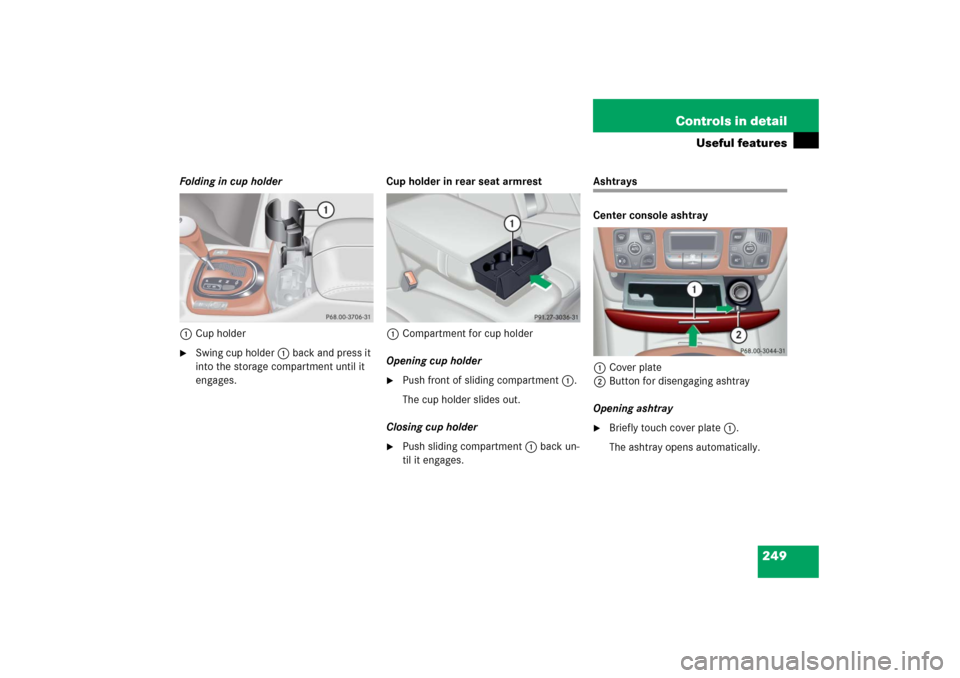
248 Controls in detailUseful featuresCup holders
Cup holder in front of seat armrestFolding out cup holder
The cup holder is located in the storage
compartment in front of the armrest.
1Button for folding out the cup holder
�
Open the storage compartment in front
of armrest (
�page 244).
�
Push button1.
The cup holder opens automatically.
Warning!
G
In order to help prevent spilling liquids on
vehicle occupants and/or vehicle equip-
ment, only use containers that fit into the
cup holder. Use lids on open containers and
do not fill containers to a height where the
contents, especially hot liquids, could spill
during braking, vehicle maneuvers, or in an
accident. Liquids spilled on vehicle occu-
pants may cause serious personal injury.
Liquids spilled on vehicle equipment may
cause damage not covered by the
Mercedes-Benz Limited Warranty.
When not in use, keep the cup holder
closed. An open cup holder may cause injury
to you or others when contacted during
braking, vehicle maneuvers, or in an acci-
dent.
Keep in mind that objects placed in the cup
holder may come loose during braking, vehi-
cle maneuvers, or in an accident and be
thrown around in the vehicle interior. Ob-
jects thrown around in the vehicle interior
may cause an accident and/or serious per-
sonal injury. !Only place containers with a maximum
diameter of 2
3/4in (72 mm) in the cup
holder. Larger containers could dam-
age the holder arm.
Page 250 of 481
249 Controls in detail
Useful features
Folding in cup holder
1Cup holder�
Swing cup holder1 back and press it
into the storage compartment until it
engages.Cup holder in rear seat armrest
1Compartment for cup holder
Opening cup holder
�
Push front of sliding compartment1.
The cup holder slides out.
Closing cup holder
�
Push sliding compartment1 back un-
til it engages.
Ashtrays
Center console ashtray
1Cover plate
2Button for disengaging ashtray
Opening ashtray�
Briefly touch cover plate1.
The ashtray opens automatically.
Page 255 of 481

The Tele Aid system consists of three
types of response:
�
automatic and manual emer")
254 Controls in detailUseful featuresTele Aid
The Tele Aid system
(Tele
matic A
larm I
dentification on D
e-
mand)
The Tele Aid system consists of three
types of response:
�
automatic and manual emergency
�
roadside assistance, and
�
informationThe Tele Aid system is operational provid-
ing that the vehicle’s battery is charged,
properly connected, not damaged and cel-
lular and GPS coverage is available.
The speaker volume of a Tele Aid call can
be adjusted when using the volume control
on the multifunction steering wheel. To
raise, press buttonæ and to lower,
press buttonç or use the volume knob
on your COMAND head unit.
�
To activate, press the SOS button, the
Roadside Assistance button• or
the Information button¡, depend-
ing on the type of response required.Shortly after the completion of your
Tele Aid acquaintance call, you will receive
a user ID and password. By visiting
www.mbusa.com and selecting “Tele Aid”
(USA only), you will have access to account
information, remote door unlock and
more.
!The initial activation of the Tele Aid sys-
tem may only be performed by com-
pleting the subscriber agreement and
placing an acquaintance call using the
Information button¡. Failure to
complete either of these steps will re-
sult in a system that is not activated.
If you have any questions regarding ac-
tivation, please call the Response Cen-
ter at 1-800-756-9018 (in the USA) or
1-888-923-8367 (in Canada).
iThe SOS button is located above the in-
terior rear view mirror.
The Roadside Assistance button•
and the Information button¡ are
located below the center armrest cov-
er.
iThe Tele Aid system utilizes the cellular
network for communication and the
GPS (Global Positioning System) satel-
lites for vehicle location. If either of
these signals are unavailable, the
Tele Aid system may not function and if
this occurs, assistance must be sum-
moned by other means.
Page 258 of 481

257 Controls in detail
Useful features
�
Wait for a voice connection to the
Response Center.
�
Close cover2 after the emergency
call is concluded.Roadside Assistance button• and
Information button¡
The Roadside Assistance button• and
the Information button¡ are located in
the storage compartment below the front
armrest (
�page 244).
1Information button¡
2Roadside Assistance button•Roadside Assistance button•
�
Press and hold the button • (for
longer than two seconds).
A call to a Mercedes-Benz Roadside As-
sistance dispatcher will be initiated.
The button will flash while the call is in
progress. The message:
CONNECTING
CALL
will appear in the multifunction
display and the audio system is muted.
When the connection is established, the
message: CALL CONNECTED
appears in the
multifunction display. The Tele Aid system
will transmit data generating the vehicle
identification number, model, color and lo-
cation (subject to availability of cellular
and GPS signals).
Warning!
G
If you feel at any way in jeopardy when in the
vehicle (e.g. smoke or fire in the vehicle, ve-
hicle in a dangerous road location), please
do not wait for voice contact after you have
pressed the emergency button. Carefully
leave the vehicle and move to a safe loca-
tion. The Response Center will automatically
contact local emergency officials with the
vehicle’s approximate location if they re-
ceive an automatic SOS signal and cannot
make voice contact with the vehicle occu-
pants.