Page 396 of 481
395 Practical hints
Replacing bulbs
Bulbs Front lamps Rear lamps
Lamp
Type
1
Additional turn signal
lamp
LED
2
Halogen headlamp:
Low beam
H7-55 W
Bi-Xenon* headlamp:
Low and high beam
1
1Vehicles with Bi-Xenon headlamps*: Low beam
and high beam use the same D2S-35W lamp. Do
not replace the Bi-Xenon bulbs yourself. See an au-
thorized Mercedes-Benz Center.
D2S-35 W
3
Turn signal lamp
2357 A
4
Fog lamp
H7-55 W
5
Parking and standing
lamp
W5W
6
Side marker lamp
W5W
7
Halogen headlamp:
High beam/high beam
flasher lamp
H7-55 W
Bi-Xenon* headlamp:
High beam flasher
H7-55 W
Lamp
Type
8
Brake lamp
LED
9
Turn signal lamp
PY 21 W
a
Tail and standing lamp,
side marker
P 21/4 W
b
Backup lamp
P21W
c
License plate lamp
C5W
d
Tail lamp, rear fog lamp
(driver’s side only)
P 21/4 W
e
High mounted brake
lamp
LED
Page 398 of 481
397 Practical hints
Replacing bulbs
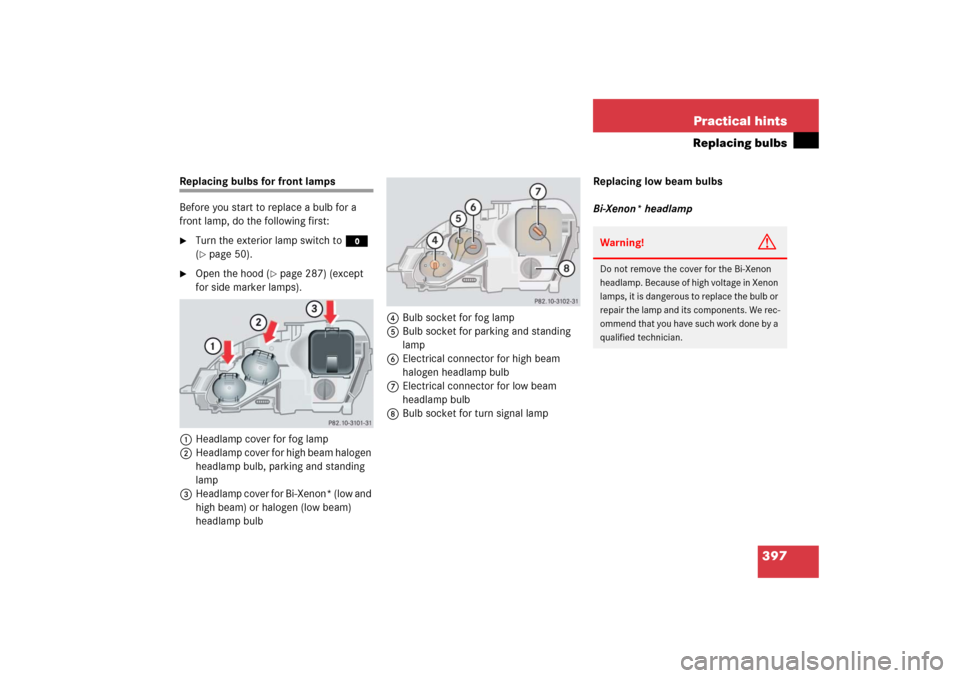
Replacing bulbs for front lamps
Before you start to replace a bulb for a
front lamp, do the following first:�
Turn the exterior lamp switch to M
(�page 50).
�
Open the hood (
�page 287) (except
for side marker lamps).
1Headlamp cover for fog lamp
2Headlamp cover for high beam halogen
headlamp bulb, parking and standing
lamp
3Headlamp cover for Bi-Xenon* (low and
high beam) or halogen (low beam)
headlamp bulb4Bulb socket for fog lamp
5Bulb socket for parking and standing
lamp
6Electrical connector for high beam
halogen headlamp bulb
7Electrical connector for low beam
headlamp bulb
8Bulb socket for turn signal lampReplacing low beam bulbs
Bi-Xenon* headlamp
Warning!
G
Do not remove the cover for the Bi-Xenon
headlamp. Because of high voltage in Xenon
lamps, it is dangerous to replace the bulb or
repair the lamp and its components. We rec-
ommend that you have such work done by a
qualified technician.
Page 399 of 481

398 Practical hintsReplacing bulbsHalogen headlamp�
Press the tab on cover3 and remove
cover.
�
Pull connector7 off of the lamp.
�
Release the retaining springs and take
out the bulb.
�
Insert the new bulb in the socket so
that the base is in the recess on the
lower left.
�
Attach the retaining springs.
�
Insert connector7 into the bulb.
�
Press cover3 onto the housing until
the tab engages.Replacing halogen high beam bulbs
�
Press the tab on cover2 and remove
cover.
�
Pull connector 6 off of the bulb.
�
Apply pressure on the bulb contacts
from above until the bulb releases from
the retaining springs.
�
Remove bulb.
�
Insert the new bulb in the socket with
the marking facing upward.
�
Press the bulb upward on the contacts
until it engages in the retaining springs.
�
Insert connector6 onto the bulb.
�
Press cover2 onto the housing until
the tab engages.Front turn signal lamp bulb
�
Turn bulb socket8 counterclockwise
and pull out.
�
Gently push bulb into socket, turn
counterclockwise and remove.
�
Insert new bulb in socket, push in and
twist clockwise.
�
Reinstall bulb socket in lamp and twist
clockwise until it engages.
Page 445 of 481

System for potentially reducing braking
distances in emergency braking situa-
tions. The system is activated when it
senses an emergency based on how")
444 Technical termsBAS
(B
rake A
ssist S
ystem)
System for potentially reducing braking
distances in emergency braking situa-
tions. The system is activated when it
senses an emergency based on how
fast the brake is applied.
Bead
(
�page 323)
Bi-xenon headlamps
Headlamps which use an electric arc as
the light source and produce a more in-
tense light than filament headlamps.
Bi-xenon headlamps produce low beam
and high beam.
CAC
(Customer A
ssistance C
enter)
Mercedes-Benz customer service cen-
ter, which can help you with any ques-
tions about your vehicle and provide
assistance in the event of a break-
down.CAN system
(C
ontroller A
rea N
etwork)
Data bus network serving to control ve-
hicle functions such as door locking or
windshield wiping.
Cockpit
All instruments, switches, buttons and
indicator/warning lamps in the passen-
ger compartment needed for vehicle
operation and monitoring.
Cold tire inflation pressure
(
�page 323)
COMAND
(Cockpit M
anagement and D
ata Sys-
tem)
Information and operating center for
vehicle sound and communications
systems, including the radio and navi-
gation system, as well as other optional
equipment (CD changer, telephone,
etc.).Control system
The control system is used to call up
vehicle information and to change
component settings. Information and
messages appear in the multifunction
display. The driver uses the buttons on
the multifunction steering wheel to
navigate through the system and to ad-
just settings.
Cruise control
Driving convenience system that auto-
matically maintains the vehicle speed
set by the driver.
Curb weight
(
�page 323)
Page 455 of 481

454 IndexBulbs, replacing 394
Additional turn signals 395
Backup lamps 395
Brake lamps 395
Fog lamps 395
Front lamps 395
High beam 395
High mounted brake lamp 395
License plate lamps 395, 400
Low beam 395
Parking and standing lamps 395
Parking lamps 395, 399
Rear fog lamp 395, 400
Rear fog lamps 399
Side marker lamps 395, 399
Standing lamps 395, 399
Tail lamp assemblies 395
Tail lamp unit 400
Turn signal lamps 395
C
CAC (Customer Assistance Center) 444
Call priority
Tele Aid 260Calling up
Distronic* settings 156
Maintenance service indicator 330
Range (distance to empty) 158
CAN system 444
Canceling
Cruise control 216
Cargo tie-down hooks 240
Catalytic converter 282
CD changer* 151
CD mode 151
CD operation
Selecting tracks 150
Center console 27
Air bag off indicator lamp 348
Front passenger front air bag off indica-
tor lamp 348
Lighter 250
Centigrade (°C)
Setting temperature units 163
Central locking
Automatic 112
From inside 113
Switch 113Switching on/off (control
system) 168
Unlocking from inside 113
Change of address or ownership 12
Changing
CDs 151
SmartKey setting 169
Vehicle level 231, 234
Charcoal filter 200
Activating 200
Deactivating 200
Charging
Vehicle battery 409
Checking
Brake fluid 285
Coolant level 294
Oil level 286, 288
Oil level via control system 289
Tire inflate pressure 286
Vehicle lighting 286
Child safety 71
Air bags 62
Infant and child restraint systems 71
LATCH child seat anchors 75
Cigarette lighter 250
Page 456 of 481

455 Index
Cleaning
Cup holder 337
Distronic* system sensor cover 335
Engine 334
Gear selector lever 337
Hard plastic trim items 337
Headlamps 186
Headliner and shelf below rear
window 337
Instrument cluster 337
Leather upholstery 338
Light alloy wheels 337
Ornamental moldings 334
Paintwork 333
Parktronic* system sensor 335
Plastic and rubber parts 338
Seat belts 337
Steering wheel 337
Upholstery 338
Windows 336
Windshield 53
Wiper blades 335
Wood trims 338
Cleaning tires 299
Clock 25Closing 58
Cup holder 249
Glove box 243
Hood 288
Power tilt/sliding sunroof 212
Power windows 208, 209
Side windows 209
Trunk 105
Closing from the inside automatically*
Trunk 105
Closing in an emergency
Power tilt/sliding sunroof 391
Cockpit 22, 444
Cockpit management and data system
(COMAND) 444
Cold tire inflation pressure 323
COMAND 444
COMAND* see separate operating instruc-
tions
Combination switch 135
High beam 50
High beam flasher 135
Turn signals 51
Windshield wipers 52Control and operation of radio
transmitters 281
Control system 143, 444
AUDIO menu 148
Checking oil level 289
Convenience submenu 169
Display digital speedometer 148
Distronic* menu 156
Functions 145, 147
Instrument cluster submenu 163
Lighting submenu 164
Menus 146, 147
Multifunction display 143
Multifunction steering wheel 144
NAVI menu 155
Settings menu 160
Standard display menu 148
Submenus 145, 147
TEL* menu 153
Trip computer menu 157
Vehicle status message memory
menu 159
Vehicle submenu 168
Page 464 of 481

463 Index
Lighter see Cigarette lighter 250
Lighting 131
Automatic headlamp mode 132
Combination switch 135
Courtesy lighting 139
Daytime running lamp mode 133
Door entry lamps 139
Exterior lamp switch 131
Front fog lamps 134
High beam flasher 135
High beams 135
Instrument cluster illumination 140
Interior 137
Locator lighting 133
Low beam 131
Manual headlamp mode 132
Night security illumination 133
Parking lamps 131
Rear fog lamp 134
Settings (control system) 164
Trunk 138, 139
Limiting opening height of trunk lid* 105
Limiting the gear range 178Limp Home Mode 185
Line of fall 446
Loading 239
Cargo tie-down hooks 240
Instructions 240
Roof rack 239
Loading terminology 323
Loading the vehicle 300
Locator lighting 133
Setting 166
Lock button 446
Door handle (KEYLESS-GO*) 58
SmartKey 92
SmartKey with KEYLESS-GO* 96
Locking 55, 58, 92
Fuel filler flap 284
Global (SmartKey with
KEYLESS-GO*) 99
Global, SmartKey 94
Glove box 242
Vehicle in an emergency 389
Vehicle with KEYLESS-GO* 101
with the KEYLESS-GO* 58with the SmartKey 58
Locking knob 446
Loss of SmartKey 96
Loss of Smartkey with
KEYLESS-GO* 102
Low beam headlamps
Messages in display 370, 371
Replacing bulbs 395
Lowering
Vehicle 407
Lumbar support adjustment 122
M
Main Dimensions 433
Maintenance 12, 329
Maintenance service
Calling up the maintenance service
indicator 330
Overdue 330
Maintenance service indicator
Calling up 330
Clearing 330
Resetting 331