Page 463 of 561

462 Practical hintsOpening / closing in an emergencyPower tilt/sliding sunroof*
You can open or close the tilt/sliding
sunroof manually should an electrical
malfunction occur.
The tilt/sliding sunroof drive is located
behind a cover on the overhead control
panel.
1Cover�
Remove the SmartKey from the starter
switch.Vehicles with KEYLESS-GO*:
�
Turn off the engine by pressing the
KEYLESS-GO start/stop button
(�page 66).
�
Open the driver’s door (this puts
the starter switch to position0,
same as with the SmartKey re-
moved from starter switch). The
driver’s door can then be closed
again.
�
Press on cover1 at the position indi-
cated by the arrow.
�
Take off cover 1.
2Crank
�
Take crank 2 out of the Operator’s
Manual pouch.
�
Insert crank2 into hole.
�
Turn crank2 clockwise to�
slide sunroof closed
�
raise sunroof at the rear
�
Turn crank2 counterclockwise to�
slide sunroof open
�
lower sunroof at the rear
iTurn crank2 slowly and smoothly.
The tilt/sliding sunroof must be syn-
chronized if it has been operated man-
ually (
�page 258).
iThe panorama roof with power
tilt/sliding panel* cannot be operated
as described. Contact an authorized
Mercedes-Benz Light Truck Center.
Page 484 of 561
.1Flap
2On/off switch
3Electrical plug
4Air hose with pre")
483 Practical hints
Flat tire
Inflating the collapsible tire�
Take the electric air pump out of the
vehicle tool kit storage well
(�page 454).1Flap
2On/off switch
3Electrical plug
4Air hose with pressure gauge and vent
screw
5Union nut
�
Open flap 1 on electric air pump.
�
Pull out electrical plug 3 and air hose
with pressure gauge 4.
�
Remove the valve cap from the collaps-
ible tire valve.
�
Screw union nut 5 onto the collaps-
ible tire valve.
�
Insert electrical plug 3 into a power
outlet (
�page 306).
�
Turn the SmartKey in the starter switch
to position1.
or
�
Vehicles with KEYLESS-GO*:
Press the KEYLESS-GO start/stop
button once without depressing the
brake pedal.
�
Press I on electric air pump switch 2.
The electric air pump should now
switch on and inflate the collapsible
tire.
Warning!
G
Inflate collapsible tire only after the wheel is
properly mounted.
Inflate the collapsible tire using the electric
air pump (
�page 454) before
lowering the
vehicle.
Warning!
G
Observe instructions on air pump label.!Do not lower the vehicle before inflat-
ing the collapsible tire. Otherwise the
rim may be damaged.
!The cigarette lighter* (
�page 303) is
not designed for use with the electric
air pump. Use a power outlet
(
�page 306) for electric air pump
operation.
��
Page 485 of 561
.
This takes about 5 minutes for the col-")
484 Practical hintsFlat tire�
Inflate the spare wheel tire to the rec-
ommended tire inflation pressure given
in the “Technical data” section
(�page 514).
This takes about 5 minutes for the col-
lapsible tire.
�
Press 0 on electric air pump switch 2.
�
Turn the SmartKey in the starter switch
to position0.
or
�
Vehicles with KEYLESS-GO*:
Press the KEYLESS-GO start/stop
button twice without depressing the
brake pedal.
�
If the tire inflation pressure is above
the recommended tire inflation pres-
sure given in this Operator’s Manual,
release excess tire inflation pressure
using the vent screw.
Warning!
G
Air hose
4
and union nut
5
can become
hot during inflation. Exercise proper caution
to avoid burning yourself when using the
equipment.
!Please compare the recommended tire
inflation pressure for your vehicle with
the tire inflation pressure on the yellow
label located on the spare wheel rim.
If the tire inflation pressure on the yel-
low label on the spare wheel rim differs
from the values given in this Operator’s
Manual, inflate the tire to the recom-
mended tire inflation pressure given on
the yellow label on the spare wheel rim.!Do not operate the electric air pump
longer than 8 minutes without interrup-
tion. Otherwise it may overheat.
You may operate the electric air pump
again after it has cooled off.
��
Page 491 of 561

�
Set the automatic position to P
(�page 199).
�
Firmly depress the parking brake
(�page 65).
�
Turn off the engine (
�page 66).
�
Leave the ignition")
490 Practical hintsBatteryStep 1 (Disconnecting)
�
Set the automatic position to P
(�page 199).
�
Firmly depress the parking brake
(�page 65).
�
Turn off the engine (
�page 66).
�
Leave the ignition switched on
(�page 38).
�
Switch off all electrical consumers.
�
Read and observe safety instructions
and precautions (
�page 487).
�
Open the front passenger door.
�
Move the front passenger seat to the
most rearward position (
�page 43).Step 2 (Disconnecting)
1Seat rail covers, front right
2Seat rail covers, front left
�
Pull off right seat rail cover 1 in direc-
tion of arrow.
�
Pull left seat rail cover 2 in direction
of arrow as far as it will go.
Left seat rail cover 2 cannot be re-
moved.
iWith a disconnected battery you will no
longer be able to turn the SmartKey in
the starter switch and pressing the
KEYLESS-GO* start/stop button will
have no effect.iIf your battery is discharged, the vehi-
cle must be jump started (
�page 496)
using the jump start contacts in the
engine compartment, or an accessory
battery charge unit* approved by
Mercedes-Benz must be connected
using the jump start contacts in the
engine compartment (see separate
instructions for the accessory battery
charge unit*) before any of the follow-
ing steps can be performed. If the bat-
tery cannot be jumped or charged,
please contact an authorized
Mercedes-Benz Light Truck Center.
iOpen doors only when conditions are
safe to do so.
Page 492 of 561
491 Practical hints
Battery
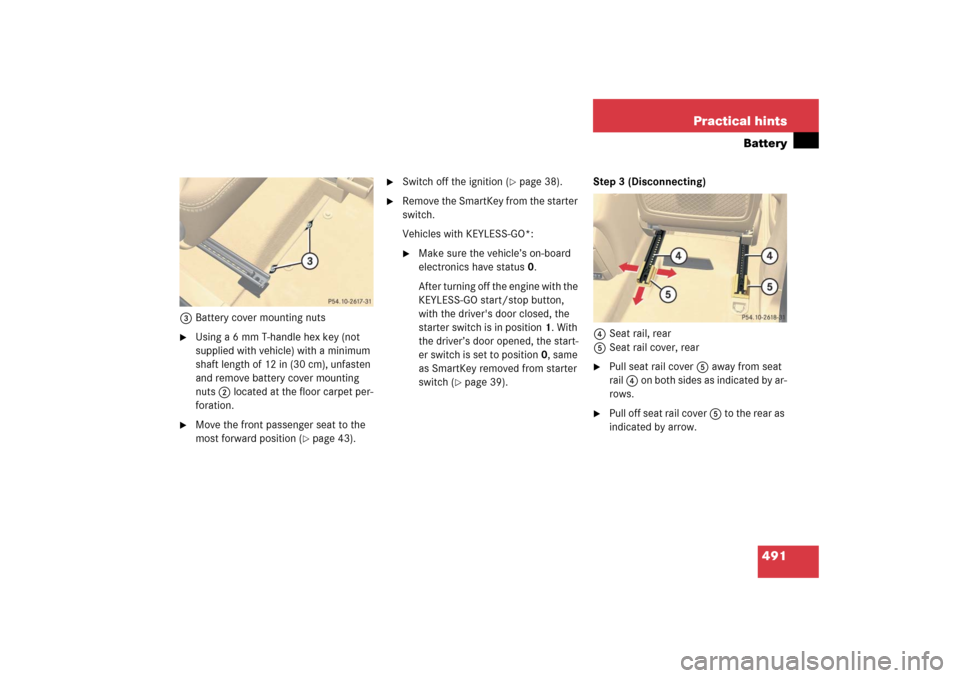
3Battery cover mounting nuts�
Using a 6 mm T-handle hex key (not
supplied with vehicle) with a minimum
shaft length of 12 in (30 cm), unfasten
and remove battery cover mounting
nuts 2 located at the floor carpet per-
foration.
�
Move the front passenger seat to the
most forward position (
�page 43).
�
Switch off the ignition (
�page 38).
�
Remove the SmartKey from the starter
switch.
Vehicles with KEYLESS-GO*:�
Make sure the vehicle’s on-board
electronics have status 0.
After turning off the engine with the
KEYLESS-GO start/stop button,
with the driver's door closed, the
starter switch is in position1. With
the driver’s door opened, the start-
er switch is set to position0, same
as SmartKey removed from starter
switch (
�page 39).Step 3 (Disconnecting)
4Seat rail, rear
5Seat rail cover, rear
�
Pull seat rail cover 5 away from seat
rail 4 on both sides as indicated by ar-
rows.
�
Pull off seat rail cover 5 to the rear as
indicated by arrow.
Page 542 of 561
 250
Opening 248
Opening fully (Express-open) 250
Stopping 250
Synchronizing 251
Doors
Message in display 436
Opening from inside vehicle 121
Opening")
541 Index
Closing 248
Closing fully (Express-close) 250
Opening 248
Opening fully (Express-open) 250
Stopping 250
Synchronizing 251
Doors
Message in display 436
Opening from inside vehicle 121
Opening from outside 112
DOT 386, 530
Downhill driving
Cruise control 265
Drinking and driving 331
Drive sensibly-save fuel 331
Driving 50, 56
Abroad 339
In winter 337
Problems 62
Safety systems 97
Through standing water 338
Driving abroad 339
Driving off 333Driving safety systems
4-ETS 102
ABS 97
BAS 99
EBP 102
ESP
®
99
Driving systems 264
AIRMATIC* 269
Cruise control 264
Driving safety systems 97
Parktronic* 274
Driving tips 203
Accelerator position 203
Kickdown 203
E
Easy-entry/exit feature* 132
Activating 189
EBP 102
Electrical fuses 503
Electrical system
Technical data 518
Electronic Brake Proportioning see EBP
Electronic Stability Program see ESP
®
Electronic Traction System see 4-ETSEmergency calls
Initiating an emergency call 314
With Tele Aid* 313
Emergency operation (Limp Home
Mode) 207
Emergency operations
Closing tilt/sliding sunroof* 462
Locking the vehicle 460
Opening tilt/sliding sunroof* 462
Remote door unlock 319
Unlocking the vehicle 459
Emergency tensioning device see ETD
Emission control 340
Emission control label 511
Ending
A call (telephone*) 195
Engine
Message in the display 433
Starting 53
Starting with KEYLESS-GO* 54
Technical data 513
Turning off 66
Engine cleaning 397
Engine compartment
Hood 345
Main fuse box 504
Page 553 of 561
 182
Menus and submenus 163
Resetting all (control system) 175
Resetting in the sub")
552 IndexSetting current speed 265
Settings
Convenience functions 189
Factory, SmartKey 112
Lighting (control system) 182
Menus and submenus 163
Resetting all (control system) 175
Resetting in the submenu 176
Selective 112, 118
Settings menu
Individual vehicle settings 174
Submenus 176
Shifting
Gear selector lever positions 200
Into optimal gear range (automatic
transmission) 207
Side impact air bags 76
Side marker lamps
Cleaning lenses 399
Side windows
Closing 249
Sidemarker lamps
Replacing bulbs 466
Sidewall 387, 533, 534Simultaneous wiping and washing
Rear window wiper/washer 62
Windshield wipers 60
Single wipe 60
Sliding/pop-up roof*
Stopping 262
SmartKey 110
Battery 463
Battery check lamp 112, 118
Checking the batteries 113, 119
Factory setting 112
Global locking 112
Global locking and unlocking 112
Global unlocking 112
Loss of 114
Selective setting 112
Starter switch positions 38
Unlocking with 36
SmartKey with KEYLESS-GO* 114
Factory setting 118
Global locking 118
Loss of 121
Messages in display 440
Remote control 115
Selective setting 118
Unlocking 114Snow chains 391
Spare wheel 457, 517
Removing 458
Speed
Setting current 265
Speed settings
Cruise control 267, 269
Speedometer 25
Settings units 178
Speedometer display mode
Selecting 178
SRS 79, 533
Indicator lamp 411
SRS indicator lamp 27
Standing lamps
Replacing bulbs 466
Standing water
Driving instructions 338
Starting difficulties 55
Starting position 38
Starting the engine 53
Steering column
Height adjustment 47
Length adjustment 47