Page 428 of 561

427 Practical hints
What to do if …
Display message
Possible cause/consequence
Possible solution
Check tires
Then reactivate
Run Flat Indicator
There was a warning message about
a loss in the tire inflation pressure
and the Run Flat Indicator has not
been reactivated yet.
�
Make sure that the correct tire inflation pressure is set
for each tire.
�
Then reactivate the Run Flat Indicator.
Run Flat Indicator
inactive
Run Flat Indicator is malfunctioning.
�
Have the Run Flat Indicator checked by an authorized
Mercedes-Benz Light Truck Center.
Run Flat Indicator
unavailable
The Run Flat Indicator has been
switched off due to an error.
�
Have the Run Flat Indicator checked by an authorized
Mercedes-Benz Light Truck Center.
Tire pressure
Check tires
The Run Flat Indicator indicates that
the pressure is too low in one or more
tires.
�
Carefully bring the vehicle to a halt, avoiding abrupt
steering and braking maneuvers. Observe the traffic sit-
uation around you.
�
Check and adjust tire inflation pressure as required
(�page 365).
�
If necessary, change the wheel (
�page 478).
�
Reactivate the Run Flat Indicator after adjusting the tire
inflation pressure values (
�page 365).
Page 432 of 561
431 Practical hints
What to do if …
Display symbol
Display message
Possible cause/consequence
Possible solution
;
(USA only)
!
(Canada only)
Release
parking brake
You are driving with the parking
brake set.
�
Release the parking brake (
�page 56).
;
(USA only)
3
(Canada only)
Changed braking behavior
Drive with extreme care
A malfunction in the Electronic
Brake Proportioning
(�page 102) was detected.
�
Continue driving with added caution.
Wheels may lock during hard braking,
reducing steering capability.
�
Read and observe messages in the multi-
function display.
�
Have the system checked at an autho-
rized Mercedes-Benz Light Truck Center
as soon as possible.
Failure to follow these instructions increases
the risk of an accident.
Page 449 of 561
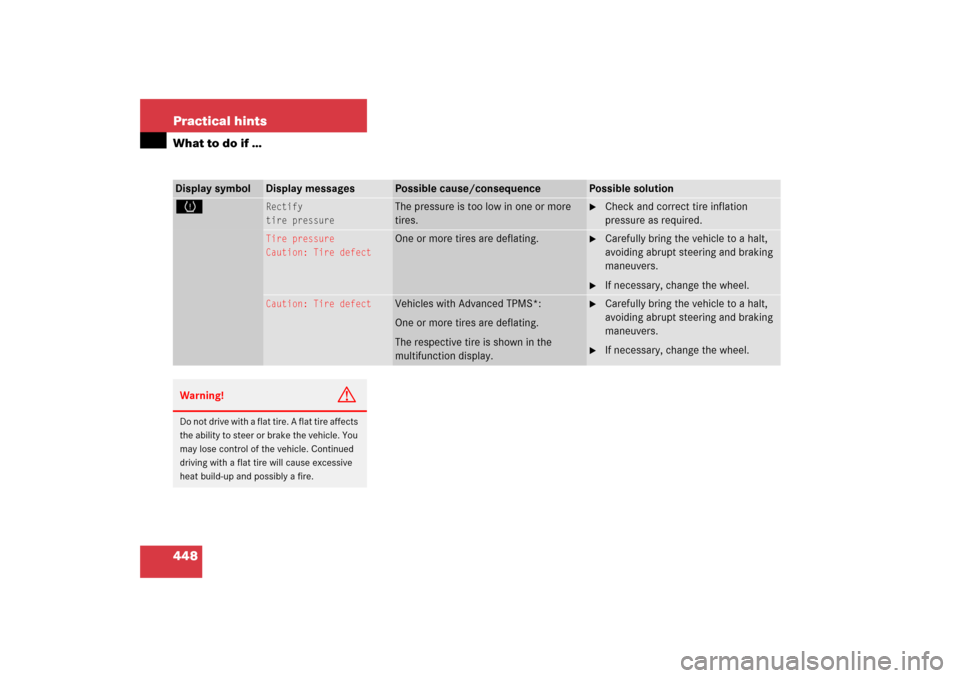
448 Practical hintsWhat to do if …Display symbol
Display messages
Possible cause/consequence
Possible solution
H
Rectify
tire pressure
The pressure is too low in one or more
tires.
�
Check and correct tire inflation
pressure as required.
Tire pressure
Caution: Tire defect
One or more tires are deflating.
�
Carefully bring the vehicle to a halt,
avoiding abrupt steering and braking
maneuvers.
�
If necessary, change the wheel.
Caution: Tire defect
Vehicles with Advanced TPMS*:
One or more tires are deflating.
The respective tire is shown in the
multifunction display.
�
Carefully bring the vehicle to a halt,
avoiding abrupt steering and braking
maneuvers.
�
If necessary, change the wheel.
Warning!
G
Do not drive with a flat tire. A flat tire affects
the ability to steer or brake the vehicle. You
may lose control of the vehicle. Continued
driving with a flat tire will cause excessive
heat build-up and possibly a fire.
Page 450 of 561
449 Practical hints
What to do if …
Display symbol
Display messages
Possible cause/consequence
Possible solution
H
Tire pressure
Check tires
The tire pressure in one or more tires is
already below the minimum value.
�
Carefully bring the vehicle to a halt,
avoiding abrupt steering and braking
maneuvers.
�
Check and adjust tire inflation
pressure as required.
�
If necessary, change the wheel.
Check tires
Vehicles with Advanced TPMS*:
The tire pressure in one or more tires is
already below the minimum value.
The respective tire is shown in the
multifunction display.
�
Carefully bring the vehicle to a halt,
avoiding abrupt steering and braking
maneuvers.
�
Check and adjust tire inflation
pressure as required.
�
If necessary, change the wheel.
Warning!
G
Do not drive with a flat tire. A flat tire affects
the ability to steer or brake the vehicle. You
may lose control of the vehicle. Continued
driving with a flat tire will cause excessive
heat build-up and possibly a fire.
Page 457 of 561

456 Practical hintsWhere will I find ...?Vehicle jackThe vehicle jack is located underneath the
storage compartment floor.
Storage position�
Remove vehicle jack from its storage
compartment (
�page 454).
�
Push crank handle up.
Operational position�
Turn crank handle clockwise until it
engages (operational position).
Before storing the vehicle jack in its stor-
age compartment:
�
The vehicle jack should be fully col-
lapsed.
�
The handle must be folded in (storage
position).
Warning!
G
The jack is designed exclusively for jacking
up the vehicle at the jack take-up brackets
built into both sides of the vehicle. To help
avoid personal injury, use the jack only to lift
the vehicle during a wheel change. Never
get beneath the vehicle while it is supported
by the jack. Keep hands and feet away from
the area under the lifted vehicle. Always
firmly set parking brake and block wheels
before raising vehicle with jack.
Do not disengage parking brake while the
vehicle is raised. Be certain that the jack is
always vertical (plumb line) when in use,
especially on hills. Always try to use the jack
on level surface. Make sure the jack arm is
fully seated in the jack take-up bracket.
Always lower the vehicle onto sufficient ca-
pacity jackstands before working under the
vehicle.
Page 458 of 561
457 Practical hints
Where will I find ...?
Setting up the collapsible wheel chock
The collapsible wheel chock serves to ad-
ditionally secure the vehicle, e.g. while
changing the wheel.
1Tilt the plate upward
2Fold the lower plate outward
3Insert the plate
�
Tilt both plates upward1.
�
Fold the lower plate outward2.
�
Guide the tabs of the lower plate all the
way into the openings of base plate3.
Spare wheel
Your vehicle is equipped with a spare
wheel with collapsible tire. The spare
wheel is located underneath the cargo
compartment floor.Warning!
G
The dimensions of the spare wheel are dif-
ferent from those of the road wheels. As a
result, the vehicle handling characteristics
change when driving with a spare wheel
mounted.
The spare wheel should only be used tempo-
rarily, and should be replaced with a regular
road wheel as quickly as possible.
Page 479 of 561
.")
478 Practical hintsFlat tire
Preparing the vehicle�
Park the vehicle in a safe distance from
moving traffic on a hard, flat surface
when possible.
�
Turn on the hazard warning flasher
(�page 153).
�
Turn the steering wheel so that the
front wheels are in a straight-ahead
position.
�
Set the parking brake (
�page 65).
�
Set the automatic transmission to P
(�page 197).
Vehicles with SmartKey:
�
Turn off the engine (
�page 66).
�
Remove the SmartKey from the starter
switch.Vehicles with KEYLESS-GO*:
�
Turn off the engine by pressing the
KEYLESS-GO* button once
(�page 66).
�
Open the driver’s door (this puts the
starter switch in position 0, same as
with the SmartKey removed from the
starter switch). The driver’s door then
can be closed again.
�
Have any passenger exit the vehicle at
a safe distance from the roadway.
Warning!
G
The dimensions of the spare wheel are dif-
ferent from those of the road wheels. As a
result, the vehicle handling characteristics
change when driving with a spare wheel
mounted. Adapt your driving style accord-
ingly.
The spare wheel is for temporary use only.
When driving with spare wheel mounted,
ensure proper tire inflation pressure and do
not exceed a vehicle speed of
50 mph (80 km/ h).
Drive to the nearest Mercedes-Benz Light
Truck Center as soon as possible to have the
spare wheel replaced with a regular road
wheel.
Never operate the vehicle with more than
one spare wheel mounted.
Do not switch off the ESP
® with a spare
wheel mounted.
iOpen doors only when conditions are
safe to do so.
Page 480 of 561
.
�
Take the wheel wrench and the vehicle
jack from the vehicle tool kit
(�")
479 Practical hints
Flat tire
Mounting the spare wheel
Preparing the vehicle�
Prepare the vehicle as described
(�page 478).
�
Take the wheel wrench and the vehicle
jack from the vehicle tool kit
(�page 455).
�
Take the spare wheel from the wheel
well under the cargo compartment
floor (
�page 458).Lifting the vehicle
�
Prevent the vehicle from rolling away
by blocking wheels with wheel chocks
or other sizable objects.
One wheel chock is included with the
vehicle tool kit (
�page 455).
When changing wheel on a level surface:
�
Place the wheel chock in front of and
another sizable object behind the
wheel that is diagonally opposite to the
wheel being changed.
Always try lifting the vehicle using the jack
on a level surface. However, should cir-
cumstances require you to do so on a hill,
place the wheel chock and another sizable
object as follows:
�
Place the wheel chock and another
sizable object on the downhill side
blocking both wheels of the axle not
being worked on.
Warning!
G
The jack is designed exclusively for jacking
up the vehicle at the jack take-up brackets
built into both sides of the vehicle. To help
avoid personal injury, use the jack only to lift
the vehicle during a wheel change. Never
get beneath the vehicle while it is supported
by the jack. Keep hands and feet away from
the area under the lifted vehicle. Always
firmly set parking brake and block wheels
before raising vehicle with jack.
Do not disengage parking brake while the
vehicle is raised. Be certain that the jack is
always vertical (plumb line) when in use,
especially on hills. Always try to use the jack
on level surface. Make sure the jack arm is
fully seated in the jack take-up bracket.
Always lower the vehicle onto sufficient
capacity jackstands before working under
the vehicle.

!
(Canada only)
Release
parking brake
You are driving with the parking
b")