Page 418 of 561
417 Practical hints
What to do if …
On the pages that follow, you will find a
compilation of the most important warning
and malfunction messages that may
appear in the multifunction display.
For your convenience the messages are
divided into two sections:�
Text messages (
�page 418)
�
Symbol messages (
�page 429)
iSwitching on the ignition causes all
instrument cluster lamps (except high
beam headlamp indicator lamp, and
turn signal indicator lamps unless acti-
vated) as well as the multifunction dis-
play to come on. Make sure the lamps
and multifunction display are in work-
ing order before starting your journey.
Page 445 of 561

444 Practical hintsWhat to do if ….
License plate lamp,
left
The left license plate lamp is
malfunctioning.
�
Replace the bulb as soon as possible.
License plate lamp,
right
The right license plate lamp is
malfunctioning.
�
Replace the bulb as soon as possible.
Light sensor
Drive to workshop
The lamp sensor is malfunction-
ing. The headlamps do not
switch on automatically.
�
In the control system, set lamp operation
to manual mode (
�page 148).
�
Switch on headlamps using the exterior
lamp switch (
�page 147).
�
Visit an authorized Mercedes-Benz Light
Truck Center as soon as possible.
Low beam,
left
The left low beam lamp is
malfunctioning.
Halogen headlamp:�
Replace the bulb as soon as possible.
Bi-Xenon* headlamp:
�
Visit an authorized Mercedes-Benz Light
Truck Center as soon as possible.
Low beam,
right
The right low beam lamp is
malfunctioning.
Halogen headlamp:�
Replace the bulb as soon as possible.
Bi-Xenon* headlamp:
�
Visit an authorized Mercedes-Benz Light
Truck Center as soon as possible.
Display symbol
Display messages
Possible cause/consequence
Possible solution
Page 467 of 561
466 Practical hintsReplacing bulbsFront lamps Rear lamps
Lamp
Type
1
Parking/standing lamp
W 5 W
2
Turn signal lamp
PY 21 W
3
Additional turn signal
lamp
LED
4
Headlamps:
Low beam
H7 (55W)
Bi-Xenon headlamps*:
Low beam
1
1Vehicles with Bi-Xenon* headlamps: Do not
replace the Bi-Xenon bulbs yourself. Contact an
authorized Mercedes-Benz Light Truck Center.
D2S-35 W
5
Headlamps:
High beam/high beam
flasher
H7 (55W)
Bi-Xenon headlamps*:
High beam/high beam
flasher spot lamp
H7 (55W)
6
Sidemarker lamp
WY 5 W
7
Corner-illuminating
front fog lamp*
H11 (55W)
Lamp
Type
8
High-mounted brake
lamp
LED
9
Tail, brake, and
sidemarker lamp
P 21 W
a
Turn signal lamp
PY 21 W
b
Backup lamp
P 21 W
c
Rear fog lamp (driver’s
side only)
P 21 W
d
License plate lamps
C 5 W
Page 468 of 561

467 Practical hints
Replacing bulbs
Notes on bulb replacement�
Only use 12-volt bulbs of the same type
and with the specified watt rating.
�
Switch the lights off before changing a
bulb to prevent short circuits.
�
Always use a clean lint-free cloth when
handling bulbs.
�
Your hands should be dry and free of oil
and grease.
�
If the newly installed bulb does not
come on, visit an authorized
Mercedes-Benz Light Truck Center.Have the LEDs and bulbs for the following
lamps replaced by an authorized
Mercedes-Benz Light Truck Center:
�
the additional turn signal lamps in the
exterior rear view mirrors
�
the high mounted brake lamp
�
the Bi-Xenon* low beam lamps
�
the Bi-Xenon high beam flasher spot-
light*
�
the front sidemarker lamps
Warning!
G
Bulbs and bulb sockets can be very hot.
Allow the lamp to cool down before chang-
ing a bulb.
Keep bulbs out of reach of children.
Halogen lamps contain pressurized gas.
A bulb can explode if you:�
touch or move it when hot
�
drop the bulb
�
scratch the bulb
Wear eye and hand protection.
Because of high voltage in Xenon lamps, it is
dangerous to replace the bulb or repair the
lamp and its components. We recommend
that you have such work done by a qualified
technician.
Page 469 of 561
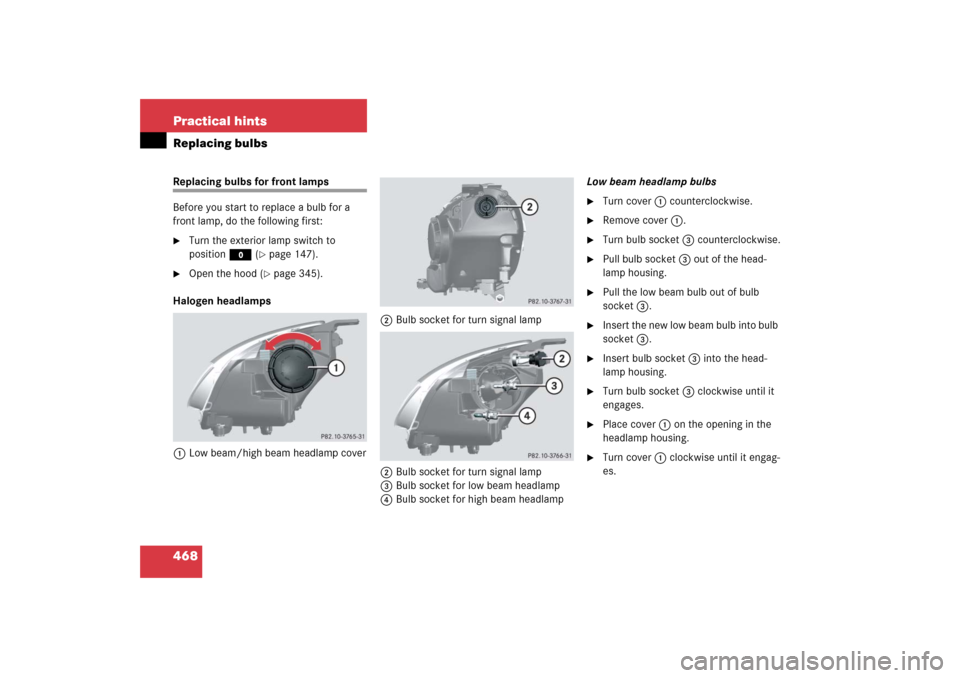
468 Practical hintsReplacing bulbsReplacing bulbs for front lamps
Before you start to replace a bulb for a
front lamp, do the following first:�
Turn the exterior lamp switch to
positionM (
�page 147).
�
Open the hood (
�page 345).
Halogen headlamps
1Low beam/high beam headlamp cover2Bulb socket for turn signal lamp
2Bulb socket for turn signal lamp
3Bulb socket for low beam headlamp
4Bulb socket for high beam headlampLow beam headlamp bulbs
�
Turn cover 1 counterclockwise.
�
Remove cover 1.
�
Turn bulb socket 3 counterclockwise.
�
Pull bulb socket 3 out of the head-
lamp housing.
�
Pull the low beam bulb out of bulb
socket 3.
�
Insert the new low beam bulb into bulb
socket 3.
�
Insert bulb socket 3 into the head-
lamp housing.
�
Turn bulb socket 3 clockwise until it
engages.
�
Place cover 1 on the opening in the
headlamp housing.
�
Turn cover 1 clockwise until it engag-
es.
Page 470 of 561
469 Practical hints
Replacing bulbs
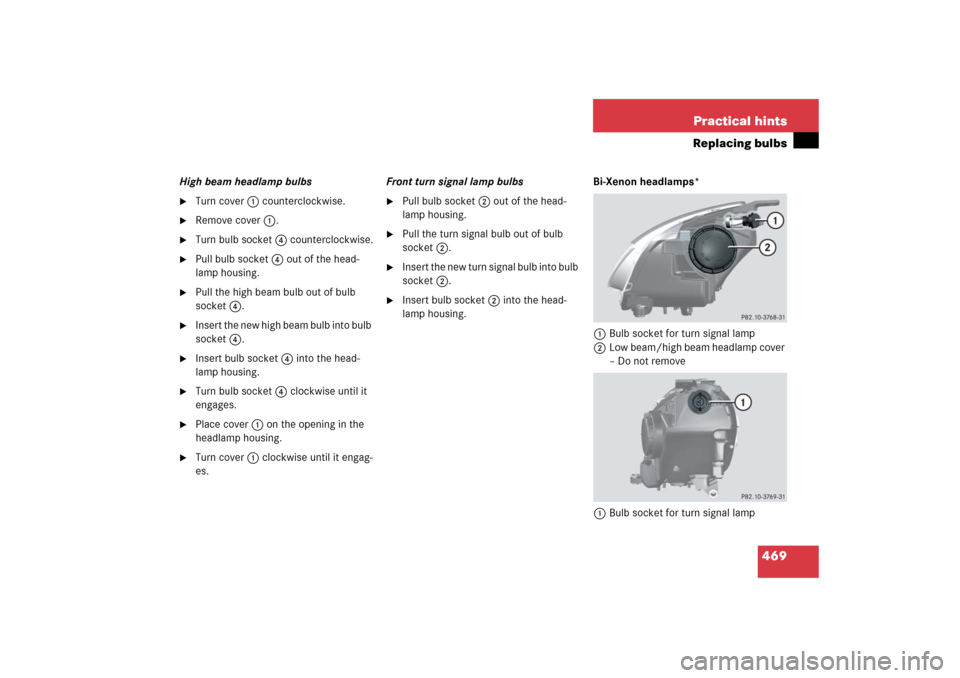
High beam headlamp bulbs�
Turn cover 1 counterclockwise.
�
Remove cover 1.
�
Turn bulb socket 4 counterclockwise.
�
Pull bulb socket 4 out of the head-
lamp housing.
�
Pull the high beam bulb out of bulb
socket 4.
�
Insert the new high beam bulb into bulb
socket 4.
�
Insert bulb socket 4 into the head-
lamp housing.
�
Turn bulb socket 4 clockwise until it
engages.
�
Place cover 1 on the opening in the
headlamp housing.
�
Turn cover 1 clockwise until it engag-
es.Front turn signal lamp bulbs
�
Pull bulb socket 2 out of the head-
lamp housing.
�
Pull the turn signal bulb out of bulb
socket 2.
�
Insert the new turn signal bulb into bulb
socket 2.
�
Insert bulb socket 2 into the head-
lamp housing.Bi-Xenon headlamps*
1Bulb socket for turn signal lamp
2Low beam/high beam headlamp cover
– Do not remove
1Bulb socket for turn signal lamp
Page 471 of 561
470 Practical hintsReplacing bulbsLow beam and high beam flasher spot
bulbsFront turn signal lamp bulbs
�
Pull bulb socket 1 out of the head-
lamp housing.
�
Pull the turn signal bulb out of bulb
socket 1.
�
Insert the new turn signal bulb into bulb
socket 1.
�
Insert bulb socket 1 into the head-
lamp housing.Parking and standing lamp bulbs
1Bulb socket for parking and standing
lamp
�
Turn bulb socket 1 counterclockwise.
�
Pull bulb socket 1 out of the housing.
�
Pull the bulb out of bulb socket 1.
�
Insert the new parking and standing
lamp bulb into bulb socket 1.
�
Insert bulb socket 1 into the housing.
�
Turn bulb socket 1 clockwise until it
engages.
Warning!
G
Do not remove the low beam/high beam
cover for the Bi-Xenon* headlamp. Because
of high voltage in Bi-Xenon* lamps, it is dan-
gerous to replace the bulb or repair the lamp
and its components. We recommend that
you have such work done by a qualified
technician.
Page 530 of 561

Prevents the wheels from locking up
during braking so that the vehicle can
continue to be steered.
Accessory weight
(
�page 385)
ADS
(Adaptive D
am")
529 Technical terms
ABS
(A
ntilock B
rake S
ystem)
Prevents the wheels from locking up
during braking so that the vehicle can
continue to be steered.
Accessory weight
(
�page 385)
ADS
(Adaptive D
amping S
ystem)
Automatically adapts the optimum sus-
pension damping to prevailing driving
conditions.
Airmatic*
Automatically selects the optimum sus-
pension tuning and ride height for your
vehicle. Airmatic consists of two com-
ponents:
�
Adaptive Damping System
�
Vehicle level control
Air pressure
(
�page 385)Alignment bolt
Metal pin with thread. The centering
pin is an aid used when changing a tire
to align the wheel with the wheel hub.
Aspect ratio
(
�page 385)
Bar
(�page 386)
BAS
(Brake A
ssist S
ystem)
System for potentially reducing braking
distances in emergency braking situa-
tions. The system is activated when it
senses an emergency based on how
fast the brake is applied.
Bead
(
�page 386)
Bi-Xenon headlamps*
Headlamps which use an electric arc as
the light source and produce a more
intense light than filament headlamps.
Bi-Xenon headlamps produce low
beam and high beam.CAC
(C
ustomer A
ssistance C
enter)
Mercedes-Benz customer service
center, which can help you with any
questions about your vehicle and
provide assistance in the event of a
breakdown.
CAN system
(C
ontroller A
rea N
etwork)
Data bus network serving to control
vehicle functions such as door locking
or windshield wiping.
Cockpit
All instruments, switches, buttons and
indicator / warning lamps in the
passenger compartment needed for
vehicle operation and monitoring.
Cold tire inflation pressure
(
�page 386)


Bi-Xenon h")