Page 177 of 561

176 Controls in detailControl systemSubmenus in the Settings menu�
Press buttonj.
The collection of the submenus
appears in the multifunction display.
�
Press buttonç.
The selection marker moves to the next
submenu.
The submenus are arranged by hierarchy.
Scroll down with buttonç, scroll up
with buttonæ.With the selection marker on the desired
submenu, use thej button to access
the individual functions within that sub-
menu. Once within that submenu, you can
use thejbutton to move to the next
function or thekbutton to move to the
previous function within that submenu.
The settings themselves are made with
buttonæ orç.
Resetting the functions of a submenu
You can reset all the functions for each
submenu to the factory settings.
�
Move to a function in the submenu.
�
Press the reset button in the
instrument cluster (
�page 158) for
approximately 3 seconds.
The request to press the reset button
once more to confirm appears in the
multifunction display.
�
Press the reset button once more.
All functions of the submenu will reset
to factory settings.
iThe settings you have changed will not
be reset unless you confirm the action
by pressing the reset button a second
time.
After approximately 5 seconds, the Settings
menu reappears in the
multifunction display (
�page 174).
iFor safety reasons, the function Lamp circuit headlamp
(�page 182)
in the
Lighting
submenu cannot be
reset while driving.
The following message appears in the
multifunction display:
Lighting
Cannot be completely reset
to factory settings while driving
Page 179 of 561

178 Controls in detailControl systemInstrument cluster submenu
Access the
Instr. cluster
submenu via
the
Settings
menu. Use the
Instr.
cluster
submenu to change the instru-
ment cluster display settings.
The following functions are available:Selecting speedometer display mode
�
Move the selection marker with
buttonæ orç to the
Instr.
cluster
submenu.
�
Press buttonj ork repeatedly
until the message
Display unit
Digital speedometer
appears in the
multifunction display.
The selection marker is on the current
setting.
�
Press buttonæ orç to set
speedometer unit to
km or
miles
.Selecting language
�
Move the selection marker with
buttonæ orç to the
Instr.
cluster
submenu.
�
Press buttonj ork repeatedly
until the message
Language
appears in
the multifunction display.
The selection marker is on the current
setting.
�
Press buttonæ orç to select
the language to be used for the
multifunction display messages.
Function
Page
Selecting speedometer display
mode
178
Selecting language
178
Selecting display (digital
speedometer or outside
temperature) for status indicator
179
Page 180 of 561
179 Controls in detail
Control system
Available languages:�
German (
Deutsch
)
�
English (
English
)
�
French (
Français
)
�
Italian (
Italiano
)
�
Spanish (
Español
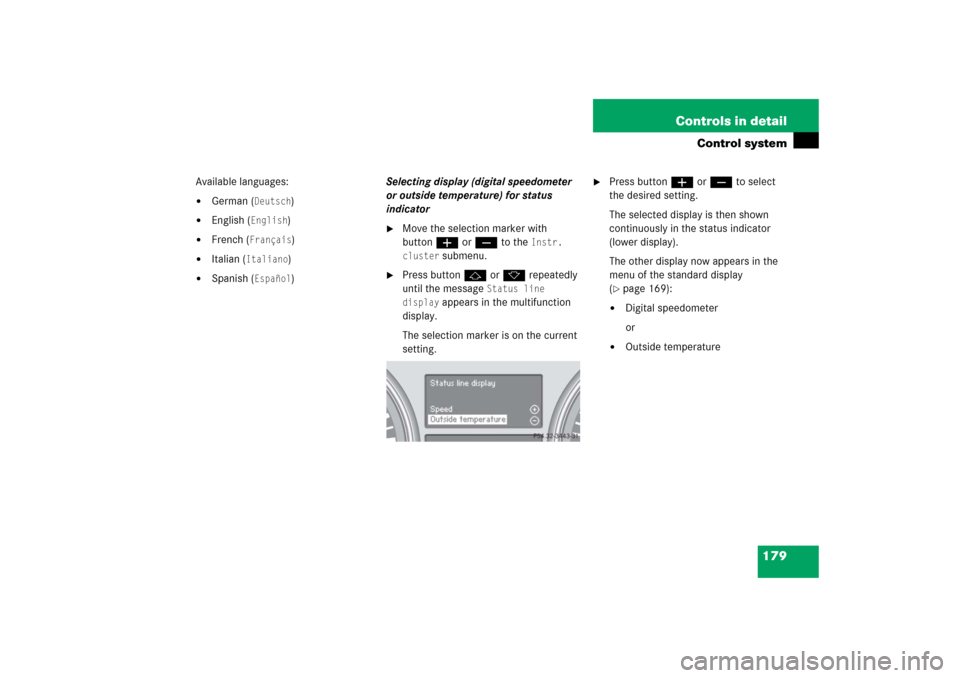
)Selecting display (digital speedometer
or outside temperature) for status
indicator
�
Move the selection marker with
buttonæ orç to the
Instr.
cluster
submenu.
�
Press buttonj ork repeatedly
until the message
Status line
display
appears in the multifunction
display.
The selection marker is on the current
setting.
�
Press buttonæ orç to select
the desired setting.
The selected display is then shown
continuously in the status indicator
(lower display).
The other display now appears in the
menu of the standard display
(�page 169):
�
Digital speedometer
or
�
Outside temperature
Page 181 of 561

180 Controls in detailControl systemTime/Date submenu
Access the
Time/Date
submenu via the
Settings
menu. Use the
Time/Date
submenu to change the time and date
settings.
The following functions are available:Setting the time (hours)
This function is not available if your vehicle
is equipped with the Modular COMAND
System and navigation module*.
�
Move the selection marker with
buttonæ orçto the
Time/Date
submenu.
�
Press buttonj ork repeatedly
until the message
Set clock hours
appears in the multifunction display.
The selection marker is on the hour
setting.
�
Press buttonæ orç to set the
hour.Setting the time (minutes)
This function is not available if your vehicle
is equipped with the Modular COMAND
System and navigation module*.
�
Move the selection marker with
buttonæ orçto the
Time/Date
submenu.
�
Press buttonj ork repeatedly
until the message
Set clock minutes
appears in the multifunction display.
The selection marker is on the minute
setting.
�
Press buttonæ orç to set the
minutes.
Function
Page
Setting the time (hours)
180
Setting the time (minutes)
180
Setting the date (month)
181
Setting the date (day)
181
Setting the date (year)
181
iIf your vehicle is equipped with the
Modular COMAND System and naviga-
tion module*, see separate COMAND
operating instructions for information
on how to set the date and time.
Page 182 of 561

This function is not available if your vehicle
is equipped with the Modular COMAND
System and navigation module*.�
Move the selection m")
181 Controls in detail
Control system
Setting the date (month)
This function is not available if your vehicle
is equipped with the Modular COMAND
System and navigation module*.�
Move the selection marker with
buttonæ orç to the
Time/Date
submenu.
�
Press buttonj ork repeatedly
until the message
Set date month
appears in the multifunction display.
The selection marker is on the month
setting.
�
Press buttonæ orç to set the
month.Setting the date (day)
This function is not available if your vehicle
is equipped with the Modular COMAND
System and navigation module*.
�
Move the selection marker with
buttonæ orç to the
Time/Date
submenu.
�
Press buttonj ork repeatedly
until the message
Set date day
appears in the multifunction display.
The selection marker is on the day
setting.
�
Press buttonæ orç to set the
day.Setting the date (year)
This function is not available if your vehicle
is equipped with the Modular COMAND
System and navigation module*.
�
Move the selection marker with
buttonæ orç to the
Time/Date
submenu.
�
Press buttonj ork repeatedly
until the message
Set date year
appears in the multifunction display.
The selection marker is on the year
setting.
�
Press buttonæ orç to set the
year.
Page 183 of 561

182 Controls in detailControl systemLighting submenu
Access the
Lighting
submenu via the
Settings
menu. Use the
Lighting
submenu to change the lamp and lighting
settings on your vehicle.
The following functions are available:Setting daytime running lamp mode
(USA only)
�
Move the selection marker with
buttonæ orç to the
Lighting
submenu.
�
Press buttonj ork repeatedly
until the message
Lamp circuit
headlamp
appears in the multifunction
display.
The selection marker is on the current
setting.
�
Press buttonæ orç to select
manual operation (
manual
) or daytime
running lamp mode (
constant
).
With daytime running lamp mode activated
and the exterior lamp switch at
positionM orU, the low beam
headlamps are switched on when the
engine is running.
Function
Page
Setting daytime running lamp
mode (USA only)
182
Setting locator lighting
183
Setting night security
illumination
184
Setting interior lighting delayed
shut-off
185
iThis function is not available in
countries where the daytime running
lamp mode is mandatory and therefore
in a constant mode.
Page 184 of 561

183 Controls in detail
Control system
In low ambient light conditions the
following lamps will switch on additionally:�
Parking lamps
�
Tail lamps
�
License plate lamps
�
Side marker lamps
For more information on the daytime
running lamp mode, see “Lighting”
(
�page 147).Setting locator lighting
With the locator lighting feature activated,
the exterior lamp switch in positionU
(
�page 148) and the interior lighting in
automatic mode (
�page 155), the follow-
ing lamps will switch on during darkness
when the vehicle is unlocked with the
SmartKey:
�
Parking lamps
�
Tail lamps
�
License plate lamps
�
Side marker lamps
�
Corner-illuminating front fog lamps*
The locator lighting switches off when the
driver’s door is opened.
If you do not open a door after unlocking
the vehicle with the SmartKey, the lamps
will switch off automatically after approxi-
mately 40 seconds.
�
Move the selection marker with
buttonæ orç to the
Lighting
submenu.
�
Press buttonj ork repeatedly
until the message
Function Surround
lighting
appears in the multifunction
display.
The selection marker is on the current
setting.
�
Press buttonæ orç to switch
the locator lighting function to
on.
�
Turn the exterior lamp switch to
positionU (
�page 147) when
exiting the vehicle.
The locator lighting feature is
activated.
iFor safety reasons, resetting the Lighting
submenu to factory settings
while driving (
�page 176) will not
deactivate the daytime running lamp
mode.
The following message appears in the
multifunction display:
Lighting
Cannot be completely reset
to factory settings while driving
Page 185 of 561

Use this function to set whether and for
how long you would like the exterior lamps
to remain on")
184 Controls in detailControl systemSetting night security illumination
(Headlamps delayed shut-off)
Use this function to set whether and for
how long you would like the exterior lamps
to remain on during darkness after exiting
the vehicle and the doors closed.
With the delayed shut-off feature activated
and the exterior lamp switch in
positionU before the engine is turned
off, the following lamps will switch on
when the engine is turned off:�
Parking lamps
�
Tail lamps
�
License plate lamps
�
Side marker lamps
�
Front fog lamps*
If after turning off the engine you do not
open a door, the lamps will switch off auto-
matically after 60 seconds.
�
Move the selection marker with
buttonæ orç to the
Lighting
submenu.
�
Press buttonj ork repeatedly
until the message
Headlmp. delayed
shut-off
appears in the multifunction
display.
The selection marker is on the current
setting.
�
Press buttonæ orç to select
the desired lamp-on period.
You can select:�
0 sec.
, the delayed shut-off feature
is deactivated.
�
15 sec.
, 30 sec.
, 45 sec.
or
60 sec.
, select the desired lamp-on
period.
�
Turn the exterior lamp switch to
positionU (
�page 147) before
turning off the engine.
The headlamps delayed shut-off
feature is activated.