Page 284 of 561

283 Controls in detail
Loading
Expanding cargo compartment
You can separately fold each seat of the
rear passenger compartment to expand
the cargo compartment.Expanding cargo compartment in part
Folding third-row seats
�
Push in the head restraints of the
third-row seats all the way
(�page 139).
1Seat belt holder
2Release handle
3Seat backrest
�
Remove cargo compartment cover
blind* (
�page 288), if so equipped.
�
Place seat belt in seat belt holder 1.
Warning!
G
When expanding the cargo compartment,
always fully fold the corresponding seats
and always use the partition net
(�page 290) when transporting cargo.
Unless you are transporting cargo, the back-
rests must remain properly locked in the up-
right position.
In an accident, during hard braking or sud-
den maneuvers, loose items will be thrown
around inside the vehicle, and can cause
injury to vehicle occupants unless the items
are securely fastened in the vehicle.
Always use the cargo tie down rings
(�page 281).
Warning!
G
Never drive vehicle with the tailgate open.
Deadly carbon monoxide (CO) gases may
enter vehicle interior resulting in uncon-
sciousness and death.!When the second-row seats are folded
forward, the front seats may not be
moved to the rearmost position. Other-
wise you could damage the front and
second-row seats.
��
Page 286 of 561
.
�
Remove the rear center console*, if so
equipped (
�page 308).
�
Remove t")
285 Controls in detail
Loading
Folding second-row seats�
Move the seat to be folded to its rear-
most position (
�page 137).
�
Remove the rear center console*, if so
equipped (
�page 308).
�
Remove the head restraint from the
second-row seat (
�page 140).
�
Place the head restraint on the seat
cushion.
The guide bars must be facing forward.
�
Push the head restraint against the
seat backrest in direction of the arrow.1Seat backrest
2Seat cushion
3Release lever
!When the second-row seats are folded
forward, the front seats may not be
moved to the rearmost position. Other-
wise you could damage the front and
second-row seats.iThe rear center console* can remain
installed, if installed in the most for-
ward position (
�page 309). However,
the cargo compartment floor will then
not be an even plane.
!Make sure to remove the head restraint
from the seat backrest and place it on
the seat cushion as described before
folding the seat. Otherwise, the seat or
head restraint may be damaged.
��
Page 287 of 561
286 Controls in detailLoading�
Pull release lever 3 past the resis-
tance point in direction of arrow as far
as it will go.
Seat backrest 1 is released.
�
Fold seat backrest 1 forward until it
fully rests on seat cushion 2 in a hori-
zontal position.
�
Push down on folded seat backrest 1
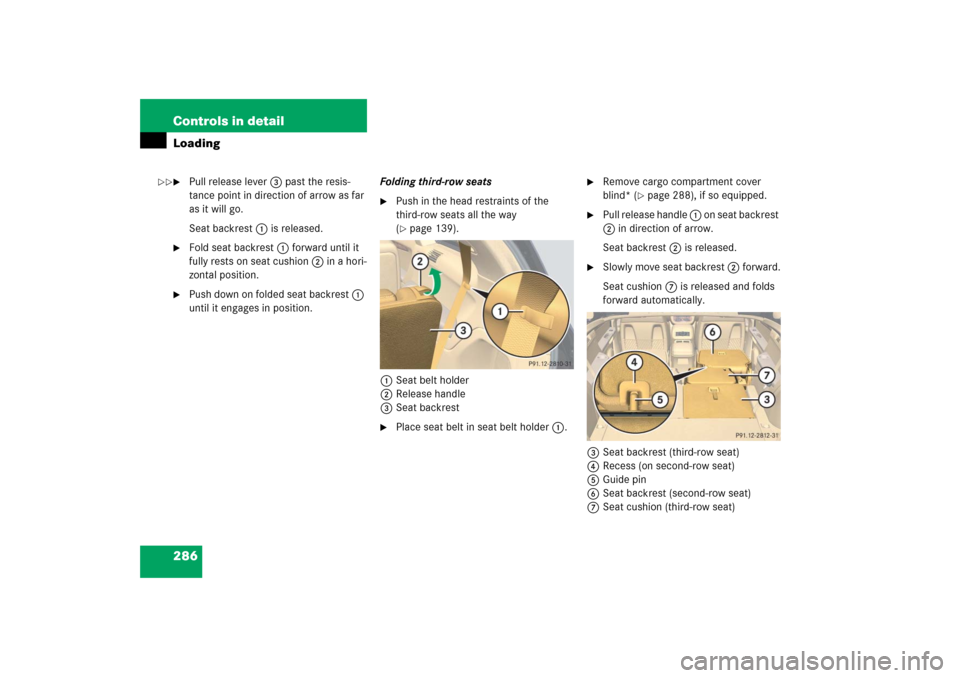
until it engages in position.Folding third-row seats
�
Push in the head restraints of the
third-row seats all the way
(�page 139).
1Seat belt holder
2Release handle
3Seat backrest
�
Place seat belt in seat belt holder 1.
�
Remove cargo compartment cover
blind* (
�page 288), if so equipped.
�
Pull release handle 1 on seat backrest
2 in direction of arrow.
Seat backrest 2 is released.
�
Slowly move seat backrest 2 forward.
Seat cushion 7 is released and folds
forward automatically.
3Seat backrest (third-row seat)
4Recess (on second-row seat)
5Guide pin
6Seat backrest (second-row seat)
7Seat cushion (third-row seat)
��
Page 289 of 561

288 Controls in detailLoadingCargo compartment cover blind*
The cargo compartment cover blind can be
installed behind the third-row seats or the
second-row seats.
Blind installed behind third-row seats1Handle
2Mount
Rolling out blind�
Pull blind on handle1 across the car-
go compartment.
�
Guide blind into mounts2 and re-
lease.
Rolling up blind
�
Disengage blind and guide retraction
by its handle1.Removing blind
Blind installed behind second-row seats1Release button
2Blind�
Roll the blind up.
�
Push release button1.
�
Pull blind 2 to the left against the
spring pressure until the spring in the
blind audibly engages.
�
Remove the blind.
!With the cargo compartment cover
blind installed, do not pile luggage high-
er than the lower edges of the rear side
windows.iThe cargo compartment cover blind
has two extensions which are connect-
ed to the cargo compartment cover
blind by cords.
The cargo compartment cover blind
must be extended for installation be-
hind the second-row seats
(�page 288).
Page 290 of 561
.
�
Remove the covers from the mounts in
side rim.
�
Place left si")
289 Controls in detail
Loading
Installing blind�
For installation behind second-row
seats, install the blind extensions
(�page 289).
�
Remove the covers from the mounts in
side rim.
�
Place left side of blind 2 in left mount.
�
Position right side of blind 2 over right
mount.
�
Press release button1 and guide
blind 2 into mount.Extending blind
1Blind
2Extension
3Guidings
4Guide pins
�
Position extension 2 over blind 1.
Guide pins 4 must point directly at
guidings 3.
�
Turn extension2 and blind 1 in op-
posite directions as indicated by the ar-
rows.
Guide pins 4 must engage in
guidings3.
When not in use, you can attach the cover
blind extensions to the cover blind.
5Extension guide rail
6Mounting
!For installation behind third-row seats,
the blind extensions must not be in-
stalled. Otherwise, the blind could be
damaged.
iThe cargo compartment cover blind
has two extensions which are connect-
ed to the cargo compartment cover
blind by cords.
The cargo compartment cover blind
must be extended for installation be-
hind the second-row seats.
��
Page 309 of 561

�
Cuphol")
308 Controls in detailUseful featuresRear center console*
The rear center console is located between
the second-row seats.
The rear center console contains:�
Storage compartment (
�page 297)
�
Cupholder (
�page 302)
�
DVD-player* (see separate COMAND
operating instructions)Removing
1Rear center console
2Release handle
3Rear center console base
4Folding back
5Handle
6Anchorage pointsiWhen fully expanding the cargo com-
partment, the rear center console has
to be removed from the vehicle in order
for the cargo compartment floor to be
an even plane (
�page 284).
Warning!
G
Remove all containers that may be stored in
the cupholders of the rear center console.
Otherwise liquids could spill on vehicle
occupants and/or vehicle equipment. Hot
liquids spilled on vehicle occupants may
cause serious personal injury. Liquids
spilled on vehicle equipment may cause
damage not covered by the Mercedes-Benz
Limited Warranty.!To prevent damage to the rear center
console and/or its components, make
sure the storage compartment
(�page 297) and the DVD-console lid*
(see separate COMAND operating
instructions) are closed before remov-
ing the rear center console.
iRemove all items from the storage
compartment (
�page 297) of the rear
center console to reduce the weight of
the rear center console.
Page 411 of 561

410 Practical hintsWhat to do if …Problem
Possible cause/consequence
Suggested solution
<
The red seat belt telltale comes
on and a warning chime sounds
for approximately 6 seconds
after starting the engine with all
doors closed.
The seat belt telltale reminds you and your
passengers to fasten your seat belts before
driving off.
�
Fasten your seat belts.
The seat belt telltale goes out.
<
The red seat belt telltale remains
illuminated after driving off. The
vehicle’s speed does not exceed
15 mph (25 km/h).
You and/or your front passenger have
forgotten to fasten your seat belts.
�
Fasten your seat belts.
There are items placed on the front passen-
ger seat and therefore the system senses the
front passenger seat as being occupied.
�
Remove the items from the front
passenger seat and put them in a safe
place.
<
The red seat belt telltale flashes
and you additionally hear an in-
termittent warning chime with in-
creasing intensity for a maximum
of 60 seconds from the time the
vehicle’s speed exceeds 15 mph
(25 km/h).
You and/or your front passenger have
forgotten to fasten your seat belts.
�
Fasten your seat belts.
There are items placed on the front passen-
ger seat and therefore the system senses the
front passenger seat as being occupied.
�
Remove the items from the front
passenger seat and put them in a safe
place.
iAfter 60 seconds with an unfastened
seat belt on one of the front seats, the
warning chime stops sounding and the
seat belt telltale illuminates continu-
ously. The seat belt telltale will only go
out if both the driver and front passen-
ger’s seat belt are fastened, or the ve-
hicle is standing still and a front door is
opened.
Page 456 of 561
455 Practical hints
Where will I find ...?
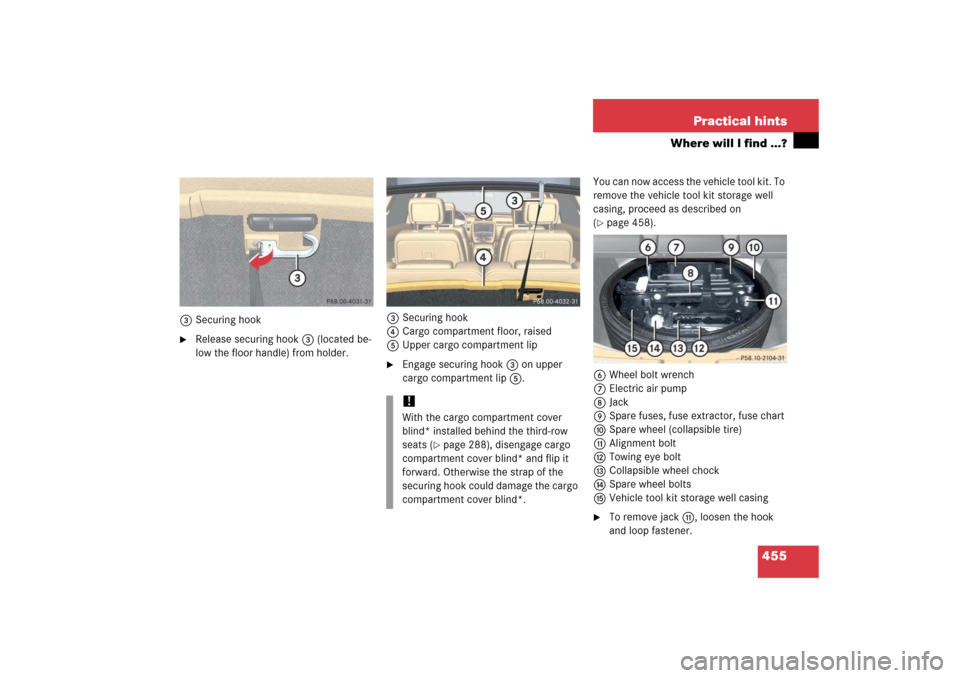
3Securing hook�
Release securing hook 3 (located be-
low the floor handle) from holder.3Securing hook
4Cargo compartment floor, raised
5Upper cargo compartment lip
�
Engage securing hook 3 on upper
cargo compartment lip 5.You can now access the vehicle tool kit. To
remove the vehicle tool kit storage well
casing, proceed as described on
(
�page 458).
6Wheel bolt wrench
7Electric air pump
8Jack
9Spare fuses, fuse extractor, fuse chart
aSpare wheel (collapsible tire)
bAlignment bolt
cTowing eye bolt
dCollapsible wheel chock
eSpare wheel bolts
fVehicle tool kit storage well casing
�
To remove jackb, loosen the hook
and loop fastener.
!With the cargo compartment cover
blind* installed behind the third-row
seats (
�page 288), disengage cargo
compartment cover blind* and flip it
forward. Otherwise the strap of the
securing hook could damage the cargo
compartment cover blind*.