Page 119 of 561
118 Controls in detailLocking and unlockingFactory setting
Global unlocking�
Grasp an outside door handle.
All turn signal lamps flash once. The
locking knobs in the doors move up.
The anti-theft alarm system is dis-
armed.
The vehicle will lock again automatically
and reactivate the anti-theft alarm system
within approximately 40 seconds of
unlocking if
�
neither door nor tailgate is opened
�
the central locking switch is not
activatedGlobal locking
�
Press the lock button at an outside
door handle (
�page 68) or the tailgate
(
�page 120).
With the tailgate and all doors closed,
the turn signal lamps flash three times.
The locking knobs on the doors move
down. The anti-theft alarm system is
armed.Selective setting
If you frequently travel alone, you may wish
to reprogram the SmartKey with
KEYLESS-GO so when you grasp the driv-
er’s door handle only the driver’s door and
the fuel filler flap unlocks.
�
Press and hold buttonsŒ and‹
simultaneously for about 6 seconds
until battery check lamp5
(�page 115) flashes twice.
The SmartKey with KEYLESS-GO will
then function as follows:
Unlocking driver’s door and fuel filler
flap
�
Grasp the driver’s outside door handle.
All turn signal lamps flash once. The
locking knob in the driver’s door moves
up. The anti-theft alarm system is dis-
armed.
i If the vehicle has been parked for more
than 72 hours, you must pull an outside
door handle in order to activate the
KEYLESS-GO function.
iThe vehicle could be inadvertently
unlocked if the SmartKey with
KEYLESS-GO is within 3 ft (1 m) of the
vehicle and�
an outside door handle is splashed
with water
or
�
you attempt to clean the outside
door handle
Page 120 of 561
119 Controls in detail
Locking and unlocking
Global unlocking�
Grasp any outside door handle other
than the driver’s outside door handle.
All turn signal lamps flash once. The
locking knobs in the doors move up.
The anti-theft alarm system is dis-
armed.
Global locking
�
Press the lock button on an outside
door handle (
�page 68) or the tailgate
(
�page 120).
All turn signal lamps flash three times.
The locking knobs in the doors move
down. The anti-theft alarm system is
armed.
Restoring to factory setting
�
Press and hold buttonsŒ and‹
simultaneously for about 6 seconds
until battery check lamp5
(�page 115) flashes twice.Checking the battery
�
Press button‹orŒ.
Battery check lamp5 (
�page 115)
comes on briefly to indicate that the
SmartKey with KEYLESS-GO battery is
in order.
!If you can no longer lock or unlock the
vehicle with the SmartKey with
KEYLESS-GO, then the battery in the
SmartKey is discharged, the SmartKey
with KEYLESS-GO is malfunctioning or
the vehicle battery is drained.�
Check the battery in the SmartKey
with KEYLESS-GO (
�page 119)
and replace it if necessary
(
�page 463).
�
Use the mechanical key to unlock
the driver’ door (
�page 459).
�
Lock the vehicle as described in the
“Practical hints” section
(�page 460).
�
Have the vehicle battery and the
vehicle battery connections
checked (
�page 487).
If the SmartKey with KEYLESS-GO is
malfunctioning, contact an authorized
Mercedes-Benz Light Truck Center.
iIf battery check lamp5 (
�page 115)
does not come on briefly during check,
the SmartKey with KEYLESS-GO bat-
tery is discharged.
Replace the battery (
�page 463).
You can obtain the required battery at
any authorized Mercedes-Benz Light
Truck Center.
iIf the battery is checked within signal
range of the vehicle, pressing the
button‹orŒ will lock or un-
lock the vehicle accordingly.
Page 252 of 561
251 Controls in detail
Power windows
Closing�
Press and release switch 2.
To stop the hinged quarter window:
�
Press and release switch 2 once
more.
Synchronizing the door windows
The door windows must be resynchronized�
after the battery was disconnected
�
if the door windows cannot be fully
opened (Express-open) or closed
(Express-close)
�
Close all doors.
�
Switch on the ignition (
�page 38).
�
Pull and hold door window switch1,
2, 3, or6 (
�page 248).
Once a door window is closed com-
pletely, hold the respective switch for
approximately 3 seconds.
The door window is synchronized.
Summer opening feature
If the weather is warm, you can ventilate
the vehicle before driving off by simulta-
neously�
opening the door windows
�
opening the hinged quarter windows
�
opening the tilt/sliding sunroof*
(or tilt/sliding panel*)
�
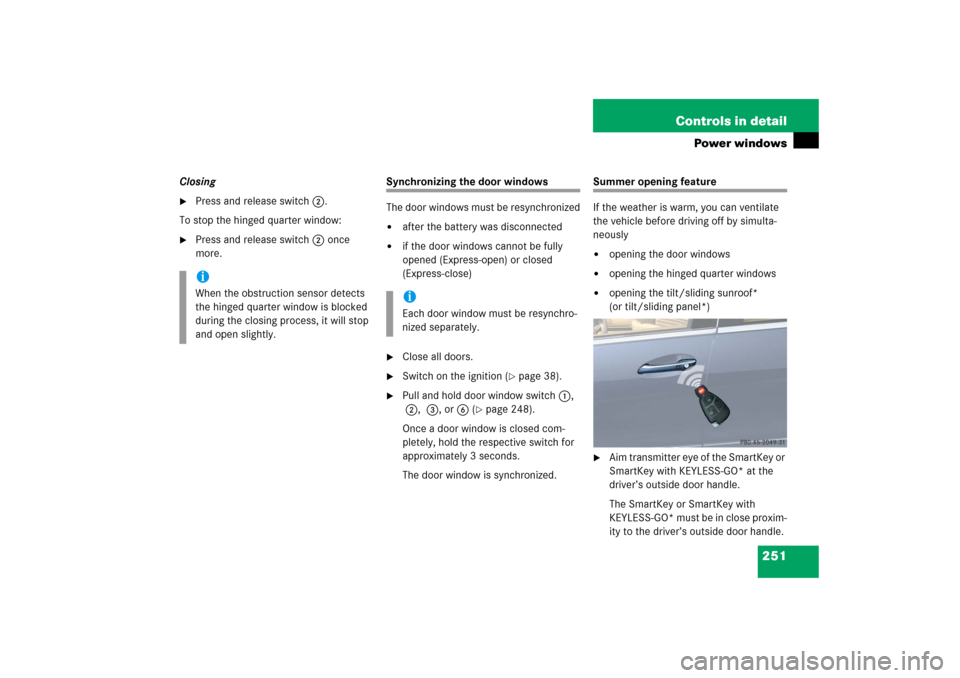
Aim transmitter eye of the SmartKey or
SmartKey with KEYLESS-GO* at the
driver’s outside door handle.
The SmartKey or SmartKey with
KEYLESS-GO* must be in close proxim-
ity to the driver’s outside door handle.
iWhen the obstruction sensor detects
the hinged quarter window is blocked
during the closing process, it will stop
and open slightly.
iEach door window must be resynchro-
nized separately.
Page 404 of 561
403 Practical hints
What to do if …
Where will I find ...?
Unlocking / locking in an emergency
Opening / closing in an emergency
Replacing SmartKey batteries
Replacing bulbs
Replacing wiper blades
Flat tire
Battery
Jump starting
Towing the vehicle
Fuses
Page 442 of 561
441 Practical hints
What to do if …
Display symbol
Display messages
Possible cause/consequence
Possible solution
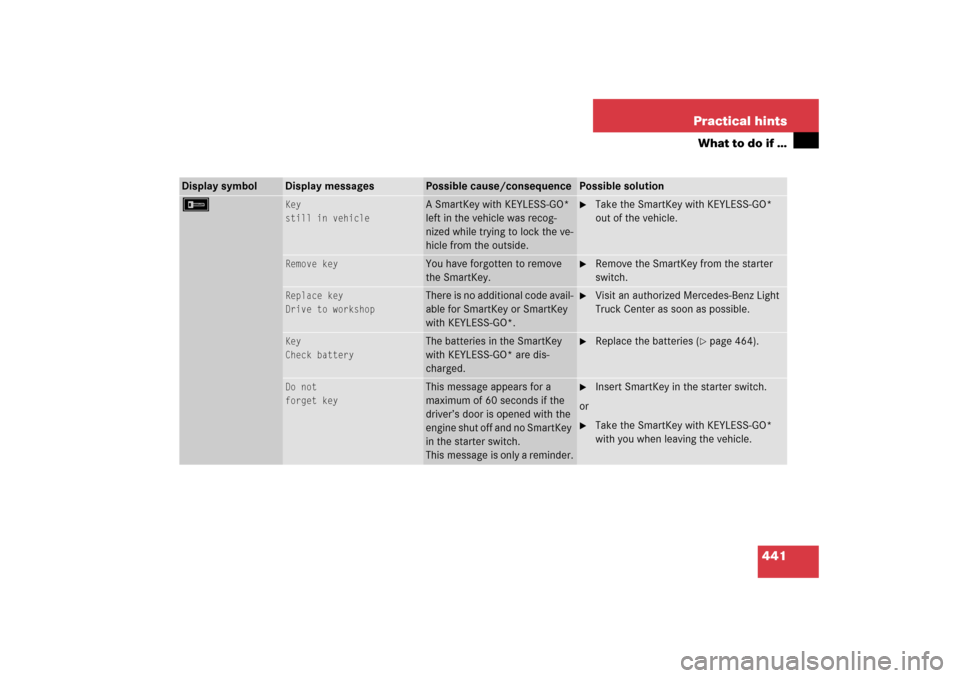
F
Key
still in vehicle
A SmartKey with KEYLESS-GO*
left in the vehicle was recog-
nized while trying to lock the ve-
hicle from the outside.
�
Take the SmartKey with KEYLESS-GO*
out of the vehicle.
Remove key
You have forgotten to remove
the SmartKey.
�
Remove the SmartKey from the starter
switch.
Replace key
Drive to workshop
There is no additional code avail-
able for SmartKey or SmartKey
with KEYLESS-GO*.
�
Visit an authorized Mercedes-Benz Light
Truck Center as soon as possible.
Key
Check battery
The batteries in the SmartKey
with KEYLESS-GO* are dis-
charged.
�
Replace the batteries (
�page 464).
Do not
forget key
This message appears for a
maximum of 60 seconds if the
driver’s door is opened with the
engine shut off and no SmartKey
in the starter switch.
This message is only a reminder.
�
Insert SmartKey in the starter switch.
or
�
Take the SmartKey with KEYLESS-GO*
with you when leaving the vehicle.
Page 461 of 561
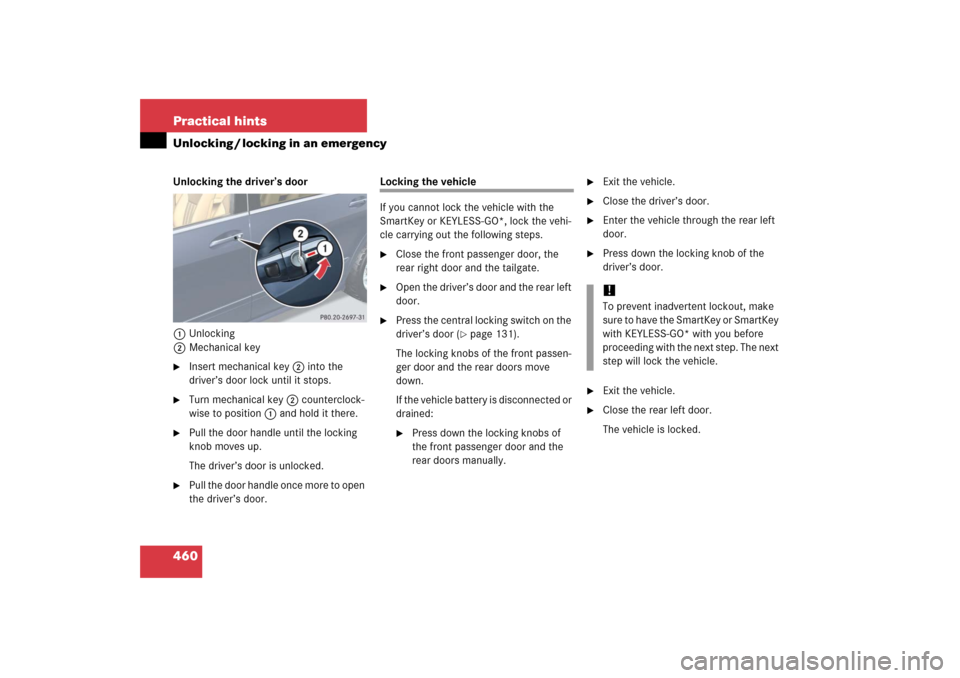
460 Practical hintsUnlocking / locking in an emergencyUnlocking the driver’s door
1Unlocking
2Mechanical key�
Insert mechanical key 2 into the
driver’s door lock until it stops.
�
Turn mechanical key 2 counterclock-
wise to position1 and hold it there.
�
Pull the door handle until the locking
knob moves up.
The driver’s door is unlocked.
�
Pull the door handle once more to open
the driver’s door.
Locking the vehicle
If you cannot lock the vehicle with the
SmartKey or KEYLESS-GO*, lock the vehi-
cle carrying out the following steps.�
Close the front passenger door, the
rear right door and the tailgate.
�
Open the driver’s door and the rear left
door.
�
Press the central locking switch on the
driver’s door (
�page 131).
The locking knobs of the front passen-
ger door and the rear doors move
down.
If the vehicle battery is disconnected or
drained:
�
Press down the locking knobs of
the front passenger door and the
rear doors manually.
�
Exit the vehicle.
�
Close the driver’s door.
�
Enter the vehicle through the rear left
door.
�
Press down the locking knob of the
driver’s door.
�
Exit the vehicle.
�
Close the rear left door.
The vehicle is locked.!To prevent inadvertent lockout, make
sure to have the SmartKey or SmartKey
with KEYLESS-GO* with you before
proceeding with the next step. The next
step will lock the vehicle.
Page 464 of 561
463 Practical hints
Replacing SmartKey batteries
�Replacing SmartKey batteries
If the batteries in the SmartKey or the
SmartKey with KEYLESS-GO* are dis-
charged, the vehicle can no longer be
locked or unlocked. It is recommended to
have the batteries replaced at an autho-
rized Mercedes-Benz Light Truck Center.
Batteries contain materials that can harm
the environment if disposed of improperly.
Recycling of batteries is the preferred
method of disposal. Many states require
sellers of batteries to accept old batteries
for recycling.
SmartKey
Replacement batteries: Lithium, type
CR 2025 or equivalent.�
Remove mechanical key1 from the
SmartKey (
�page 459).
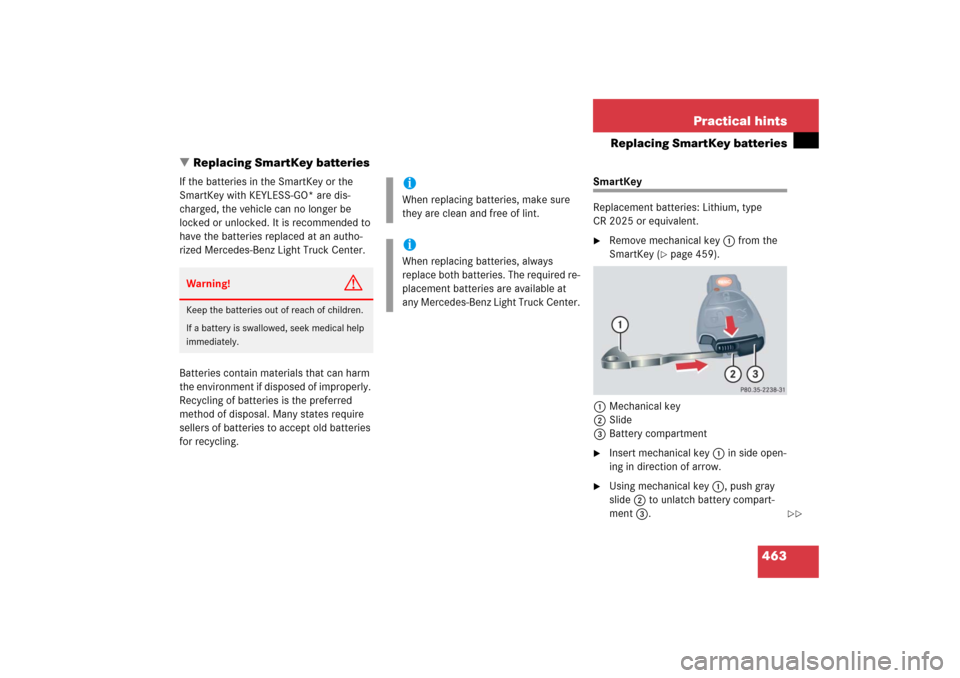
1Mechanical key
2Slide
3Battery compartment
�
Insert mechanical key 1 in side open-
ing in direction of arrow.
�
Using mechanical key 1, push gray
slide 2 to unlatch battery compart-
ment 3.
Warning!
G
Keep the batteries out of reach of children.
If a battery is swallowed, seek medical help
immediately.
iWhen replacing batteries, make sure
they are clean and free of lint.iWhen replacing batteries, always
replace both batteries. The required re-
placement batteries are available at
any Mercedes-Benz Light Truck Center.
��
Page 465 of 561
464 Practical hintsReplacing SmartKey batteries�
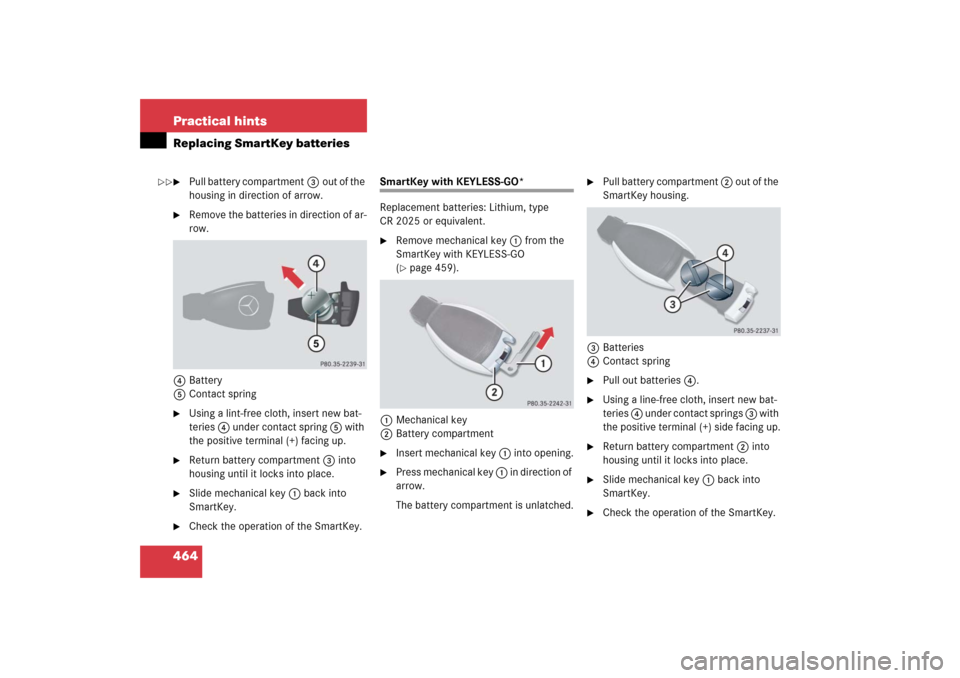
Pull battery compartment3out of the
housing in direction of arrow.
�
Remove the batteries in direction of ar-
row.
4Battery
5Contact spring
�
Using a lint-free cloth, insert new bat-
teries 4 under contact spring 5 with
the positive terminal (+) facing up.
�
Return battery compartment 3 into
housing until it locks into place.
�
Slide mechanical key 1 back into
SmartKey.
�
Check the operation of the SmartKey.
SmartKey with KEYLESS-GO*
Replacement batteries: Lithium, type
CR 2025 or equivalent.�
Remove mechanical key1 from the
SmartKey with KEYLESS-GO
(�page 459).
1Mechanical key
2Battery compartment
�
Insert mechanical key 1 into opening.
�
Press mechanical key 1 in direction of
arrow.
The battery compartment is unlatched.
�
Pull battery compartment 2 out of the
SmartKey housing.
3Batteries
4Contact spring
�
Pull out batteries4.
�
Using a line-free cloth, insert new bat-
teries 4 under contact springs 3 with
the positive terminal (+) side facing up.
�
Return battery compartment 2 into
housing until it locks into place.
�
Slide mechanical key 1 back into
SmartKey.
�
Check the operation of the SmartKey.
��