Page 309 of 561

308 Controls in detailUseful featuresRear center console*
The rear center console is located between
the second-row seats.
The rear center console contains:�
Storage compartment (
�page 297)
�
Cupholder (
�page 302)
�
DVD-player* (see separate COMAND
operating instructions)Removing
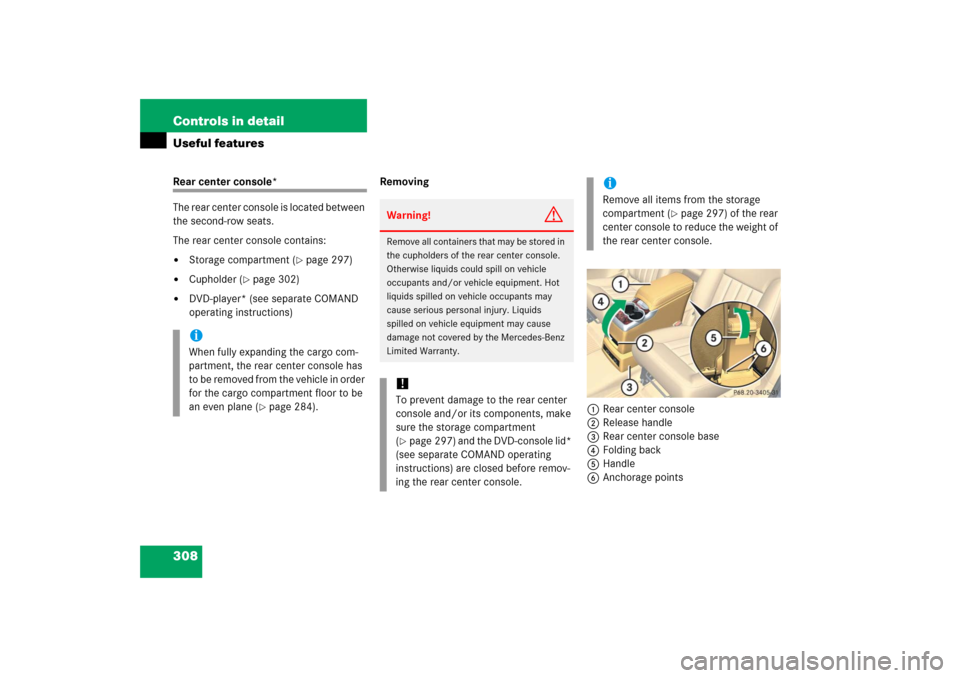
1Rear center console
2Release handle
3Rear center console base
4Folding back
5Handle
6Anchorage pointsiWhen fully expanding the cargo com-
partment, the rear center console has
to be removed from the vehicle in order
for the cargo compartment floor to be
an even plane (
�page 284).
Warning!
G
Remove all containers that may be stored in
the cupholders of the rear center console.
Otherwise liquids could spill on vehicle
occupants and/or vehicle equipment. Hot
liquids spilled on vehicle occupants may
cause serious personal injury. Liquids
spilled on vehicle equipment may cause
damage not covered by the Mercedes-Benz
Limited Warranty.!To prevent damage to the rear center
console and/or its components, make
sure the storage compartment
(�page 297) and the DVD-console lid*
(see separate COMAND operating
instructions) are closed before remov-
ing the rear center console.
iRemove all items from the storage
compartment (
�page 297) of the rear
center console to reduce the weight of
the rear center console.
Page 310 of 561

309 Controls in detail
Useful features
�
Pull release handle 2.
The front part of center console 1 is
released from base 3.
�
Lift center console 1 in direction of
arrow 4 and hold it there.
�
While holding center console 1 up,
grip handle 5.
�
Lift center console 1 at rear
handle5 to release the center con-
sole from anchorage points 6.
�
Take center console 1 out of the vehi-
cle.InstallingYou can install the rear center console in
two different positions. In the most for-
ward position (position 1) you can expand
the cargo compartment fully (
�page 284)
without removing the rear center console.
However, for the storage compartment
and the cupholders in the rear center con-
sole to be illuminated, the rear center con-
sole must be installed in the most rearward
position (position 0).
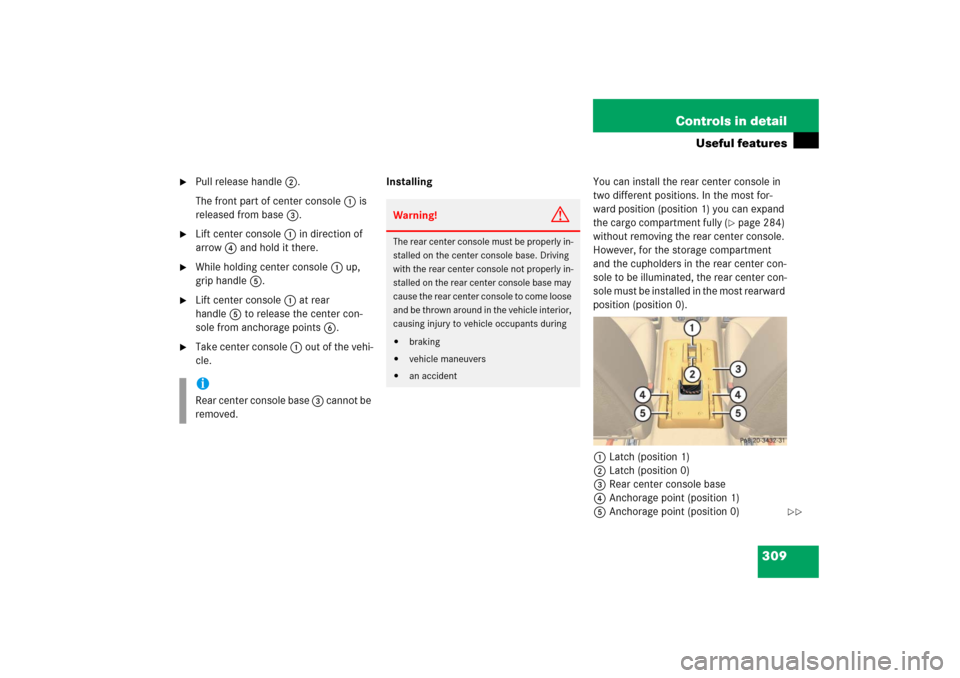
1Latch (position 1)
2Latch (position 0)
3Rear center console base
4Anchorage point (position 1)
5Anchorage point (position 0)
iRear center console base 3 cannot be
removed.
Warning!
G
The rear center console must be properly in-
stalled on the center console base. Driving
with the rear center console not properly in-
stalled on the rear center console base may
cause the rear center console to come loose
and be thrown around in the vehicle interior,
causing injury to vehicle occupants during�
braking
�
vehicle maneuvers
�
an accident
��
Page 402 of 561

401 Operation
Vehicle care
Cleaning the panorama roof with
tilt/sliding panel*
The rear part of the tilt/sliding panel* has
a protective layer on the inside. �
Use a soft, clean cloth and a mild win-
dow cleaning solution.
An automotive glass cleaner is recom-
mended.Light alloy wheels
If possible, clean wheels once a week.
�
Use Mercedes-Benz approved Wheel
Care, a soft bristle brush and a strong
spray of water for cleaning the light al-
loy wheels.
Plastic and rubber parts
�
Use a gentle dishwashing detergent or
mild detergent for delicate fabrics as a
washing solution.
Instrument cluster and cup holders
�
Use a gentle dishwashing detergent or
mild detergent for delicate fabrics as a
washing solution.
�
Wipe with a cloth moistened in a luke-
warm solution.
!Do not use a dry cloth, abrasives, sol-
vents or cleaners containing solvents.
Do not touch the protective layer with
hard objects such as an ice scraper or
ring. Never apply strong force and only
use a soft, non-scratching cloth when
cleaning the rear part of the tilt/sliding
panel*.
Otherwise you may scratch or damage
the protective layer.
!Only use acid-free cleaning materials.
Acid may cause corrosion or damage
the clear coat.!The vehicle should not be parked for an
extended period of time immediately
after it has been cleaned, especially not
after the wheel rims have been cleaned
with wheel rim cleaner. Wheel rim
cleaners can lead to increased corro-
sion of the brake disks and brake pads.
Therefore, the vehicle’s brake system
should always be warmed-up before it
is parked after cleaning. To do so,
please drive your vehicle for several
minutes to allow the brakes to dry.
When applying Mercedes-Benz ap-
proved Tire Care and Mercedes-Benz
approved Wheel Care products, take
care not to spray them on the brake
disks. !Do not use oil or wax on these parts.!To prevent scratches, do not use scour-
ing agents.
Page 540 of 561

539 Index
Closing the tailgate from the inside
electrically* 124
Closing the tailgate from the outside (vehi-
cles without KEYLESS-GO*) 126
Closing tilt/sliding sunroof*
In an emergency 462
Cockpit 22, 529
Cold tire inflation pressure 386, 529
Collapsible tire 457, 530
Collapsible wheel chock 457
Combination switch
High beam flasher 58
Turn signals 58
Windshield wipers 59
Compass 186, 327
Adjustment 186
Calibration 187
Setting the compass zone 186
Control and operation of radio
transmitters 339Control system 530
AUDIO menu 170
Convenience submenu 189
Display digital speedometer 169
Functions 165
Instrument cluster submenu 178,
180
Lighting submenu 182
Malfunction memory menu 173
Menus 164, 165
Selecting radio system 170
Selecting satellite radio* system 171
Settings menu 174
Standard display menu 168
Submenus 163, 165
TEL* menu 194
Trip computer menu 192
Vehicle submenu 186
Convenience submenu 189
Activating easy-entry/exit
feature* 189Coolant 351, 525
Adding 351
Anticorrosion/antifreeze
quantity 526
Checking level 351
Messages in display 433, 436
Temperature 341
Coolant level
Checking 351
Corner-illuminating front fog lamps* 152
Cruise control 264, 530
Canceling 266
Driving downhill 265
Driving uphill 265
Setting current speed 265
Setting speeds 269
Cruise control lever 264
Cup holder
Front center console 299
In rear center console 301
Cup holders 299
Cleaning 401
Curb weight 386, 530
Customer Assistance Center (CAC) 529
Page 557 of 561

556 IndexUseful features 294
Ashtrays* 302
Cup holders 299
Power outlets 306
Storage compartments 294
Tele Aid* 311
Telephone* 310
V
Vehicle
Data recording 20
Individual settings 174, 177
Locking in an emergency 460
Lowering 485
Proper use of 17
Unlocking in an emergency 459
Vehicle capacity weight 388, 534
Vehicle care
Engine cleaning 397
Light alloy wheels 401
Ornamental moldings 399
Paintwork 397
Parktronic* system sensor 399
Plastic and rubber parts 402Power washer 396
Steering wheel 402
Tar stains 396
Vehicle washing 397
Vehicle identification number (VIN) 511
Vehicle jack 456
Vehicle lighting
Checking 344
Vehicle loading terminology 385
Vehicle maximum load on the tire 388
Vehicle tool kit 454
Collapsible wheel chock 455, 457
Vehicle washing 397
VIN (Vehicle Identification Number) 511,
534W
Warning indicators
Parktronic* 276
Warning sounds
Drivers seat belts 77
Parking brake 57
Warranty coverage 509
Washer fluid see Windshield washer fluid
Washing the vehicle 395
Wear pattern (tires) 389
Weights 520
Wheel change
Tightening torque 485
Wheels
Tires and wheels 353
Window curtain air bags 76
Windows, cleaning 400
Windshield
Cleaning wiper blades 400
Defogging 224, 238