Page 444 of 539

443 Practical hints
Replacing bulbs
�Replacing bulbs
Bulbs
Safe vehicle operation depends on proper
exterior lighting and signaling. It is there-
fore essential that all bulbs and lamp as-
semblies are in good working order at all
times.
Correct headlamp adjustment is extremely
important. Have headlamps checked and
readjusted at regular intervals. See an
authorized Mercedes-Benz Light Truck
Center for headlamp adjustment.Front lamps
iSubstitute bulbs will be brought into
use when the following lamps malfunc-
tion:�
Brake lamps
�
Parking lamps
�
Turn signal lamps
�
Tail lamps
Observe the messages in the multi-
function display (
�page 418).
iIf the headlamps or front fog lamps are
fogged up on the inside as a result of
high humidity, driving the vehicle a dis-
tance with the lights on should clear up
the fogging.
Lamp
Type
1
Parking and standing
lamp
W5W
2
High beam/high
beam flasher lamp
H7 (55 W)
3
Low beam
1
1Vehicles with Bi-Xenon headlamps*: Do not re-
place the Bi-Xenon bulbs yourself. See your autho-
rized Mercedes-Benz Light Truck Center.
H7 (55 W)
Bi-Xenon*:
D2S-35 W
4
Additional turn signal
lamp
LED
5
Side marker lamp
WY 5 W
6
Turn signal lamp
3457 AK S-8
(30/2.2 cp
bulb)
7
Front fog lamp
H11 (55 W)
Page 445 of 539

444 Practical hintsReplacing bulbsRear lamps Notes on bulb replacement
�
Only use 12 volt bulbs of the same type
and with the specified watt rating.
�
Switch lights off before changing a bulb
to prevent short circuits.
�
Always use a clean lint-free cloth when
handling bulbs.
�
Your hands should be dry and free of oil
and grease.
�
If the newly installed bulb does not
come on, visit an authorized
Mercedes-Benz Light Truck Center.
Lamp
Type
8
High mounted brake
lamp
LED
9
Brake lamp
P21W
a
Backup lamp
P21W
b
Turn signal lamp
PY 21 W
c
Side marker lamp
P21/4W
d
Tail, parking, standing
lamp, rear fog lamp
(only driver’s side)
P21/4W
e
License plate lamps
C5W
Warning!
G
Bulbs and bulb sockets can be very hot.
Allow the lamp to cool down before chang-
ing a bulb.
Keep bulbs out of reach of children.
Halogen lamps contain pressurized gas.
A bulb can explode if you:�
touch or move it when hot
�
drop the bulb
�
scratch the bulb
Wear eye and hand protection.
Because of high voltage in Xenon lamps, it is
dangerous to replace the bulb or repair the
lamp and its components. We recommend
that you have such work done by a qualified
technician.
Page 446 of 539
445 Practical hints
Replacing bulbs
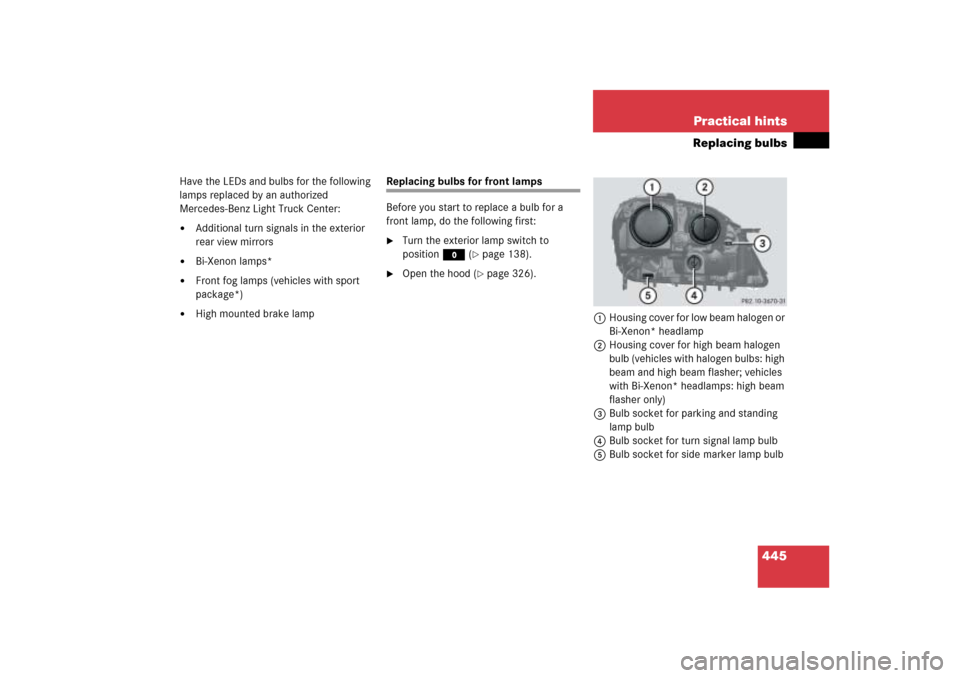
Have the LEDs and bulbs for the following
lamps replaced by an authorized
Mercedes-Benz Light Truck Center:�
Additional turn signals in the exterior
rear view mirrors
�
Bi-Xenon lamps*
�
Front fog lamps (vehicles with sport
package*)
�
High mounted brake lamp
Replacing bulbs for front lamps
Before you start to replace a bulb for a
front lamp, do the following first:�
Turn the exterior lamp switch to
positionM (
�page 138).
�
Open the hood (
�page 326).
1Housing cover for low beam halogen or
Bi-Xenon* headlamp
2Housing cover for high beam halogen
bulb (vehicles with halogen bulbs: high
beam and high beam flasher; vehicles
with Bi-Xenon* headlamps: high beam
flasher only)
3Bulb socket for parking and standing
lamp bulb
4Bulb socket for turn signal lamp bulb
5Bulb socket for side marker lamp bulb
Page 449 of 539
.
�
Pull out bulb socket3 with the bulb.
�
Press gently onto the bulb and tu")
448 Practical hintsReplacing bulbsParking/standing lamp bulb�
Turn bulb socket3 counterclockwise
and remove it (
�page 445).
�
Pull out bulb socket3 with the bulb.
�
Press gently onto the bulb and turn
counterclockwise out of bulb
socket3.
�
Press the new bulb gently into bulb
socket3 and turn clockwise until it
engages.
�
Press bulb socket3 back into the
lamp.
�
Align bulb socket3 and turn it clock-
wise.Turn signal bulb
1Bulb socket
�
Turn bulb socket1 counterclockwise
and pull it out.
�
Press the new bulb gently into
socket1, turn socket counterclock-
wise and remove it.
�
Insert the new bulb in socket1, push
and turn the bulb clockwise.
�
Align bulb socket1 and turn bulb
socket clockwise.Side marker lamp bulb
�
Turn bulb socket5 counterclockwise
and remove it (
�page 445).
�
Pull out bulb socket5 with the bulb.
�
Press gently onto the bulb and turn
counterclockwise out of bulb
socket5.
�
Press the new bulb gently into bulb
socket5 and turn clockwise until it
engages.
�
Press bulb socket5 back into the
lamp.
�
Align bulb socket5 and turn it clock-
wise.
Page 452 of 539
451 Practical hints
Replacing bulbs
Example rear lamp passenger-side1Brake lamp
2Backup lamp
3Rear fog lamp (only driver’s side), tail
lamp, parking and standing lamp
4Side marker lamp
5Turn signal lamp�
Turn the respective bulb socket with
the bulb counterclockwise and remove
it.
�
Press gently onto the respective bulb
and turn counterclockwise out of its
bulb socket.
�
Press the new bulb gently into its bulb
socket and turn clockwise until it en-
gages.
�
Align bulb socket and turn it clockwise.
License plate lamp
1License plate lamp cover
2Screw
�
Loosen both screws2.
�
Remove license plate lamp cover1.
�
Replace the tubular bulb.
�
Reinstall license plate lamp cover1.
�
Retighten screws2.
Adjusting headlamp aim
VVertical centerline
HHeadlamp mounting high, measured
from the center
iHigh beam adjustments simultaneous-
ly aim the low beam.
Vehicle should have a normal tailgate
load.
Page 474 of 539

473 Practical hints
Towing the vehicle
!
To be certain to avoid additional dam-
age to the vehicle powertrain, however
you should observe the following:�
With damage to the front axle�
raise front axle
�
remove flexible drive shaft be-
tween rear axle and transfer
case
�
With damage to the rear axle�
raise rear axle
�
tow vehicle with wheel lift or
dolly placed under front wheels
�
With damage to the transfer case�
remove flexible drive shaft to
the drive axles
Warning!
G
If circumstances require towing the vehicle
with all wheels on the ground, always tow
with a tow bar if:�
the engine will not run
�
there is a malfunction in the power sup-
ply or in the vehicle’s electrical system
as that will be necessary to adequately con-
trol the towed vehicle.
Prior to towing the vehicle with all wheels on
the ground, make sure the SmartKey is in
starter switch position2.
If the SmartKey is left in starter switch
position0 for an extended period of time, it
can no longer be turned in the switch. In this
case, the steering is locked. To unlock, re-
move SmartKey from starter switch and re-
insert.
Warning!
G
With the engine not running, there is no
power assistance for the brake and steering
systems. In this case, it is important to keep
in mind that a considerably higher degree of
effort is necessary to brake and steer the
vehicle. Adapt your driving accordingly.iTo signal turns while being towed with
hazard warning flasher in use, turn
SmartKey in starter switch to
position2 and activate combination
switch for left or right turn signal in usu-
al manner – only the selected turn sig-
nal will operate.
Upon canceling the turn signal, the
hazard warning flasher will operate
again.
Page 505 of 539

Modular COMAND System
Information and operating center for
vehicle sound and communications
systems, including the radio and the ra-
d")
504 Technical termsMaximum tire inflation pressure
(
�page 366)
Modular COMAND System
Information and operating center for
vehicle sound and communications
systems, including the radio and the ra-
dio and navigation system, as well as
for other optional equipment (CD
changer, telephone, etc.).
Memory function*
Used to store three individual seat,
steering wheel and exterior mirror
positions.
MON
(Motor O
ctane N
umber)
The Motor Octane Number for gasoline
as determined by a standardized meth-
od. It is an indication of a gasoline’s
ability to resist undesired detonation
(knocking). The average of both the
MON (Motor Octane Number) and
->RON (Research Octane Number) is
posted at the pump, also known as
ANTI-KNOCK INDEX.Multifunction display
The display field in the instrument clus-
ter used to present information provid-
ed by the control system.
Multifunction steering wheel
Steering wheel with buttons for operat-
ing the control system.
Normal occupant weight
(
�page 366)
OCS
(Occupant C
lassification S
ystem)
The system automatically turns the
front passenger front air bag on or off
based on the classified occupant size
category determined by weight sensor
readings from the seat.
Overspeed range
Engine speeds within the red marking
on the tachometer dial. Avoid this en-
gine speed range, as it may result in se-
rious engine damage that is not
covered by the Mercedes-Benz Limited
Warranty.Parktronic (Parking assist)*
System which uses visual and acoustic
signals to assist the driver during park-
ing maneuvers.
Poly-V-belt drive
Drives engine-components (alternator,
AC compressor, etc.) from the engine.
Power train
Collective term designating all compo-
nents used to generate and transmit
motive power to the drive axles, includ-
ing
�
Engine
�
Clutch/torque converter
�
Transmission
�
Transfer case
�
Drive shaft
�
Differential
�
Axle shafts/axles
Page 508 of 539

507 Index
A
ABS 93, 501
ABS control 93
Malfunction indicator lamp 382
Messages in display 397
Off-road - ABS 94
Warning lamp 382
Accelerator position, automatic
transmission 190
Accessory weight 365
Accident
In case of 59
Activating
Air circulation mode 226
Air conditioning (cooling) 211
Air recirculation mode 209, 224
Anti-theft alarm system 101
Central locking (control system) 172
Defrosting 208
Easy-entry/exit feature* 173
ESP
®
98Exterior headlamps 54
Hazard warning flasher 145
Headlamps 54
High beams 142
Ignition 34
Immobilizer 62, 100
Rear window defroster 201
Rear window wiper 58
Residual heat 212, 227
Seat heating* 134
Tow-away alarm 102
Warning indicators (Parktronic*) 256
Windshield wipers 55
Adaptive Damping
System (ADS)* 249, 501
Adding
Coolant 333
Engine oil 331
Additional turn signals 443Adjusting 38
Air distribution 207, 222
Air volume 207, 208, 222
Backrest tilt 40
Compass zone 171
Exterior rear view mirror 44
Head restraint height 40
Head restraint tilt 41
Headlamp aim 451
Instrument cluster illumination 148
Interior rear view mirror 44
Mirrors 43
Multicontour seat* 132
Seat cushion depth 132
Seat cushion tilt 40
Seat fore and aft adjustment 39
Seat height 39
Seats 38
Steering column height 43
Steering wheel 41
Adjusting steering column 43
ADS* 501
, tail
lamp, parking and standing lamp
4Side marker lamp
5Turn signal")