Page 172 of 539

171 Controls in detail
Control system
Vehicle submenu
Access the
Vehicle
submenu via the
Settings...
menu. Use the
Vehicle
sub-
menu to make general vehicle settings.
The following functions are available:Adjusting compass zone
This function is not available if your vehicle
is equipped with the Modular COMAND
System and navigation module*.
Use this function to set the compass zone.
To set the compass zone:
�
Move the selection marker to the Vehicle
submenu using theæ
orç button.
�
Press buttonj ork repeatedly
until you see this message in the dis-
play:
Compass Adjustment Zone
.
The selection marker is on the current
setting.
�
Press buttonæ orç to set the
respective compass zone.For information on how to select the prop-
er geographic zone, see “Compass”
(
�page 295).
Calibrating compass
This function is not available if your vehicle
is equipped with the Modular COMAND
System and navigation module*.
Use this function to calibrate the compass
zone.
To calibrate the compass:
�
Move the selection marker to the Vehicle
submenu using theæ
orç button.
�
Press buttonj ork repeatedly
until you see this message in the dis-
play:
Compass Calibration
.
The selection marker is on the current
setting.
Function
Page
Adjusting compass zone
171
Calibrating compass
171
Display when ignition is
switched off
172
Set automatic locking
172
Limiting opening height of tail-
gate*
173
��
Page 173 of 539

172 Controls in detailControl system�
Press buttonæ to start calibrating
the compass.
Display when ignition is switched off
Use this function to select which message
will be shown in the multifunction display
when the ignition is being switched off.
�
Move the selection marker to the Vehicle
submenu using theæ
orç button.
�
Press buttonj ork repeatedly
until you see this message in the dis-
play:
Display when ignition is
turned off
.
The selection marker is on the current
setting.
�
Press buttonæ orç to select
the desired setting.Setting automatic locking
Use this function to activate or deactivate
the automatic central locking. With the au-
tomatic central locking system activated,
the vehicle is centrally locked at vehicle
speeds of approximately 9 mph
(15 km/h).
�
Move the selection marker to the Vehicle
submenu using theæ
orç button.
�
Press buttonj ork repeatedly
until you see this message in the dis-
play:
Automatic door lock
.
The selection marker is on the current
setting.
�
Press buttonæ orç to switch Automatic door lock
On or
Off
.
��
Page 176 of 539
175 Controls in detail
Control system
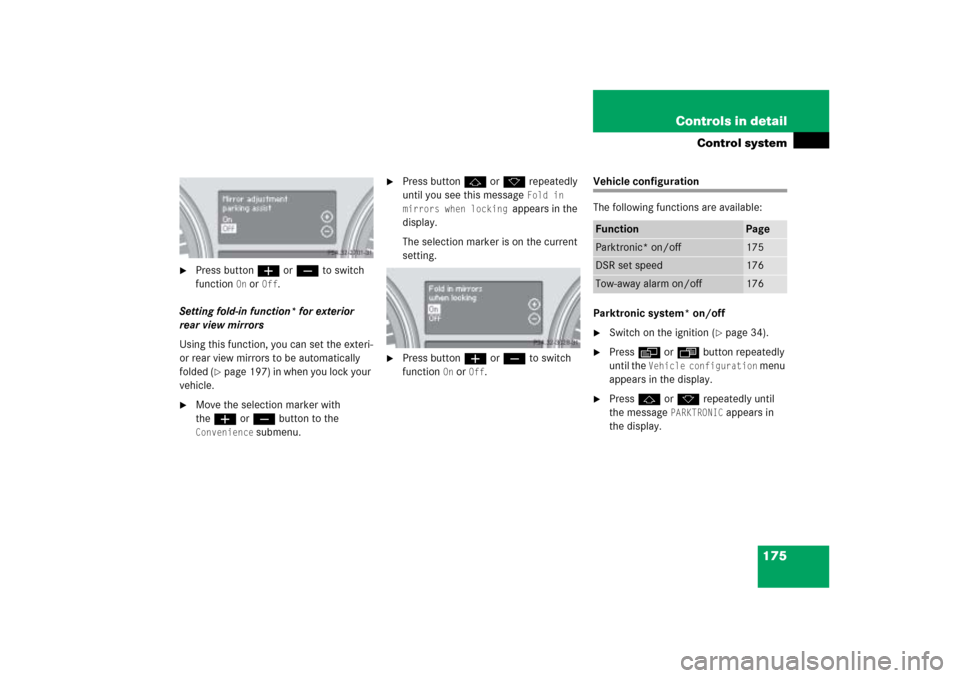
�
Press buttonæ orç to switch
function
On or
Off
.
Setting fold-in function* for exterior
rear view mirrors
Using this function, you can set the exteri-
or rear view mirrors to be automatically
folded (
�page 197) in when you lock your
vehicle.
�
Move the selection marker with
theæ orç button to the
Convenience
submenu.
�
Press buttonj ork repeatedly
until you see this message
Fold in
mirrors when locking
appears in the
display.
The selection marker is on the current
setting.
�
Press buttonæ orç to switch
function
On or
Off
.
Vehicle configuration
The following functions are available:
Parktronic system* on/off�
Switch on the ignition (
�page 34).
�
Pressè orÿ button repeatedly
until the
Vehicle configuration
menu
appears in the display.
�
Pressj ork repeatedly until
the message
PARKTRONIC
appears in
the display.
Function
Page
Parktronic* on/off
175
DSR set speed
176
Tow-away alarm on/off
176
Page 177 of 539

programmed")
176 Controls in detailControl system�
Press buttonæ orç to switch
function
On or
Off
.
This setting is maintained until the ignition
is switched off.
DSR (Downhill Speed Regulation)
programmed default speed
In the
Downhill Speed Regulation
menu,
you can program the default speed the
DSR is set to when it is activated.
You can program the default speed be-
tween 4 - 10 mph (Canada: 6 - 18 km/h).
The set value is increased in 1 mph
(Canada: 2 km/h) increments.
�
Pressè orÿ button repeatedly
until the
Vehicle configuration
menu
appears in the multifunction display.
�
Pressj ork button repeatedly
until the message
DSR Speed
appears
in the display.
The selection marker is on the current
setting.
�
Pressæ orç button repeatedly
until the desired speed is shown in the
multifunction display.
When DSR is switched on, DSR will use
the programmed default speed to regu-
late the vehicle’s speed.Tow-away alarm on/off
You can switch off the tow-away alarm,
e.g. before towing the vehicle, or when
parking on a surface subject to movement,
such as a ferry or auto train.
�
Pressè orÿ button repeatedly
until the
Vehicle configuration
menu appears in the display.
�
Pressj ork button repeatedly
until the message
Tow-away alarm
appears in the display.
iOnce DSR is switched on, you can
adjust the set speed using the cruise
control lever (
�page 246).
Page 195 of 539
194 Controls in detailGood visibilityFor information on the windshield wipers,
see “Windshield wipers” (
�page 55).
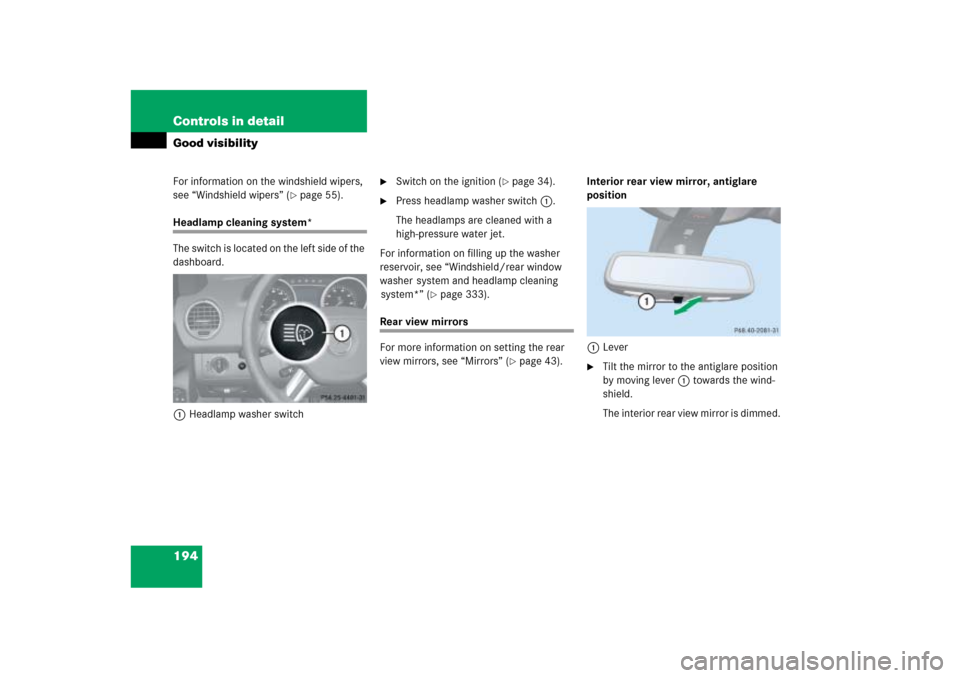
Headlamp cleaning system*
The switch is located on the left side of the
dashboard.
1Headlamp washer switch
�
Switch on the ignition (
�page 34).
�
Press headlamp washer switch1.
The headlamps are cleaned with a
high-pressure water jet.
For information on filling up the washer
reservoir, see “Windshield/rear window
washer system and headlamp cleaning
system*” (
�page 333).
Rear view mirrors
For more information on setting the rear
view mirrors, see “Mirrors” (
�page 43).Interior rear view mirror, antiglare
position
1Lever
�
Tilt the mirror to the antiglare position
by moving lever1 towards the wind-
shield.
The interior rear view mirror is dimmed.
Page 196 of 539

195 Controls in detail
Good visibility
Auto-dimming rear view mirror*
The reflection brightness of the exterior
rear view mirror on the driver’s side and
the interior rear view mirror will respond
automatically to glare when�
the ignition is switched on
�
incoming light from headlamps falls on
the sensor in the interior rear view
mirror
The rear view mirror will not react if
�
reverse gearR is engaged
�
the interior light is turned on
Warning!
G
The auto-dimming function does not react if
incoming light is not aimed directly at sen-
sors in the interior rear view mirror.
The interior rear view mirror and the exterior
rear view mirror on the driver’s side do not
react, for example, when transporting cargo
which covers the rear window.
Glare can endanger you and others.Warning!
G
In case of an accident, liquid electrolyte may
escape from the mirror housing if the mirror
glass breaks.
Electrolyte has an irritating effect. Do not
allow the liquid to come into contact with
eyes, skin, clothing, or respiratory system.
In case it does, immediately flush affected
area with water, and seek medical help if
necessary.
!Electrolyte drops coming into contact
with the vehicle paint finish can be
completely removed only while in the
liquid state and by applying plenty of
water.Warning!
G
Exercise care when using the passen-
ger-side exterior rear view mirror. The mirror
surface is convex (outwardly curved surface
for a wider field of view). Objects in mirror
are closer than they appear. Check your
interior rear view mirror or glance over your
shoulder before changing lanes.
Page 197 of 539

196 Controls in detailGood visibilityActivating exterior rear view mirror
parking position*
Follow these steps to activate the mirror
parking position so that the
passenger-side exterior rear view mirror
will be turned downward to the stored
position.
The buttons are located on the door
control panel.
1Driver’s side exterior rear view mirror
button
2Adjustment button
3Passenger-side exterior rear view mir-
ror button
�
Make sure you have stored a parking
position for the passenger-side exterior
rear view mirror (
�page 137).
�
Make sure the
Mirror adjustment
parking assist function in the
Conve-
nience
submenu of the control system
is switched to
On (�page 174).
�
Switch on the ignition (
�page 34).
�
Place the gear selector lever in reverse
gearR.
The indicator lamp on the driver’s side
or passenger-side exterior rear view
mirror button comes on, dependent
from the last setting.When the driver’s side exterior rear view
mirror button comes on:
�
Press button3 for the passenger-side
exterior rear view mirror.
The passenger-side exterior rear view mir-
ror will be turned downward to the stored
position.
When the passenger-side exterior rear
view mirror button comes on:
The passenger-side exterior rear view mir-
ror will be turned downward to the stored
position.iThe exterior rear view mirror parking
position is key-dependent. For more in-
formation on storing exterior rear view
mirror parking position, see “Storing
exterior rear view mirror parking posi-
tion” (
�page 137).
Page 198 of 539

197 Controls in detail
Good visibility
The exterior rear view mirror returns to its
previously stored driving position:�
when you switch off the ignition
�
ten seconds after you put the gear
selector lever out of positionR
Approximately 15 seconds later the in-
dicator lamp on the exterior rear view
mirror button goes out.
�
immediately once your vehicle exceeds
a speed of approx. 6 mph (10 km / h)
�
immediately when you press button1
for driver’s side mirror (
�page 196)Power folding exterior rear view
mirrors*
Folding the exterior mirrors in and out
automatically
When the corresponding function in the
control system is activated (
�page 175):
�
The exterior rear view mirrors automat-
ically fold in as soon as the vehicle is
locked from the outside.
�
The exterior rear view mirrors automat-
ically fold out as soon as the vehicle is
unlocked and the driver’s or front pas-
senger door are subsequently opened.Folding the exterior mirrors in and out
manually
The button is located on the door control
panel.
1Button for folding exterior mirrors in
and out
�
Switch on the ignition (
�page 34).
iWith gear selector lever in reverse
gearR you can deactivate the exterior
rear view mirror parking position by
pressing button1, or activate by
pressing button3. The indicator lamp
of the selected button is on.
!Before you drive the vehicle through an
automatic car wash, fold the exterior
mirrors in, otherwise they may get
damaged.