Page 140 of 539

139 Controls in detail
Lighting
Manual headlamp mode
The low beam headlamps and the parking
lamps can be switched on and off with the
exterior lamp switch.
Automatic headlamp mode
The following lamps switch on and off au-
tomatically depending on the brightness of
the ambient light:�
Low beam headlamps
�
Tail and parking lamps
�
License plate lamps
�
Side marker lamps
iWith the SmartKey removed from the
starter switch and the driver’s door
open, a warning sounds if the parking
lamps or low beam headlamps are
switched on.
The message
Switch off lights
appears in the multifunction display.
iWith the daytime running lamp mode
activated and the engine running, the
low beam headlamps cannot be
switched off manually.
To activate the daytime running lamp
mode, see “Setting daytime running
lamp mode (USA only)” (
�page 140).
Warning!
G
If the exterior lamp switch is set toU,�
the headlamps may switch off unexpect-
edly when the system senses bright
ambient light, for example light from
oncoming traffic.
�
the headlamps will not be automatically
switched on under foggy conditions.
To minimize risk to you and to others,
activate headlamps by turning exterior lamp
switch toB when driving or when traffic
and/or ambient lighting conditions require
you to do so.
In low ambient lighting conditions, only
switch from positionU toB with the
vehicle at a standstill in a safe location.
Switching fromUtoB will briefly
switch off the headlamps. Doing so while
driving in low ambient lighting conditions
may result in an accident.
The automatic headlamp feature is only an
aid to the driver. The driver is responsible for
the operation of the vehicle’s lights at all
times.
Page 150 of 539

149 Controls in detail
Instrument cluster
Trip odometer
Make sure you are viewing the trip odome-
ter display (
�page 150).
�
If it is not displayed, press buttonè
orÿ on the multifunction steering
wheel (
�page 151) until the trip odom-
eter appears.
�
Press and hold the reset button on the
instrument cluster (
�page 148) until
the trip odometer is reset.
Tachometer
The red marking on the tachometer
(�page 24) denotes excessive engine
speed.To help protect the engine, the fuel supply
is interrupted if the engine is operated
within the red marking.
Outside temperature indicator
The outside temperature is displayed in
the multifunction display (
�page 150).The temperature sensor is located in the
front bumper area. Due to its location, the
sensor can be affected by road or engine
heat during idling or slow driving. This
means that the accuracy of the displayed
temperature can only be verified by com-
parison to a thermometer placed next to
the sensor, not by comparison to external
displays (e.g. bank signs etc.).
When moving the vehicle into colder ambi-
ent temperatures (e.g. when leaving your
garage), you will notice a delay before the
lower temperature is displayed.
A delay also occurs when ambient temper-
atures rise. This prevents inaccurate tem-
perature indications caused by heat
radiated from the engine during idling or
slow driving.
!Avoid driving at excessive engine
speeds, as it may result in serious en-
gine damage that is not covered by the
Mercedes-Benz Limited Warranty.
Warning!
G
The outside temperature indicator is not de-
s i g n e d t o s e r v e a s a n i c e - w a r n i n g d e v i c e a n d
is therefore unsuitable for that purpose.
Indicated temperatures just above the freez-
ing point do not guarantee that the road sur-
face is free of ice. The road may still be icy,
especially in wooded areas or on bridges.
Page 151 of 539

150 Controls in detailControl systemThe control system is activated as soon as
the SmartKey in the starter switch is
turned to position1 or as soon as the
KEYLESS-GO start/stop button* is in
position1. The control system enables you
to:�
call up information about your vehicle
�
change vehicle settings
For example, you can use the control sys-
tem to find out when your vehicle is next
due for service, to set the language for
messages in the instrument cluster dis-
play, and much more.
The control system relays information to
the multifunction display.
Multifunction display
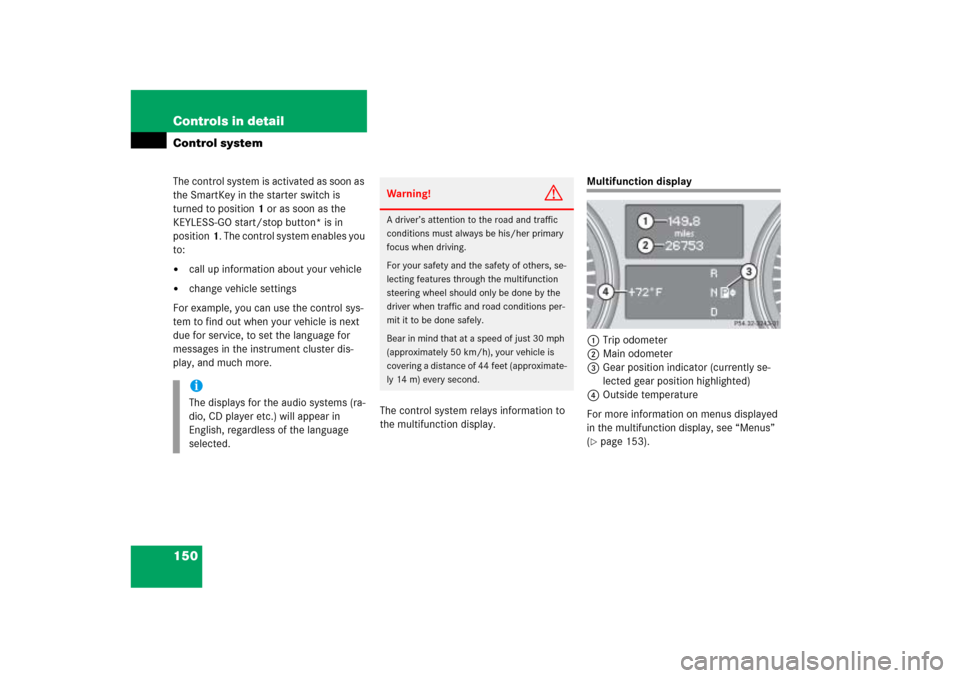
1Trip odometer
2Main odometer
3Gear position indicator (currently se-
lected gear position highlighted)
4Outside temperature
For more information on menus displayed
in the multifunction display, see “Menus”
(�page 153).
iThe displays for the audio systems (ra-
dio, CD player etc.) will appear in
English, regardless of the language
selected.
Warning!
G
A driver’s attention to the road and traffic
conditions must always be his/her primary
focus when driving.
For your safety and the safety of others, se-
lecting features through the multifunction
steering wheel should only be done by the
driver when traffic and road conditions per-
mit it to be done safely.
Bear in mind that at a speed of just 30 mph
(approximately 50 km/h), your vehicle is
covering a distance of 44 feet (approximate-
ly 14 m) every second.
Page 152 of 539

151 Controls in detail
Control system
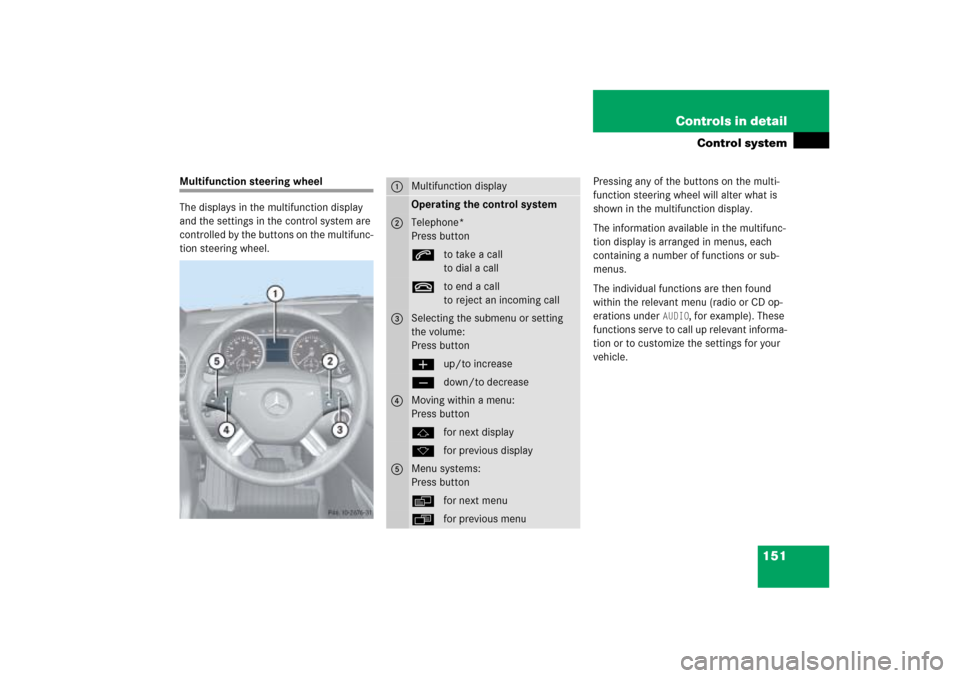
Multifunction steering wheel
The displays in the multifunction display
and the settings in the control system are
controlled by the buttons on the multifunc-
tion steering wheel.Pressing any of the buttons on the multi-
function steering wheel will alter what is
shown in the multifunction display.
The information available in the multifunc-
tion display is arranged in menus, each
containing a number of functions or sub-
menus.
The individual functions are then found
within the relevant menu (radio or CD op-
erations under
AUDIO
, for example). These
functions serve to call up relevant informa-
tion or to customize the settings for your
vehicle.
1
Multifunction displayOperating the control system
2
Telephone*
Press buttonsto take a call
to dial a calltto end a call
to reject an incoming call
3
Selecting the submenu or setting
the volume:
Press buttonæup/to increaseçdown/to decrease
4
Moving within a menu:
Press buttonjfor next displaykfor previous display
5
Menu systems:
Press buttonèfor next menuÿfor previous menu
Page 153 of 539
152 Controls in detailControl systemIt is helpful to think of the menus, and the
functions within each menu, as being ar-
ranged in a circular pattern.�
If you press buttonè orÿ re-
peatedly, you will pass through each
menu one after the other.
�
If you press buttonk orj re-
peatedly, you will pass through each
function display, one after the other, in
the current menu.In the
Settings...
menu, instead of
functions you will find a number of
submenus for calling up and changing
settings. For instructions on using these
submenus, see “Settings menu”
(
�page 161).
The number of menus available in the sys-
tem depends on which optional equipment
is installed in your vehicle.The menus are described on the following
pages.
Page 155 of 539
154 Controls in detailControl systemMenus, submenus and functions
Menu1
Menu2
Menu3
Menu4
Menu5
Menu6
Standard display
AUDIO
NAV*
Off-road
Vehicle status
message memory
Settings
(�page 156)
(�page 157)
(�page 158)
(�page 159)
(�page 159)
(�page 161)
Commands/submenusTrip odometer and
Main odometer
Select radio station
Show route guid-
ance instructions,
current direction
traveled
Compass
Call up vehicle mal-
function, warning
and system status
messages stored in
memory
Reset to factory set-
tings
Check tire inflation
pressure
Select satellite radio*
station
Vehicle level*
Instrument cluster
submenu
Check coolant temper-
ature
Operate CD player
Time/Date sub-
menu
Digital speedometer/
outside temperature
Lighting submenu
Call up maintenance
service indicator
Vehicle submenu
Check engine oil level*
Convenience sub-
menu
Page 156 of 539
155 Controls in detail
Control system
Menu7
Menu8
Menu9
Vehicle configuration
Trip computer
Telephone*
(�page 175)
(�page 177)
(�page 178)
Commands/submenusParktronic*
Fuel consumption statis-
tics after start
Load phone book
DSR (Downhill Speed Reg-
ulation) programmed
default speed
Fuel consumption statis-
tics since the last reset
Search for name in phone
book
Tow-away alarm
Call up range
iThe headings used in the menus table
are designed to facilitate navigation
within the system and are not neces-
sarily identical to those shown in the
control system displays.
The first function displayed in each
menu will automatically show you
which part of the system you are in.
Page 157 of 539

156 Controls in detailControl systemStandard display menu
In basic mode, the multifunction display
shows the trip odometer and the main
odometer. This is known as the standard
display.
1Trip odometer
2Main odometer
In case you see another display, press
buttonè orÿ repeatedly until the
standard display appears.�
Press buttonk orj to select
the functions in the standard display
menu.The following functions are available:
Call up digital speedometer
�
Press buttonk orj until the
digital speedometer or the outside
temperature appears in the multifunc-
tion display.
To select whether the digital speedometer
or the outside temperature is shown in the
multifunction display, see “Selecting dis-
play (speed display or outside tempera-
ture) for status display” (
�page 165).Call up coolant temperature display
�
Press buttonk orj repeatedly
until the coolant temperature appears
in the multifunction display.
Function
Page
Check engine oil level (ML 500)
328
Call up maintenance service
indicator
371
Call up digital speedometer
156
Call up coolant temperature
display
156
Check tire inflation pressure
347
iDuring severe operating conditions,
e.g. stop-and-go traffic, the coolant
temperature may rise close to 248°F
(120°C).!The engine should not be operated with
the coolant temperature above 248°F
(120°C). Doing so may cause serious
engine damage which is not covered by
the Mercedes-Benz Limited Warranty.