Page 432 of 539

431 Practical hints
Where will I find ...?
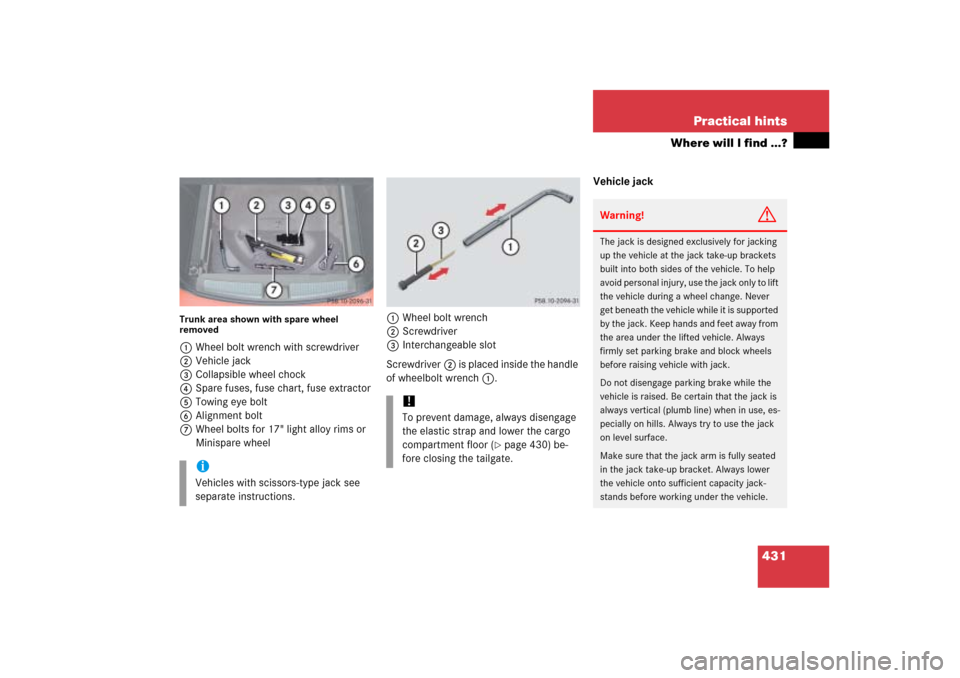
Trunk area shown with spare wheel
removed1Wheel bolt wrench with screwdriver
2Vehicle jack
3Collapsible wheel chock
4Spare fuses, fuse chart, fuse extractor
5Towing eye bolt
6Alignment bolt
7Wheel bolts for 17" light alloy rims or
Minispare wheel1Wheel bolt wrench
2Screwdriver
3Interchangeable slot
Screwdriver2 is placed inside the handle
of wheelbolt wrench1.Vehicle jack
iVehicles with scissors-type jack see
separate instructions.
!To prevent damage, always disengage
the elastic strap and lower the cargo
compartment floor (
�page 430) be-
fore closing the tailgate.
Warning!
G
The jack is designed exclusively for jacking
up the vehicle at the jack take-up brackets
built into both sides of the vehicle. To help
avoid personal injury, use the jack only to lift
the vehicle during a wheel change. Never
get beneath the vehicle while it is supported
by the jack. Keep hands and feet away from
the area under the lifted vehicle. Always
firmly set parking brake and block wheels
before raising vehicle with jack.
Do not disengage parking brake while the
vehicle is raised. Be certain that the jack is
always vertical (plumb line) when in use, es-
pecially on hills. Always try to use the jack
on level surface.
Make sure that the jack arm is fully seated
in the jack take-up bracket. Always lower
the vehicle onto sufficient capacity jack-
stands before working under the vehicle.
Page 460 of 539

459 Practical hints
Flat tire
Removing the wheel
1Alignment bolt�
Unscrew upper-most wheel bolt and
remove it.
�
Replace this wheel bolt with alignment
bolt1 supplied with the tool kit
(�page 430).
�
Remove the remaining bolts.
�
Remove the wheel.Mounting the new wheel
1Wheel bolt for 18" and 19" light alloy
rims*
2Wheel bolt for 17" light alloy rims or
Minispare wheel (located in vehicle tool
kit (
�page 431))
Warning!
G
The jack is intended only for lifting the
vehicle briefly for wheel changes. It is not
suited for performing maintenance work
under the vehicle.�
Never start the engine when the vehicle
is raised.
�
Never lie down under the raised vehicle.
!Do not place wheel bolts in sand or dirt.
This could result in damage to the bolts
and wheel hub threads.
!Wheel bolts2 must be used when
mounting 17" light alloy rims or the
Minispare wheel. The use of any wheel
bolts other than wheel bolts2 for
17" light alloy rims or the Minispare
wheel will physically damage the vehi-
cle’s brakes.
��
Page 482 of 539
481 Technical data
Parts service
Warranty coverage
Identification labels
Layout of poly-V-belt drive
Engine
Rims and tires
Electrical system
Main Dimensions
Weights
Fuels, coolants, lubricants, etc.
Page 488 of 539

487 Technical data
Rims and tires
�Rims and tires
!
Only use tires which have been specifi-
cally developed for your vehicle and
tested and approved by
Mercedes-Benz. Tires approved by
Mercedes-Benz are developed to pro-
vide best possible performance in con-
junction with the driving safety
systems on your vehicle such as ABS or
ESP
® and can be identified by finding
the following on the tire’s sidewall:
�
MO = M
ercedes-Benz O
riginal
equipment tires
Using tires other than those approved
by Mercedes-Benz may result in dam-
age that is not covered by the
Mercedes-Benz Limited Warranty.
!Using tires other than those approved
by Mercedes-Benz can have detrimen-
tal effects, such as�
poor handling characteristics
�
increased noise
�
increased fuel consumption
Moreover, tires and rims not approved
by Mercedes-Benz may, under load,
exhibit dimensional variations and dif-
ferent tire deformation characteristics
that could cause them to come into
contact with the vehicle body or axle
parts. Damage to the tires or the vehi-
cle may be the result.
iFurther information on tires and rims is
available at any authorized
Mercedes-Benz Light Truck Center.
A placard with the recommended tire
inflation pressure is located on the
driver’s door B-pillar. Some vehicles
may have supplemental tire inflation
pressure information for driving at high
speeds (
�page 345) or for vehicle
loads less than the maximum loaded
vehicle condition. If such information is
provided, it can be found on the placard
located on the inside of the fuel filler
flap. The tire inflation pressure should
be checked regularly and should only
be adjusted on cold tires. Follow tire
manufacturer’s maintenance recom-
mendation included with vehicle.
Page 489 of 539
488 Technical dataRims and tiresRims and tires
ML 350
ML 350*
ML 500
ML 350 (Sport Package*)
ML 500 (Sport Package*)
Rims (light alloy)
7.5 J x 17 H2
8J x18 H2
8J x19 H2
Wheel offset
2.20 in (56 mm)
2.36 in (60 mm)
2.36 in (60 mm)
Summer tires
1
1Radial-ply tires
-
-
255/50 R19 103W
All-season tires
1
235/65 R17 104H M+S
255/55 R18 105H M+S
not available at time of
printing
3
Winter tires
1,23
2Not available as factory equipment.3Data not available at time of printing; please contact an authorized Mercedes-Benz Light Truck Center.
235/65 R17 104H M+S.
255/55 R18 105H M+S
.
not available at time of
printing
3
All-terrain tires*
1,2
-
255/55 R18 105H M+S
-
Page 490 of 539
489 Technical data
Rims and tires
Minispare wheel
ML 350
ML 500
Rim
4.0B x 18 H2
Wheel offset
1.58 in (40 mm)
Tire
T 155/90-18 113M
1
1Must not be used with snow chains.!Please compare the recommended tire
inflation pressure for your vehicle with
the tire inflation pressure on the yellow
label located on the Minispare wheel
rim.
If the tire inflation pressure on the
yellow label on the Minispare wheel rim
differs from the values given in this
Operator’s Manual, inflate the tire to
the recommended tire inflation pres-
sure given on the yellow label on the
Minispare wheel rim.
iPlease note that the tire inflation
pressure of the Minispare tire differs
from the tire inflation pressure of the
road tires.
Inflate the Minispare tire to approxi-
mately 61 psi (4.2 bar).
Page 527 of 539

526 IndexReplacing key batteries
SmartKey with KEYLESS-GO* 441
Reporting
Safety defects 19
Reset button in the instrument
cluster 161
Resetting
All functions of a submenu 162
Fuel consumption 177
Maintenance service indicator 373
Trip odometer 149
Residual heat utilization 212, 226, 227,
505
Residual ventilation 212, 226
REST (Residual engine heat
utilization) 505Restraint system 505
Restraint system see Infant
and child restraint systems
Returning from off-road driving 313
Returning seat backrest to original
position 262
Rim 367
Rims 487
Roadside assistance 12
Tele Aid* 284
RON 324
RON (Research Octane Number) 505
Roof rack* 269
Rotating wheels 368
Rubber parts
Cleaning 380
Run Flat Indicator 348S
Safety
Occupant 66
Safety belts see Seat belts
Safety defects
Reporting 19
Safety systems
Driving 93
Seat backrest
Returning to original position 262
Seat belt force limiter 76
Seat belt height adjustment 48
Seat belts 73
Cleaning 379
Fastening 46
Height adjustment 48
Proper use of 48, 74
Safety guidelines 70
Warning lamp 388, 389
Page 532 of 539

531 Index
Tar stains 375
Technical data 495
Brake fluid 495
Coolants 497
Electrical system 490
Engine 486
Engine oil 495
Engine oil additives 495
Fuel requirements 496
Gasoline additives 497
Main dimensions 491
Premium unleaded gasoline 496
Rims and tires 487
Weights 492
Windshield washer and
headlamp cleaning* system 500Tele Aid* 280
Call priority 287
Emergency calls 282
Information 286
Initiating an emergency call
manually 284
Messages in display 425, 426
Remote door unlock 288
Roadside assistance 284
Stolen vehicle recovery services 289
System self-check 282
Tele Aid* System 505
Telematics* 506
Telephone* 279
Answering a call 179
Dialing a number from
the phone book 180
Ending a call 180
Loading phone book* 180
Operating 178
Redialing 181Telephones and two-way radios 320
Telescoping rod 268
Temperature
Setting interior
temperature 207, 221
Tires 346
The coolant level is correct if
the level 333
Tie-down rings
(Cargo compartment) 260
Tightening torque 506
Tightening torque (Wheel bolts) 461
Tilt
Head restraint 41
Tilt/sliding sunroof*
Closing 235
Closing with KEYLESS-GO* 234
Opening 235
Synchronizing 237